1. lora介绍(Low Rank Adaption)
何为LoRA?LoRA并不是扩散模型专有的技术,而是从隔壁语言模型(LLM)迁移过来的,旨在解决避免将整个模型参数拷贝下来才能对模型进行调校的问题。因为大型语言模型的参数量过于恐怖,比如最近新出的GPT-4参数量约为100 万亿。
LoRA采用的方式是向原有的模型中插入新的数据处理层,这样就避免了去修改原有的模型参数,从而避免将整个模型进行拷贝的情况,同时其也优化了插入层的参数量,最终实现了一种很轻量化的模型调校方法。
和上文提到的Hypernetwork相同,LoRA在稳定扩散模型里也将注意打在了crossattention(注意力交叉)机制上,LoRA将会将自己的权重添加到注意力交叉层的权重中,以此来实现微调。
添加是以向量(矩阵)的形式,如果这样做,LoRA势必需要存储同样大小的参数,那么LoRA又有了个好点子,直接以向量(矩阵)相乘的形式存储,最终文件大小就会小很多了。 https://www.bilibili.com/read/cv22533819?spm_id_from=333.999.0.0
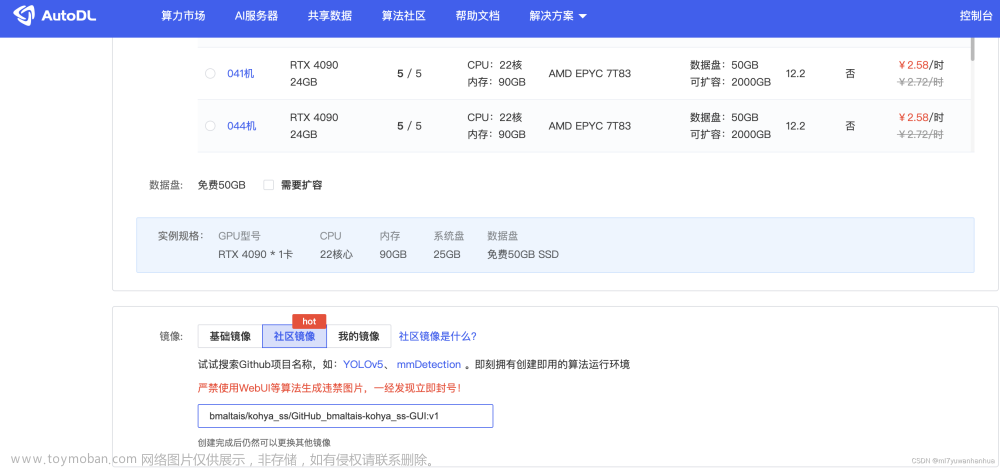
2. 环境准备
为了使用LoRa,需要stable-diffusion-webui的环境:
stable-diffusion-webui
想要自己训练lora,可以使用以下工具
lora-scripts(LoRA training scripts for kohya-ss/sd-scripts)
3. 模型训练
各种大模型以及社区训练好的模型可以在这里下载civitai(需要魔法),使用方法可见第五章。
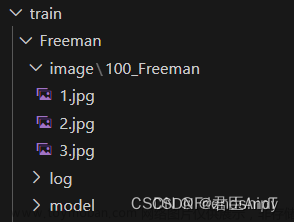
1. 数据准备(最重要)
数据准备是训练过程中的重要步骤,因为好的数据集会大大提高模型的性能,质量比数量更重。
需要关注的主要点有:
-
数据质量(抠图):确保你的图像是准确的、清晰的,没有噪声和其他不必要的干扰因素。因此,需要进行目标识别与抠图。我找了几个实用的方式,手动操作的话可以用这个网站,免费全尺寸抠图人像抠图(单张操作)。数量多的话可以用remove.bg网站的api来进行抠图,有每月50张的免费额度。附录有写好的python脚本,填上api和图像目录就行。
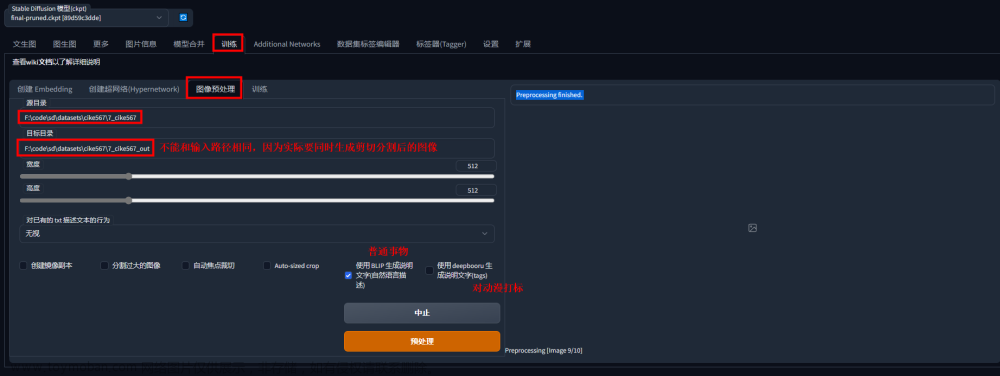
【更新】 通过多个本地分割案例测试,该方法Semantic Guided Human Matting也能够很好的进行抠图,可以点击链接进入相应的git仓库按步骤进行本地部署。 - 图像尺寸:在训练模型之前,需要将所有的图像调整到同一尺寸。图像尺寸的选择取决于你的模型和数据,基于sd-1.5一般为512*512. 修改图像尺寸可以使用该网站的功能。修改尺寸工具
-
数据标签:每个样本都应该有准确的标签。可以使用多种方法生成标签Tag。我们可以手动填写每个标签,但建议大家先批量自动生成,然后再进行手动修改,这样的效果可以更好。
如果你需要某一部分是可控的,那么就将这一部分放在标签内;如果某一部分是该LoRA的特征,那么最好不要去添加。
举例:如果我们需要后续可以修改头发的颜色,那就在标签内填写现在有头发特征,如黑发|长发,这样后续才方便我们使用SD生成时进行修改。如果关于该图的所有Tag内都没有关于头发的描述,那么AI将会理解关于头发的部分,是这个LoRA的一部分,是内置在LoRA模型内无法进行单独修改的。 - 数据的多样性:你的数据应该涵盖所有可能的情况。例如,数据集应该包括各种不同的角度和环境条件下的图像。
- 数据数量:至少大于5张,越多越好,一般10-20张够用。
参考资料:图像素材准备与打标
2. 模型选择
在开始训练前,你需要选择一个适合你任务的模型。模型的选择通常取决于你的任务类型以及你的计算资源,看是训练 真人模型还是动漫模型,需要选择合适的大模型底膜。例如真人模型要选 majic_mix.safetensor.
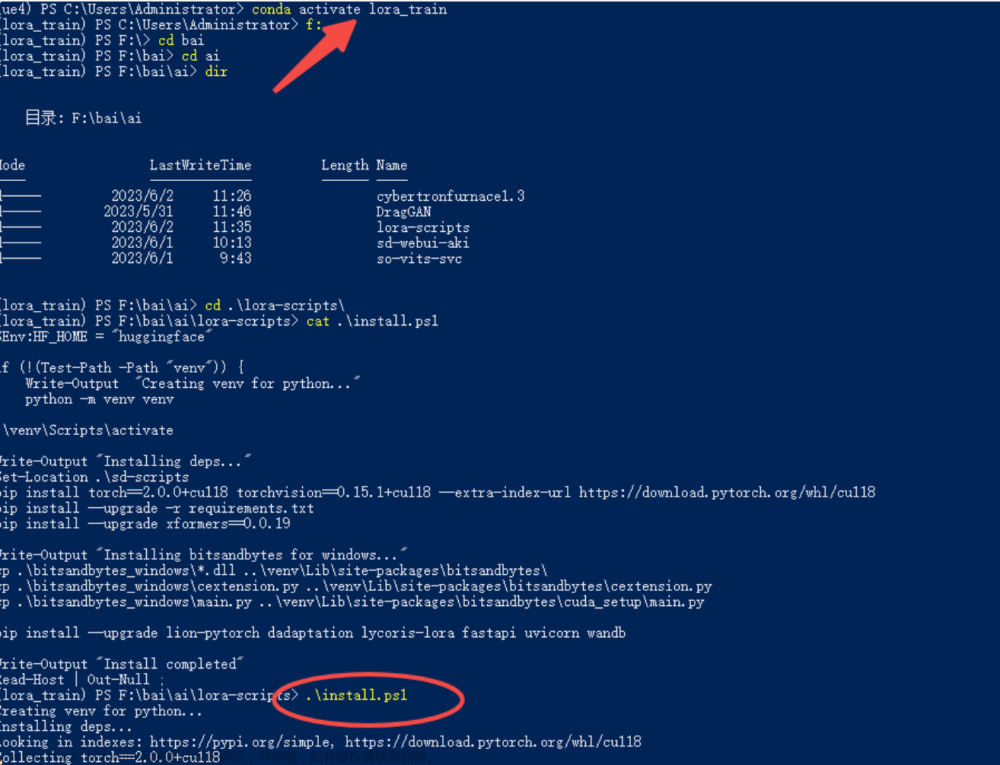
3. 训练过程
在开始训练前,你需要设置一些超参数。这些参数在lora-scripts的train.sh中定义:
# Train data path | 设置训练用模型、图片
pretrained_model="./sd-models/model.ckpt" # base model path | 底模路径
is_v2_model=0                             # SD2.0 model | SD2.0模型 2.0模型下 clip_skip 默认无效
parameterization=0                        # parameterization | 参数化 本参数需要和 V2 参数同步使用 实验性功能
train_data_dir="./train/aki"              # train dataset path | 训练数据集路径
reg_data_dir=""                           # directory for regularization images | 正则化数据集路径,默认不使用正则化图像。

# Network settings | 网络设置
network_module="networks.lora" # 在这里将会设置训练的网络种类,默认为 networks.lora 也就是 LoRA 训练。如果你想训练 LyCORIS(LoCon、LoHa) 等,则修改这个值为 lycoris.kohya
network_weights=""             # pretrained weights for LoRA network | 若需要从已有的 LoRA 模型上继续训练,请填写 LoRA 模型路径。
network_dim=32                 # network dim | 常用 4~128,不是越大越好
network_alpha=32               # network alpha | 常用与 network_dim 相同的值或者采用较小的值,如 network_dim的一半 防止下溢。默认值为 1,使用较小的 alpha 需要提升学习率。

# Train related params | 训练相关参数
resolution="512,512"  # image resolution w,h. 图片分辨率,宽,高。支持非正方形,但必须是 64 倍数。
batch_size=1          # batch size
max_train_epoches=10  # max train epoches | 最大训练 epoch
save_every_n_epochs=2 # save every n epochs | 每 N 个 epoch 保存一次

train_unet_only=0         # train U-Net only | 仅训练 U-Net,开启这个会牺牲效果大幅减少显存使用。6G显存可以开启
train_text_encoder_only=0 # train Text Encoder only | 仅训练 文本编码器
stop_text_encoder_training=0 # stop text encoder training | 在第N步时停止训练文本编码器

noise_offset="0"  # noise offset | 在训练中添加噪声偏移来改良生成非常暗或者非常亮的图像,如果启用,推荐参数为0.1
keep_tokens=0   # keep heading N tokens when shuffling caption tokens | 在随机打乱 tokens 时,保留前 N 个不变。
min_snr_gamma=0 # minimum signal-to-noise ratio (SNR) value for gamma-ray | 伽马射线事件的最小信噪比(SNR)值  默认为 0

# Learning rate | 学习率
lr="1e-4"
unet_lr="1e-4"
text_encoder_lr="1e-5"
lr_scheduler="cosine_with_restarts" # "linear", "cosine", "cosine_with_restarts", "polynomial", "constant", "constant_with_warmup", "adafactor"
lr_warmup_steps=0                   # warmup steps | 学习率预热步数,lr_scheduler 为 constant 或 adafactor 时该值需要设为0。
lr_restart_cycles=1                 # cosine_with_restarts restart cycles | 余弦退火重启次数,仅在 lr_scheduler 为 cosine_with_restarts 时起效。

# Output settings | 输出设置
output_name="aki"           # output model name | 模型保存名称
save_model_as="safetensors" # model save ext | 模型保存格式 ckpt, pt, safetensors

# Resume training state | 恢复训练设置
save_state=0 # save state | 保存训练状态 名称类似于 <output_name>-??????-state ?????? 表示 epoch 数
resume=""    # resume from state | 从某个状态文件夹中恢复训练 需配合上方参数同时使用 由于规范文件限制 epoch 数和全局步数不会保存 即使恢复时它们也从 1 开始 与 network_weights 的具体实现操作并不一致

# 其他设置
min_bucket_reso=256              # arb min resolution | arb 最小分辨率
max_bucket_reso=1024             # arb max resolution | arb 最大分辨率
persistent_data_loader_workers=0 # persistent dataloader workers | 容易爆内存,保留加载训练集的worker,减少每个 epoch 之间的停顿
clip_skip=2                      # clip skip | 玄学 一般用 2

# 优化器设置
optimizer_type="AdamW8bit" # Optimizer type | 优化器类型 默认为 AdamW8bit,可选:AdamW AdamW8bit Lion SGDNesterov SGDNesterov8bit DAdaptation AdaFactor

# LyCORIS 训练设置
algo="lora"  # LyCORIS network algo | LyCORIS 网络算法 可选 lora、loha、lokr、ia3、dylora。lora即为locon
conv_dim=4   # conv dim | 类似于 network_dim,推荐为 4
conv_alpha=4 # conv alpha | 类似于 network_alpha,可以采用与 conv_dim 一致或者更小的值
dropout="0"  # dropout | dropout 概率, 0 为不使用 dropout, 越大则 dropout 越多,推荐 0~0.5, LoHa/LoKr/(IA)^3暂时不支持
实际经过测试以后发现这两个值设置为128,64或128,128训练的效果会比较好:
network_dim=128
network_alpha=128
batch_size表示一次训练同时有几张图一起,越大速度越快,但相应显存要求也越高,我是4090,改成了6.
batch_size=6 # batch size
lr学习率,如果训练的时候出现 loss=nan 一般就是学习率设大了,可以参考下述参数:
lr="1e-5"
unet_lr="1e-5"
text_encoder_lr="1e-6"
如果有多显卡用于训练,添加以下代码(实例为两张显卡的情况):
export CUDA_VISIBLE_DEVICES=0,1
multi_gpu=1
并在源代码73行改成这样,添加 --num_processes=2:
if [[ $multi_gpu == 1 ]]; then launchArgs+=("--multi_gpu --num_processes=2"); fi
4. 模型验证
一旦模型训练完毕,你就需要验证其性能。这通常通过在测试集上评估模型来实现。一般查看loss在0.08左右就是训练的不错的结果了
此外,还可以在stable-diffusion网页版中使用plot-xyz功能进行测试,通过可视化的方式直观地了解模型的性能。
参考资料:调参验证
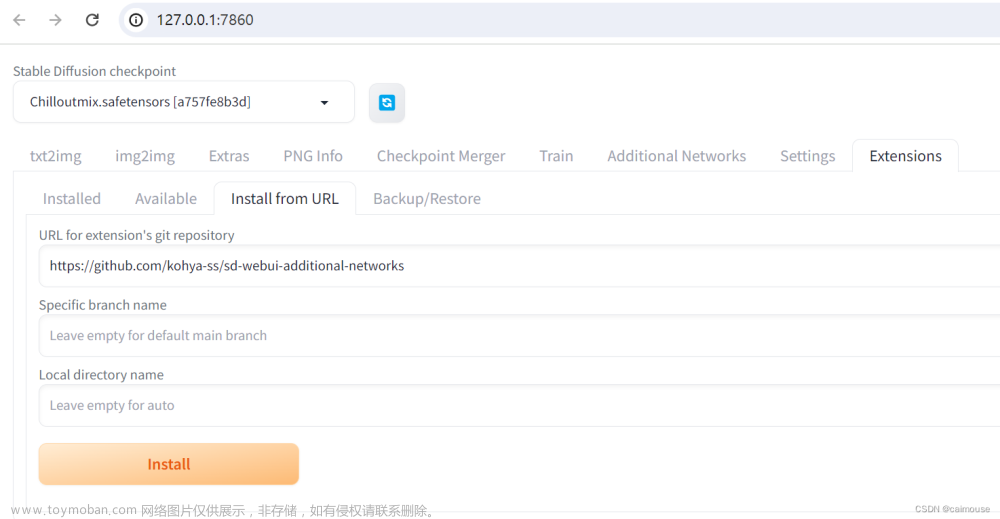
5. 在Stable Diffusion WebUI中加载和使用LoRa模型
c站下载相应模型后将文件放入 stable-diffusion-webui\models\Lora文件夹中
选择好ckpt模型后点击1处再点击2处(若未显示模型则点击刷新)
网上都有,可供参考资料:如何使用lora文章来源:https://www.toymoban.com/news/detail-687023.html
6. 附录
利用remove.bg网站的api来进行抠图的脚本文章来源地址https://www.toymoban.com/news/detail-687023.html
from __future__ import absolute_import
import requests
import logging
import os
from concurrent.futures import ThreadPoolExecutor, as_completed
import signal
from functools import partial

# Specify the API keys to use. Each API key can process 50 images per month for free.
API_ENDPOINT = "https://api.remove.bg/v1.0/removebg"
# List of API keys for load balancing
api_keys = ['api-key']

class RemoveBg(object):

    def __init__(self, api_key, error_log_file):
        self.__api_key = api_key
        logging.basicConfig(filename=error_log_file)

    def _check_arguments(self, size, type, type_level, format, channels):
        """Check if arguments are valid."""
        if size not in ["auto", "preview", "small", "regular", "medium", "hd", "full", "4k"]:
            raise ValueError("size argument wrong")

        if type not in ["auto", "person", "product", "animal", "car", "car_interior", "car_part", "transportation", "graphics", "other"]:
            raise ValueError("type argument wrong")

        if type_level not in ["none", "latest", "1", "2"]:
            raise ValueError("type_level argument wrong")

        if format not in ["jpg", "zip", "png", "auto"]:
            raise ValueError("format argument wrong")

        if channels not in ["rgba", "alpha"]:
            raise ValueError("channels argument wrong")

    def _output_file(self, response, new_file_name):
        # If successful, write out the file
        if response.status_code == requests.codes.ok:
            with open(new_file_name, 'wb') as removed_bg_file:
                removed_bg_file.write(response.content)
        # Otherwise, print out the error
        else:
            error_reason = response.json()["errors"][0]["title"].lower()
            logging.error("Unable to save %s due to %s", new_file_name, error_reason)

    def remove_background_from_img_file(self, img_file_path, size="preview",
                                       type="auto", type_level="none",
                                       format="auto", roi="0 0 100% 100%",
                                       crop=None, scale="original",
                                       position="original", channels="rgba",
                                       shadow=False, semitransparency=True,
                                       bg=None, bg_type=None, new_file_name="no-bg.png"):

        self._check_arguments(size, type, type_level, format, channels)

        img_file = open(img_file_path, 'rb')
        files = {'image_file': img_file}

        data = {
            'size': size,
            'type': type,
            'type_level': type_level,
            'format': format,
            'roi': roi,
            'crop': 'true' if crop else 'false',
            'crop_margin': crop,
            'scale': scale,
            'position': position,
            'channels': channels,
            'add_shadow': 'true' if shadow else 'false',
            'semitransparency': 'true' if semitransparency else 'false',
        }

        # Open image file to send information post request and send the post request
        response = requests.post(
            API_ENDPOINT,
            files=files,
            data=data,
            headers={'X-Api-Key': self.__api_key})
        response.raise_for_status()
        self._output_file(response, new_file_name)

        # Close original file
        img_file.close()


# Specify the input folder containing the images
input_folder = '文件地址'

# Specify the output folder to save the processed images
output_folder = os.path.join(input_folder, 'cutout')

error_log_path = os.path.join(input_folder, 'error.log')

# Create an instance of RemoveBg for each API key
removebg_instances = [RemoveBg(api_key=key, error_log_file='error.log') for key in api_keys]

def remove_background_from_image(file_path, output_folder, removebg_instance):
    file_name = os.path.basename(file_path)
    new_file_path = os.path.join(output_folder, file_name)

    try:
        removebg_instance.remove_background_from_img_file(file_path, new_file_name=new_file_path)
        print(f"Background removed for {file_path}")
    except Exception as e:
        print(f"Error processing {file_path} with API key {removebg_instance._RemoveBg__api_key}: {str(e)}")

def remove_background_from_images_in_folder(folder_path, output_folder):
    os.makedirs(output_folder, exist_ok=True)

    with ThreadPoolExecutor(max_workers=2) as executor:
        # Create a partial function with the fixed output folder argument
        remove_bg_partial = partial(remove_background_from_image, output_folder=output_folder)

        # List the files in the folder
        file_list = [file_name for file_name in os.listdir(folder_path)
                     if os.path.isfile(os.path.join(folder_path, file_name))
                     and file_name.lower().endswith(('.png', '.jpg'))]

        # Submit tasks to the executor and store the Future objects
        futures = []
        for i, file_name in enumerate(file_list):
            file_path = os.path.join(folder_path, file_name)
            removebg_instance = removebg_instances[i % len(removebg_instances)]
            futures.append(executor.submit(remove_bg_partial, file_path, removebg_instance=removebg_instance))

        try:
            # Wait for the tasks to complete and handle keyboard interrupts
            for future in as_completed(futures):
                future.result()
            print("All futures have completed.")
        except KeyboardInterrupt:
            print("Keyboard interrupt received. Cancelling...")
            # Cancel any pending tasks
            for future in futures:
                future.cancel()
                # Ensure exceptions in the cancelled tasks are propagated
                future.exception()
            # Raise the KeyboardInterrupt to terminate the script
            raise


# Set up the signal handler for SIGINT (Ctrl+C)
signal.signal(signal.SIGINT, signal.SIG_DFL)

# Remove background from PNG and JPG images in the input folder concurrently with a maximum of 2 workers and load balancing across multiple API keys
remove_background_from_images_in_folder(input_folder, output_folder)
到了这里,关于LoRa模型训练教程(炼丹,Stable Diffusion)的文章就介绍完了。如果您还想了解更多内容,请在右上角搜索TOY模板网以前的文章或继续浏览下面的相关文章,希望大家以后多多支持TOY模板网!