环境:win11+wsl
1.安装Node.js、Git和Hexo
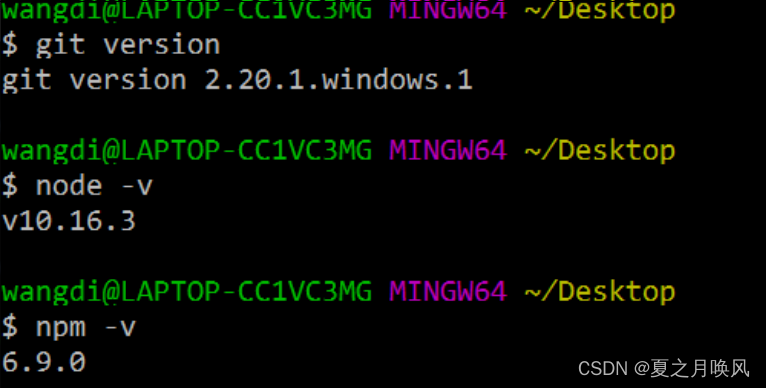
打开终端安装以下软件
sudo apt update
sudo apt-get install git

sudo apt install nodejs
sudo apt install npm        #Node.js 的包管理器
sudo npm install -g hexo-cli        #安装hexo
2.创建 GitHub 仓库并配置ssh
登录你的 GitHub 帐号,并创建一个新的仓库,仓库名是 <username>.github.io,其中 <username> 是你的 GitHub 用户名。将该仓库设置为公开仓库。
设置ssh
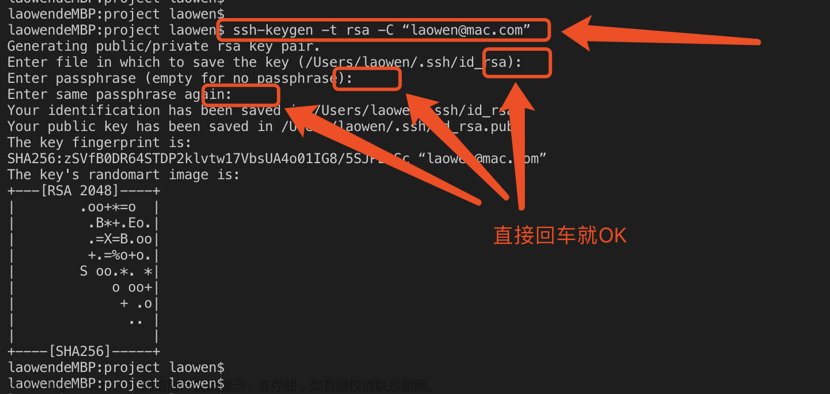
ssh-keygen -t rsa -C 'xxx@xxx.com'  #自己的邮箱
cat ~/.ssh/id_rsa.pub  #将里面的内容复制到 github ->settings ->SSH and GPC keys ->SSH keys ->New SSH key中
ssh -T git@github.com  #输入yes之后,行末尾会显示你的用户名(绑定成功邮箱会收到邮件提醒)
#接着在本地绑定与Github的用户名和邮箱(git)
git config --global user.name "<username>"    #自己的用户名
git config --global user.email 'xxx@xxx.com'  #自己的邮箱
3.初始化Hexo
创建一个新的文件夹,用于存储你的博客项目。
在终端中,进入该文件夹,并运行以下命令来初始化 Hexo
mkdir myblog
hexo init
#或者直接一步到位
hexo init myblog
4.配置Hexo
- 进入你的 Hexo 项目文件夹,找到 _config.yml 文件,使用文本编辑器打开它。
- 在 _config.yml 文件中,配置你的博客设置,例如标题、描述、作者等。
- 根据需要,你还可以配置主题、插件和其他 Hexo 选项。
编辑_config.yml文件,添加如下内容
deploy:
        type: git
        repo: git@github.com: <username>/ <username>.github.io.git  #<username>为自己的用户名
        branch: main
npm install hexo-deployer-git #安装 hexo-deployer-git 插件 将部署过程自动化
5.创建博客内容
在终端中,运行以下命令来创建新的博客文章:
hexo new "My First Post"
这将在 Hexo 项目的 source/_posts 目录下创建一个新的 Markdown 文件,用于编写你的第一篇博客文章。
6.部署
hexo s    # 预览
#Hexo is running at http://localhost:4000/ . Press Ctrl+C to stop.
#用浏览器打开 http://localhost:4000/
hexo g #生成静态网站文件
hexo d #将生成的静态网站文件部署到github
7.查看
浏览器打开<username>.github.io即可查看
8.参考:
https://blog.csdn.net/qq_62928039/article/details/130248518
9.选择主题:
https://hexo.io/themes/
https://github.com/yelog/hexo-theme-3-hexo文章来源:https://www.toymoban.com/news/detail-687895.html
#在hexo根目录下
git clone https://github.com/yelog/hexo-theme-3-hexo.git themes/3-hexo
#修改hexo根目录的_config.yml,如下
theme: 3-hexo
#博客配置
http://yelog.org/2017/03/23/3-hexo-instruction/
最终效果:
https://yyheroi.github.io/2023/08/25/github+hexo%E5%8D%9A%E5%AE%A2%E6%90%AD%E5%BB%BA/文章来源地址https://www.toymoban.com/news/detail-687895.html
到了这里,关于github+hexo 博客搭建的文章就介绍完了。如果您还想了解更多内容,请在右上角搜索TOY模板网以前的文章或继续浏览下面的相关文章,希望大家以后多多支持TOY模板网!