前言:后端使用SpringBoot框架,前端使用Vue框架,做一个前后端分离的小项目,需求:实现一个表格,具备新增、删除、修改的功能。
目录
一、数据库表的设计
二、后端实现
环境配置
数据处理-增删改查
model层
mapper层
XML配置
Service层
controller层
单元测试
三、前后端交互
配置
vite.config.ts文件配置
创建axios实例
业务请求
四、前端实现
环境配置
Main.vue
interface接口
五、效果展示
六、总结
一、数据库表的设计
设计了一个merchandise表,id是编号,唯一的,类型为int,category是一级类别,type是二级类别,name是商品的名称,sum_quantity是总数量,sold_quantity是售卖的数量。

数据库里的字段名使用的是下划线连接,在java中变量命名一般使用驼峰式,需要在application.properties文件中进行配置
mybatis.configuration.map-underscore-to-camel-case=true二、后端实现
model层
package com.mrjj.java.model;

import lombok.AllArgsConstructor;
import lombok.Data;
import lombok.NoArgsConstructor;

@Data
@NoArgsConstructor
@AllArgsConstructor
public class merchandise {
    public int id;
    public String category;
    public String type;
    public String name;
    public String sum_quantity;
    public String sold_quantity;
}
环境配置
引入需要的依赖
        <dependency>
            <groupId>org.springframework.boot</groupId>
            <artifactId>spring-boot-starter-web</artifactId>
        </dependency>

        <dependency>
            <groupId>org.springframework.boot</groupId>
            <artifactId>spring-boot-starter-tomcat</artifactId>
            <scope>provided</scope>
        </dependency>
        <dependency>
            <groupId>org.springframework.boot</groupId>
            <artifactId>spring-boot-starter-test</artifactId>
            <scope>test</scope>
        </dependency>
        <dependency>
            <groupId>org.mybatis.spring.boot</groupId>
            <artifactId>mybatis-spring-boot-starter</artifactId>
            <version>2.2.2</version>
        </dependency>
        <dependency>
            <groupId>mysql</groupId>
            <artifactId>mysql-connector-java</artifactId>
            <version>8.0.19</version>
        </dependency>
        <dependency>
            <groupId>org.mybatis.generator</groupId>
            <artifactId>mybatis-generator-core</artifactId>
            <version>1.4.0</version>
        </dependency>
        <dependency>
            <groupId>org.springframework.boot</groupId>
            <artifactId>spring-boot-starter-thymeleaf</artifactId>
        </dependency>
        <dependency>
            <groupId>org.projectlombok</groupId>
            <artifactId>lombok</artifactId>
        </dependency>
        <dependency>
            <groupId>com.baomidou</groupId>
            <artifactId>mybatis-plus-boot-starter</artifactId>
            <version>3.5.3</version>
        </dependency>
完成application.properties文件的配置,连接mysql
server.port=8888
spring.datasource.driver-class-name=com.mysql.cj.jdbc.Driver
spring.datasource.url=jdbc:mysql://localhost:3306/mrjj?allowMultiQueries=true&useUnicode=true&characterEncoding=utf8&serverTimezone=UTC
spring.datasource.username=root
spring.datasource.password=123456
mybatis.mapper-locations=classpath:/mapper/*.xml
mybatis.configuration.map-underscore-to-camel-case=true
数据处理-增删改查
model层
映射数据库中的字段
package com.mrjj.java.model;

import lombok.AllArgsConstructor;
import lombok.Data;
import lombok.NoArgsConstructor;

@Data
@NoArgsConstructor
@AllArgsConstructor
public class Merchandise {
    public int id;
    public String merchandiseCategory;
    public String merchandiseType;
    public String merchandiseName;
    public int sumQuantity;
    public int soldQuantity;
}
返回结果字段
package com.mrjj.java.model;

import lombok.AllArgsConstructor;
import lombok.Data;
import lombok.NoArgsConstructor;

@Data
@NoArgsConstructor
@AllArgsConstructor
public class Result<T> {
    private Integer code;
    private String msg;
    private T data;

    public Result(String msg, Integer code) {
        this.msg = msg;
        this.code = code;
    }

    public Result(T data) {
        this.data = data;
        this.code = 1000;
    }

    public static <T> Result<T> success(T data) {
        Result<T> result = new Result<>(data);
        result.setCode(200);
        result.setMsg("请求成功");
        return result;
    }

    public static <T> Result<T> success(String msg, T data) {
        Result<T> result = new Result<>(data);
        result.setCode(200);
        result.setMsg(msg);
        return result;
    }

    public static <T> Result fail(int code, String message, T data) {
        Result<T> resultData = new Result<>();
        resultData.setCode(code);
        resultData.setMsg(message);
        resultData.setData(data);
        return resultData;
    }
}
mapper层
package com.mrjj.java.mapper;

import com.mrjj.java.model.Merchandise;
import org.apache.ibatis.annotations.*;

import java.util.List;

@Mapper
public interface MerchandiseMapper {

    @Select("select * from merchandise")
    List<Merchandise> getMerchandise();

    @Insert("insert into merchandise values(#{id},#{merchandiseCategory},#{merchandiseType},#{merchandiseName},#{sumQuantity},#{soldQuantity})")
    int addMerchandise(Merchandise merchandise);

    @Delete("delete from merchandise where id=#{id}")
    int deleteOneMerchandise(@Param("id") Long id);

    int updateMerchandise(List<Merchandise> merchandise);
}
XML配置
注意!!!
要配置上allowMultiQueries=true,才能批量处理!!!这个问题查了蛮久的!!!
<?xml version="1.0" encoding="UTF-8" ?>
<!DOCTYPE mapper
        PUBLIC "-//mybatis.org//DTD Mapper 3.0//EN"
        "http://mybatis.org/dtd/mybatis-3-mapper.dtd">
<!-- namespace:填写映射当前的Mapper接口,所有的增删改查的参数和返回值类型,
		就可以直接填写缩写,不区分大小写,直接通过方法名去找类型-->
<mapper namespace="com.mrjj.java.mapper.MerchandiseMapper">
    <!--    id 对应的是mapper.CaseMapper里的方法名-->

    <delete id="deleteMoreMerchandise">
        delete from merchandise
        <where>
            <foreach collection="list" separator="," item="item" open="id in (" close=")">
                #{item}
            </foreach>
        </where>
    </delete>

    <update id="updateMerchandise" parameterType="java.util.List">
        <foreach collection="list" item="item" separator=";">
            update merchandise
            <set>
                <if test="#{item.merchandiseCategory}!=null">
                    merchandise_category=#{item.merchandiseCategory},
                </if>
                <if test="#{item.merchandiseType}!=null">
                    merchandise_type=#{item.merchandiseType},
                </if>
                <if test="#{item.merchandiseName}!=null">
                    merchandise_name=#{item.merchandiseName},
                </if>
                <if test="#{item.sumQuantity}!=null">
                    sum_quantity=#{item.sumQuantity},
                </if>
                <if test="#{item.soldQuantity}!=null">
                    sold_quantity=#{item.soldQuantity},
                </if>

            </set>
            where id=#{item.id}
        </foreach>
    </update>
</mapper>
Service层
package com.mrjj.java.service;

import java.util.List;

public interface MerchandiseService {
    int deleteMoreMerchandise(List<Long> ids);
}
package com.mrjj.java.service.impl;
import com.mrjj.java.mapper.MerchandiseMapper;
import com.mrjj.java.service.MerchandiseService;
import org.springframework.stereotype.Service;
import javax.annotation.Resource;
import java.util.List;
@Service("MerchandiseService")
public class MerchandiseServiceImpl implements MerchandiseService {
@Resource
MerchandiseMapper merchandiseMapper;
@Override
public int deleteMoreMerchandise(List<Long> ids) {
int delCount = 0;
for (Long id : ids) {
delCount += merchandiseMapper.deleteOneMerchandise(id);
}
System.out.println("删除了" + delCount + "条用例");
return delCount;
}
}controller层
package com.mrjj.java.controller;

import com.mrjj.java.mapper.MerchandiseMapper;
import com.mrjj.java.model.Merchandise;
import com.mrjj.java.model.Result;
import com.mrjj.java.service.MerchandiseService;
import org.springframework.web.bind.annotation.*;
import org.springframework.web.servlet.ModelAndView;

import javax.annotation.Resource;
import java.util.List;

@RestController
@RequestMapping("/mrjjMerchandise")
public class MerchandiseController {
    @Resource
    MerchandiseMapper merchandiseMapper;
    @Resource
    MerchandiseService merchandiseService;

    @GetMapping
    public Result listMerchandise() {
        List<Merchandise> Marchandise = merchandiseMapper.getMerchandise();
        System.out.println("查到的商品是" + Marchandise);
        return Result.success(Marchandise);
    }

    @GetMapping("/view")
    public ModelAndView showMerchandise() {
        ModelAndView MarchandiseView = new ModelAndView();
        List<Merchandise> Marchandise = merchandiseMapper.getMerchandise();
        MarchandiseView.addObject("mrjjMarchandiseView", Marchandise);
        MarchandiseView.setViewName("mrjjMarchandise");
        return MarchandiseView;
    }

    @PostMapping
    public Result addMerchandise(@RequestBody Merchandise merchandise) {
        int i = merchandiseMapper.addMerchandise(merchandise);
        if (i > 0) {
            return Result.success(merchandise);
        } else {
            return Result.fail(210, "新增商品信息失败", merchandise);
        }
    }

    @PutMapping
    public Result updateMerchandise(@RequestBody List<Merchandise> MerchandiseList) {
        System.out.println("修改");
        int i = merchandiseMapper.updateMerchandise(MerchandiseList);
        if (i > 0)
            return Result.success("修改商品信息成功");
        else
            return Result.fail(230, "修改商品信息失败", MerchandiseList);
    }

    @DeleteMapping("/{id}")
    public Result deleteOneMerchandise(@PathVariable Long id) {
        System.out.println(id);
        int i = merchandiseMapper.deleteOneMerchandise(id);
        System.out.println("删除的结果是:" + i);
        if (i > 0) {
            return Result.success("删除商品成功");
        } else {
            return Result.fail(240, "删除商品信息用例失败", "删除商品信息失败");
        }
    }

    @DeleteMapping("/ids/{ids}")
    public int deleteMoreMerchandise(@PathVariable List<Long> ids) {
        return merchandiseService.deleteMoreMerchandise(ids);
    }


}
单元测试
package com.mrjj.java.controller;

import com.mrjj.java.model.Result;
import org.junit.jupiter.api.Test;
import org.junit.runner.RunWith;
import org.springframework.boot.test.context.SpringBootTest;
import org.springframework.test.annotation.Rollback;
import org.springframework.test.context.junit4.SpringRunner;
import org.springframework.transaction.annotation.Transactional;

import javax.annotation.Resource;

import java.util.ArrayList;
import java.util.List;

@SpringBootTest
@RunWith(SpringRunner.class)
@Transactional
@Rollback(value=true)
class MerchandiseControllerTest {
    @Resource
    MerchandiseController merchandiseController;

    @Test
    public void testQuery() {
        Result queryData = merchandiseController.listMerchandise();
        System.out.println(queryData);
    }
    @Test
    public void testDelete(){
        Result deleteData = merchandiseController.deleteOneMerchandise(4L);
        System.out.println(deleteData);
    }
    @Test
    public void testDeleteMore(){
        List<Long> list1 = new ArrayList<>();
        list1.add(0,5L);
        list1.add(1,4L);
        int deleteMoreData = merchandiseController.deleteMoreMerchandise(list1);
        System.out.println(deleteMoreData);
    }
}
三、前后端交互
配置
大致画了个流程图
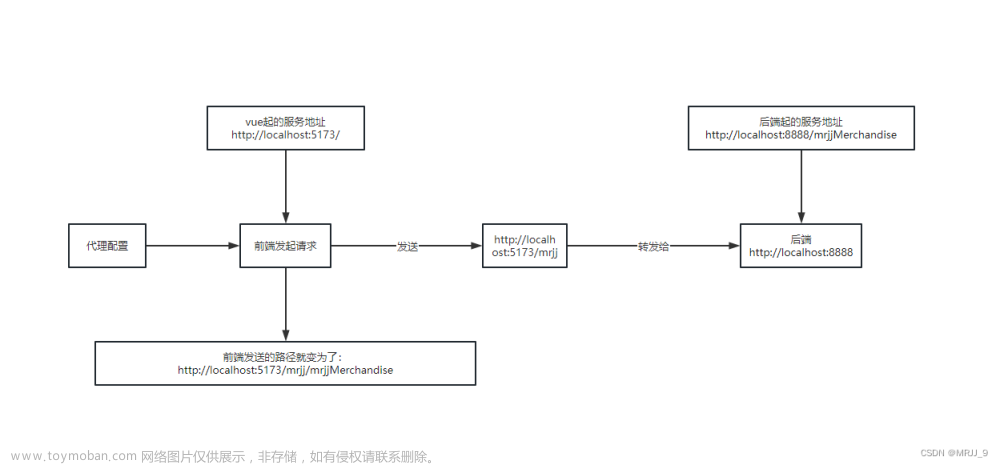
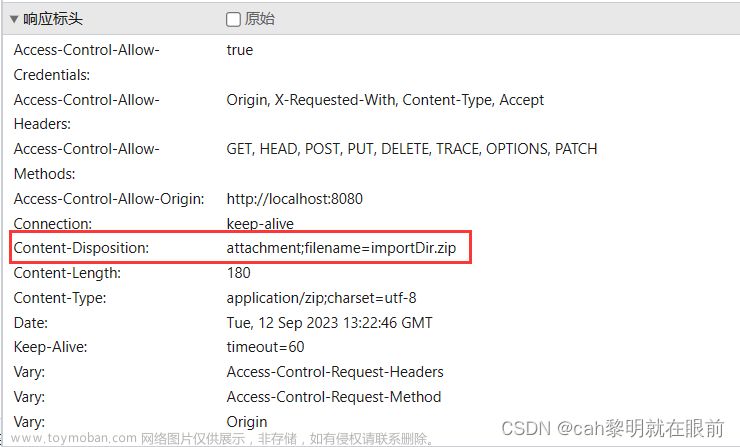
可以看到在发送请求时,路径以及变了

vite.config.ts文件配置
target是本地服务的地址和端口号
添加的路径/mrjj
server:{
    open:true,
    proxy:{
      '/mrjj': {
        target: 'http://localhost:8888',
        changeOrigin: true,
        rewrite: (path) => path.replace(/^\/mrjj/, ''),
      },
    }
  }
创建axios实例
import axios, { type AxiosResponse } from 'axios'
const instance = axios.create({
  baseURL: '/mrjj',
  timeout: 30000,
  headers: { 'Content-Type': 'application/json;charset=utf-8' }
})

instance.interceptors.response.use(
  function (response: AxiosResponse) {
    const { code } = response.data
    if (code === 200) {
      return response.data
    }
  },
  function (error) {
    return Promise.reject(error)
  }
)
export default instance
业务请求
baseURL对应本地服务的接口地址
导出后端服务增删改查方法
import request from '../request'
import axios, { type AxiosPromise } from 'axios'
import type { MrjjMerchandise } from '@/types/merchandises/type'
const instance = axios.create({
  baseURL: '/mrjjMerchandise',
  timeout: 30000,
  headers: { 'Content-Type': 'application/json;charset=utf-8' }
})
export default instance

export function listMerchandiseApi(): AxiosPromise<MrjjMerchandise[]> {
  return request({
    url: '/mrjjMerchandise',
    method: 'get'
  })
}

export function addMerchandiseApi(data: MrjjMerchandise) {
  return request({
    url: '/mrjjMerchandise',
    method: 'post',
    data: data
  })
}

export function changeMerchandiseApi(data: MrjjMerchandise) {
  return request({
    url: '/mrjjMerchandise',
    method: 'put',
    data
  })
}

export function deleteMerchandiseApi(ids: string) {
  return request({
    url: '/mrjjMerchandise/ids/' + ids,
    method: 'delete'
  })
}
四、前端实现
环境配置
import { createApp } from 'vue'
import App from './App.vue'
import ElementPlus from 'element-plus'
import 'element-plus/dist/index.css'
import zhCn from 'element-plus/es/locale/lang/zh-cn'
import VXETable from 'vxe-table'
import 'vxe-table/lib/style.css'
import router from './router'
createApp(App).use(router).use(ElementPlus, { locale: zhCn }).use(VXETable).mount('#app')
Main.vue
<template>
  <el-dialog title="添加商品" v-model="isAdd" width="30%">
    <el-form :model="newMerchandise" ref="form" label-width="80px" :inline="false" size="normal">
      <el-form-item label="一级分类">
        <el-input v-model="newMerchandise.merchandiseCategory"></el-input>
      </el-form-item>
      <el-form-item label="二级分类">
        <el-input v-model="newMerchandise.merchandiseType"></el-input>
      </el-form-item>
      <el-form-item label="商品名称">
        <el-input v-model="newMerchandise.merchandiseName"></el-input>
      </el-form-item>
      <el-form-item label="总数量">
        <el-input v-model="newMerchandise.sumQuantity"></el-input>
      </el-form-item>
      <el-form-item label="已售出">
        <el-input v-model="newMerchandise.soldQuantity"></el-input>
      </el-form-item>
    </el-form>
    <template #footer>
      <span
        ><el-button @click="closeAdder">取消</el-button>
        <el-button type="primary" @click="addMerchandise">确认</el-button></span
      >
    </template>
  </el-dialog>

  <el-card shadow="always" :body-style="{ padding: '0px' }">
    <template #header>
      <div>
        <el-row :gutter="16">
          <el-col :span="4" class="case-title"><span>商品信息</span></el-col>
          <el-col :span="4" :offset="16">
            <el-button type="success" @click="openMerchandiseAdd"
              ><el-icon><Plus /></el-icon> 新增商品</el-button
            >
          </el-col>
          <el-button type="primary" size="default" @click="changeMerchandise"
            ><el-icon><Promotion /></el-icon>提交修改</el-button
          >
          <el-button
            type="danger"
            size="default"
            @click="deleteChecked"
            :disable="checkedMoreIds?.length === 0"
            ><el-icon><Delete /></el-icon>删除选中商品</el-button
          >
        </el-row>
      </div>
    </template>
    <vxe-table
      ref="merchandiseTable"
      border
      show-header-overflow
      show-overflow
      @checkbox-all="selectMoreMerchandiseEvent"
      :column-config="{ resizable: true }"
      :data="Merchandises"
      :edit-config="{ trigger: 'dblclick', mode: 'cell' }"
    >
      <vxe-column type="checkbox" width="60"></vxe-column>
      <vxe-column
        field="merchandiseCategory"
        title="一级类别"
        :edit-render="{ name: 'input' }"
      ></vxe-column>
      <vxe-column
        field="merchandiseType"
        title="二级类别"
        :edit-render="{ name: 'input' }"
      ></vxe-column>
      <vxe-column
        field="merchandiseName"
        title="商品名称"
        :edit-render="{ name: 'input' }"
      ></vxe-column>
      <vxe-column field="sumQuantity" title="总数量" :edit-render="{ name: 'input' }"></vxe-column>
      <vxe-column field="soldQuantity" title="已售出" :edit-render="{ name: 'input' }"></vxe-column>
      <vxe-column field="" title="操作">
        <template #default="{ row }">
          <el-button type="primary" size="default" @click="deleteMerchandise(row)" :icon="Delete"
            >删除</el-button
          ></template
        >
      </vxe-column>
    </vxe-table>
  </el-card>
</template>

<script setup lang="ts">
import { Delete, Promotion, Plus } from '@element-plus/icons-vue'
import type { VxeTableInstance } from 'vxe-table'
import type { MerchandiseShow, MrjjMerchandise } from '../types/merchandises/type'
import {
  listMerchandiseApi,
  addMerchandiseApi,
  deleteMerchandiseApi,
  changeMerchandiseApi
} from '../api/merchandise'
import { ref, onMounted, reactive, computed } from 'vue'
onMounted(() => {
  listMerchandises()
})
let isAdd = ref(false)
let isEdit = ref(false)
let merchandiseTable = ref<VxeTableInstance>()
let Merchandises = ref([])
let emptyMerchandise = {
  merchandiseCategory: '',
  merchandiseType: '',
  merchandiseName: '',
  sumQuantity: '',
  soldQuantity: ''
}
let newMerchandise = reactive<MerchandiseShow>({
  merchandiseCategory: '',
  merchandiseType: '',
  merchandiseName: '',
  sumQuantity: '',
  soldQuantity: ''
})
const checkedMoreIds = computed(() => {
  return merchandiseTable.value?.getCheckboxRecords().map((MrjjMerchandise) => {
    return MrjjMerchandise.id
  })
})
function closeAdder() {
  isAdd.value = false
}
function openMerchandiseAdd() {
  isAdd.value = true
}
function listMerchandises() {
  console.log('正在发送请求')
  listMerchandiseApi()
    .then(({ data }) => {
      Merchandises.value = data
      console.log('获取到的用例信息是:', Merchandises)
    })
    .catch((error: any) => {
      console.log('报错了', error)
    })
}
function addMerchandise() {
  let lastId =
    Merchandises.value.length > 0 ? Merchandises.value[Merchandises.value.length - 1].id : -1
  let addMerchandise: MrjjMerchandise = { ...newMerchandise, id: 0 }
  addMerchandise.id = lastId + 1
  console.log('要新增的商品是:', addMerchandise)
  addMerchandiseApi(addMerchandise).then(() => {
    listMerchandises()
  })
  closeAdder()
}

function deleteMerchandise(deleteOneMerchandise: MrjjMerchandise) {
  deleteMerchandiseApi(deleteOneMerchandise.id + '').then(() => {
    listMerchandises()
  })
}
function deleteChecked() {
  console.log('选中的id是', checkedMoreIds.value?.toString())

  deleteMerchandiseApi(checkedMoreIds.value!.toString()).then(() => {
    listMerchandises()
  })
}
function changeMerchandise() {
  changeMerchandiseApi(Merchandises.value).then(() => {
    listMerchandises()
  })
}
</script>

<style scoped>
.case-title {
  font-size: large;
  color: red;
  font-weight: bolder;
}
</style>
interface接口
export interface MerchandiseShow{
    merchandiseCategory:string;
    merchandiseType:string;
    merchandiseName:string;
    sumQuantity:number;
    soldQuantity:number;
    [key:string]: any;
    }
    export interface MrjjMerchandise extends MerchandiseShow{
        id:number;
    }
    export interface MrjjMerchandiseEdit extends MrjjMerchandise{
        isEdit:boolean;
    }
五、效果展示
实现了查询、新增、删除、修改的功能

 修改后,数据库里的值也发生了变化
 文章来源:https://www.toymoban.com/news/detail-694612.html
六、总结
通过对数据库表、后端接口设计、前端页面编写,已经实现了一个前后端分离的小项目了,当然还可以进一步完善这个功能,比如新增时可以加上参数校验,可以做一个树形结构的列表,实现数据的拖拽,还可以加上查询、分页、排序等功能,后续博客会对不断进行完善。文章来源地址https://www.toymoban.com/news/detail-694612.html
到了这里,关于后端SpringBoot+前端Vue前后端分离的项目(一)的文章就介绍完了。如果您还想了解更多内容,请在右上角搜索TOY模板网以前的文章或继续浏览下面的相关文章,希望大家以后多多支持TOY模板网!