欢迎访问我的GitHub
这里分类和汇总了欣宸的全部原创(含配套源码):https://github.com/zq2599/blog_demos
本机情况
- 省吃俭用入手了ThinkPad T14,打算装好Linux后作为开发机器使用,本文记录了安装过程,以便将来在新系统上用到
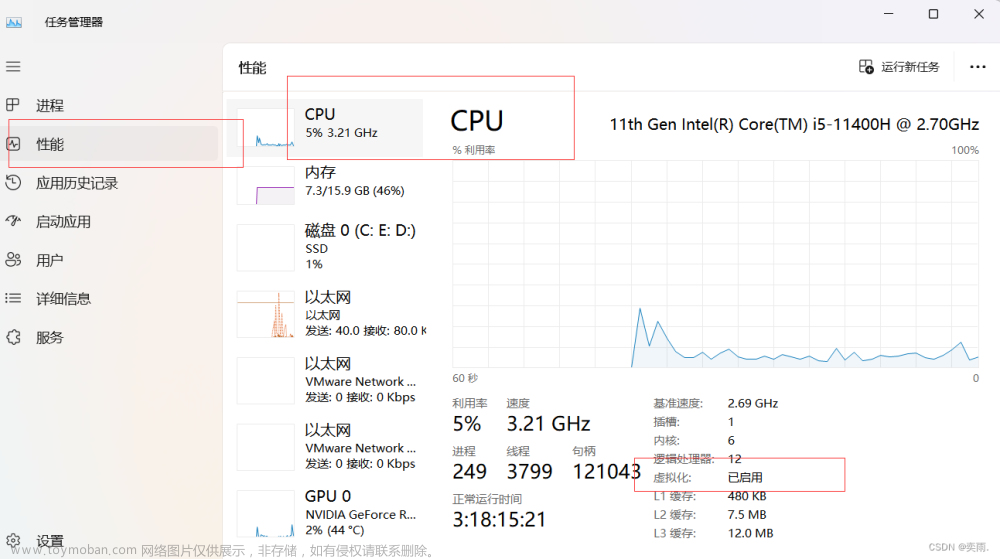
- 作为参考,机器软硬件情况如下

- 接下来就是安装wsl2的过程,并未为了验证Linux是否正常,还在Linxu下安装了docker
设置
-
打开设置窗口,进入"应用" -> "可选功能",点击下图中的更多Windows功能

-
勾选下图红框中的两项

-
点击确定后,会提示正在处理

-
提示重启电脑,选择立即重新启动

-
支持,设置完成,等重启后就能开始安装了,过程很简单,随本文轻松操作即可文章来源:https://www.toymoban.com/news/detail-695038.html
安装
- 重启后,打开Microsoft Store,就是桌面底部下图箭头所指

- 搜索WSL,然后选择适合自己的Linux版本,我这里选择了最新版的Ubuntu

- 点击获取按钮后,开始等待

- 下载完毕后,点击打开按钮后,控制台报错

- 为了解决上述问题,先以管理员身份打开Windows PowerShell

- 输入wsl --update,对WSL进行更新,等待更新完成,如下图

- 此时新装的ubuntu已经进入应用列表,可以直接点击打开

- 按照控制台提示输入账号密码,即完成设置

- 输入top命令,再输入数字1,即可看到CPU情况,12代酷睿的多核看起来真是开心啊
will@thinkpad:~$ top
top - 23:50:50 up 2 min,  0 users,  load average: 0.00, 0.00, 0.00
Tasks:   5 total,   1 running,   4 sleeping,   0 stopped,   0 zombie
%Cpu0  :  0.0 us,  0.0 sy,  0.0 ni,100.0 id,  0.0 wa,  0.0 hi,  0.0 si,  0.0 st
%Cpu1  :  0.0 us,  0.0 sy,  0.0 ni,100.0 id,  0.0 wa,  0.0 hi,  0.0 si,  0.0 st
%Cpu2  :  0.0 us,  0.0 sy,  0.0 ni,100.0 id,  0.0 wa,  0.0 hi,  0.0 si,  0.0 st
%Cpu3  :  0.0 us,  0.0 sy,  0.0 ni,100.0 id,  0.0 wa,  0.0 hi,  0.0 si,  0.0 st
%Cpu4  :  0.0 us,  0.0 sy,  0.0 ni,100.0 id,  0.0 wa,  0.0 hi,  0.0 si,  0.0 st
%Cpu5  :  0.0 us,  0.0 sy,  0.0 ni,100.0 id,  0.0 wa,  0.0 hi,  0.0 si,  0.0 st
%Cpu6  :  0.0 us,  0.0 sy,  0.0 ni,100.0 id,  0.0 wa,  0.0 hi,  0.0 si,  0.0 st
%Cpu7  :  0.0 us,  0.0 sy,  0.0 ni,100.0 id,  0.0 wa,  0.0 hi,  0.0 si,  0.0 st
%Cpu8  :  0.0 us,  0.0 sy,  0.0 ni,100.0 id,  0.0 wa,  0.0 hi,  0.0 si,  0.0 st
%Cpu9  :  0.0 us,  0.0 sy,  0.0 ni,100.0 id,  0.0 wa,  0.0 hi,  0.0 si,  0.0 st
%Cpu10 :  0.0 us,  0.0 sy,  0.0 ni,100.0 id,  0.0 wa,  0.0 hi,  0.0 si,  0.0 st
%Cpu11 :  0.0 us,  0.0 sy,  0.0 ni,100.0 id,  0.0 wa,  0.0 hi,  0.0 si,  0.0 st
%Cpu12 :  0.0 us,  0.0 sy,  0.0 ni, 99.7 id,  0.3 wa,  0.0 hi,  0.0 si,  0.0 st
%Cpu13 :  0.0 us,  0.0 sy,  0.0 ni,100.0 id,  0.0 wa,  0.0 hi,  0.0 si,  0.0 st
%Cpu14 :  0.0 us,  0.0 sy,  0.0 ni,100.0 id,  0.0 wa,  0.0 hi,  0.0 si,  0.0 st
%Cpu15 :  0.0 us,  0.0 sy,  0.0 ni,100.0 id,  0.0 wa,  0.0 hi,  0.0 si,  0.0 st
MiB Mem :   7797.3 total,   7404.1 free,    283.7 used,    109.5 buff/cache
MiB Swap:   2048.0 total,   2048.0 free,      0.0 used.   7330.0 avail Mem

  PID USER      PR  NI    VIRT    RES    SHR S  %CPU  %MEM     TIME+ COMMAND
    1 root      20   0    1756   1080   1020 S   0.0   0.0   0:00.01 init
   48 root      20   0    2112    360      0 S   0.0   0.0   0:00.00 init
   49 root      20   0    2112    368      0 S   0.0   0.0   0:00.01 init
   50 will      20   0   10044   5044   3336 S   0.0   0.1   0:00.02 bash
  118 will      20   0   10872   3648   3136 R   0.0   0.0   0:00.01 t
- 为了后面操作方便,用命令sudo passwd root给root账号设置密码
will@thinkpad:~$ sudo passwd root
New password:
Retype new password:
passwd: password updated successfully
安装docker
- docker是常用工具,这里列一下安装步骤
- 执行sudo apt-get update更新
- 安装必要软件
sudo apt-get install \
    ca-certificates \
    curl \
    gnupg \
    lsb-release
- 安装GPG key,用于安装服务的信任
sudo mkdir -p /etc/apt/keyrings \
&& curl -fsSL https://download.docker.com/linux/ubuntu/gpg | sudo gpg --dearmor -o /etc/apt/keyrings/docker.gpg
- 添加安装包仓库
echo \
  "deb [arch=$(dpkg --print-architecture) signed-by=/etc/apt/keyrings/docker.gpg] https://download.docker.com/linux/ubuntu \
  $(lsb_release -cs) stable" | sudo tee /etc/apt/sources.list.d/docker.list > /dev/null
- 开始安装(最新版)
sudo apt-get update \
&& sudo apt-get install docker-ce docker-ce-cli containerd.io docker-compose-plugin
- 如果想安装指定版本,可以先查看版本列表:
apt-cache madison docker-ce
- 可见有多个版本可供选择
docker-ce | 5:20.10.17~3-0~ubuntu-focal | https://download.docker.com/linux/ubuntu focal/stable amd64 Packages
 docker-ce | 5:20.10.16~3-0~ubuntu-focal | https://download.docker.com/linux/ubuntu focal/stable amd64 Packages
 docker-ce | 5:20.10.15~3-0~ubuntu-focal | https://download.docker.com/linux/ubuntu focal/stable amd64 Packages
 docker-ce | 5:20.10.14~3-0~ubuntu-focal | https://download.docker.com/linux/ubuntu focal/stable amd64 Packages
 docker-ce | 5:20.10.13~3-0~ubuntu-focal | https://download.docker.com/linux/ubuntu focal/stable amd64 Packages
 docker-ce | 5:20.10.12~3-0~ubuntu-focal | https://download.docker.com/linux/ubuntu focal/stable amd64 Packages
 docker-ce | 5:20.10.11~3-0~ubuntu-focal | https://download.docker.com/linux/ubuntu focal/stable amd64 Packages
 docker-ce | 5:20.10.10~3-0~ubuntu-focal | https://download.docker.com/linux/ubuntu focal/stable amd64 Packages
 docker-ce | 5:20.10.9~3-0~ubuntu-focal | https://download.docker.com/linux/ubuntu focal/stable amd64 Packages
 docker-ce | 5:20.10.8~3-0~ubuntu-focal | https://download.docker.com/linux/ubuntu focal/stable amd64 Packages
 docker-ce | 5:20.10.7~3-0~ubuntu-focal | https://download.docker.com/linux/ubuntu focal/stable amd64 Packages
 docker-ce | 5:20.10.6~3-0~ubuntu-focal | https://download.docker.com/linux/ubuntu focal/stable amd64 Packages
 docker-ce | 5:20.10.5~3-0~ubuntu-focal | https://download.docker.com/linux/ubuntu focal/stable amd64 Packages
 docker-ce | 5:20.10.4~3-0~ubuntu-focal | https://download.docker.com/linux/ubuntu focal/stable amd64 Packages
 docker-ce | 5:20.10.3~3-0~ubuntu-focal | https://download.docker.com/linux/ubuntu focal/stable amd64 Packages
 docker-ce | 5:20.10.2~3-0~ubuntu-focal | https://download.docker.com/linux/ubuntu focal/stable amd64 Packages
 docker-ce | 5:20.10.1~3-0~ubuntu-focal | https://download.docker.com/linux/ubuntu focal/stable amd64 Packages
 docker-ce | 5:20.10.0~3-0~ubuntu-focal | https://download.docker.com/linux/ubuntu focal/stable amd64 Packages
 docker-ce | 5:19.03.15~3-0~ubuntu-focal | https://download.docker.com/linux/ubuntu focal/stable amd64 Packages
 docker-ce | 5:19.03.14~3-0~ubuntu-focal | https://download.docker.com/linux/ubuntu focal/stable amd64 Packages
 docker-ce | 5:19.03.13~3-0~ubuntu-focal | https://download.docker.com/linux/ubuntu focal/stable amd64 Packages
 docker-ce | 5:19.03.12~3-0~ubuntu-focal | https://download.docker.com/linux/ubuntu focal/stable amd64 Packages
 docker-ce | 5:19.03.11~3-0~ubuntu-focal | https://download.docker.com/linux/ubuntu focal/stable amd64 Packages
 docker-ce | 5:19.03.10~3-0~ubuntu-focal | https://download.docker.com/linux/ubuntu focal/stable amd64 Packages
 docker-ce | 5:19.03.9~3-0~ubuntu-focal | https://download.docker.com/linux/ubuntu focal/stable amd64 Packages
- 安装指定版本的命令如下,请将<VERSION_STRING>替换成您需要的版本
sudo apt-get install docker-ce=<VERSION_STRING> docker-ce-cli=<VERSION_STRING> containerd.io docker-compose-plugin
启动
- 用命令service docker status查看服务状态,发现未启动
$ service docker status
* Docker is not running
- 如下,启动后再查看,发现状态正常
$ sudo service docker start
* Starting Docker: docker                                                                                                                                                 [ OK ]
$ service docker status
* Docker is running
- 查看版本
$ sudo docker version
Client: Docker Engine - Community
 Version:           20.10.17
 API version:       1.41
 Go version:        go1.17.11
 Git commit:        100c701
 Built:             Mon Jun  6 23:02:57 2022
 OS/Arch:           linux/amd64
 Context:           default
 Experimental:      true

Server: Docker Engine - Community
 Engine:
  Version:          20.10.17
  API version:      1.41 (minimum version 1.12)
  Go version:       go1.17.11
  Git commit:       a89b842
  Built:            Mon Jun  6 23:01:03 2022
  OS/Arch:          linux/amd64
  Experimental:     false
 containerd:
  Version:          1.6.7
  GitCommit:        0197261a30bf81f1ee8e6a4dd2dea0ef95d67ccb
 runc:
  Version:          1.1.3
  GitCommit:        v1.1.3-0-g6724737
 docker-init:
  Version:          0.19.0
  GitCommit:        de40ad0
- 经典的hello world可以验证服务是否正常,命令是sudo docker hello-world
$ sudo docker run hello-world
Unable to find image 'hello-world:latest' locally
latest: Pulling from library/hello-world
2db29710123e: Pull complete
Digest: sha256:7d246653d0511db2a6b2e0436cfd0e52ac8c066000264b3ce63331ac66dca625
Status: Downloaded newer image for hello-world:latest

Hello from Docker!
This message shows that your installation appears to be working correctly.

To generate this message, Docker took the following steps:
 1. The Docker client contacted the Docker daemon.
 2. The Docker daemon pulled the "hello-world" image from the Docker Hub.
    (amd64)
 3. The Docker daemon created a new container from that image which runs the
    executable that produces the output you are currently reading.
 4. The Docker daemon streamed that output to the Docker client, which sent it
    to your terminal.

To try something more ambitious, you can run an Ubuntu container with:
 $ docker run -it ubuntu bash

Share images, automate workflows, and more with a free Docker ID:
 https://hub.docker.com/

For more examples and ideas, visit:
 https://docs.docker.com/get-started/
- 至此,win11安装wsl2成功,并且验证Linux安装docker也能正常工作
欢迎关注博客园:程序员欣宸
学习路上,你不孤单,欣宸原创一路相伴...文章来源地址https://www.toymoban.com/news/detail-695038.html
到了这里,关于win11安装ubuntu(by wsl2)的文章就介绍完了。如果您还想了解更多内容,请在右上角搜索TOY模板网以前的文章或继续浏览下面的相关文章,希望大家以后多多支持TOY模板网!