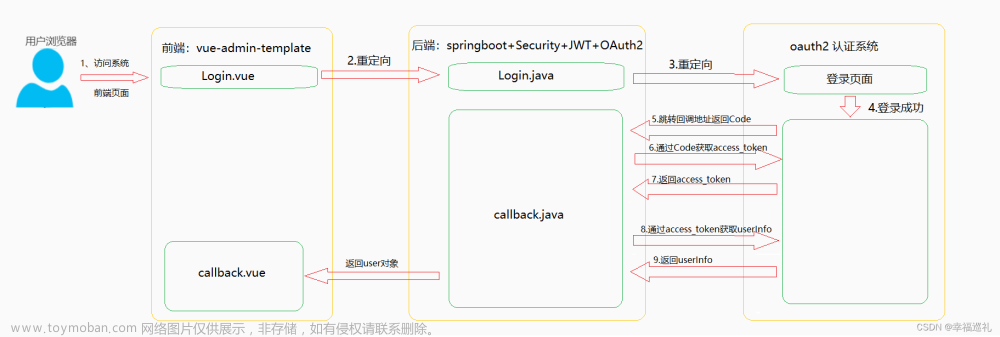
Oauth2.0提供了四种认证方式:
授权码模式(authorization code)、
简化模式(implicit)、
密码模式(resource owner passwordcredentials)、
客户端模式(client credentials)
Oauth2.0中的四个重要角色
| OAauth2.0包括的角色 | 说明 |
| 资源拥有者 | 通常为用户,也可以是应用程序,即该资源的拥有者。 |
| 客户端 | 本身不存储资源,需要通过资源拥有者的授权去请求资源服务器的资源,比如:Android客户端、Web客户端(浏览器端)、微信客户端等。 |
| 授权服务器(也称认证服务器) | 用于服务提供商对资源拥有者的身份进行认证、对访问资源进行授权,认证成功后会给客户端发放令牌 (access_token),作为客户端访问资源服务器的凭据。 |
| 资源服务器 | 存储资源的服务器。 |
废话不多说,直接上代码。
引入依赖
 <!--        springSecurity-->
        <dependency>
            <groupId>org.springframework.boot</groupId>
            <artifactId>spring-boot-starter-security</artifactId>
        </dependency>
        <!--        Oauth2-->
        <dependency>
            <groupId>org.springframework.security.oauth</groupId>
            <artifactId>spring-security-oauth2</artifactId>
            <version>2.2.6.RELEASE</version>
        </dependency>
        <!--        jwt增强-->
        <dependency>
            <groupId>org.springframework.security</groupId>
            <artifactId>spring-security-jwt</artifactId>
            <version>1.1.0.RELEASE</version>
        </dependency>
添加配置文件
SpringSecurity配置文件
import com.municipal.service.impl.UserAuthService;
import org.springframework.beans.factory.annotation.Autowired;
import org.springframework.context.annotation.Bean;
import org.springframework.context.annotation.Configuration;
import org.springframework.security.authentication.AuthenticationManager;
import org.springframework.security.config.annotation.authentication.builders.AuthenticationManagerBuilder;
import org.springframework.security.config.annotation.method.configuration.EnableGlobalMethodSecurity;
import org.springframework.security.config.annotation.web.builders.HttpSecurity;
import org.springframework.security.config.annotation.web.configuration.EnableWebSecurity;
import org.springframework.security.config.annotation.web.configuration.WebSecurityConfigurerAdapter;

/**
 * @Author majinzhong
 * @Date 2023/6/12 19:11
 * @Version 1.0
 * URI拦截.
 */
@EnableWebSecurity
@Configuration
@EnableGlobalMethodSecurity(prePostEnabled = true, securedEnabled = true)
public class WebSecurityConfig extends WebSecurityConfigurerAdapter {
    @Autowired
    private UserAuthService userAuthService;


    @Override
    protected void configure(HttpSecurity http) throws Exception {
        http
                .authorizeRequests()
                .antMatchers("/oauth/**", "/oauth2/**","/login/**", "logout/**").permitAll()    // login 页面,所有用户都可以访问
                //.antMatchers("/home").hasAnyRole("USER", "com.municipal.pojo")   // home 页面,ADMIN 和 USER 都可以访问
                .anyRequest().authenticated()
//                .and()
//                .formLogin()
//                .loginPage("/login") // 自定义登录表单
                //.defaultSuccessUrl("/home", true)  // 登录成功跳转的页面,第二个参数true表示每次登录成功都是跳转到home,如果false则表示跳转到登录之前访问的页面
                //.failureUrl("/login?error=true")
//                .failureHandler(authenticationFailureHandler())  // 失败跳转的页面(比如用户名/密码错误),这里还是跳转到login页面,只是给出错误提示
                .and().logout().permitAll()  // 登出 所有用户都可以访问
                .and().csrf().disable();    // 关闭csrf,此时登出logout接收任何形式的请求;(默认开启,logout只接受post请求)
    }


    @Override
    public void configure(AuthenticationManagerBuilder auth) throws Exception {
        //设置登陆账户和密码
//        BCryptPasswordEncoder encoder = new BCryptPasswordEncoder();
//        auth.inMemoryAuthentication().withUser("admin").
//                password(encoder.encode("123456")).authorities("ROLE ADMIN");
        //从数据库中读取账户密码
        auth.userDetailsService(userAuthService);
    }
    //---------------------
    @Bean
    @Override
    public AuthenticationManager authenticationManagerBean() throws Exception {
        return super.authenticationManagerBean();
    }
}
Oauth配置文件
import com.municipal.service.impl.UserAuthService;
import org.springframework.beans.factory.annotation.Autowired;
import org.springframework.context.annotation.Bean;
import org.springframework.context.annotation.Configuration;
import org.springframework.http.HttpMethod;
import org.springframework.security.authentication.AuthenticationManager;
import org.springframework.security.crypto.bcrypt.BCryptPasswordEncoder;
import org.springframework.security.crypto.password.PasswordEncoder;
import org.springframework.security.oauth2.config.annotation.configurers.ClientDetailsServiceConfigurer;
import org.springframework.security.oauth2.config.annotation.web.configuration.AuthorizationServerConfigurerAdapter;
import org.springframework.security.oauth2.config.annotation.web.configuration.EnableAuthorizationServer;
import org.springframework.security.oauth2.config.annotation.web.configurers.AuthorizationServerEndpointsConfigurer;
import org.springframework.security.oauth2.config.annotation.web.configurers.AuthorizationServerSecurityConfigurer;
import org.springframework.security.oauth2.provider.error.WebResponseExceptionTranslator;
import org.springframework.security.oauth2.provider.token.store.InMemoryTokenStore;

import javax.annotation.Resource;
import javax.sql.DataSource;

/**
 * 认证服务端配置.
 * @Author majinzhong
 * @Date 2023/7/5 17:24
 * @Version 1.0
 */
@Configuration
@EnableAuthorizationServer
public class AuthorizationServerConfig extends AuthorizationServerConfigurerAdapter {

    @Resource
    AuthenticationManager authenticationManager;
//
//    @Resource
//    RedisConnectionFactory redisConnectionFactory;

    @Autowired
    private CustomWebResponseExceptionTranslator customWebResponseExceptionTranslator;

    @Autowired
    UserAuthService userAuthService;

    @Bean
    PasswordEncoder passwordEncoder() {
        return new BCryptPasswordEncoder();
    }

    @Resource
    DataSource dataSource;

    @Override
    public void configure(ClientDetailsServiceConfigurer clientDetailsServiceConfigurer) throws Exception {
        // 内存存储配置信息+密码模式
        serviceConfig(0, clientDetailsServiceConfigurer, dataSource, "password");
    }

    /**
     * 服务配置,如授权方式,token过期时间等.
     *
     * @param flag                           内存和数据库标识,0:内存;1:数据库
     * @param clientDetailsServiceConfigurer 配置器
     * @param dataSource                     数据源
     * @param grantType                      授权类型,password:密码模式;authorization_code:授权码模式
     * @throws Exception 异常
     */
    private void serviceConfig(int flag, ClientDetailsServiceConfigurer clientDetailsServiceConfigurer, DataSource dataSource, String grantType) throws Exception {
//        if (flag == 1) {
//            clientDetailsServiceConfigurer.jdbc(dataSource);
//        } else {
            clientDetailsServiceConfigurer
                    //存储到内存中
                    .inMemory()
                    //配置client_id
                    .withClient("client")
                    //配置client-secret
                    .secret(new BCryptPasswordEncoder().encode("123456"))
                    //配置访问token的有效期
                    .accessTokenValiditySeconds(3600)
                    //配置刷新token的有效期
                    .refreshTokenValiditySeconds(864000)
                    //配置redirect_uri,用于授权成功后跳转
//                .redirectUris("http://www.baidu.com")
                    //配置申请的权限范围
                    .scopes("all")
                    //配置grant_type,表示授权类型
                    .authorizedGrantTypes("password","refresh_token");
//        }
    }

    @Override
    public void configure(AuthorizationServerEndpointsConfigurer endpointsConfig) throws Exception {
        // 默认情况下,授权码存储在内存中:InMemoryAuthorizationCodeServices,
        // 所以,不用配置
        endpointsConfig.tokenStore(new InMemoryTokenStore()) //增加 TokenStore 配置
                .authenticationManager(authenticationManager) //使用密码模式需要配置
                .allowedTokenEndpointRequestMethods(HttpMethod.GET,HttpMethod.POST) //支持GET,POST请求
                .userDetailsService(userAuthService); //设置userDetailsService刷新token时候会用到
        endpointsConfig.exceptionTranslator(customWebResponseExceptionTranslator);//错误异常
    }

//    /**
//     * 配置授权码存储位置.
//     *
//     * @param flag                                 授权码存储位置标识:0,内存;1:数据库
//     * @param endpointsConfig                      端配置
//     * @param randomValueAuthorizationCodeServices 授权码存储位置
//     */
//    private void codeStoreEndpointConfig(int flag, AuthorizationServerEndpointsConfigurer endpointsConfig, RandomValueAuthorizationCodeServices randomValueAuthorizationCodeServices) {
//        if (flag == 1) {
//            // 授权码存储数据库,需要配置jdbc存储
//            endpointsConfig.authorizationCodeServices(randomValueAuthorizationCodeServices);
//        }
//    }

    @Override
    public void configure(AuthorizationServerSecurityConfigurer serverSecurityConfig) throws Exception {
        //允许表单认证
        serverSecurityConfig.allowFormAuthenticationForClients();
        //添加tokan校验失败返回消息
        serverSecurityConfig.authenticationEntryPoint(new AuthExceptionEntryPoint());
    }
}
认证资源配置
import com.municipal.service.impl.UserAuthService;
import org.springframework.beans.factory.annotation.Autowired;
import org.springframework.context.annotation.Configuration;
import org.springframework.security.config.annotation.web.builders.HttpSecurity;
import org.springframework.security.oauth2.config.annotation.web.configuration.EnableResourceServer;
import org.springframework.security.oauth2.config.annotation.web.configuration.ResourceServerConfigurerAdapter;
import org.springframework.security.oauth2.config.annotation.web.configurers.ResourceServerSecurityConfigurer;

/**
 * 认证资源配置.
 * @Author majinzhong
 * @Date 2023/7/5 17:29
 * @Version 1.0
 */
@Configuration
@EnableResourceServer
public class ResourceConfig extends ResourceServerConfigurerAdapter {

//    @Override
//    public void configure(ResourceServerSecurityConfigurer resources) throws Exception {
//        resources.resourceId("admin");
//    }

    @Override
    public void configure(HttpSecurity httpSecurity) throws Exception {
        httpSecurity.requestMatchers()
                .antMatchers("/**")
                .and()
                .authorizeRequests()
                .antMatchers("/**")
                .authenticated();
    }
}
配置UserDetailsService
import com.municipal.pojo.UserInfo;
import org.springframework.security.core.userdetails.UserDetails;
import org.springframework.security.core.userdetails.UserDetailsService;
import org.springframework.security.core.userdetails.UsernameNotFoundException;
import org.springframework.security.crypto.bcrypt.BCryptPasswordEncoder;
import org.springframework.stereotype.Component;

/**
 * @Author majinzhong
 * @Date 2023/6/29 10:51
 * @Version 1.0
 */
@Component
public class UserAuthService implements UserDetailsService {
//    @Autowired
//    private UserMapper userMapper;

    @Override
    public UserDetails loadUserByUsername(String username) throws UsernameNotFoundException {
//        User user = userMapper.getByUsername(username);
//        if(user == null){
//            throw new UsernameNotFoundException("not found the user:"+username);
//        }else{
//            return user;
//        }
        if("admin".equals(username)){
            BCryptPasswordEncoder encoder = new BCryptPasswordEncoder();
            return new UserInfo(1, "admin", encoder.encode("123456"));
        }else{
            throw new UsernameNotFoundException("not found the user:"+username);
        }
    }
}
用户实体类
import lombok.AllArgsConstructor;
import lombok.Data;
import lombok.NoArgsConstructor;
import org.springframework.security.core.GrantedAuthority;
import org.springframework.security.core.userdetails.UserDetails;

import java.util.ArrayList;
import java.util.Collection;

/**
 * @Author majinzhong
 * @Date 2023/6/29 10:49
 * @Version 1.0
 */
@Data
@AllArgsConstructor
@NoArgsConstructor
public class UserInfo implements UserDetails {

    private Integer userId;
    private String userName;
    private String password;

    //将我们的 权限字符串进行分割,并存到集合中,最后供 AuthenticationProvider 使用
    @Override
    public Collection<? extends GrantedAuthority> getAuthorities() {

        return null;
    }

    //将我们的 密码 转换成 AuthenticationProvider 能够认识的 password
    @Override
    public String getPassword() {
        return this.password;
    }

    //将我们的 账户 转换成 AuthenticationProvider 能够认识的 username
    @Override
    public String getUsername() {
        return this.userName;
    }

    //都返回 true
    @Override
    public boolean isAccountNonExpired() {
        return true;
    }

    @Override
    public boolean isAccountNonLocked() {
        return true;
    }

    @Override
    public boolean isCredentialsNonExpired() {
        return true;
    }

    @Override
    public boolean isEnabled() {
        return true;
    }
}
至此,OAuth已经配置成功了,但当浏览器访问/oauth/token接口返回401的时候,页面会出现弹框
是因为response headers里面有Www-Authenticate: Basic realm="oauth2/client"

为了把这个弹框去掉也是费了一番大功夫
密码模式错误处理类(WebResponseExceptionTranslator)
import org.springframework.http.ResponseEntity;
import org.springframework.security.oauth2.common.exceptions.OAuth2Exception;
import org.springframework.security.oauth2.provider.error.WebResponseExceptionTranslator;
import org.springframework.stereotype.Component;

/**
 *
 * @ClassName:  CustomWebResponseExceptionTranslator
 * @Description:password模式错误处理,自定义登录失败异常信息
 * @Author majinzhong
 * @Date 2023/7/3 16:33
 * @Version 1.0
 */
@Component
public class CustomWebResponseExceptionTranslator implements WebResponseExceptionTranslator {
    @Override
    public ResponseEntity<OAuth2Exception> translate(Exception e) throws Exception {

        OAuth2Exception oAuth2Exception = (OAuth2Exception) e;
        return ResponseEntity
                //.status(oAuth2Exception.getHttpErrorCode())
                .status(200)
                .body(new CustomOauthException(oAuth2Exception.getMessage()));
    }
}
认证失败序列化类(CustomOauthExceptionSerializer)
import com.fasterxml.jackson.core.JsonGenerator;
import com.fasterxml.jackson.databind.SerializerProvider;
import com.fasterxml.jackson.databind.ser.std.StdSerializer;
import org.springframework.web.context.request.RequestContextHolder;
import org.springframework.web.context.request.ServletRequestAttributes;

import javax.servlet.http.HttpServletRequest;
import java.io.IOException;
import java.util.Date;
import java.util.Map;

/**
 *
 * @ClassName:  CustomOauthExceptionSerializer
 * @Description:password模式错误处理,自定义登录失败异常信息
 * @Author majinzhong
 * @Date 2023/7/3 16:32
 * @Version 1.0
 */
public class CustomOauthExceptionSerializer extends StdSerializer<CustomOauthException> {

    private static final long serialVersionUID = 1478842053473472921L;

    public CustomOauthExceptionSerializer() {
        super(CustomOauthException.class);
    }
    @Override
    public void serialize(CustomOauthException value, JsonGenerator gen, SerializerProvider provider) throws IOException {
        HttpServletRequest request = ((ServletRequestAttributes) RequestContextHolder.getRequestAttributes()).getRequest();

        gen.writeStartObject();
        gen.writeStringField("error", String.valueOf(value.getHttpErrorCode()));
//        gen.writeStringField("message", value.getMessage());
        gen.writeStringField("message", "用户名或密码错误");
        gen.writeStringField("path", request.getServletPath());
        gen.writeStringField("timestamp", String.valueOf(new Date().getTime()));
        if (value.getAdditionalInformation()!=null) {
            for (Map.Entry<String, String> entry :
                    value.getAdditionalInformation().entrySet()) {
                String key = entry.getKey();
                String add = entry.getValue();
                gen.writeStringField(key, add);
            }
        }
        gen.writeEndObject();
    }
}
认证异常返回类(CustomOauthException)
import com.fasterxml.jackson.databind.annotation.JsonSerialize;
import org.springframework.security.oauth2.common.exceptions.OAuth2Exception;

/**
 *
 * @ClassName:  CustomOauthException
 * @Description:password模式错误处理,自定义登录失败异常信息
 * @Author majinzhong
 * @Date 2023/7/3 16:32
 * @Version 1.0
 */
@JsonSerialize(using = CustomOauthExceptionSerializer.class)
public class CustomOauthException extends OAuth2Exception {
    public CustomOauthException(String msg) {
        super(msg);
    }
}tokan校验失败返回信息(AuthExceptionEntryPoint)同时解决浏览器打开出现弹框的问题
import com.fasterxml.jackson.databind.ObjectMapper;
import org.springframework.security.core.AuthenticationException;
import org.springframework.security.web.AuthenticationEntryPoint;

import javax.servlet.ServletException;
import javax.servlet.http.HttpServletRequest;
import javax.servlet.http.HttpServletResponse;
import java.util.Date;
import java.util.HashMap;
import java.util.Map;

/**
 * 自定义AuthExceptionEntryPoint用于tokan校验失败返回信息
 * @Author majinzhong
 * @Date 2023/7/3 16:31
 * @Version 1.0
 */
public class AuthExceptionEntryPoint implements AuthenticationEntryPoint {
    @Override
    public void commence(HttpServletRequest request, HttpServletResponse response,
                         AuthenticationException authException) throws ServletException {

        Map<String, Object> map = new HashMap<>();
        //401 未授权
        map.put("error", HttpServletResponse.SC_UNAUTHORIZED);
        map.put("message", authException.getMessage());
        map.put("path", request.getServletPath());
        map.put("timestamp", String.valueOf(new Date().getTime()));
        response.setContentType("application/json");
        response.setStatus(HttpServletResponse.SC_UNAUTHORIZED);
        try {
            ObjectMapper mapper = new ObjectMapper();
            mapper.writeValue(response.getOutputStream(), map);
        } catch (Exception e) {
            throw new ServletException();
        }
    }

}
此时,springboot集成oauth就完成了,进行测试(post和get方式都行)
获取token接口
127.0.0.1:8088/oauth/token?username=admin&password=123456&grant_type=password&client_id=client&client_secret=123456&scope=all

刷新token接口
127.0.0.1:8088/oauth/token?grant_type=refresh_token&client_id=client&client_secret=123456&refresh_token=2be033f2-6dab-46fb-bfc8-3f97b6a46dd4

get请求示例:
方式一

方式二


post请求和get请求的方式二一致
 文章来源:https://www.toymoban.com/news/detail-695801.html
 文章来源地址https://www.toymoban.com/news/detail-695801.html
到了这里,关于SpringBoot集成Oauth2.0(密码模式)的文章就介绍完了。如果您还想了解更多内容,请在右上角搜索TOY模板网以前的文章或继续浏览下面的相关文章,希望大家以后多多支持TOY模板网!


