大型语言模型(LLM)每天都在发展,这种情况有助于语义搜索的扩展。 LLM 擅长分析文本和揭示语义相似性。 这种情况也反映在搜索引擎上,因为语义搜索引擎可以为用户提供更满意的结果。
尽管大型语言模型可以捕获语义上接近的结果,但在搜索结果中实施过滤器对于增强用户体验至关重要。 例如,合并基于日期或类别的过滤器可以显着提高更令人满意的搜索体验。 那么,如何才能有效地将语义搜索与过滤结合起来呢?
在今天的展示中,我将使用最新的 Elastic Stack 8.9.0 来进行展示。为了方便大家学习,所有数据请在地址 https://github.com/liu-xiao-guo/elasticsearch-vector-search/ 进行下载。
安装
如果你还没有安装好自己的 Elasticsearch 及 Kibana,请参考我之前的文章:
-
如何在 Linux,MacOS 及 Windows 上进行安装 Elasticsearch
-
Kibana:如何在 Linux,MacOS 及 Windows 上安装 Elastic 栈中的 Kibana
在安装的时候,我们选择最新的 Elastic Stack 8.x 来进行安装。在默认的情况下,Elasticsearch 是带有 HTTPS 安全访问的。在 Elasticsearch 第一次启动时,我们记录下超级用户 elastic 的用户名及密码:
✅ Elasticsearch security features have been automatically configured!
✅ Authentication is enabled and cluster connections are encrypted.

ℹ️  Password for the elastic user (reset with `bin/elasticsearch-reset-password -u elastic`):
  p1k6cT4a4bF+pFYf37Xx

ℹ️  HTTP CA certificate SHA-256 fingerprint:
  633bf7f6e4bf264e6a05d488af3c686b858fa63592dc83999a0d77f7e9fe5940

ℹ️  Configure Kibana to use this cluster:
• Run Kibana and click the configuration link in the terminal when Kibana starts.
• Copy the following enrollment token and paste it into Kibana in your browser (valid for the next 30 minutes):
  eyJ2ZXIiOiI4LjkuMCIsImFkciI6WyIxOTIuMTY4LjAuMzo5MjAwIl0sImZnciI6IjYzM2JmN2Y2ZTRiZjI2NGU2YTA1ZDQ4OGFmM2M2ODZiODU4ZmE2MzU5MmRjODM5OTlhMGQ3N2Y3ZTlmZTU5NDAiLCJrZXkiOiJ3WEE3MDRrQkxxWTFWWGY0QWRHbDpCa0VZVXZmaFFidWNPOFUxdXJwXzZnIn0=

ℹ️  Configure other nodes to join this cluster:
• On this node:
  ⁃ Create an enrollment token with `bin/elasticsearch-create-enrollment-token -s node`.
  ⁃ Uncomment the transport.host setting at the end of config/elasticsearch.yml.
  ⁃ Restart Elasticsearch.
• On other nodes:
  ⁃ Start Elasticsearch with `bin/elasticsearch --enrollment-token <token>`, using the enrollment token that you generated.
词汇搜索 - 基本搜索
让我们首先从 Elasticsearch 连接和基本搜索查询开始。我们使用 Python 进行展示。我们需要安装需要的 Python 包:
pip3 install elasticsearch
pip3 install Config
有关 Elasticsearch 的连接,请参考 “Elasticsearch:关于在 Python 中使用 Elasticsearch 你需要知道的一切 - 8.x”。我们在下载的代码里修改如下的文件 simple.cfg:
simple.cfg
ES_PASSWORD: "p1k6cT4a4bF+pFYf37Xx"
ES_FINGERPRINT: "633bf7f6e4bf264e6a05d488af3c686b858fa63592dc83999a0d77f7e9fe5940"
上面的 ES_PASSWORD 是我们在 Elasticsearch 第一次启动时显示的密码,而 ES_FINGERPRINT 的值是 http_ca.crt 的 fingerprint。我们也可以在 Elasticsearch 第一次启动的时候看到。如果你已经找不到这个显示,那么你可以参考文章 “Elasticsearch:关于在 Python 中使用 Elasticsearch 你需要知道的一切 - 8.x” 来了解如何获得这个。另外一种比较简单的方法就是打开 config/kibana.yml 这个文件:

我们使用 jupyter 来打开文件 es-intro.ipynb:
from elasticsearch import Elasticsearch
from config import Config

with open('simple.cfg') as f:
    cfg = Config(f)

print(cfg['ES_FINGERPRINT'])
print(cfg['ES_PASSWORD'])

client = Elasticsearch(
    'https://localhost:9200',
    ssl_assert_fingerprint = cfg['ES_FINGERPRINT'],
    basic_auth=('elastic', cfg['ES_PASSWORD'])
)

client.info()
很显然我们的代码连接到 Elasticsearch 是成功的。
我们使用如下的代码来读取文件:
import json
with open('data.json', 'r') as f:
    data = json.load(f)

for book in data:
    print(book)
我将在这篇文章中使用的数据集是由 ChatGPT 生成的,并遵循上述格式。
我们首先检查是否已经有 book_index 索引被创建。如果有,就删除该索引:
INDEX_NAME = "book_index"

if(client.indices.exists(index=INDEX_NAME)):
    print("The index has already existed, going to remove it")
    client.options(ignore_status=404).indices.delete(index=INDEX_NAME)
我们使用如下的代码来写入数据到 Elasticsearch:
book_mappings = {
    "properties": {
        "title": {"type": "text"},
        "author": {"type": "text"},
        "date": {"type": "date"}
    }
}

client.indices.create(index = INDEX_NAME, mappings = book_mappings)

for each in data:
    client.index(index = INDEX_NAME, document = each)
client.indices.refresh()
上面显示已经写入 14 个文档。我们使用如下的代码来显示所有的文档:
# GET ALL DOCUMENTS
resp = client.search(index='book_index', query={"match_all": {}})
for hit in resp['hits']['hits']:
    print(hit['_source'])
为了对索引中的文档应用过滤,我们需要修改 “query” 参数。 要搜索文本中的单词,我们将使用 “match” 关键字:
# FILTERING - MATCH
resp = client.search(index='book_index',
                     query={
                         "match":
                         {"title": "Data"}
                     })
for hit in resp['hits']['hits']:
    print(hit['_score'], hit['_source'])
我们列出了索引中 “title” 字段中包含 “Data”一词的文档。
如果你想跨多个字段应用过滤,可以使用 “bool” 操作来实现。 如果你不希望某些字段影响搜索中的分数,你可以在 “filter” 中指定它们。
# FILTERING - COMBINE FILTERS
resp = client.search(index='book_index',
                     query={
                         "bool": {
                             "must": [
                                #  {"match": {"title": "data"}},
                                 {"match": {"author": "Smith"}},
                                 {"range": {"date": {"gte": "2023-08-01"}}}
                             ]
                         }
                     })
for hit in resp['hits']['hits']:
    print(hit)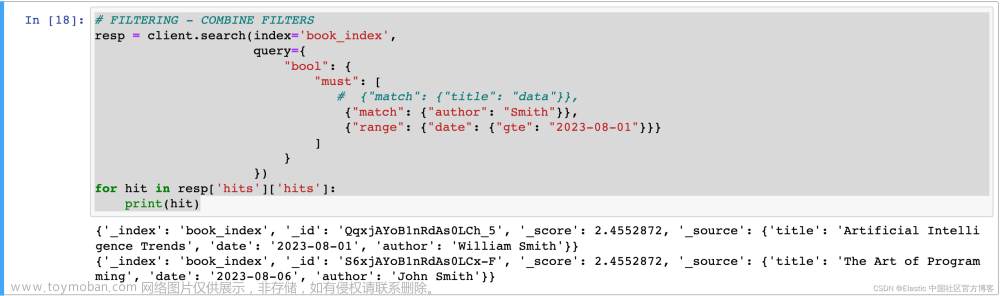
有关 Elasticsearch 查询的更多信息,你可以在此处查看。
现在,让我们创建包含文档向量的相同索引。 在这篇文章中,我将使用 Sentence-Transformers 库和 “all-mpnet-base-v2” 模型。 模型使用没有限制,因此你可以选择任何您想要的模型。 你可以在此处探索更多模型。
from sentence_transformers import SentenceTransformer

model = SentenceTransformer('all-mpnet-base-v2')
model
我们通过如下的方式来查看模型的维度大小:

我们使用如下的代码来检查索引 vector_index 是否已经存在,如果已经存在那么久删除它:
INDEX_NAME_VECTOR = "vector_index"
if(client.indices.exists(index = INDEX_NAME_VECTOR)):
    print("The index has already existed, going to remove it")
    client.options(ignore_status=404).indices.delete(index = INDEX_NAME_VECTOR)
vector_mapping = {
"properties": {
"title": {"type": "text"},
"author": {"type": "text"},
"date": {"type": "date"},
"vector": {
"type": "dense_vector",
"dims": 768,
"index": True,
"similarity": "dot_product"
}
}
}
client.indices.create(index = INDEX_NAME_VECTOR, mappings = vector_mapping)
这次创建 “vector_index” 时,我们添加了一个 “dense_vector” 类型的附加字段,并指定向量搜索的参数:“dims” 参数表示所用模型作为输出生成的矢量的维数。 “Similarity” 决定了衡量向量相似度的方法。 你可以在这里探索不同的 “similarity” 值。
for each in data:
    each['vector'] = model.encode(each['title'])
    client.index(index='vector_index', document=each)
client.indices.refresh()
让我们使用 Sentence-Transformers 库加载模型,并从数据集的 “title” 部分提取向量。 然后,我们将这些向量添加到每个数据条目中,并继续将此数据添加到 “vector_index” 索引中。
为了在 Elasticsearch 中执行向量搜索,我们首先需要一个查询文本,然后是其相应的向量表示。
重要提示:用于获取查询向量的模型应与索引文档时使用的模型相同; 否则,获得准确的结果将非常具有挑战性。
我们可以运行如下的代码来查看已经生成的 embeddings:
resp = client.search(index = INDEX_NAME_VECTOR, query={"match_all": {}})
for hit in resp['hits']['hits']:
    print(resp)
为了执行向量搜索,Elasticsearch.search() 函数使用 “knn” 参数。 下图显示了 “knn” 查询的示例。 “k” 值表示要检索多少个结果,而 “num_candidates” 指定将有多少候选文档放入池中进行计算。 “query_vector” 是查询文本的向量表示(在我们的例子中是 “HTML and CSS programming”)。 你可以在此处找到有关 knn 查询参数的详细信息。
query_text = "HTML and CSS programming"
query_vector = model.encode(query_text)
query = {
    "field": "vector",
    "query_vector": query_vector,
    "k": 5,
    "num_candidates": 14
}

resp = client.search(index='vector_index', knn=query, source=False, fields=['title'])
for hit in resp['hits']['hits']:
    print(hit['_score'], hit['fields'])
上面显示的结果为:

示例查询返回的结果如上图所示。 尽管返回的结果都不包含完全相同的单词,但它们已经成功捕获了语义相似的结果。
那么,如果我们还想将这些语义搜索结果与过滤结合使用,我们应该如何准备 knn 查询呢?
query = {
    "field": "vector",
    "query_vector": query_vector,
    "k": 5,
    "num_candidates": 14,
    "filter":[
        {"range": {"date": {"gte": "2023-07-01"}}},
        {"match": {"title": "Development"}}
    ]
}
resp = client.search(index='vector_index', knn=query, source=False, fields=['title'])
for hit in resp['hits']['hits']:
    print(hit['_score'], hit['fields'])
我们应用的每个过滤器都作为 knn 参数中的 filter 提供。 你可以在此处添加任意数量的过滤器,并根据这些过滤器组合结果。 在上面的示例中,日期过滤器和关键字过滤器已添加在一起,旨在列出语义上接近且包含单词 Development 但日期晚于 2023 年 7 月 1 日的文档。
重要提示:Elasticsearch 在矢量搜索过程后执行过滤,因此可能存在无法返回精确 k 个结果的情况。 在上图中,即使 “k” 值设置为 5,查询仍返回 3 个文档作为结果。 这是因为,在准备的示例数据集中,只有 3 个文档满足指定的条件。文章来源:https://www.toymoban.com/news/detail-698991.html
更多关于向量搜索的知识,请参考文章 “Elastic:开发者上手指南” 中的 “NLP - 自然语言处理及矢量搜索” 章节。文章来源地址https://www.toymoban.com/news/detail-698991.html
到了这里,关于如何在 Elasticsearch 中将向量搜索与过滤结合起来 - Python 8.x的文章就介绍完了。如果您还想了解更多内容,请在右上角搜索TOY模板网以前的文章或继续浏览下面的相关文章,希望大家以后多多支持TOY模板网!