一、生产者模块
1.导入依赖
重点是这个依赖
        <dependency>
            <groupId>org.springframework.boot</groupId>
            <artifactId>spring-boot-starter-amqp</artifactId>
        </dependency>
<properties>
<maven.compiler.source>8</maven.compiler.source>
<maven.compiler.target>8</maven.compiler.target>
<project.build.sourceEncoding>UTF-8</project.build.sourceEncoding>
<!-- 声明springboot的版本号 -->
<spring-boot.version>2.2.9.RELEASE</spring-boot.version>
</properties>
<!-- 引入springboot官方提供的所有依赖的版本号定义,如果项目中使用相关依赖,可以不必写版本号了-->
<dependencyManagement>
<dependencies>
<dependency>
<groupId>org.springframework.boot</groupId>
<artifactId>spring-boot-dependencies</artifactId>
<version>${spring-boot.version}</version>
<type>pom</type>
<scope>import</scope>
</dependency>
</dependencies>
</dependencyManagement>
<dependencies>
<dependency>
<groupId>org.springframework.boot</groupId>
<artifactId>spring-boot-starter-web</artifactId>
</dependency>
<dependency>
<groupId>org.projectlombok</groupId>
<artifactId>lombok</artifactId>
</dependency>
<dependency>
<groupId>org.springframework.boot</groupId>
<artifactId>spring-boot-starter-test</artifactId>
</dependency>
<dependency>
<groupId>org.springframework.boot</groupId>
<artifactId>spring-boot-starter-amqp</artifactId>
</dependency>
</dependencies>2.yml配置文件
spring:
  rabbitmq:
    host: 8.140.244.227
    port: 6786
    username: test
    password: test
    virtual-host: /test
server:
  port: 8081
3.用接口方式实现生产者
通过
@Autowired
RabbitTemplate rabbitTemplate;//这个模板
package com.qf.bootmq2302.controller;

import org.springframework.amqp.rabbit.core.RabbitTemplate;
import org.springframework.beans.factory.annotation.Autowired;
import org.springframework.web.bind.annotation.GetMapping;
import org.springframework.web.bind.annotation.RequestMapping;
import org.springframework.web.bind.annotation.RestController;

import java.util.HashMap;
import java.util.Map;
import java.util.TreeMap;

@RestController
public class TestController {
    @Autowired
    RabbitTemplate rabbitTemplate;
    @GetMapping("/test1")
    public String test1(String msg){
        System.out.println(msg);
        String exchangeName = "";//默认交换机
        String routingkey = "hello";//队列名字
        //生产者发送消息
        rabbitTemplate.convertAndSend(exchangeName,routingkey,msg);
        return "ok";
    }


    @GetMapping("/test2")
    public String test2(String name,Integer age){

        TreeMap<String, Object> map = new TreeMap<String, Object>();
        map.put("name",name);
        map.put("age",age);
        String exchangeName = "";//默认交换机
        String routingkey = "work";//队列名字
        //生产者发送消息
        rabbitTemplate.convertAndSend(exchangeName,routingkey,map);
        return "ok";
    }
}
4.主启动类
package com.qf.bootmq2302;

import org.springframework.boot.SpringApplication;
import org.springframework.boot.autoconfigure.SpringBootApplication;

@SpringBootApplication
public class BootMqApp {
    public static void main(String[] args) {
        SpringApplication.run(BootMqApp.class,args);
    }
}
二、消费者模块
1.导入依赖
和上一个一样文章来源:https://www.toymoban.com/news/detail-700533.html
2.yml配置文件
spring:
  rabbitmq:
    host: 8.140.244.227
    port: 6786
    username: test
    password: test
    virtual-host: /test
    #手动ACK
    listener:
      simple:
        acknowledge-mode: manual
        prefetch: 1 #等价于basicQos(1)
3.通过注解绑定 队列名字
package com.qf.bootconsumer.consumer;

import com.rabbitmq.client.Channel;
import org.springframework.amqp.core.Message;
import org.springframework.amqp.rabbit.annotation.RabbitListener;
import org.springframework.stereotype.Component;

import java.io.IOException;
import java.io.UnsupportedEncodingException;
import java.util.HashMap;
import java.util.Map;
import java.util.TreeMap;

@Component
public class MyConsumer {

//    @RabbitListener(queues = "hello")
//    public void getMsg(Message message) throws UnsupportedEncodingException {
//        byte[] body = message.getBody();
//        String s = new String(body, "utf-8");
//        System.out.println(s);
//
//    }

//    @RabbitListener(queues = "hello")
//    public void getMsg(String msg) throws UnsupportedEncodingException {
//
//        System.out.println(msg);
//
//    }


    @RabbitListener(queues = "hello")
    public void getMsg(Map<String,Object> message) throws UnsupportedEncodingException {

        System.out.println(message);

    }

    @RabbitListener(queues = "work")
    public void getMsg1(Map<String,Object> data, Channel channel,Message message) throws IOException {


        System.out.println(data);

        //手动ack//若开启手动ack,不给手动ack,就按照 prefetch: 1 #等价于basicQos(1)的量,就这么多,不会多给你了,因为你没有确认。确认一条,就给你一条
        channel.basicAck(message.getMessageProperties().getDeliveryTag(),false);

    }


}
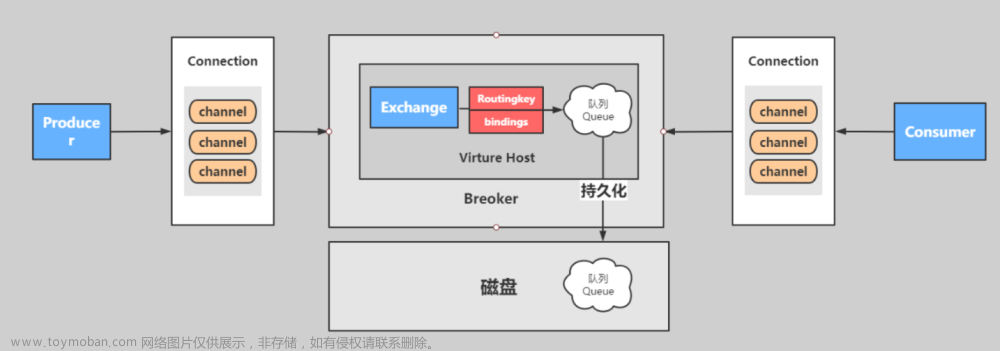
4.通过配置类,创建队列,交换机,绑定队列给交换机和给予路由
文章来源地址https://www.toymoban.com/news/detail-700533.html
package com.qf.bootconsumer.config;

import org.springframework.amqp.core.*;
import org.springframework.context.annotation.Bean;
import org.springframework.context.annotation.Configuration;

/**
 * 在 该配置类中可以,通过@Bean 方法定义 mq内部的交换机和队列 ,及其绑定关系
 */
@Configuration
public class MyConfig {

    @Bean
    public TopicExchange exchange01(){
        return  new TopicExchange("boot-exchange",true,false);
    }

    @Bean
    public Queue queue01(){
        /**
         * 第一个参数:队列名字
         * 第二个参数:true:代表服务重启后,此队列还存在
         * 第三个参数: true:排外,不能让其他连接来访问此队列,只有创建此队列的连接能访问消费此队列
         * 第四个参数: true:代表服务关闭时,RabbitMQ会自动把 此队列删除了。
         */
        Queue queue = new Queue("boot-Queue", true, false, false);
        return queue;
    }
    @Bean
    public Binding binding01(TopicExchange exchange01,Queue queue01){
        Binding binding = BindingBuilder.bind(queue01).to(exchange01).with("*.orange.*");
        return binding;
    }

    @Bean
    public Binding binding02(TopicExchange exchange01,Queue queue01){
        Binding binding = BindingBuilder.bind(queue01).to(exchange01).with("*.*.rabbit");
        return binding;
    }

    @Bean
    public FanoutExchange exchange02(){
        return new FanoutExchange("boot-fanout");
    }

    @Bean
    public Queue queue02(){
        return new Queue("boot-queue02",true,false,false);
    }
    @Bean
    public Queue queue03(){
        return new Queue("boot-queue03",true,false,false);
    }
    @Bean
    public Binding binding03(FanoutExchange exchange02,Queue queue02){
        Binding binding = BindingBuilder.bind(queue02).to(exchange02);
        return binding;
    }
    @Bean
    public Binding binding04(FanoutExchange exchange02,Queue queue03){
        Binding binding = BindingBuilder.bind(queue03).to(exchange02);
        return binding;
    }

}
到了这里,关于RabbitMQ: SpringBoot 整合 RabbitMQ的文章就介绍完了。如果您还想了解更多内容,请在右上角搜索TOY模板网以前的文章或继续浏览下面的相关文章,希望大家以后多多支持TOY模板网!