element ui 多张图片上传、回显、删除
前端文件上传
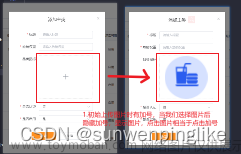
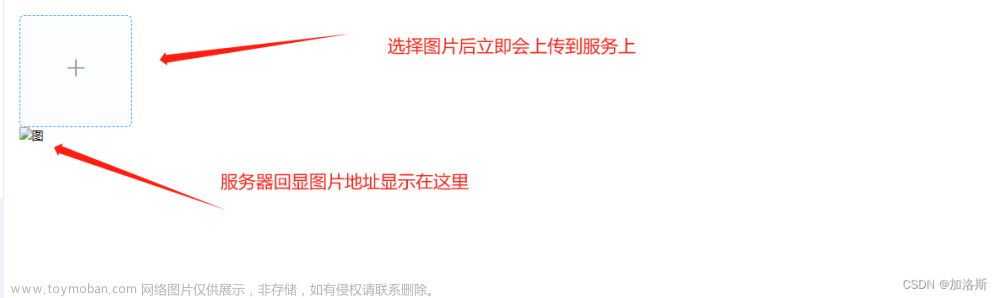
1、展示部分
<el-form-item class="aisd" label="车辆照片" prop="saveName">
			  <el-upload
			    class="avatar-uploader"
			    action="http://localhost:2000/talentsapp/product/upload" //文件上传请求后端的地址
				:headers="headers"  //请求头携带token
			    :with-credentials="true" //支持发送 cookie 凭证信息
			    :show-file-list="true" //是否显示已上传文件列表
				list-type="picture-card" //文件列表的类型
				:file-list="fileList"  //上传的文件列表
				:on-remove="handleRemove" //文件删除时触发的事件
			    :on-success="handleAvatarSuccess" //文件上传成功的回调
			    :before-upload="beforeAvatarUpload"> //上传文件之前的钩子,参数为上传的文件,若返回 false 或者返回 Promise 且被 reject,则停止上传。
			    <img style="width: 100px;height: 100px;" v-if="false" src="" class="avatar">
			    <i v-else class="el-icon-plus avatar-uploader-icon"></i>
			  </el-upload>
			</el-form-item>
2、方法部分
data() {
		 var token = this.token=sessionStorage.getItem("token");
		  return {
			fileList:[],
			form:{
				saveName:"",
				},
			http:"http://localhost:8016/img/",
			total:0,
			pageSize:10,
			currentPage:1,
			currentPage2:5,
			dialogVisible: false,
			dialogVisible1: false,
			  //请求头携带token
			  headers: {
			  	"Authorization": token
			  },
			}
		}
3.函数部分
methods:{
    //上传图片成功之后执行操作
    handleAvatarSuccess(res, file, fileList) {
        file.saveName = res.target;
        this.fileList=fileList;
      },
    //上传图像之前进行验证
    beforeAvatarUpload(file) {
      const isJPG = file.type === 'image/jpeg';
      const isLt2M = file.size / 1024 / 1024 < 2;

    if (!isLt2M) {
      this.$message.error('上传头像图片大小不能超过 2MB!');
    }
      return isJPG && isLt2M;
    },
    //删除图片时的回调
    handleRemove(file, fileList) {
        this.fileList=fileList;
        console.log(file, fileList);
    }
}
表单提交时的操作
这个写的有点长,大家挑选自己用的到的部分复制修改一下就行文章来源:https://www.toymoban.com/news/detail-701427.html
//表单提交
			onSubmit() {
				this.$refs.form.validate((valid)=>{
				  if(valid){
					 delete this.form.ptypes;
					 var file = "";
					 for(var i=0;i<this.fileList.length;i++){
						 console.info(this.fileList[i].saveName);
						 file+=this.fileList[i].saveName+",";
					 }
					 file = file.substring(0,file.length-1);
					 this.form.saveName=file;
					 console.info(this.form.saveName);
					 //往后台发送ajax请求 获取商品数据
					 this.$http.post("talentsapp/product/saveOrUpdate",this.form).then(response=>{
						if(response.data.success){
							this.localData();
							this.dialogVisible=false;
							this.$message({
								  message: '操作成功',
								  type: 'success'
								});
						}else{
							this.$message.error(response.data.error);
						}
					 });
				  }else{
					  return false;
				  }
				});
			},
后端文件上传
1.controoler部分文章来源地址https://www.toymoban.com/news/detail-701427.html
 /**
     * 文件上传
     * @param file
     * @return
     */
    @RequestMapping("/upload")
    public DefaultMsg upload(MultipartFile file){
        DefaultMsg defaultMsg = new DefaultMsg();
        //生成保存文件名
        String saveName = UUID.randomUUID().toString();
        //目标文件
        File targetFile = new File("D:/upload/"+saveName);
        try {
            file.transferTo(targetFile);
            defaultMsg.setTarget(saveName);
        } catch (IOException e) {
            e.printStackTrace();
            defaultMsg.setError("上传失败");
            defaultMsg.setSuccess(0);
        }
        return defaultMsg;
    }
到了这里,关于element ui 多张图片上传、回显、删除的文章就介绍完了。如果您还想了解更多内容,请在右上角搜索TOY模板网以前的文章或继续浏览下面的相关文章,希望大家以后多多支持TOY模板网!