安装前最好测试一遍 步骤三,避免安装失败,浪费时间。
一、驱动安装
1、更新系统包
sudo apt-get update

sudo apt-get upgrade
sudo apt install build-essential 2、安装显卡驱动
使用apt方式安装驱动,多数情况不容易成功,
使用一下方法更佳:
1.查看合适显卡的驱动版本
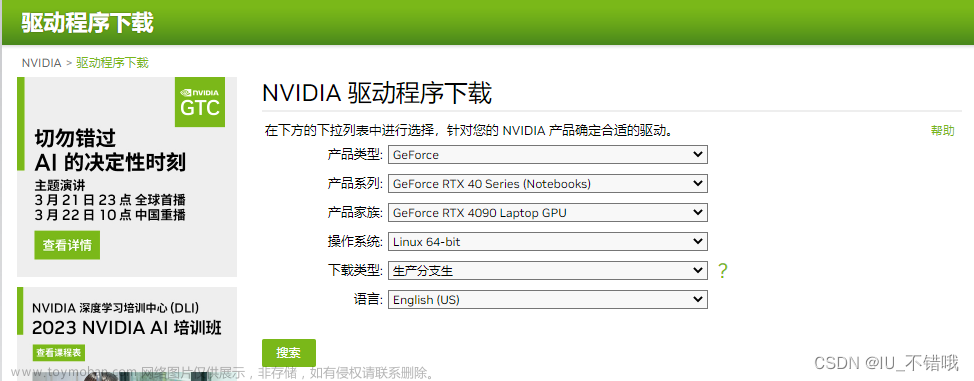
ubuntu-drivers devicesNVIDIA GeForce 驱动程序 - N 卡驱动 | NVIDIANVIDIA GeForce 驱动程序官方提供下载最新版的 Geforce 驱动程序,可提升 PC 游戏体验和应用程序速度。更多关于更新显卡驱动程序以及显卡驱动程序下载的信息,请访问 NVIDIA 官网。https://www.nvidia.cn/geforce/drivers/选择合适版本的驱动,下载后直接可以安装

下载推荐版本

两种方式:①有桌面的,直接双击进行安装。
②命令行:
sudo dpkg -i XXX.deb2.minicoda 见前面的文章 。Miniconda — conda documentationhttps://docs.conda.io/en/latest/miniconda.html#linux-installers
3、安装cuda
查看版本对应
CUDA 12.2 Release Notes — cuda-toolkit-release-notes 12.2 documentationThe Release Notes for the CUDA Toolkit.https://docs.nvidia.com/cuda/cuda-toolkit-release-notes/index.html

查看pytorch版本对应
Previous PyTorch Versions | PyTorchAn open source machine learning framework that accelerates the path from research prototyping to production deployment.https://pytorch.org/get-started/previous-versions/
安装 11.7版本cuda比较通用
CUDA Toolkit 11.7 Update 1 Downloads | NVIDIA DeveloperResources CUDA Documentation/Release NotesMacOS Tools Training Sample Code Forums Archive of Previous CUDA Releases FAQ Open Source PackagesSubmit a BugTarball and Zip Archive Deliverableshttps://developer.nvidia.com/cuda-11-7-1-download-archive?target_os=Linux&target_arch=x86_64&Distribution=Ubuntu&target_version=20.04&target_type=deb_local
不要使用network版本安装,它会直接安装最新版本,使用离线安装,两个时间差不多

4、安装cudnn
cuDNN Archive | NVIDIA DeveloperExplore and download past releases from cuDNN GPU-accelerated primitive library for deep neural networks.https://developer.nvidia.com/rdp/cudnn-archive
主要对应版本,intel 选86_64 , 系统 20.04.只需要下载一个文件,这里和老版本不太一样。同样双击就可以安装。

最后一把配置环境变量
export PATH="/usr/local/cuda-11.7/bin${PATH:+:${PATH}}"
export LD_LIBRARY_PATH="/usr/local/cuda-11.7/lib64${LD_LIBRARY_PATH:+:${LD_LIBRARY_PATH}}"
torch安装,参考18.04版本
Ubuntu 18.04 深度学习环境快速配置命令记录_瑾怀轩的博客-CSDN博客sudo apt-get install ubuntu-drivers-common #安装。4、在线安装不行,离线安装ok。5、安装miniconda。10、安装cudann。6、初始化conda。https://blog.csdn.net/ckq707718837/article/details/130884384?spm=1001.2014.3001.5502
二、驱动卸载
卸载cuda:
sudo apt-get --purge remove "*cuda*" "*cublas*" "*cufft*" "*cufile*" "*curand*" \
 "*cusolver*" "*cusparse*" "*gds-tools*" "*npp*" "*nvjpeg*" "nsight*" "*nvvm*"
卸载nvidia驱动
sudo apt-get --purge remove "*nvidia*" "libxnvctrl*"卸载不用的依赖包
sudo apt-get autoremove三、可能会遇到的问题:
问题一、
ERROR: An
NVIDIA kernel module 'nvidia-uvm' appears to already be loaded in your kernel
ERROR: An NVIDIA kernel module 'nvidia-drm' appears to already be loaded in your kernel
安装驱动的报错信息为:
ERROR: An NVIDIA kernel module 'nvidia-uvm' appears to already be loaded in your kernel. This may be because it is
in use (for example, by an X server, a CUDA program, or the NVIDIA Persistence Daemon), but this may also happen if
your kernel was configured without support for module unloading. Please be sure to exit any programs that may be us
ing the GPU(s) before attempting to upgrade your driver. If no GPU-based programs are running, you know that your k
ernel supports module unloading, and you still receive this message, then an error may have occurred that has corrup
ted an NVIDIA kernel module's usage count, for which the simplest remedy is to reboot your computer.
or
ERROR: An NVIDIA kernel module 'nvidia-drm' appears to already be loaded in your kernel. This may be because it is
in use (for example, by an X server, a CUDA program, or the NVIDIA Persistence Daemon), but this may also happen if
your kernel was configured without support for module unloading. Please be sure to exit any programs that may be us
ing the GPU(s) before attempting to upgrade your driver. If no GPU-based programs are running, you know that your k
ernel supports module unloading, and you still receive this message, then an error may have occurred that has corrup
ted an NVIDIA kernel module's usage count, for which the simplest remedy is to reboot your computer.
正常情况:
解决办法如下: 目的是移去kernel中包含NVIDIA的进程,举个栗子:
命令:
lsmod | grep nvidianvidia_uvm 995356 2
nvidia_drm 53134 0
nvidia_modeset 1195268 1 nvidia_drm
nvidia 35237551 14 nvidia_modeset,nvidia_uvm
drm_kms_helper 179394 2 i915,nvidia_drm
drm 429744 5 i915,drm_kms_helper,nvidia,nvidia_drm
数字代表依赖进程数量,卸载时,需要重后置位不存在依赖项的开始卸载,比如这里要从
nvidia-smi开始
sudo rmmod nvidia-drmsudo rmmod nvidia-modesetsudo rmmod nvidia现在再使用:
lsmod | grep nvidia会发现基本上没有信息了打印了,如何还有,就用上面的命令卸载过程中还会出现意外情况,就是 某个模块被占用,卸载不掉
rmmod: ERROR: Module nvidia_drm is in use
如果是 nvidia-uvm可以使用top命令,查看进程,kill掉进程,再执行上面步骤。
如果是 nvidia-drm 会发现没在进程中,这是进入无图形化界面
sudo systemctl isolate multi-user.target这个过程可能黑屏,不用慌张,关机重启,再尝试该操作,登录账号后,同样的操作,
lsmod | grep nvidiasudo rmmod nvidia-drm也可以使用下面命令
sudo modprobe -r nvidia-drm如果还有其他的一次性卸载完。卸载完后,使用下面命令进入图形化界面
sudo systemctl start graphical.target进入后 ,检查一下
lsmod | grep nvidia没有依赖项可以安装了
问题二、安装是要注意版本,安装时注意选项选择
sudo sh NVIDIA-Linux-x86_64-535.42.run -no-x-check -no-nouveau-check -no-opengl-files后面可加参数,选择选项,跟着默认项选即可。
这里注意的是,安装32位库会根据显卡版本,修改系统内核。所以在安装前选好版本后,尽量和系统推荐版本,与内核版本保持一致。
查看内核版本
less /proc/versioncat /proc/driver/nvidia/versionubuntu-drivers devices安装好后nvidia驱动,使用nvidia-smi如果不需要低版本cuda需求,尽量使用nvidia-smi上面推荐的cuda版本
问题3
Failed to initialize NVML: Driver
这个问题 一般情况重启就能解决, 注意前提
1、安装好显卡驱动
2、安装好cuda和cudnn
3、配置好环境变量
解决办法: 关机 --》开机文章来源:https://www.toymoban.com/news/detail-704186.html
如果还解决不了,从头再来,大概率是安装显卡驱动版本选错了,或者提示选项选错了。文章来源地址https://www.toymoban.com/news/detail-704186.html
到了这里,关于Linux Ubuntu20.04深度学习环境快速配置命令记录的文章就介绍完了。如果您还想了解更多内容,请在右上角搜索TOY模板网以前的文章或继续浏览下面的相关文章,希望大家以后多多支持TOY模板网!


