一、开发环境准备
- JDK1.8
- MySQL8
- idea2021
- Tomcat8.5.87
- Apache-Maven3.9
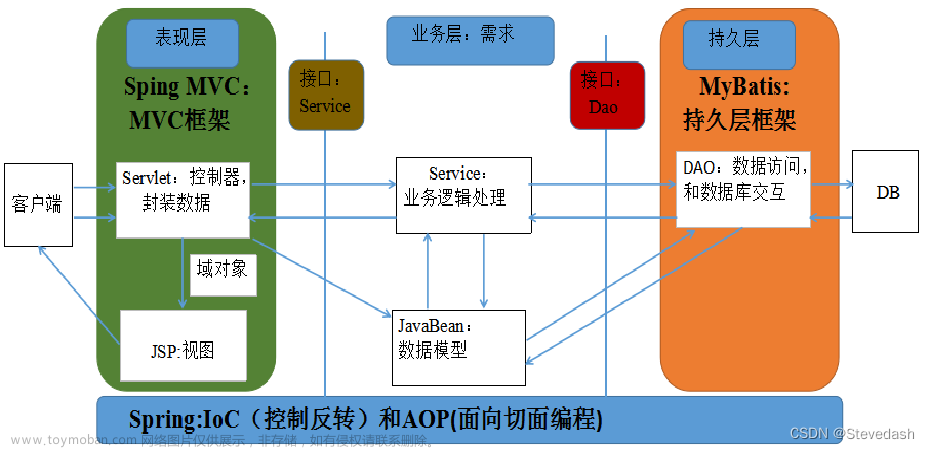
二、搭建SSM
2.1新建Maven项目
【File】-> 【new Project】-> 【选择Archetype】
2.2项目整体结构
项目的整体结构: 包括resources目录下的xml和webapp目录下文件。如果不包含某些文件,就自己创建。
MVC结构、spring-config.xml(applicationContext.xml)、jdbc.properties(数据源)、mybatis-config.xml(mybatis配置类)、spring-mvc.xml(springMVC前端控制器配置类)、web.xml(web项目配置类)

2.3spring-config.xml配置
<?xml version="1.0" encoding="UTF-8"?>
<beans xmlns="http://www.springframework.org/schema/beans"
       xmlns:xsi="http://www.w3.org/2001/XMLSchema-instance"
       xmlns:context="http://www.springframework.org/schema/context"
       xsi:schemaLocation="http://www.springframework.org/schema/beans http://www.springframework.org/schema/beans/spring-beans.xsd http://www.springframework.org/schema/context https://www.springframework.org/schema/context/spring-context.xsd">
    <!--引入配置类-->
    <context:property-placeholder location="classpath:jdbc.properties"/>

    <!--声明数据源DataSource-->
    <bean id="myDataSource" class="com.alibaba.druid.pool.DruidDataSource" init-method="init" destroy-method="close">
        <property name="url" value="${database.url}"/>
        <property name="username" value="${database.username}"/>
        <property name="password" value="${database.password}"/>
    </bean>

    <!--声明SqlSessionFactoryBean,在这个类的内部,创建SqlSessionFactory-->
    <bean id="factory" class="org.mybatis.spring.SqlSessionFactoryBean">
        <!--指定数据源-->
        <property name="dataSource" ref="myDataSource"/>
        <!--指定mybatis主配置文件
                resource可以直接使用value赋值
        -->
        <property name="configLocation" value="classpath:mybatis-config.xml"/>
    </bean>

     <!-- 使用MapperScannerConfigurer自定生成代理实现类
    MapperScan
    nerConfigurer是spring和mybatis整合的mybatis-spring的jar包中提供的一个类。
    -->

    <bean class="org.mybatis.spring.mapper.MapperScannerConfigurer">
        <!--指定SqlSessionFactory的名称-->
        <property name="sqlSessionFactoryBeanName" value="factory"/>
        <!-- 给指定包下的接口生成代理实现类 -->
        <property name="basePackage" value="com.shenxm.mapper"/>
    </bean>
</beans>
2.4jdbc.properties配置
database.driver=com.mysql.cj.jdbc.Driver
database.url=jdbc:mysql://localhost:3306/demo
database.username=root
database.password=123456
2.5mybatis-config.xml配置
<?xml version="1.0" encoding="UTF-8" ?>
<!DOCTYPE configuration
PUBLIC "-//mybatis.org//DTD Config 3.0//EN"
"http://mybatis.org/dtd/mybatis-3-config.dtd">
<configuration>
<!--引入jdbc.properties配置文件-->
<properties resource="jdbc.properties"/>
<settings>
<!--配置运行的sql在控制台打印输出-->
<setting name="logImpl" value="STDOUT_LOGGING"/>
<!--设置映射方式 autoMappingBehavior属性
NONE:不自动进行映射
PARTIAL:默认值,对没有嵌套结果集自动进行映射
FILL:对所有结果集进行自动映射,一般情况下,如果有结果集我们也使用ReaultMap,所以FULL很少用
-->
<setting name="autoMappingBehavior" value="PARTIAL"/>
<!--驼峰映射
开启驼峰映射后:例如数据库字段中的nick_name,在PO中属性却是nickName也可以自动匹配上(mybatis会自动将下划线更改成驼峰类型)
-->
<setting name="mapUnderscoreToCamelCase" value="true"/>
<!--开启延迟加载的开关 默认是false -->
<setting name="lazyLoadingEnabled" value="true"/>
<!-- <!–发生延迟加载的时候, 是否完全加载 默认是 false (3.1.4版本之后) 一般不配置 用默认的就可以–>
<setting name="aggressiveLazyLoading" value="true"/>-->
</settings>
<!--注入映射器-->
<mappers>
<!--映射器(xml)所在包-->
<package name="com.shenxm.mapper"/>
</mappers>
</configuration>
2.6spring-mvc.xml配置
<?xml version="1.0" encoding="UTF-8"?>
<beans xmlns="http://www.springframework.org/schema/beans"
       xmlns:xsi="http://www.w3.org/2001/XMLSchema-instance"
       xmlns:context="http://www.springframework.org/schema/context"
       xmlns:mvc="http://www.springframework.org/schema/mvc"
       xsi:schemaLocation="http://www.springframework.org/schema/beans http://www.springframework.org/schema/beans/spring-beans.xsd http://www.springframework.org/schema/context https://www.springframework.org/schema/context/spring-context.xsd http://www.springframework.org/schema/mvc https://www.springframework.org/schema/mvc/spring-mvc.xsd">

    <!-- 自动注册组件 -->
    <mvc:annotation-driven />
    <!--指定组件扫描路径-->
    <context:component-scan base-package="com.shenxm"/>

</beans>
2.7web.xml配置
<?xml version="1.0" encoding="UTF-8"?>
<web-app xmlns="http://xmlns.jcp.org/xml/ns/javaee"
         xmlns:xsi="http://www.w3.org/2001/XMLSchema-instance"
         xsi:schemaLocation="http://xmlns.jcp.org/xml/ns/javaee http://xmlns.jcp.org/xml/ns/javaee/web-app_4_0.xsd"
         version="4.0">

    <!--配置全局过滤filter-->
    <filter>
        <filter-name>CharacterEncodingFilter</filter-name>
        <filter-class>org.springframework.web.filter.CharacterEncodingFilter</filter-class>
        <init-param>
            <param-name>encoding</param-name>
            <param-value>UTF-8</param-value>
        </init-param>
    </filter>
    <filter-mapping>
        <filter-name>CharacterEncodingFilter</filter-name>
        <url-pattern>/*</url-pattern>
    </filter-mapping>

    <!--配置springMVC的前端控制器-->
    <servlet>
        <servlet-name>DispatcherServlet</servlet-name>
        <servlet-class>org.springframework.web.servlet.DispatcherServlet</servlet-class>
        <init-param>
            <param-name>contextConfigLocation</param-name>
            <param-value>classpath:spring-mvc.xml</param-value>
        </init-param>
        <load-on-startup>1</load-on-startup>
    </servlet>
    <servlet-mapping>
        <servlet-name>DispatcherServlet</servlet-name>
        <url-pattern>/</url-pattern>
    </servlet-mapping>

    <context-param>
        <!--  contextConfigLocation:名称是固定的,表示自定义的spring配置文件的路径  -->
        <param-name>contextConfigLocation</param-name>
        <!--    自定义配置文件的路径  -->
        <param-value>classpath:spring-config.xml</param-value>
    </context-param>

    <listener>
        <listener-class>org.springframework.web.context.ContextLoaderListener</listener-class>
    </listener>
</web-app>
2.8index.jsp
<%@ page contentType="text/html;charset=UTF-8"  pageEncoding="utf-8" language="java" isELIgnored="false" %>
<html>
<body>
<h2>测试</h2>
<p>创建学生用户信息</p>
<form action="${pageContext.request.contextPath}/test/add" method="post">
    姓名:<input type="text" name="name"><br/>
    年龄:<input type="text" name="age"><br/>
    <input type="submit" value="注册学生">
</form>
</body>
</html>
2.9ok.jsp
<%@ page contentType="text/html;charset=UTF-8" language="java" %>
<html>
<head>
    <title>成功</title>
    <h2>添加成功,这是一个跳转页面!!!</h2>
</head>
<body>
</body>
</html>
2.10Java代码
controller层:
package com.shenxm.controller;

import com.shenxm.po.Test;
import com.shenxm.service.TestService;
import org.springframework.beans.factory.annotation.Autowired;
import org.springframework.stereotype.Controller;
import org.springframework.web.bind.annotation.RequestMapping;
import org.springframework.web.servlet.ModelAndView;

@Controller
@RequestMapping("/test")
public class DemoController {
    @Autowired
    private TestService testService;

    @RequestMapping("/add")
    public ModelAndView addOneTest(Test test){
        ModelAndView modelAndView = new ModelAndView();
        testService.addTest(test);
        System.out.println("addTest方法执行完成");
        modelAndView.setViewName("/ok.jsp");
        return modelAndView;
    }
}
service层接口类:
package com.shenxm.service;
import com.shenxm.po.Test;

public interface TestService {
    int addTest(Test test);
}
service层实现类:
package com.shenxm.service.impl;

import com.shenxm.mapper.TestMapper;
import com.shenxm.po.Test;
import com.shenxm.service.TestService;
import org.springframework.beans.factory.annotation.Autowired;
import org.springframework.stereotype.Service;

@Service
public class TestServiceImpl implements TestService {

    @Autowired
    private TestMapper testMapper;
    @Override
    public int addTest(Test test) {
        int row = testMapper.addTest(test);
        return row;
    }
}
mapper层:
TestMapper.java
package com.shenxm.mapper;
import com.shenxm.po.Test;
import org.springframework.stereotype.Component;

@Component
public interface TestMapper {
    int addTest(Test test);
}
TestMapper.xml
<?xml version="1.0" encoding="UTF-8" ?>
<!DOCTYPE mapper
        PUBLIC "-//mybatis.org//DTD Mapper 3.0//EN"
        "http://mybatis.org/dtd/mybatis-3-mapper.dtd">
<mapper namespace="com.shenxm.mapper.TestMapper">
    <insert id="addTest" parameterType="com.shenxm.po.Test" useGeneratedKeys="true" keyProperty="id">
        insert into test values (null,#{name},#{age})
    </insert>
</mapper>
po包:
package com.shenxm.po;

import lombok.AllArgsConstructor;
import lombok.Builder;
import lombok.Data;
import lombok.NoArgsConstructor;

@Data
@AllArgsConstructor
@NoArgsConstructor
@Builder
public class Test {
    /** 自增的id */
    private Integer id;
    /** 姓名 */
    private String name;
    /** 年龄 */
    private Integer age;
}
2.11测试
tomcat8.5配置启动

访问页面:(成功)文章来源:https://www.toymoban.com/news/detail-709229.html
 文章来源地址https://www.toymoban.com/news/detail-709229.html
到了这里,关于快速搭建SSM框架【详细】的文章就介绍完了。如果您还想了解更多内容,请在右上角搜索TOY模板网以前的文章或继续浏览下面的相关文章,希望大家以后多多支持TOY模板网!