-
TensorRT系列之 Windows10下yolov8 tensorrt模型加速部署
-
TensorRT系列之 Linux下 yolov8 tensorrt模型加速部署
-
TensorRT系列之 Linux下 yolov7 tensorrt模型加速部署
-
TensorRT系列之 Linux下 yolov6 tensorrt模型加速部署
-
TensorRT系列之 Linux下 yolov5 tensorrt模型加速部署
-
TensorRT系列之 Linux下 yolox tensorrt模型加速部署
-
TensorRT系列之 Linux下 u2net tensorrt模型加速部署
-
更多(点我进去)…
yolov8 opencv模型部署(C++ 版)
使用opencv推理yolov8模型,仅依赖opencv,无需其他库,以yolov8s为例子,注意:
- 使用opencv4.8.1 !
- 使用opencv4.8.1 !
- 使用opencv4.8.1 !
如果你使用别的版本,例如opencv4.5,可能会出现以下错误。
20231206新增推理效果,代码修改。

一、安装yolov8
conda create -n yolov8 python=3.9 -y
conda activate yolov8
pip install ultralytics -i https://pypi.tuna.tsinghua.edu.cn/simple
二、导出onnx
导出onnx格式模型的时候,注意,如果你是自己训练的模型,只需要把以下代码中yolov8s.pt修改为自己的模型即可,如best.pt。如果是下面代码中默认的模型,并且你没有下载到本地,系统会自动下载,我这里在文章末尾提供了下载链接。
将以下代码创建、拷贝到yolov8根目录下。
具体代码my_export.py:
from ultralytics import YOLO
# Load a model
model = YOLO('yolov8n.pt')  # load an official model
# Export the model
model.export(format='onnx', imgsz=[480, 640], opset=12) # 导出一定不要修改这里参数
执行导出命令:
python my_export.py
输出如下图信息,表明onnx格式的模型被成功导出,保存在my_export.py同一级目录。
三、基于opencv CPP推理onnx
使用opencv4.8.0,linux和windows都可以,下面以windows为例子。注:运行代码需要onnx模型 + 一张图,文末给了下载链接,classes.txt不需要。
以下是主函数文件main.cpp:
#include <iostream>
#include <vector>
#include <opencv2/opencv.hpp>
#include "inference.h"
using namespace std;
using namespace cv;

int main(int argc, char **argv)
{
    bool runOnGPU = false;

    // 1. 设置你的onnx模型
    // Note that in this example the classes are hard-coded and 'classes.txt' is a place holder.
    Inference inf("D:/CodePython/ultralytics/yolov8s.onnx", cv::Size(640, 480), "classes.txt", runOnGPU); // classes.txt 可以缺失

    // 2. 设置你的输入图片
    std::vector<std::string> imageNames;
    imageNames.push_back("bus.jpg");
    //imageNames.push_back("zidane.jpg");

    for (int i = 0; i < imageNames.size(); ++i)
    {
        cv::Mat frame = cv::imread(imageNames[i]);

        // Inference starts here...
        std::vector<Detection> output = inf.runInference(frame);

        int detections = output.size();
        std::cout << "Number of detections:" << detections << std::endl;

        // feiyull
        // 这里需要resize下,否则结果不对
        //cv::resize(frame, frame, cv::Size(480, 640));

        for (int i = 0; i < detections; ++i)
        {
            Detection detection = output[i];

            cv::Rect box = detection.box;
            cv::Scalar color = detection.color;

            // Detection box
            cv::rectangle(frame, box, color, 2);

            // Detection box text
            std::string classString = detection.className + ' ' + std::to_string(detection.confidence).substr(0, 4);
            cv::Size textSize = cv::getTextSize(classString, cv::FONT_HERSHEY_DUPLEX, 1, 2, 0);
            cv::Rect textBox(box.x, box.y - 40, textSize.width + 10, textSize.height + 20);

            cv::rectangle(frame, textBox, color, cv::FILLED);
            cv::putText(frame, classString, cv::Point(box.x + 5, box.y - 10), cv::FONT_HERSHEY_DUPLEX, 1, cv::Scalar(0, 0, 0), 2, 0);
        }
        cv::imshow("Inference", frame);
        cv::waitKey(0);
        cv::destroyAllWindows();
    }
}
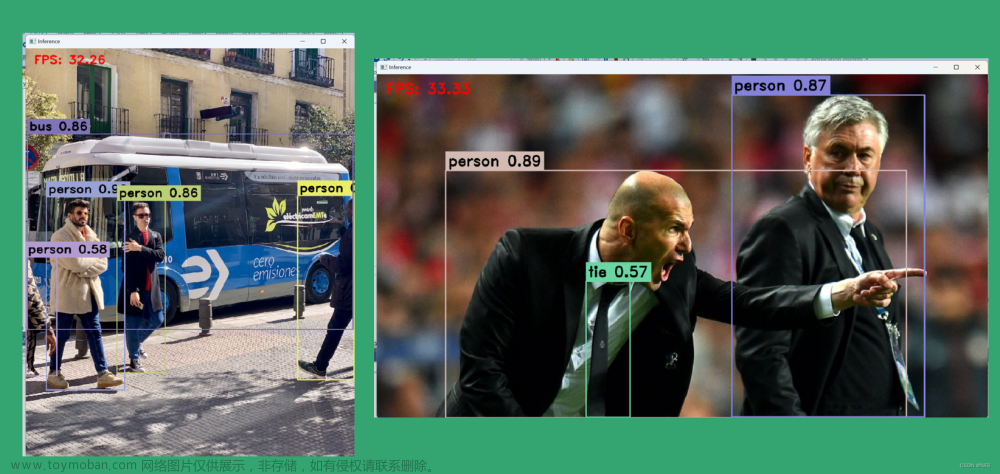
以下是运行效果图:
其他依赖文件:inference.h、inference.cpp
inference.h:
#ifndef INFERENCE_H
#define INFERENCE_H

// Cpp native
#include <fstream>
#include <vector>
#include <string>
#include <random>

// OpenCV / DNN / Inference
#include <opencv2/imgproc.hpp>
#include <opencv2/opencv.hpp>
#include <opencv2/dnn.hpp>

struct Detection
{
    int class_id{0};
    std::string className{};
    float confidence{0.0};
    cv::Scalar color{};
    cv::Rect box{};
};

class Inference
{
public:
    Inference(const std::string &onnxModelPath, const cv::Size &modelInputShape = {640, 640}, const std::string &classesTxtFile = "", const bool &runWithCuda = true);
    std::vector<Detection> runInference(const cv::Mat &input);

private:
    void loadClassesFromFile();
    void loadOnnxNetwork();
    cv::Mat formatToSquare(const cv::Mat &source);

    std::string modelPath{};
    std::string classesPath{};
    bool cudaEnabled{};

    std::vector<std::string> classes{"person", "bicycle", "car", "motorcycle", "airplane", "bus", "train", "truck", "boat", "traffic light", "fire hydrant", "stop sign", "parking meter", "bench", "bird", "cat", "dog", "horse", "sheep", "cow", "elephant", "bear", "zebra", "giraffe", "backpack", "umbrella", "handbag", "tie", "suitcase", "frisbee", "skis", "snowboard", "sports ball", "kite", "baseball bat", "baseball glove", "skateboard", "surfboard", "tennis racket", "bottle", "wine glass", "cup", "fork", "knife", "spoon", "bowl", "banana", "apple", "sandwich", "orange", "broccoli", "carrot", "hot dog", "pizza", "donut", "cake", "chair", "couch", "potted plant", "bed", "dining table", "toilet", "tv", "laptop", "mouse", "remote", "keyboard", "cell phone", "microwave", "oven", "toaster", "sink", "refrigerator", "book", "clock", "vase", "scissors", "teddy bear", "hair drier", "toothbrush"};

    cv::Size2f modelShape{};

    float modelConfidenceThreshold {0.25};
    float modelScoreThreshold      {0.45};
    float modelNMSThreshold        {0.50};

    bool letterBoxForSquare = true;

    cv::dnn::Net net;
};

#endif // INFERENCE_H
inference.cpp文章来源:https://www.toymoban.com/news/detail-712825.html
#include "inference.h"

Inference::Inference(const std::string &onnxModelPath, const cv::Size &modelInputShape, const std::string &classesTxtFile, const bool &runWithCuda)
{
    modelPath = onnxModelPath;
    modelShape = modelInputShape;
    classesPath = classesTxtFile;
    cudaEnabled = runWithCuda;

    loadOnnxNetwork();
    // loadClassesFromFile(); The classes are hard-coded for this example
}

std::vector<Detection> Inference::runInference(const cv::Mat &input)
{
    cv::Mat modelInput = input;
    if (letterBoxForSquare && modelShape.width == modelShape.height)
        modelInput = formatToSquare(modelInput);

    cv::Mat blob;
    cv::dnn::blobFromImage(modelInput, blob, 1.0/255.0, modelShape, cv::Scalar(), true, false);
    net.setInput(blob);

    std::vector<cv::Mat> outputs;
    net.forward(outputs, net.getUnconnectedOutLayersNames());

    int rows = outputs[0].size[1];
    int dimensions = outputs[0].size[2];

    bool yolov8 = false;
    // yolov5 has an output of shape (batchSize, 25200, 85) (Num classes + box[x,y,w,h] + confidence[c])
    // yolov8 has an output of shape (batchSize, 84,  8400) (Num classes + box[x,y,w,h])
    if (dimensions > rows) // Check if the shape[2] is more than shape[1] (yolov8)
    {
        yolov8 = true;
        rows = outputs[0].size[2];
        dimensions = outputs[0].size[1];

        outputs[0] = outputs[0].reshape(1, dimensions);
        cv::transpose(outputs[0], outputs[0]);
    }
    float *data = (float *)outputs[0].data;

    float x_factor = modelInput.cols / modelShape.width;
    float y_factor = modelInput.rows / modelShape.height;

    std::vector<int> class_ids;
    std::vector<float> confidences;
    std::vector<cv::Rect> boxes;

    for (int i = 0; i < rows; ++i)
    {
        if (yolov8)
        {
            float *classes_scores = data+4;

            cv::Mat scores(1, classes.size(), CV_32FC1, classes_scores);
            cv::Point class_id;
            double maxClassScore;

            minMaxLoc(scores, 0, &maxClassScore, 0, &class_id);

            if (maxClassScore > modelScoreThreshold)
            {
                confidences.push_back(maxClassScore);
                class_ids.push_back(class_id.x);

                float x = data[0];
                float y = data[1];
                float w = data[2];
                float h = data[3];

                int left = int((x - 0.5 * w) * x_factor);
                int top = int((y - 0.5 * h) * y_factor);

                int width = int(w * x_factor);
                int height = int(h * y_factor);

                boxes.push_back(cv::Rect(left, top, width, height));
            }
        }
        else // yolov5
        {
            float confidence = data[4];

            if (confidence >= modelConfidenceThreshold)
            {
                float *classes_scores = data+5;

                cv::Mat scores(1, classes.size(), CV_32FC1, classes_scores);
                cv::Point class_id;
                double max_class_score;

                minMaxLoc(scores, 0, &max_class_score, 0, &class_id);

                if (max_class_score > modelScoreThreshold)
                {
                    confidences.push_back(confidence);
                    class_ids.push_back(class_id.x);

                    float x = data[0];
                    float y = data[1];
                    float w = data[2];
                    float h = data[3];

                    int left = int((x - 0.5 * w) * x_factor);
                    int top = int((y - 0.5 * h) * y_factor);

                    int width = int(w * x_factor);
                    int height = int(h * y_factor);

                    boxes.push_back(cv::Rect(left, top, width, height));
                }
            }
        }

        data += dimensions;
    }

    std::vector<int> nms_result;
    cv::dnn::NMSBoxes(boxes, confidences, modelScoreThreshold, modelNMSThreshold, nms_result);

    std::vector<Detection> detections{};
    for (unsigned long i = 0; i < nms_result.size(); ++i)
    {
        int idx = nms_result[i];

        Detection result;
        result.class_id = class_ids[idx];
        result.confidence = confidences[idx];

        std::random_device rd;
        std::mt19937 gen(rd());
        std::uniform_int_distribution<int> dis(100, 255);
        result.color = cv::Scalar(dis(gen),
                                  dis(gen),
                                  dis(gen));

        result.className = classes[result.class_id];
        result.box = boxes[idx];

        detections.push_back(result);
    }

    return detections;
}

void Inference::loadClassesFromFile()
{
    std::ifstream inputFile(classesPath);
    if (inputFile.is_open())
    {
        std::string classLine;
        while (std::getline(inputFile, classLine))
            classes.push_back(classLine);
        inputFile.close();
    }
}

void Inference::loadOnnxNetwork()
{
    net = cv::dnn::readNetFromONNX(modelPath);
    if (cudaEnabled)
    {
        std::cout << "\nRunning on CUDA" << std::endl;
        net.setPreferableBackend(cv::dnn::DNN_BACKEND_CUDA);
        net.setPreferableTarget(cv::dnn::DNN_TARGET_CUDA);
    }
    else
    {
        std::cout << "\nRunning on CPU" << std::endl;
        net.setPreferableBackend(cv::dnn::DNN_BACKEND_OPENCV);
        net.setPreferableTarget(cv::dnn::DNN_TARGET_CPU);
    }
}

cv::Mat Inference::formatToSquare(const cv::Mat &source)
{
    int col = source.cols;
    int row = source.rows;
    int _max = MAX(col, row);
    cv::Mat result = cv::Mat::zeros(_max, _max, CV_8UC3);
    source.copyTo(result(cv::Rect(0, 0, col, row)));
    return result;
}
完整代码+数据下载:
链接:https://pan.baidu.com/s/1XcgPSzxFhgxYEONum3dJFA?pwd=xcof
提取码:xcof文章来源地址https://www.toymoban.com/news/detail-712825.html
到了这里,关于yolov8 opencv模型部署(C++版)的文章就介绍完了。如果您还想了解更多内容,请在右上角搜索TOY模板网以前的文章或继续浏览下面的相关文章,希望大家以后多多支持TOY模板网!
![[C++]使用纯opencv部署yolov8旋转框目标检测](https://imgs.yssmx.com/Uploads/2024/04/858578-1.jpeg)

![[C++]使用yolov8的onnx模型仅用opencv和bytetrack实现目标追踪](https://imgs.yssmx.com/Uploads/2024/01/821298-1.jpeg)

![[C++]使用纯opencv去部署yolov9的onnx模型](https://imgs.yssmx.com/Uploads/2024/03/839313-1.jpeg)


