Spring bean定义
目录
Spring bean定义
文章来源地址https://www.toymoban.com/news/detail-715689.html
Spring配置元数据
Spring Bean 的作用域
singleton作用域:
原型作用域:
示例:
形成应用程序的骨干是由Spring IoC容器所管理的对象称为bean。bean被实例化,组装,并通过Spring IoC容器所管理的对象。这些bean由容器提供,例如,在XML的<bean/>定义,已经看到了前几章的形式配置元数据创建。
bean定义包含所需要的容器要知道以下称为配置元数据的信息:
-
如何创建一个bean
-
Bean 生命周期的详细信息
-
Bean 依赖关系
上述所有配置元数据转换成一组的下列属性构成每个bean的定义。
| 属性 | 描述 |
|---|---|
| class | 此属性是强制性的,并指定bean类被用来创建bean。 |
| name | 此属性指定唯一bean标识符。在基于XML的配置元数据时,您可以使用id和/或name属性来指定bean标识符 |
| scope | 该属性指定一个特定的bean定义创建,它会在bean作用域本章要讨论的对象范围。 |
| constructor-arg | 这是用来注入的依赖关系,并在接下来的章节中进行讨论。 |
| properties | 这是用来注入的依赖关系,并在接下来的章节中进行讨论。 |
| autowiring mode | 这是用来注入的依赖关系,并在接下来的章节中进行讨论。 |
| lazy-initialization mode | 延迟初始化的bean告诉IoC容器创建bean实例时,它首先要求,而不是在启动时。 |
| initialization method | 回调只是在bean的所有必要属性后调用已设置的容器。它会在bean的生命周期章节中讨论。 |
| destruction method | 当包含该bean容器被销毁所使用的回调。它会在bean的生命周期章节中讨论。 |
Spring配置元数据
Spring IoC容器完全由在此配置元数据实际写入的格式解耦。有下列提供的配置元数据的Spring容器三个重要的方法:
-
基于XML的配置文件。
-
基于注解的配置
-
基于Java的配置
我们已经看到了基于XML的配置元数据如何提供给容器,但让我们看到了不同的bean定义,包括延迟初始化,初始化方法和销毁方法基于XML配置文件的另一个示例:
<?xml version="1.0" encoding="UTF-8"?>

<beans xmlns="http://www.springframework.org/schema/beans"
    xmlns:xsi="http://www.w3.org/2001/XMLSchema-instance"
    xsi:schemaLocation="http://www.springframework.org/schema/beans
    http://www.springframework.org/schema/beans/spring-beans-3.0.xsd">

   <!-- A simple bean definition -->
   <bean id="..." class="...">
       <!-- collaborators and configuration for this bean go here -->
   </bean>

   <!-- A bean definition with lazy init set on -->
   <bean id="..." class="..." lazy-init="true">
       <!-- collaborators and configuration for this bean go here -->
   </bean>

   <!-- A bean definition with initialization method -->
   <bean id="..." class="..." init-method="...">
       <!-- collaborators and configuration for this bean go here -->
   </bean>

   <!-- A bean definition with destruction method -->
   <bean id="..." class="..." destroy-method="...">
       <!-- collaborators and configuration for this bean go here -->
   </bean>

   <!-- more bean definitions go here -->

</beans>
有关基于注解的配置在一个单独的章节讨论。在一个单独的章节刻意保留它,因为希望能掌握一些Spring其他的重要概念,在开始用注解依赖注入来编程。
Spring Bean 的作用域
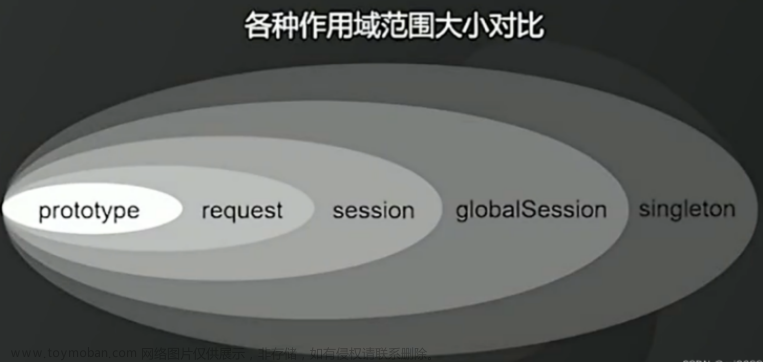
当定义一个Spring的<bean>,必须声明bean 作用域的选项。例如,要强制Spring需要产生一个新的bean实例,应该声明bean的scope属性为prototype。如果你希望Spring 每次都返回同一个bean实例,应该声明bean的作用域,方式类似属性是单例。
Spring框架支持以下五个作用域,其中三个只有当您使用Web感知的 ApplicationContext 可用。
| 范围 | 描述 |
|---|---|
| singleton | This scopes the bean definition to a single instance per Spring IoC container (default). |
| prototype | This scopes a single bean definition to have any number of object instances. |
| request | This scopes a bean definition to an HTTP request. Only valid in the context of a web-aware Spring ApplicationContext. |
| session | This scopes a bean definition to an HTTP session. Only valid in the context of a web-aware Spring ApplicationContext. |
| global-session | This scopes a bean definition to a global HTTP session. Only valid in the context of a web-aware Spring ApplicationContext. |
本章将讨论前两个范围和其余三将讨论的时候,我们将讨论有关Web感知Spring的ApplicationContext。
singleton作用域:
如果范围设置为单例,Spring IoC容器创建了一个由该bean定义的对象只有一个实例。这个单一实例存储在这样的单例bean的高速缓存,以及所有后续请求和引用针对该bean返回缓存对象。
默认范围是始终单例,但是当你需要bean的一个实例,可以设置的范围属性单例在bean配置文件中,如下图所示:
<!-- A bean definition with singleton scope -->
<bean id="..." class="..." scope="singleton">
    <!-- collaborators and configuration for this bean go here -->
</bean>
示例:
让我们使用Eclipse IDE,然后按照下面的步骤来创建一个Spring应用程序:
| 步骤 | 描述 |
|---|---|
| 1 | Create a project with a name SpringExample and create a package com.manongjc under the src folder in the created project. |
| 2 | Add required Spring libraries using Add External JARs option as explained in the Spring Hello World Example chapter. |
| 3 | Create Java classes HelloWorld and MainApp under the com.manongjc package. |
| 4 | Create Beans configuration file Beans.xml under the src folder. |
| 5 | The final step is to create the content of all the Java files and Bean Configuration file and run the application as explained below. |
这里是HelloWorld.java 文件的内容:
package com.manongjc;

public class HelloWorld {
   private String message;

   public void setMessage(String message){
      this.message  = message;
   }

   public void getMessage(){
      System.out.println("Your Message : " + message);
   }
}
以下是MainApp.java文件的内容:
package com.manongjc;
import org.springframework.context.ApplicationContext;
import org.springframework.context.support.ClassPathXmlApplicationContext;
public class MainApp {
public static void main(String[] args) {
ApplicationContext context =
new ClassPathXmlApplicationContext("Beans.xml");
HelloWorld objA = (HelloWorld) context.getBean("helloWorld");
objA.setMessage("I'm object A");
objA.getMessage();
HelloWorld objB = (HelloWorld) context.getBean("helloWorld");
objB.getMessage();
}
}以下是需要singleton作用域配置文件beans.xml文件:
<?xml version="1.0" encoding="UTF-8"?>
<beans xmlns="http://www.springframework.org/schema/beans"
xmlns:xsi="http://www.w3.org/2001/XMLSchema-instance"
xsi:schemaLocation="http://www.springframework.org/schema/beans
http://www.springframework.org/schema/beans/spring-beans-3.0.xsd">
<bean id="helloWorld" class="com.manongjc.HelloWorld"
scope="singleton">
</bean>
</beans>一旦创建源代码和bean配置文件来完成,运行应用程序。如果一切顺利,这将打印以下信息:
Your Message : I'm object A
Your Message : I'm object A原型作用域:
如果范围设置为原型,那么Spring IoC容器创建对象的新的bean实例为每个特定的bean发出请求时的时间。作为一项规则,使用prototype作用域为所有状态的bean类和singleton作用域为无状态的bean。
要定义一个原型作用域,可以设置的范围属性为原型的bean配置文件中,如下图所示:
<!-- A bean definition with singleton scope -->
<bean id="..." class="..." scope="prototype">
    <!-- collaborators and configuration for this bean go here -->
</bean>
示例:
让我们在地方工作的Eclipse IDE,然后按照下面的步骤来创建一个Spring应用程序:
| 步骤 | 描述 |
|---|---|
| 1 | Create a project with a name SpringExample and create a package com.manongjc under the src folder in the created project. |
| 2 | Add required Spring libraries using Add External JARs option as explained in the Spring Hello World Example chapter. |
| 3 | Create Java classes HelloWorld and MainApp under the com.manongjc package. |
| 4 | Create Beans configuration file Beans.xml under the src folder. |
| 5 | The final step is to create the content of all the Java files and Bean Configuration file and run the application as explained below. |
这里是HelloWorld.java 文件的内容:
package com.manongjc;
public class HelloWorld {
private String message;
public void setMessage(String message){
this.message = message;
}
public void getMessage(){
System.out.println("Your Message : " + message);
}
}以下是MainApp.java文件的内容:
package com.manongjc;
import org.springframework.context.ApplicationContext;
import org.springframework.context.support.ClassPathXmlApplicationContext;
public class MainApp {
public static void main(String[] args) {
ApplicationContext context =
new ClassPathXmlApplicationContext("Beans.xml");
HelloWorld objA = (HelloWorld) context.getBean("helloWorld");
objA.setMessage("I'm object A");
objA.getMessage();
HelloWorld objB = (HelloWorld) context.getBean("helloWorld");
objB.getMessage();
}
}以下是必需的原型作用域的配置文件beans.xml:
<?xml version="1.0" encoding="UTF-8"?>
<beans xmlns="http://www.springframework.org/schema/beans"
xmlns:xsi="http://www.w3.org/2001/XMLSchema-instance"
xsi:schemaLocation="http://www.springframework.org/schema/beans
http://www.springframework.org/schema/beans/spring-beans-3.0.xsd">
<bean id="helloWorld" class="com.manongjc.HelloWorld"
scope="prototype">
</bean>
</beans>创建源代码和bean配置文件完成后,让我们运行应用程序。如果一切顺利,这将打印以下信息:
Your Message : I'm object A
Your Message : null文章来源:https://www.toymoban.com/news/detail-715689.html
到了这里,关于Spring bean定义&Spring Bean 的作用域的文章就介绍完了。如果您还想了解更多内容,请在右上角搜索TOY模板网以前的文章或继续浏览下面的相关文章,希望大家以后多多支持TOY模板网!


