0、背景
现状:公司各部门业务系统有各自的工作流引擎,也有cross function的业务在不同系统或OA系统流转,没有统一的去规划布局统一的BPM解决方案,近期由于一个项目引发朝着整合统一的BPM方案,特了解一下市面上比较主流的开源和收费的工作流引擎。本文主要介绍开源的工作流引擎flowable.
1、开源工作流引擎比较
开源工作流引擎是一种用于管理和自动化业务流程的软件,它可以帮助用户实现业务流程的可视化设计、流程编排、任务调度、监控和优化等功能。本文将介绍几种常见的开源工作流引擎,并进行比较。目前市场上比较主流的开源流程引擎有:Activiti、Camunda、Flowable。
1.1、Activiti
Activiti是一个轻量级的开源工作流引擎,采用Java语言开发,基于BPMN 2.0规范,支持嵌入式部署和分布式部署。Activiti提供了丰富的API和插件,支持与Java应用程序进行集成。它还提供了Web界面和REST API,可以方便地进行流程设计、部署、调度和监控。Activiti具有以下优点:
- 易用性和灵活性:Activiti提供了简单易用的流程设计器和API,支持多种流程模型和任务类型,可以满足不同场景和需求的使用。
- 可伸缩性和性能:Activiti支持嵌入式和分布式部署,可以扩展集群规模以支持更大的业务流程和更高的并发量。此外,它还提供了优化和缓存机制,可以提高性能和响应速度。
- 社区支持和生态系统:Activiti拥有庞大的社区和活跃的开发者,提供了丰富的插件和工具,可以扩展其功能和使用。例如,Activiti Explorer可以用于流程设计和管理,Camunda Modeler可以用于编辑BPMN模型,Flowable Task可以用于任务管理等。
- 安全性和可靠性:Activiti提供了可靠的安全性控制,可以对数据进行访问控制和加密,以满足不同场景和需求的安全要求。它还提供了事务管理和错误处理机制,可以保证业务流程的可靠性和稳定性。
1.2、Camunda
Camunda是一个强大的开源工作流引擎,采用Java语言开发,支持BPMN 2.0规范和CMMN规范。Camunda提供了丰富的API和插件,支持与Java应用程序进行集成。它还提供了Web界面和REST API,可以方便地进行流程设计、部署、调度和监控。Camunda具有以下优点:
- 功能丰富和灵活性:Camunda提供了丰富的功能和灵活的流程设计,支持多种流程模型和任务类型,可以满足不同场景和需求的使用。
- 可伸缩性和性能:Camunda支持嵌入式和分布式部署,可以扩展集群规模以支持更大的业务流程和更高的并发量。此外,它还提供了优化和缓存机制,可以提高性能和响应速度。
- 社区支持和生态系统:Camunda拥有庞大的社区和活跃的开发者,提供了丰富的插件和工具,可以扩展其功能和使用。例如,Camunda Modeler可以用于编辑BPMN模型,Camunda Cockpit可以用于任务管理和流程监控,Camunda Tasklist可以用于任务列表等。
- 可扩展的架构和API:Camunda采用可扩展的架构和API,可以方便地进行集成和扩展。例如,它支持自定义流程引擎插件、外部任务处理器、表单引擎等。
- 安全性和可靠性:Camunda提供了可靠的安全性控制,可以对数据进行访问控制和加密,以满足不同场景和需求的安全要求。它还提供了事务管理和错误处理机制,可以保证业务流程的可靠性和稳定性。
1.3、Flowable
Flowable是一个开源的轻量级工作流引擎,基于Activiti 5.x版本开发,支持BPMN 2.0规范和CMMN规范。Flowable提供了丰富的API和插件,支持与Java应用程序进行集成。它还提供了Web界面和REST API,可以方便地进行流程设计、部署、调度和监控。Flowable具有以下优点:
- 易用性和灵活性:Flowable提供了简单易用的流程设计器和API,支持多种流程模型和任务类型,可以满足不同场景和需求的使用。
- 可伸缩性和性能:Flowable支持嵌入式和分布式部署,可以扩展集群规模以支持更大的业务流程和更高的并发量。此外,它还提供了优化和缓存机制,可以提高性能和响应速度。
- 社区支持和生态系统:Flowable拥有庞大的社区和活跃的开发者,提供了丰富的插件和工具,可以扩展其功能和使用。例如,Flowable Modeler可以用于流程设计和管理,Flowable Task可以用于任务管理和流程监控,Flowable Admin可以用于集群管理等。
- 可扩展的架构和API:Flowable采用可扩展的架构和API,可以方便地进行集成和扩展。例如,它支持自定义流程引擎插件、外部任务处理器、表单引擎等。
- 安全性和可靠性:Flowable提供了可靠的安全性控制,可以对数据进行访问控制和加密,以满足不同场景和需求的安全要求。它还提供了事务管理和错误处理机制,可以保证业务流程的可靠性和稳定性。
2、flowable安装
2.1、下载软件
Github链接,目前flowable已经更新到Flowable 7.0.0.M2版本了。

安装方式有很多,可以通过下载zip包也可以通过docker拉取镜像进行部署,本文采用zip的window环境部署。
下载安装包,我下载的是flowable-6.7.0版本,同时需要配合tomcat(选择的是apache-tomcat-9.0.79版本)服务进行部署,tomcat下载地址:


下载上面两个软件之后还需要配置flowale的配置数据存储,我选择的mysql数据库,当然他还支持其他数据库类型。mysql数据库是docker镜像运行的,这里不再赘述安装过程,可以看我往期docker mysql安装.
2.2、解压运行
分别解压tomcat和flowable:


把flowable-6.7.0\wars目录下的flowable-ui.war拷贝到apache-tomcat-9.0.79\webapps下面启动tomcat startup.bat
 此时会解压war文件,同时会删除war文件,同时会生成新文件apache-tomcat-9.0.79\webapps\flowable-ui.
2.3、配置数据源
修改apache-tomcat-9.0.79\webapps\flowable-ui\WEB-INF\classes\flowable-default.properties

参考:
server.port=8080
server.servlet.context-path=/flowable-ui
spring.jmx.unique-names=true
# This is needed to force use of JDK proxies instead of using CGLIB
spring.aop.proxy-target-class=false
spring.aop.auto=false
spring.application.name=flowable-ui
spring.banner.location=classpath:/org/flowable/spring/boot/flowable-banner.txt
# The default domain for generating ObjectNames must be specified. Otherwise when multiple Spring Boot applications start in the same servlet container
# all would be created with the same name (com.zaxxer.hikari:name=dataSource,type=HikariDataSource) for example
spring.jmx.default-domain=${spring.application.name}
#
# SECURITY
#
spring.security.filter.dispatcher-types=REQUEST,FORWARD,ASYNC

# Expose all actuator endpoints to the web
# They are exposed, but only authenticated users can see /info and /health abd users with access-admin can see the others
management.endpoints.web.exposure.include=*
# Full health details should only be displayed when a user is authorized
management.endpoint.health.show-details=when_authorized
# Only users with role access-admin can access full health details
management.endpoint.health.roles=access-admin
# Spring prefixes the roles with ROLE_. However, Flowable does not have that concept yet, so we need to override that with an empty string
flowable.common.app.role-prefix=

#
# SECURITY OAuth2
# Examples are for Keycloak
#
#spring.security.oauth2.resourceserver.jwt.issuer-uri=<keycloakLocation>/auth/realms/<realmName>
#spring.security.oauth2.client.registration.keycloak.client-id=<clientId>
#spring.security.oauth2.client.registration.keycloak.client-secret=<clientSecret>
#spring.security.oauth2.client.registration.keycloak.client-name=Flowable UI Keycloak
#spring.security.oauth2.client.registration.keycloak.authorization-grant-type=authorization_code
#spring.security.oauth2.client.provider.keycloak.issuer-uri=<keycloakLocation>/auth/realms/<realmName>
#spring.security.oauth2.client.provider.keycloak.user-name-attribute=preferred_username

#flowable.common.app.security.type=oauth2
#flowable.common.app.security.oauth2.authorities-attribute=groups
#flowable.common.app.security.oauth2.groups-attribute=userGroups
#flowable.common.app.security.oauth2.default-authorities=access-task
#flowable.common.app.security.oauth2.default-groups=flowableUser
#flowable.common.app.security.oauth2.full-name-attribute=name
#flowable.common.app.security.oauth2.email-attribute=email

#
# DATABASE
#

#spring.datasource.driver-class-name=org.h2.Driver
#spring.datasource.url=jdbc:h2:~/flowable-db/engine-db;AUTO_SERVER=TRUE;AUTO_SERVER_PORT=9093;DB_CLOSE_DELAY=-1

spring.datasource.driver-class-name=com.mysql.jdbc.Driver
spring.datasource.url=jdbc:mysql://192.168.56.100:13306/flowable?characterEncoding=UTF-8

#spring.datasource.driver-class-name=org.postgresql.Driver
#spring.datasource.url=jdbc:postgresql://localhost:5432/flowable

#spring.datasource.driver-class-name=com.microsoft.sqlserver.jdbc.SQLServerDriver
#spring.datasource.url=jdbc:sqlserver://localhost:1433;databaseName=flowablea

#spring.datasource.driver-class-name=oracle.jdbc.driver.OracleDriver
#spring.datasource.url=jdbc:oracle:thin:@localhost:1521:FLOWABLE

#spring.datasource.driver-class-name=com.ibm.db2.jcc.DB2Driver
#spring.datasource.url=jdbc:db2://localhost:50000/flowable

spring.datasource.username=root
spring.datasource.password=my-secret-pw

# JNDI CONFIG

# If uncommented, the datasource will be looked up using the configured JNDI name.
# This will have preference over any datasource configuration done below that doesn't use JNDI
#
# Eg for JBoss: java:jboss/datasources/flowableDS
#
#spring.datasource.jndi-name==jdbc/flowableDS

# Set whether the lookup occurs in a J2EE container, i.e. if the prefix "java:comp/env/" needs to be added if the JNDI
# name doesn't already contain it. Default is "true".
#datasource.jndi.resourceRef=true

#
# Connection pool (see https://github.com/brettwooldridge/HikariCP#configuration-knobs-baby)
#

spring.datasource.hikari.poolName=${spring.application.name}
# 10 minutes
spring.datasource.hikari.maxLifetime=600000
# 5 minutes
spring.datasource.hikari.idleTimeout=300000
spring.datasource.hikari.minimumIdle=10
spring.datasource.hikari.maximumPoolSize=50
# test query for H2, MySQL, PostgreSQL and Microsoft SQL Server
#spring.datasource.hikari.connection-test-query=select 1
# test query for Oracle
#spring.datasource.hikari.connection-test-query=SELECT 1 FROM DUAL
# test query for DB2
#spring.datasource.hikari.connection-test-query=SELECT current date FROM sysibm.sysdummy1

#
# Default Task Executor (will be used for @Async)
#
spring.task.execution.pool.core-size=2
spring.task.execution.pool.max-size=50
spring.task.execution.pool.queue-capacity=10000
spring.task.execution.thread-name-prefix=flowable-ui-task-Executor-

#
# Task scheduling
#
spring.task.scheduling.pool.size=5

#
# EMAIL
#

#flowable.mail.server.host=localhost
#flowable.mail.server.port=1025
#flowable.mail.server.username=
#flowable.mail.server.password=

#
# FLOWABLE
#

flowable.process.definition-cache-limit=512
#flowable.dmn.strict-mode=false
flowable.process.async.executor.default-async-job-acquire-wait-time=PT5S
flowable.process.async.executor.default-timer-job-acquire-wait-time=PT5S

flowable.cmmn.async.executor.default-async-job-acquire-wait-time=PT5S
flowable.cmmn.async.executor.default-timer-job-acquire-wait-time=PT5S

# The maximum file upload limit. Set to -1 to set to 'no limit'. Expressed in bytes
spring.servlet.multipart.max-file-size=10MB
# The maximum request size limit. Set to -1 to set to 'no limit'.
# When multiple files can be uploaded this needs to be more than the 'max-file-size'.
spring.servlet.multipart.max-request-size=10MB

# For development purposes, data folder is created inside the sources ./data folder
flowable.content.storage.root-folder=data/
flowable.content.storage.create-root=true

flowable.common.app.idm-admin.user=admin
flowable.common.app.idm-admin.password=test

flowable.experimental.debugger.enabled=false

# Rest API in task application

# If false, disables the rest api in the task app
flowable.task.app.rest-enabled=true

# Configures the way user credentials are verified when doing a REST API call:
# 'any-user' : the user needs to exist and the password need to match. Any user is allowed to do the call (this is the pre 6.3.0 behavior)
# 'verify-privilege' : the user needs to exist, the password needs to match and the user needs to have the 'rest-api' privilege
# If nothing set, defaults to 'verify-privilege'
flowable.rest.app.authentication-mode=verify-privilege

# Enable form field validation after form submission on the engine side
flowable.form-field-validation-enabled=false

# Flowable Admin Properties

# Passwords for rest endpoints and master configs are stored encrypted in the database using AES/CBC/PKCS5PADDING
# It needs a 128-bit initialization vector (http://en.wikipedia.org/wiki/Initialization_vector)
# and a 128-bit secret key represented as 16 ascii characters below
#
# Do note that if these properties are changed after passwords have been saved, all existing passwords
# will not be able to be decrypted and the password would need to be reset in the UI.
flowable.admin.app.security.encryption.credentials-i-v-spec=j8kdO2hejA9lKmm6
flowable.admin.app.security.encryption.credentials-secret-spec=9FGl73ngxcOoJvmL
#flowable.admin.app.security.preemptive-basic-authentication=true

# Flowable IDM Properties

#
# LDAP
#
#flowable.idm.ldap.enabled=true
#flowable.idm.ldap.server=ldap://localhost
#flowable.idm.ldap.port=10389
#flowable.idm.ldap.user=uid=admin, ou=system
#flowable.idm.ldap.password=secret
#flowable.idm.ldap.base-dn=o=flowable
#flowable.idm.ldap.query.user-by-id=(&(objectClass=inetOrgPerson)(uid={0}))
#flowable.idm.ldap.query.user-by-full-name-like=(&(objectClass=inetOrgPerson)(|({0}=*{1}*)({2}=*{3}*)))
#flowable.idm.ldap.query.all-users=(objectClass=inetOrgPerson)
#flowable.idm.ldap.query.groups-for-user=(&(objectClass=groupOfUniqueNames)(uniqueMember={0}))
#flowable.idm.ldap.query.all-groups=(objectClass=groupOfUniqueNames)
#flowable.idm.ldap.query.group-by-id=(&(objectClass=groupOfUniqueNames)(uniqueId={0}))
#flowable.idm.ldap.attribute.user-id=uid
#flowable.idm.ldap.attribute.first-name=cn
#flowable.idm.ldap.attribute.last-name=sn
#flowable.idm.ldap.attribute.email=mail
#flowable.idm.ldap.attribute.group-id=cn
#flowable.idm.ldap.attribute.group-name=cn
#flowable.idm.ldap.cache.group-size=10000
#flowable.idm.ldap.cache.group-expiration=180000

#
# Keycloak
#
#flowable.idm.app.keycloak.enabled=true
#flowable.idm.app.keycloak.server=<keycloakLocation>
#flowable.idm.app.keycloak.authentication-realm=master
#flowable.idm.app.keycloak.authentication-user=admin
#flowable.idm.app.keycloak.authentication-password=admin
#flowable.idm.app.keycloak.realm=<realm>

#
# DEFAULT ADMINISTRATOR ACCOUNT
#

flowable.idm.app.admin.user-id=admin
flowable.idm.app.admin.password=test
flowable.idm.app.admin.first-name=Test
flowable.idm.app.admin.last-name=Administrator
flowable.idm.app.admin.email=test-admin@example-domain.tld

# Enable and configure JMS
#flowable.task.app.jms-enabled=true
#spring.activemq.broker-url=tcp://localhost:61616

# Enable and configure RabbitMQ
#flowable.task.app.rabbit-enabled=true
#spring.rabbitmq.addresses=localhost:5672
#spring.rabbitmq.username=guest
#spring.rabbitmq.password=guest

# Enable and configure Kafka
#flowable.task.app.kafka-enabled=true
#spring.kafka.bootstrap-servers=localhost:9092
默认情况下flowable有没有把mysql驱动程序打入到war包里面,需要手动添加对应的驱动。apache-tomcat-9.0.79\webapps\flowable-ui\WEB-INF\lib 我选择的是mysql-connector-java-5.1.45.jar驱动,具体可以从网上下载也可以通过maven方式从中央仓库拉取。

再次启动tomcat,访问http://127.0.0.1:8080/flowable-ui 初始用户名和密码:admin/test
3、springboot接入flowable
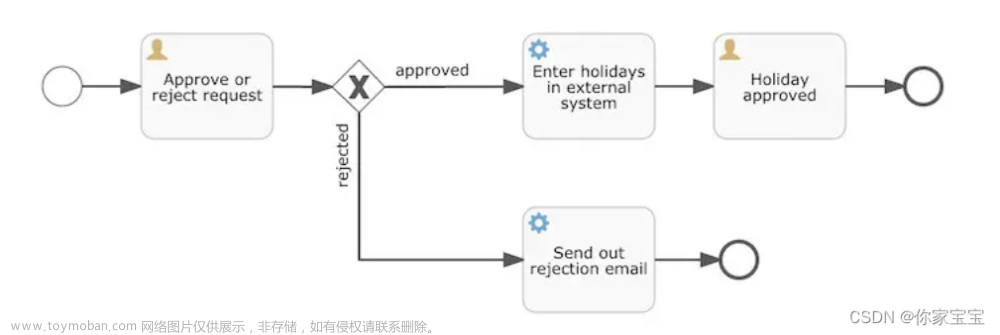
登录flowable之后选择建模器应用程序,添加一个流程,我这边已经添加了一个简单的请假流程。


新入门可以导入我们流程定义,具体文件在看的我资源。重点介绍springboot如何集成flowable,配置后续有机会在单独介绍里程配置说明。
新建springboot项目添加响应的依赖。
 <dependencies>

        <dependency>
            <groupId>org.springframework.boot</groupId>
            <artifactId>spring-boot-starter-web</artifactId>
        </dependency>

        <dependency>
            <groupId>org.flowable</groupId>
            <artifactId>flowable-spring-boot-starter</artifactId>
            <version>6.7.0</version>
        </dependency>

        <dependency>
            <groupId>mysql</groupId>
            <artifactId>mysql-connector-java</artifactId>
            <version>5.1.45</version>
        </dependency>
        <!-- Flowable 内部日志采用 SLF4J -->
        <dependency>
            <groupId>org.slf4j</groupId>
            <artifactId>slf4j-api</artifactId>
            <version>1.7.21</version>
        </dependency>
        <dependency>
            <groupId>org.slf4j</groupId>
            <artifactId>slf4j-log4j12</artifactId>
            <version>1.7.21</version>
        </dependency>
    </dependencies>
application.yml配置:
spring:
  datasource:
    url: jdbc:mysql://192.168.56.100:13306/flowable?useSSL=false&characterEncoding=UTF-8&serverTimezone=GMT%2B8
    driver-class-name: com.mysql.jdbc.Driver
    username: root
    password: my-secret-pw
# flowable 配置
flowable:
  # 关闭异步,不关闭历史数据的插入就是异步的,会在同一个事物里面,无法回滚
  # 开发可开启会提高些效率,上线需要关闭
  async-executor-activate: false
server:
  port: 18080
Controller
import liquibase.pro.packaged.O;
import liquibase.pro.packaged.U;
import org.flowable.bpmn.model.BpmnModel;
import org.flowable.engine.*;
import org.flowable.engine.history.HistoricActivityInstance;
import org.flowable.engine.history.HistoricProcessInstance;
import org.flowable.engine.runtime.ActivityInstance;
import org.flowable.engine.runtime.Execution;
import org.flowable.engine.runtime.ProcessInstance;
import org.flowable.image.ProcessDiagramGenerator;
import org.flowable.task.api.Task;
import org.springframework.beans.factory.annotation.Autowired;
import org.springframework.web.bind.annotation.GetMapping;
import org.springframework.web.bind.annotation.RequestMapping;
import org.springframework.web.bind.annotation.RestController;

import javax.servlet.http.HttpServletResponse;
import java.io.InputStream;
import java.io.OutputStream;
import java.util.ArrayList;
import java.util.HashMap;
import java.util.List;
import java.util.Map;

/**
 * @author pyj
 * @date 2019/10/30
 */
@RestController
@RequestMapping("flowable")
public class TestController {

    @Autowired
    private RuntimeService runtimeService;
    @Autowired
    private TaskService taskService;
    @Autowired
    private HistoryService historyService;
    @Autowired
    private RepositoryService repositoryService;
    @Autowired
    private ProcessEngine processEngine;

    /**
     * 创建流程
     *
     * @param userId
     * @param days
     * @param reason
     * @return
     */
    @GetMapping("add")
    public String addExpense(String userId, String days, String reason) {
        Map<String, Object> map = new HashMap<>();
        map.put("employee", userId);
        map.put("nrOfHolidays", days);
        map.put("description", reason);

        ProcessInstance processInstance = runtimeService.startProcessInstanceByKey("holidayRequest", map);
        return "提交成功,流程ID为:" + processInstance.getId();
    }

    /**
     * 获取指定用户组流程任务列表
     *
     * @return
     */
    @GetMapping("listtask")
    public Object listtask() {
        StringBuffer btf = new StringBuffer();
        List<Task> list = taskService.createTaskQuery().list();
        for (Task task : list){
            btf.append(task.getId()+"\r\n");
            System.out.println(task.getId());
        }
        return btf.toString();
    }

    /**
     * 获取指定用户组流程任务列表
     *
     * @param group
     * @return
     */
    @GetMapping("list")
    public Object list(String group) {
        List<Task> list = taskService.createTaskQuery().list();
        List<Task> tasks = taskService.createTaskQuery().taskCandidateGroup(group).list();
        return tasks.toString();
    }

    /**
     * 通过/拒绝任务
     *
     * @param taskId
     * @param approved 1 :true  2:false
     * @return
     */
    @GetMapping("apply")
    public String apply(String taskId, String approved) {
        Task task = taskService.createTaskQuery().taskId(taskId).singleResult();
        if (task == null) {
            return "流程不存在";
        }
        Map<String, Object> variables = new HashMap<>();
        Boolean apply = approved.equals("1") ? true : false;
        variables.put("approved", apply);
        taskService.complete(taskId, variables);
        return "审批是否通过:" + approved;

    }

    /**
     * 查看历史流程记录
     *
     * @param processInstanceId
     * @return
     */
    @GetMapping("historyList")
    public Object getHistoryList(String processInstanceId) {
        List<HistoricActivityInstance> historicActivityInstances = historyService.createHistoricActivityInstanceQuery()
                .processInstanceId(processInstanceId).finished().orderByHistoricActivityInstanceEndTime().asc().list();

        return historicActivityInstances;
    }

    /**
     * 驳回流程实例
     *
     * @param taskId
     * @param targetTaskKey
     * @return
     */
    @GetMapping("rollbask")
    public String rollbaskTask(String taskId, String targetTaskKey) {
        Task currentTask = taskService.createTaskQuery().taskId(taskId).singleResult();
        if (currentTask == null) {
            return "节点不存在";
        }
        List<String> key = new ArrayList<>();
        key.add(currentTask.getTaskDefinitionKey());


        runtimeService.createChangeActivityStateBuilder()
                .processInstanceId(currentTask.getProcessInstanceId())
                .moveActivityIdsToSingleActivityId(key, targetTaskKey)
                .changeState();
        return "驳回成功...";
    }


    /**
     * 终止流程实例
     *
     * @param processInstanceId
     */
    public String deleteProcessInstanceById(String processInstanceId) {
        // ""这个参数本来可以写删除原因
        runtimeService.deleteProcessInstance(processInstanceId, "");
        return "终止流程实例成功";
    }


    /**
     * 挂起流程实例
     *
     * @param processInstanceId 当前流程实例id
     */
    @GetMapping("hangUp")
    public String handUpProcessInstance(String processInstanceId) {
        runtimeService.suspendProcessInstanceById(processInstanceId);
        return "挂起流程成功...";
    }

    /**
     * 恢复(唤醒)被挂起的流程实例
     *
     * @param processInstanceId 流程实例id
     */
    @GetMapping("recovery")
    public String activateProcessInstance(String processInstanceId) {
        runtimeService.activateProcessInstanceById(processInstanceId);
        return "恢复流程成功...";
    }


    /**
     * 判断传入流程实例在运行中是否存在
     *
     * @param processInstanceId
     * @return
     */
    @GetMapping("isExist/running")
    public Boolean isExistProcIntRunning(String processInstanceId) {
        ProcessInstance processInstance = runtimeService.createProcessInstanceQuery().processInstanceId(processInstanceId).singleResult();
        if (processInstance == null) {
            return false;
        }
        return true;
    }

    /**
     * 判断流程实例在历史记录中是否存在
     * @param processInstanceId
     * @return
     */
    @GetMapping("isExist/history")
    public Boolean isExistProcInHistory(String processInstanceId) {
        HistoricProcessInstance historicProcessInstance = historyService.createHistoricProcessInstanceQuery().processInstanceId(processInstanceId).singleResult();
        if (historicProcessInstance == null) {
            return false;
        }
        return true;
    }


    /**
     * 我发起的流程实例列表
     *
     * @param userId
     * @return 流程实例列表
     */
    @GetMapping("myTasks")
    public List<HistoricProcessInstance> getMyStartProcint(String userId) {
        List<HistoricProcessInstance> list = historyService
                .createHistoricProcessInstanceQuery()
                .startedBy(userId)
                .orderByProcessInstanceStartTime()
                .asc()
                .list();
        return list;
    }


    /**
     * 查询流程图
     *
     * @param httpServletResponse
     * @param processId
     * @throws Exception
     */
    @RequestMapping(value = "processDiagram")
    public void genProcessDiagram(HttpServletResponse httpServletResponse, String processId) throws Exception {

        List<ActivityInstance> activityInstanceList =  runtimeService.createActivityInstanceQuery().list();
        for(ActivityInstance activityInstance : activityInstanceList){
            System.out.println(activityInstance.getId());
        }

        System.out.println("=========================================================================");

        List<ProcessInstance> list =  runtimeService.createProcessInstanceQuery().list();
        for(ProcessInstance processInstance : list){
            System.out.println(processInstance.getId());
        }

        ProcessInstance pi = runtimeService.createProcessInstanceQuery().processInstanceId(processId).singleResult();

        //流程走完的不显示图
        if (pi == null) {
            return;
        }
        Task task = taskService.createTaskQuery().processInstanceId(pi.getId()).singleResult();
        //使用流程实例ID,查询正在执行的执行对象表,返回流程实例对象
        String InstanceId = task.getProcessInstanceId();
        List<Execution> executions = runtimeService
                .createExecutionQuery()
                .processInstanceId(InstanceId)
                .list();

        //得到正在执行的Activity的Id
        List<String> activityIds = new ArrayList<>();
        List<String> flows = new ArrayList<>();
        for (Execution exe : executions) {
            List<String> ids = runtimeService.getActiveActivityIds(exe.getId());
            activityIds.addAll(ids);
        }

        //获取流程图
        BpmnModel bpmnModel = repositoryService.getBpmnModel(pi.getProcessDefinitionId());
        ProcessEngineConfiguration engconf = processEngine.getProcessEngineConfiguration();
        ProcessDiagramGenerator diagramGenerator = engconf.getProcessDiagramGenerator();
        InputStream in = diagramGenerator.generateDiagram(bpmnModel, "png", activityIds, flows, engconf.getActivityFontName(), engconf.getLabelFontName(), engconf.getAnnotationFontName(), engconf.getClassLoader(), 1.0,true);
        OutputStream out = null;
        byte[] buf = new byte[1024];
        int legth = 0;
        try {
            out = httpServletResponse.getOutputStream();
            while ((legth = in.read(buf)) != -1) {
                out.write(buf, 0, legth);
            }
        } finally {
            if (in != null) {
                in.close();
            }
            if (out != null) {
                out.close();
            }
        }
    }

}
Flowable提供了几个Service接口和实现类,可以通过service拿到流程的一些定义、流转等信息。
正如TestController里面定义的几个方法,分别是实例化流程,审批流程,查看流程等操作。如下
实例化流程:

审批流程:

拉取当前流程任务清单:

查看流程状态:

具体大家可以参考如下文章有详细的springboot集成指引。
Flowable BPMN 用户手册 (v 6.3.0)
文章来源地址https://www.toymoban.com/news/detail-716828.html文章来源:https://www.toymoban.com/news/detail-716828.html
到了这里,关于工作流程引擎之flowable(集成springboot)的文章就介绍完了。如果您还想了解更多内容,请在右上角搜索TOY模板网以前的文章或继续浏览下面的相关文章,希望大家以后多多支持TOY模板网!


