软件准备:keil uVsion 5 和 proteus 8.15
一、原理图的绘制
打开proteus8.15 -> 新建项目 -> 改名 -> 一直next
鼠标右键 -> 放置 -> 元件 -> From Libraries
搜索Stm32 -> 选择stm32f103c8
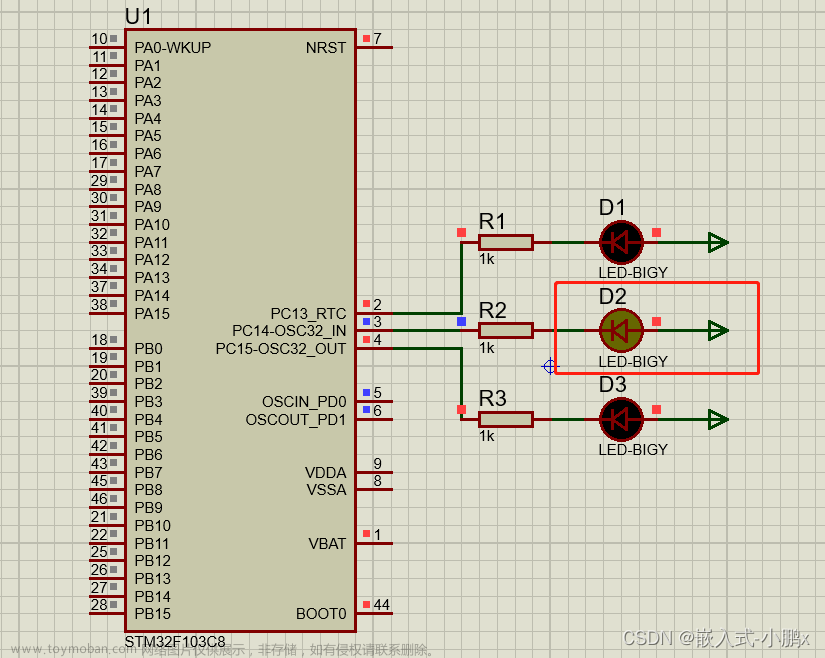
画出点亮一个LED灯的原理图
提示,各元器件搜索:
主控芯片:stm32
电阻:res
LED灯:led
鼠标右键 -> 放置 -> 元件 -> From Libraries
地和VCC 在左侧工具栏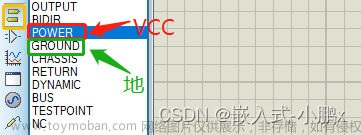
二、代码的编写
1.新建一个工程模板
这里采用正点原子提供的工程模板
复制工程模板,改名为1.点亮一个LED灯
工程模板下载链接:
链接:https://pan.baidu.com/s/14c7aIfUNBSR0quoEuqbN5g
提取码:sfdh
2.打开新建的项目
在项目文件夹 -> USER下的.uvprojx
点击即可通过keil_v5打开
3.点亮一个LED灯代码
led.c文件的内容
#include "led.h"
#include "stm32f10x.h"
void LED_Init(void)
{
	//声明一个结构体,名字是GPIO_InitStructure
	GPIO_InitTypeDef GPIO_InitStructure;
	//使能GPIOC的时钟,ENABLE代表使能
	RCC_APB2PeriphClockCmd(RCC_APB2Periph_GPIOC,ENABLE);//GPIOC
	//设置引脚为推挽输出Out_PP
	GPIO_InitStructure.GPIO_Mode=GPIO_Mode_Out_PP;
	//定义引脚为哪一号引脚,GPIO_Pin_13就是13号引脚
	GPIO_InitStructure.GPIO_Pin=GPIO_Pin_13;
	 //设置引脚的速度50MHz
	GPIO_InitStructure.GPIO_Speed=GPIO_Speed_50MHz;
	 //初始化GPIO,初始化哪个引脚就对应哪个
	GPIO_Init(GPIOC,&GPIO_InitStructure);//初始化GPIOC,所以引脚对应PC13
	GPIO_SetBits(GPIOC,GPIO_Pin_13); //PC13引脚拉高电平
}
GPIO_SetBits(GPIOC,GPIO_Pin_13); 为设置PC13为高电平
GPIO_ResetBits(GPIOC,GPIO_Pin_13); 为设置PC13为低电平
led.h头文件的内容
#ifndef __LED_H  //头文件的格式
#define __LED_H
	void LED_Init(void); //函数的声明
#endif
main.c的内容
#include "stm32f10x.h"
#include  "led.h"  //led的头文件
#include "delay.h"

int main(void)
{
	delay_init();
	LED_Init();
	while(1){  //主循环
		//由原理图,拉低电平-> LED灯亮
		GPIO_ResetBits(GPIOC,GPIO_Pin_13);
		delay_ms(500);
		//拉高电平-> LED灯灭
		GPIO_SetBits(GPIOC,GPIO_Pin_13);
		delay_ms(500);
	}
}
4.设置生成.hex文件
魔术棒-> Output -> 勾选Create HEX File -> ok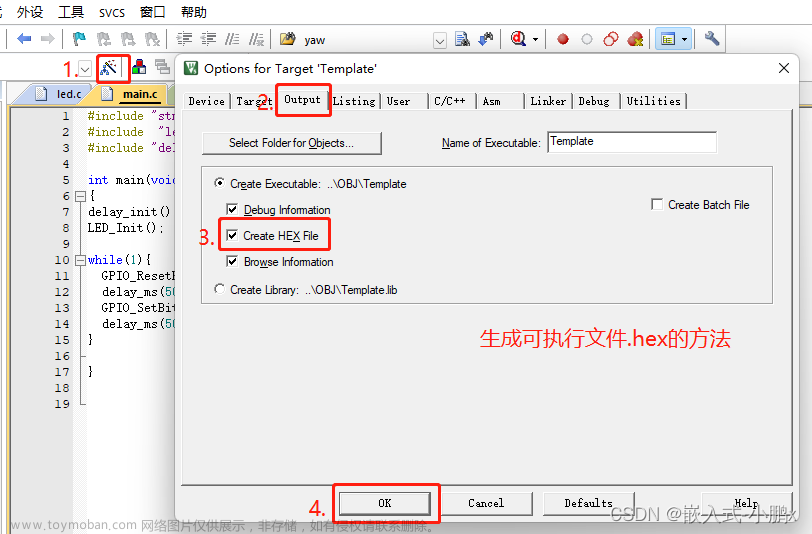
编译运行代码
0错误,0警告
5.上传.hex文件到proteus
打开proteus
双击芯片->选择Program File的路径
选择刚刚生成的.hex文件打开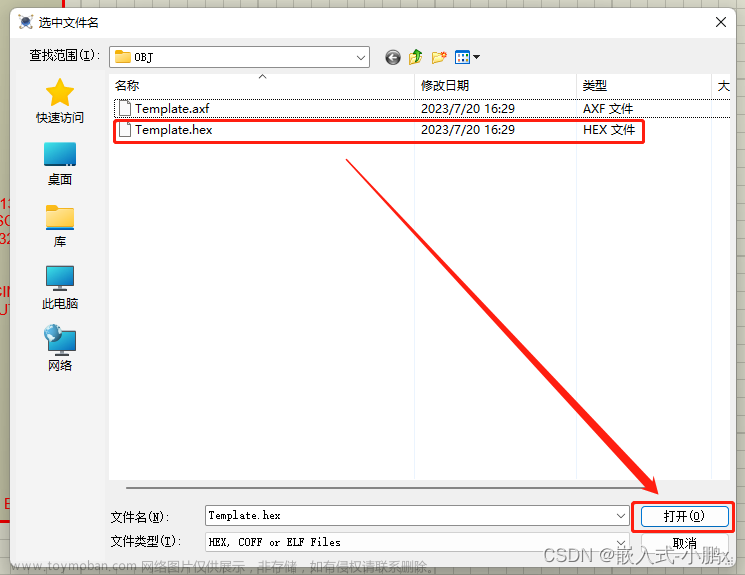
6.仿真运行
点击左下角运行
需要暂停运行也是在左下角
注意:只有停止运行才能修改原理图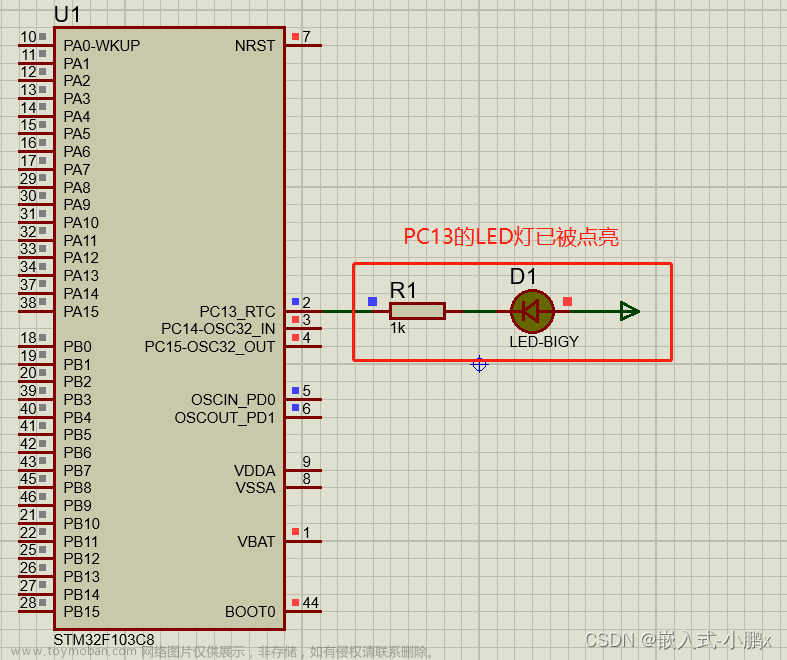
三、更多功能的实现
1.点亮一排LED灯
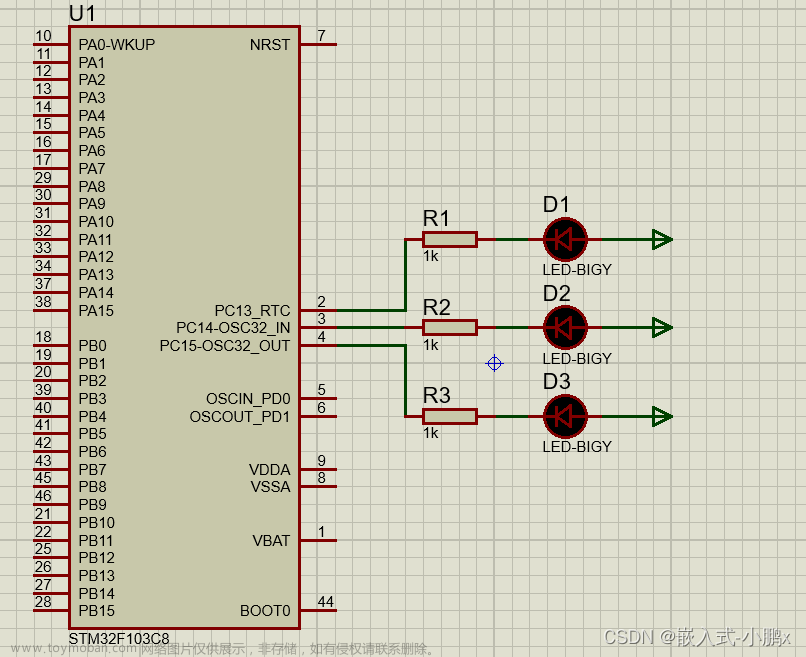
led.c文件新增几个引脚
led.c文件的内容:
#include "led.h"
#include "stm32f10x.h"
void LED_Init(void)
{
	GPIO_InitTypeDef GPIO_InitStructure;
	RCC_APB2PeriphClockCmd(RCC_APB2Periph_GPIOC,ENABLE);//GPIOC
	GPIO_InitStructure.GPIO_Mode=GPIO_Mode_Out_PP;
	GPIO_InitStructure.GPIO_Pin=GPIO_Pin_13|GPIO_Pin_14|GPIO_Pin_15;
	GPIO_InitStructure.GPIO_Speed=GPIO_Speed_50MHz;
	GPIO_Init(GPIOC,&GPIO_InitStructure);
	 //PC13、PC14、PC15引脚拉高电平
	GPIO_SetBits(GPIOC,GPIO_Pin_13|GPIO_Pin_14|GPIO_Pin_15);
}
led.h头文件内容不变
main.c文件:(三个灯一起亮、一起灭)
#include "stm32f10x.h"
#include  "led.h"
#include "delay.h"
int main(void)
{
	delay_init();
	LED_Init();
	while(1){  //效果是三个灯一起亮、一起灭
		GPIO_ResetBits(GPIOC,GPIO_Pin_13|GPIO_Pin_14|GPIO_Pin_15);
		delay_ms(500);
		//上面x|x|x 和下面分开写的效果是一样的
		GPIO_SetBits(GPIOC,GPIO_Pin_13);
		GPIO_SetBits(GPIOC,GPIO_Pin_14);
		GPIO_SetBits(GPIOC,GPIO_Pin_15);
		delay_ms(500);
		}
}

2.点亮流水灯
main.c文件:(流水灯)
#include "stm32f10x.h"
#include  "led.h"
#include "delay.h"
int main(void)
{
	delay_init();
	LED_Init();
	while(1){  //效果是三个灯轮流亮(流水灯)
		GPIO_ResetBits(GPIOC,GPIO_Pin_13);
		delay_ms(500);
		GPIO_SetBits(GPIOC,GPIO_Pin_13);
		GPIO_ResetBits(GPIOC,GPIO_Pin_14);
		delay_ms(500);
		GPIO_SetBits(GPIOC,GPIO_Pin_14);
		GPIO_ResetBits(GPIOC,GPIO_Pin_15);
		delay_ms(500);
		GPIO_SetBits(GPIOC,GPIO_Pin_15);
		}
}
 文章来源:https://www.toymoban.com/news/detail-717697.html
四、项目(代码+仿真)分享链接
百度网盘
链接:https://pan.baidu.com/s/1pcVtAcER2mAwnQnyRL3aXQ
提取码:p8q4文章来源地址https://www.toymoban.com/news/detail-717697.html
到了这里,关于Stm32f103c8t6(proteus仿真)学习——1.点亮LED流水灯的文章就介绍完了。如果您还想了解更多内容,请在右上角搜索TOY模板网以前的文章或继续浏览下面的相关文章,希望大家以后多多支持TOY模板网!

![[STM32F103C8T6]ADC转换](https://imgs.yssmx.com/Uploads/2024/02/458238-1.png)
