文件传输协议(file Transfer Protocol,FTP),它工作在应用层,由客户端软件和服务端软件两个部分共同实现文件传输功能,使用 TCP 传输而不是 UDP, 客户在和服务器建立连接前要经过一个“三次握手”的过程, 保证客户与服务器之间的连接是可靠的, 而且是面向连接,为数据传输提供可靠保证。
ftp 主要使用20和21端口
20端口传输数据;21端口建立连接
主动模式: 服务器主动连接客户端传输
被动模式: 服务器等待客户端连接。
部署ftp服务器
1.查看是否安装过vsftp,没有就下载vsftp
[root@ansible_nfs ~]# rpm -q vsftpd
未安装软件包 vsftpd
[root@ansible_nfs ~]# yum install -y vsftpd
已加载插件:fastestmirror
Loading mirror speeds from cached hostfile
 * base: mirrors.aliyun.com
 * epel: mirrors.cqu.edu.cn
 * extras: mirrors.huaweicloud.com
 * updates: mirrors.huaweicloud.com
正在解决依赖关系
--> 正在检查事务
---> 软件包 vsftpd.x86_64.0.3.0.2-29.el7_9 将被 安装
--> 解决依赖关系完成
2.查看vsftp软件的详细信息
[root@ansible_nfs 7-3]# rpm -qi vsftpd
Name        : vsftpd
Version     : 3.0.2
Release     : 29.el7_9
Architecture: x86_64
Install Date: 2023年07月07日 星期五 11时42分23秒
Group       : System Environment/Daemons
Size        : 361349
License     : GPLv2 with exceptions
Signature   : RSA/SHA256, 2021年06月11日 星期五 23时06分15秒, Key ID 24c6a8a7f4a80eb5
Source RPM  : vsftpd-3.0.2-29.el7_9.src.rpm
Build Date  : 2021年06月10日 星期四 00时15分50秒
Build Host  : x86-02.bsys.centos.org
Relocations : (not relocatable)
Packager    : CentOS BuildSystem <http://bugs.centos.org>
Vendor      : CentOS
URL         : https://security.appspot.com/vsftpd.html
Summary     : Very Secure Ftp Daemon
Description :
vsftpd is a Very Secure FTP daemon. It was written completely from
scratch.
3.启动vsftp服务
[root@ansible_nfs 7-3]# service vsftpd start
Redirecting to /bin/systemctl start vsftpd.service
vsftpd — Very Secure FTP Daemon
4.判断ftp服务是否启动
查看vsftpd进程
[root@ansible_nfs 7-3]# ps aux|grep vsftpd
root 1808 0.0 0.0 53292 576 ? Ss 11:44 0:00 /usr/sbin/vsftpd /etc/vsftpd/vsftpd.conf
root 1810 0.0 0.0 112824 984 pts/0 S+ 11:44 0:00 grep --color=auto vsftpd
查看vsftpd端口
[root@ansible_nfs 7-3]# netstat -anplut|grep vsftpd
tcp6 0 0 :::21 :::* LISTEN 1808/vsftpd
查看vsftpd服务状态
[root@ansible_nfs ~]# systemctl status vsftpd
● vsftpd.service - Vsftpd ftp daemon
Loaded: loaded (/usr/lib/systemd/system/vsftpd.service; disabled; vendor preset: disabled)
Active: active (running) since 五 2023-07-07 11:44:10 CST; 58min ago
Main PID: 1808 (vsftpd)
CGroup: /system.slice/vsftpd.service
└─1808 /usr/sbin/vsftpd /etc/vsftpd/vsftpd.conf7月 07 11:44:10 ansible_nfs systemd[1]: Starting Vsftpd ftp daemon...
7月 07 11:44:10 ansible_nfs systemd[1]: Started Vsftpd ftp daemon.
5.登录ftp服务
下载客户端工具 ftp和lftp
[root@ansible_nfs 7-3]# yum install ftp lftp -y
默认情况下不允许root用户登录
[root@ansible_nfs vsftpd]# lftp 192.168.2.24
lftp 192.168.2.24:~> ls
中断
lftp 192.168.2.24:~> exit
6.新建用户sc测试ftp服务
[root@ansible_nfs 7-3]# useradd sc
[root@ansible_nfs 7-3]# id sc
uid=1042(sc) gid=1042(sc) 组=1042(sc)
[root@ansible_nfs 7-3]# echo "12345"|passwd sc --stdin
更改用户 sc 的密码 。
passwd:所有的身份验证令牌已经成功更新。
7.登录lftp:格式:lftp -u 用户名、密码 ip地址
[root@ansible_nfs ~]# lftp -u sc,12345 192.168.2.24
lftp sc@192.168.2.24:~> ls
lftp sc@192.168.2.24:/> pwd
ftp://sc:12345@192.168.2.24/
lftp sc@192.168.2.24:/> mkdir sanchuang
mkdir 成功, 建立 `sanchuang'
lftp sc@192.168.2.24:/> ls
drwx------ 2 1042 1042 6 Jul 07 05:28 sanchuang
8.查看lftp常用命令
lftp sc@192.168.2.24:/> help
    !<shell-command>                     (commands)                           alias [<name> [<value>]]             attach [PID]                         bookmark [SUBCMD]
    cache [SUBCMD]                       cat [-b] <files>                     cd <rdir>                            chmod [OPTS] mode file...            close [-a]
    [re]cls [opts] [path/][pattern]      debug [<level>|off] [-o <file>]      du [options] <dirs>                  exit [<code>|bg]                     get [OPTS] <rfile> [-o <lfile>]
    glob [OPTS] <cmd> <args>             help [<cmd>]                         history -w file|-r file|-c|-l [cnt]  jobs [-v] [<job_no...>]              kill all|<job_no>                    lcd <ldir>
    lftp [OPTS] <site>                   ln [-s] <file1> <file2>              ls [<args>]                          mget [OPTS] <files>                  mirror [OPTS] [remote [local]]
    mkdir [-p] <dirs>                    module name [args]                   more <files>                         mput [OPTS] <files>                  mrm <files>
    mv <file1> <file2>                   [re]nlist [<args>]                   open [OPTS] <site>                   pget [OPTS] <rfile> [-o <lfile>]     put [OPTS] <lfile> [-o <rfile>]      pwd [-p]
    queue [OPTS] [<cmd>]                 quote <cmd>                          repeat [OPTS] [delay] [command]      rm [-r] [-f] <files>                 rmdir [-f] <dirs>
    scache [<session_no>]                set [OPT] [<var> [<val>]]            site <site-cmd>                      source <file>                        torrent [-O <dir>] <file|URL>...
    user <user|URL> [<pass>]             wait [<jobno>]                       zcat <files>                         zmore <files>
lftp sc@192.168.2.24:/>
lcd命令 : 在本地切换目录
!ls : 查看本地目录内容
lftp sc@192.168.2.24:/> lcd /tmp
lcd 成功, 本地目录=/tmp
lftp sc@192.168.2.24:/> !ls
crontab.3jDKSH vmware-root_680-2689143817 vmware-root_687-4022112208 vmware-root_696-2722173465
file1 vmware-root_683-4013919829 vmware-root_688-2688750615 vmware-root_698-2730496923
memlog_{mem_monitor.sh}.log vmware-root_684-2697598348 vmware-root_690-2697074069 vmware-root_701-3979708482
systemd-private-18d619f418854e2b9704e239e455cbe2-chronyd.service-SycrL7 vmware-root_685-4013788754 vmware-root_692-2696942994
systemd-private-3a8e0357f3fc4688834d7b8bed6eefe5-chronyd.service-CCZNvw vmware-root_686-2689274894 vmware-root_694-2688619536
put命令 上传文件到ftp服务器
lftp sc@192.168.2.24:/> put memlog_{mem_monitor.sh}.log
180 bytes transferred
lftp sc@192.168.2.24:/> ls
-rw------- 1 1042 1042 1241 Jul 07 05:32 anaconda-ks.cfg
-rw-r--r-- 1 1042 1042 180 Jul 07 06:48 memlog_{mem_monitor.sh}.log
drwx------ 2 1042 1042 6 Jul 07 05:28 sanchuang
lftp sc@192.168.2.24:/> rm -rf anaconda-ks.cfg
rm 成功, 删除 `anaconda-ks.cfg'
lftp sc@192.168.2.24:/> ls
-rw-r--r-- 1 1042 1042 180 Jul 07 06:48 memlog_{mem_monitor.sh}.log
drwx------ 2 1042 1042 6 Jul 07 05:28 sanchuang
mirror命令 下载文件夹到本地
lftp sc@192.168.2.24:/> lcd
lcd 成功, 本地目录=/root
lftp sc@192.168.2.24:/> mirror sanchuang/
Total: 1 directory, 0 files, 0 symlinks
lftp sc@192.168.2.24:/> !ls
anaconda-ks.cfg sanchuang9.进行备份ftp服务的主要配置文件
[root@ansible_nfs vsftpd]# rpm -qc vsftpd
/etc/logrotate.d/vsftpd
/etc/pam.d/vsftpd
/etc/vsftpd/ftpusers
/etc/vsftpd/user_list
/etc/vsftpd/vsftpd.conf[root@ansible_nfs /]# cd /etc/vsftpd/
[root@ansible_nfs vsftpd]# cp vsftpd.conf vsftpd.conf.bak
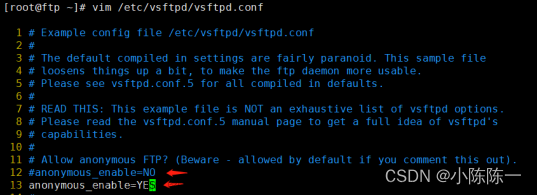
一、匿名用户
1.修改配置文件,vim /etc/vsftpd/vsftpd.conf
anon_upload_enable=YES #允许匿名用户上传文件,取消注释
anon_mkdir_write_enable=YES #允许匿名用户创建目录,需取消注释
anon_other_write_enable=YES #允许匿名删除、重命名、覆盖等操作,需添加
anon_root=/var/ftp/pub
#anon_root 针对匿名用户(如果不设置默认为此目录,可以进行修改,修改之后修改给它权限)
anonymous_enable=YES  #开启匿名用户访问(默认开启)

# Uncomment this to allow local users to log in.
# When SELinux is enforcing check for SE bool ftp_home_dir
local_enable=YES 	  #允许本地用户登录(默认开启)

# Uncomment this to enable any form of FTP write command.
write_enable=YES 	  #开放服务器的写权限(默认开启)
#
# Default umask for local users is 077. You may wish to change this to 022,
# if your users expect that (022 is used by most other ftpd's)
local_umask=022  	  #设置用户所上传数据的权限掩码
#
# Uncomment this to allow the anonymous FTP user to upload files. This only
# has an effect if the above global write enable is activated. Also, you will
# obviously need to create a directory writable by the FTP user.
# When SELinux is enforcing check for SE bool allow_ftpd_anon_write, allow_ftpd_full_access
anon_upload_enable=YES   #允许匿名用户上传文件(取消注释)
#
# Uncomment this if you want the anonymous FTP user to be able to create
# new directories.
anon_mkdir_write_enable=YES  #允许匿名用户创建目录(取消注释)
anon_other_write_enable=YES  #允许匿名删除、重命名、覆盖等操作(新增)

anon_root=/var/ftp/pub
#anon_root 针对匿名用户(如果不设置默认为此目录,可以进行修改,修改之后修改给它权限)
2.修改文件 /var/ftp/pub 权限为777
-R : 对目前目录下的所有档案与子目录进行相同的权限变更(即以递回的方式逐个变更)
[root@ansible_nfs pub]# pwd
/var/ftp/pub
[root@ansible_nfs ftp]# ll
总用量 0
drwxr-xr-x 2 root root 6 6月 10 2021 pub
[root@ansible_nfs ftp]# chmod -R 777 /var/ftp/pub/
[root@ansible_nfs ftp]# ll
总用量 0
drwxrwxrwx 2 root root 6 6月 10 2021 pub
3.重启vsftpd服务
[root@ansible_nfs vsftpd]# systemctl restart vsftpd
4.windows匿名访问测试
首先确保Linux和windows是同一网段,Linux虚拟机网络可以选择为桥接模式,并且都需要关闭防火墙。
windows的ip地址

Linux里ip地址
[root@ansible_nfs vsftpd]# ip a
1: lo: <LOOPBACK,UP,LOWER_UP> mtu 65536 qdisc noqueue state UNKNOWN group default qlen 1000
link/loopback 00:00:00:00:00:00 brd 00:00:00:00:00:00
inet 127.0.0.1/8 scope host lo
valid_lft forever preferred_lft forever
inet6 ::1/128 scope host
valid_lft forever preferred_lft forever
2: ens33: <BROADCAST,MULTICAST,UP,LOWER_UP> mtu 1500 qdisc pfifo_fast state UP group default qlen 1000
link/ether 00:0c:29:cc:31:b9 brd ff:ff:ff:ff:ff:ff
inet 192.168.2.24/24 brd 192.168.2.255 scope global noprefixroute dynamic ens33
valid_lft 80909sec preferred_lft 80909sec
inet6 fe80::20c:29ff:fecc:31b9/64 scope link
valid_lft forever preferred_lft forever
Linux里关闭防火墙和selinux
[root@ansible_nfs vsftpd]# vim vsftpd.conf
[root@ansible_nfs vsftpd]# service firewalld stop
Redirecting to /bin/systemctl stop firewalld.service
[root@ansible_nfs vsftpd]# getenforce
Disabled
windows里关闭防火墙

win+r 进入cmd;ftp ftp服务器ip地址

或者用之前创建的用户sc登录

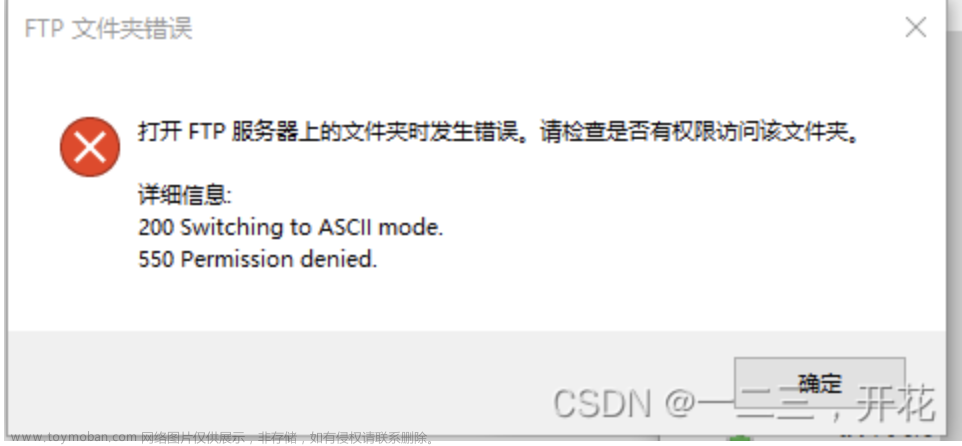
在FTP服务器中的共享目录中创建一个文件 ,在windows里查看是否可查看文件
[root@ansible_nfs vsftpd]# cd /var/ftp/pub
[root@ansible_nfs vsftpd]# mkdir sanchuang.txt run.sh
[root@ansible_nfs pub]# ls
sanchuang.txt run.sh

可以将文件下载到windows里并查看

在windows中创建文件上传后去ftp服务器查看
在windows桌面创建文本changsha.txt
使用 put changsha.txt 上传


[root@ansible_nfs pub]# ls
changsha.txt run.sh sanchuang.txt
二、用户登录
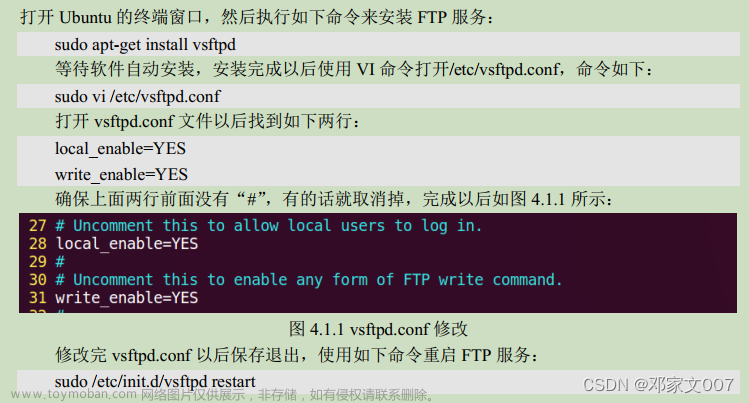
1.修改配置文件vsftpd.conf
anonymous_enable=NO #关闭匿名用户访问
local_umask=077 #修改为077
新增3行
chroot_local_user=YES #将访问禁锢在用户的宿主目录中
allow_writeable_chroot=YES #允许被限制的用户主目录具有写权限
local_root=/var/www/data #上传默认位置 可以更改及注释
#anon_mkdir_write_enable=YES 注释
#anon_other_write_enable=YES 注释
[root@ansible_nfs vsftpd]# vim vsftpd.conf

anonymous_enable=NO   #关闭匿名用户访问
#
# Uncomment this to allow local users to log in.
# When SELinux is enforcing check for SE bool ftp_home_dir
local_enable=YES   	  #启用本地用户
#
# Uncomment this to enable any form of FTP write command.
write_enable=YES  	  #开放服务器的写权限
#
# Default umask for local users is 077. You may wish to change this to 022,
# if your users expect that (022 is used by most other ftpd's)
local_umask=077  	   #可设置仅宿主用户拥有被上传的文件的权限为077
#
# Uncomment this to allow the anonymous FTP user to upload files. This only
# has an effect if the above global write enable is activated. Also, you will
# obviously need to create a directory writable by the FTP user.
# When SELinux is enforcing check for SE bool allow_ftpd_anon_write, allow_ftpd_full_access
anon_upload_enable=YES
#
# Uncomment this if you want the anonymous FTP user to be able to create
# new directories.

# anon_mkdir_write_enable=YES   #注释
# anon_other_write_enable=YES   #注释

chroot_local_user=YES  			#将访问禁锢在用户的宿主目录中
allow_writeable_chroot=YES 		#允许被限制的用户主目录具有写权限
local_root=/var/www/data 		#上传默认位置  可以更改及注释

重启vsftpd服务
[root@ansible_nfs vsftpd]# systemctl restart vsftpd
[root@ansible_nfs vsftpd]#
2.创建一个目录作为FTP的共享目录,创建一个用户,把此目录作为此用户的属主目录
[root@ansible_nfs vsftpd]# cd /var/ftp/
[root@ansible_nfs vsftpd]# mkdir data
[root@ansible_nfs ftp]# ls
data  pub
[root@ansible_nfs ftp]# useradd yy
[root@ansible_nfs ftp]# echo 123|passwd yy --stdin
更改用户 yy 的密码 。
passwd:所有的身份验证令牌已经成功更新。

递归更改属主
[root@ansible_nfs ftp]# chown -R yy:root data
[root@ansible_nfs ftp]# ll
总用量 0
drwxr-xr-x 2 yy   root  6 7月   7 13:04 data
drwxrwxrwx 2 root root 61 7月   7 16:34 pub
3.创建文件并且授予权限,然后重启服务
[root@ansible_nfs www]# mkdir -p /var/www/data/
[root@ansible_nfs www]# chmod 777 /var/www/data/
[root@ansible_nfs www]# ll
总用量 0
drwxrwxrwx 4 root root 82 7月 7 16:14 data
[root@ansible_nfs www]# systemctl restart vsftpd
4.在windows浏览器里直接输入 ftp://192.168.2.24(需要输入用户和密码)

 文章来源:https://www.toymoban.com/news/detail-718214.html
 文章来源地址https://www.toymoban.com/news/detail-718214.html
到了这里,关于Linux 部署ftp服务的文章就介绍完了。如果您还想了解更多内容,请在右上角搜索TOY模板网以前的文章或继续浏览下面的相关文章,希望大家以后多多支持TOY模板网!