一、简述
先把通知权限打开
为什么写,因为在学kotlin刚好顺手写一下,整块代码在最后
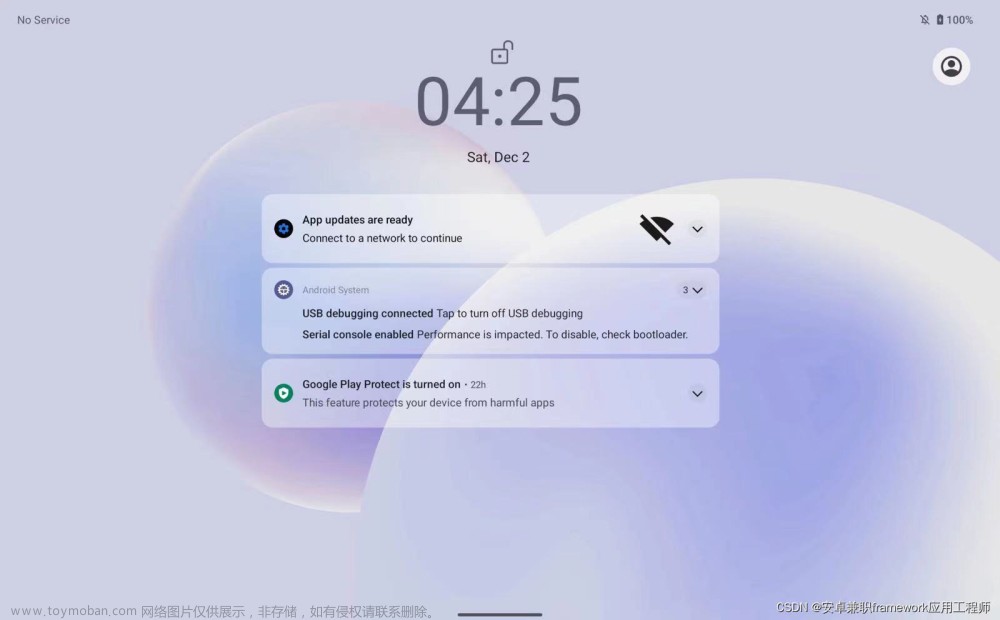
图示效果:(图片来源于网络)


1、首先需要一个NotificationManager对通知进行管理,可以通过调用Context的 getSystemService()方法获取。getSystemService()方法接收一个字符串参数用于确定 获取系统的哪个服务,这里我们传入Context.NOTIFICATION_SERVICE即可。因此,获取 NotificationManager的实例就可以写成:
val manager = getSystemService(Context.NOTIFICATION_SERVICE) as NotificationManager接下来要使用NotificationChannel类构建一个通知渠道,并调用NotificationManager的 createNotificationChannel()方法完成创建。由于NotificationChannel类和 createNotificationChannel()方法都是Android 8.0系统中新增的API,因此我们在使用 的时候还需要进行版本判断才可以,写法如下:
if (Build.VERSION.SDK_INT >= Build.VERSION_CODES.O) {
 val channel = NotificationChannel(channelId, channelName, importance)
 manager.createNotificationChannel(channel)
}
创建一个通知渠道至少需要渠道ID、渠道名称以及重要等级这3个参数,其中渠道ID可以随便定 义,只要保证全局唯一性就可以。渠道名称是给用户看的,需要可以清楚地表达这个渠道的用 途。通知的重要等级主要有IMPORTANCE_HIGH、IMPORTANCE_DEFAULT、 IMPORTANCE_LOW、IMPORTANCE_MIN这几种,对应的重要程度依次从高到低。不同的重要等 级会决定通知的不同行为,后面我们会通过具体的例子进行演示。当然这里只是初始状态下的 重要等级,用户可以随时手动更改某个通知渠道的重要等级,开发者是无法干预的。
2、了解了如何创建通知渠道之后,看一下通知的使用。既可以在Activity里创建,也可以在BroadcastReceiver里创建,当然还可以在后面 我们即将学习的Service里创建。相比于BroadcastReceiver和Service,在Activity里创建通 知的场景还是比较少的,因为一般只有当程序进入后台的时候才需要使用通知。 不过,无论是在哪里创建通知,整体的步骤都是相同的。
/**首先需要使用一个Builder构造器来创建Notification对象,但问题在于,
Android系统的每 一个版本都会对通知功能进行或多或少的修改,API不稳定
的问题在通知上凸显得尤其严重,比 方说刚刚介绍的通知渠道功能在Android
 8.0系统之前就是没有的。那么该如何解决这个问题 呢?其实解决方案我们之
前已经见过好几回了,就是使用AndroidX库中提供的兼容API。 AndroidX库中
提供了一个NotificationCompat类,使用这个类的构造器创建 Notification
对象,就可以保证我们的程序在所有Android系统版本上都能正常工作了:*/
val notification = NotificationCompat.Builder(context, channelId).build()
二、实际使用
演示图片在文章首页
//通知
        //1.普通通知
        //解决通知消失的方法有两种:一种是在
        //NotificationCompat.Builder中再连缀一个setAutoCancel()方法,一种是显式地调用
        //NotificationManager的cancel()方法将它取消

        val manager = getSystemService(Context.NOTIFICATION_SERVICE) as NotificationManager
        if (Build.VERSION.SDK_INT >= Build.VERSION_CODES.O) {
            val channel = NotificationChannel("normal", "Normal", NotificationManager.IMPORTANCE_DEFAULT)
            manager.createNotificationChannel(channel)
        }

        findViewById<View>(R.id.bt4).setOnClickListener {
            var intent = Intent(this,notificationActivity::class.java)
            val padinintent = PendingIntent.getActivity(this,0,intent,0)
            val notification = NotificationCompat.Builder(this, "normal")
                .setContentTitle("标题")
                .setContentText("内容")
                .setSmallIcon(R.drawable.ic_launcher_foreground)
                .setLargeIcon(
                    BitmapFactory.decodeResource(resources, android.R.drawable.btn_star_big_on)
                )
                .setContentIntent(padinintent)
                .setAutoCancel(true)
                .build()
            manager.notify(1, notification)
        }

        //长字符通知
        findViewById<View>(R.id.bt5).setOnClickListener {
            var intent = Intent(this,notificationActivity::class.java)
            val padinintent = PendingIntent.getActivity(this,0,intent,0)
            val notification = NotificationCompat.Builder(this, "normal")
                .setContentTitle("标题")
                .setStyle(NotificationCompat.BigTextStyle()
                    .bigText("Learn how to build\n" +
                        " notifications, send and sync data, and use voice actions. Get the official\n" +
                        " Android IDE and developer tools to build apps for Android."))
                .setSmallIcon(R.drawable.ic_launcher_foreground)
                .setLargeIcon(
                    BitmapFactory.decodeResource(resources, android.R.drawable.btn_star_big_on)
                )
                .setContentIntent(padinintent)
                .setAutoCancel(true)
                .build()
            manager.notify(1, notification)
        }

        //大图通知
        findViewById<View>(R.id.bt6).setOnClickListener {
            var intent = Intent(this,notificationActivity::class.java)
            val padinintent = PendingIntent.getActivity(this,0,intent,0)
            val notification = NotificationCompat.Builder(this, "normal")
                .setContentTitle("标题")
                .setStyle(NotificationCompat.BigPictureStyle().bigPicture(BitmapFactory
                    .decodeResource(resources, android.R.drawable.presence_online)))
                .setSmallIcon(R.drawable.ic_launcher_foreground)
                .setLargeIcon(
                    BitmapFactory.decodeResource(resources, android.R.drawable.btn_star_big_on)
                )
                .setContentIntent(padinintent)
                .setAutoCancel(true)
                .build()
            manager.notify(1, notification)
        }

        //app内部通知
        if (Build.VERSION.SDK_INT >= Build.VERSION_CODES.O) {
            val channel2 = NotificationChannel("important", "Important",
                NotificationManager.IMPORTANCE_HIGH)
            manager.createNotificationChannel(channel2)
        }
        findViewById<View>(R.id.bt7).setOnClickListener {
            val intent = Intent(this, notificationActivity::class.java)
            val pi = PendingIntent.getActivity(this, 0, intent, 0)
            val notification = NotificationCompat.Builder(this, "important")
                .setContentTitle("标题")
                .setContentText("内容")
                .setSmallIcon(R.drawable.ic_launcher_foreground)
                .setLargeIcon(
                    BitmapFactory.decodeResource(resources, android.R.drawable.btn_star_big_on)
                )
                .setContentIntent(pi)
                .setAutoCancel(true)
                .build()
            manager.notify(1, notification)
        }
被跳转的activity
class notificationActivity : AppCompatActivity() {
    override fun onCreate(savedInstanceState: Bundle?) {
        super.onCreate(savedInstanceState)
        setContentView(R.layout.activity_notification)

        val manager = getSystemService(Context.NOTIFICATION_SERVICE) as
                NotificationManager
        manager.cancel(1)

    }
}
xml
<?xml version="1.0" encoding="utf-8"?>
<LinearLayout xmlns:android="http://schemas.android.com/apk/res/android"
    xmlns:app="http://schemas.android.com/apk/res-auto"
    xmlns:tools="http://schemas.android.com/tools"
    android:layout_width="match_parent"
    android:layout_height="match_parent"
    android:orientation="vertical"
    tools:context=".activity.MainActivity">

    <Button
        android:id="@+id/bt"
        android:layout_width="wrap_content"
        android:layout_height="wrap_content"
        android:text="toase"
        app:layout_constraintBottom_toBottomOf="parent"
        app:layout_constraintEnd_toEndOf="parent"
        app:layout_constraintStart_toStartOf="parent"
        app:layout_constraintTop_toTopOf="parent" />
    <Button
        android:id="@+id/bt2"
        android:layout_width="wrap_content"
        android:layout_height="wrap_content"
        android:text="调用viewmodel方法"
        app:layout_constraintBottom_toBottomOf="parent"
        app:layout_constraintEnd_toEndOf="parent"
        app:layout_constraintStart_toStartOf="parent"
        app:layout_constraintTop_toTopOf="parent" />
    <Button
        android:id="@+id/bt3"
        android:layout_width="wrap_content"
        android:layout_height="wrap_content"
        android:text="跳转"
        app:layout_constraintBottom_toBottomOf="parent"
        app:layout_constraintEnd_toEndOf="parent"
        app:layout_constraintStart_toStartOf="parent"
        app:layout_constraintTop_toTopOf="parent" />
    <Button
        android:id="@+id/bt4"
        android:layout_width="wrap_content"
        android:layout_height="wrap_content"
        android:text="普通通知"
        app:layout_constraintBottom_toBottomOf="parent"
        app:layout_constraintEnd_toEndOf="parent"
        app:layout_constraintStart_toStartOf="parent"
        app:layout_constraintTop_toTopOf="parent" />
    <Button
        android:id="@+id/bt5"
        android:layout_width="wrap_content"
        android:layout_height="wrap_content"
        android:text="长字符通知"
        app:layout_constraintBottom_toBottomOf="parent"
        app:layout_constraintEnd_toEndOf="parent"
        app:layout_constraintStart_toStartOf="parent"
        app:layout_constraintTop_toTopOf="parent" />

    <Button
        android:id="@+id/bt6"
        android:layout_width="wrap_content"
        android:layout_height="wrap_content"
        android:text="大图通知"
        app:layout_constraintBottom_toBottomOf="parent"
        app:layout_constraintEnd_toEndOf="parent"
        app:layout_constraintStart_toStartOf="parent"
        app:layout_constraintTop_toTopOf="parent" />

    <Button
        android:id="@+id/bt7"
        android:layout_width="wrap_content"
        android:layout_height="wrap_content"
        android:text="app内部通知"
        app:layout_constraintBottom_toBottomOf="parent"
        app:layout_constraintEnd_toEndOf="parent"
        app:layout_constraintStart_toStartOf="parent"
        app:layout_constraintTop_toTopOf="parent" />

</LinearLayout>
到这里就结束了
下边是一些解释
1.PendingIntent文章来源:https://www.toymoban.com/news/detail-719423.html
从名字上看起来就和Intent有些类似,它们确实存在不少共同点。比如它们都可 以指明某一个“意图”,都可以用于启动Activity、启动Service以及发送广播等。不同的是, Intent倾向于立即执行某个动作,而PendingIntent倾向于在某个合适的时机执行某个动作。所 以,也可以把PendingIntent简单地理解为延迟执行的Intent。 PendingIntent的用法同样很简单,它主要提供了几个静态方法用于获取PendingIntent的实 例,可以根据需求来选择是使用getActivity()方法、getBroadcast()方法,还是 getService()方法。这几个方法所接收的参数都是相同的:第一个参数依旧是Context,不 用多做解释;第二个参数一般用不到,传入0即可;第三个参数是一个Intent对象,我们可以通 www.blogss.cn 过这个对象构建出PendingIntent的“意图”;第四个参数用于确定PendingIntent的行为,有 FLAG_ONE_SHOT、FLAG_NO_CREATE、FLAG_CANCEL_CURRENT和 FLAG_UPDATE_CURRENT这4种值可选,每种值的具体含义你可以查看文档,通常情况下这个 参数传入0就可以了。 对PendingIntent有了一定的了解后,我们再回过头来看一下 NotificationCompat.Builder。这个构造器还可以连缀一个setContentIntent()方 法,接收的参数正是一个PendingIntent对象。因此,这里就可以通过PendingIntent构建一个 延迟执行的“意图”,当用户点击这条通知时就会执行相应的逻辑。 现在我们来优化一下NotificationTest项目,给刚才的通知加上点击功能,让用户点击它的时候 可以启动另一个Activity文章来源地址https://www.toymoban.com/news/detail-719423.html
到了这里,关于Android - app内部通知通知栏通知Notification (Kotlin)的文章就介绍完了。如果您还想了解更多内容,请在右上角搜索TOY模板网以前的文章或继续浏览下面的相关文章,希望大家以后多多支持TOY模板网!


