1 关于Diffusers Pipeline
1.1 简介
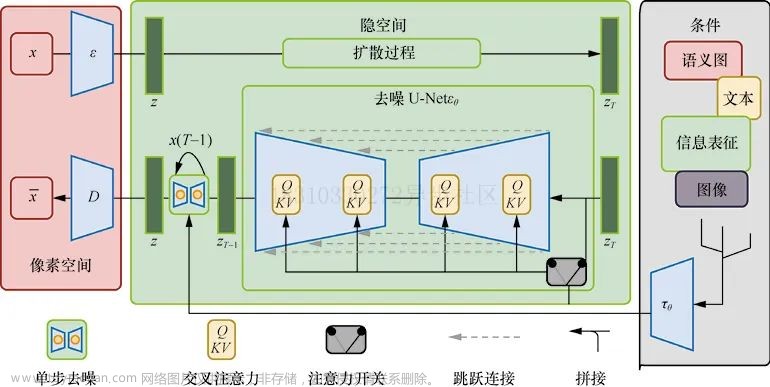
大部分扩散模型包含多个独立训练的子模型和组件模块组合而成,例如StableDiffusion 有:
- 3个独立训练的子模型:Autoencoder、 Conditional Unet、CLIP text encoder
- 调度器组件scheduler,
- CLIPImageProcessor,
- safety checker.
为了让开发者以最简单的方式使用最新最先进的扩散模型,diffusers开发了pipeline管理和使用这些类,使得开发者可以以端对端方式使用扩散模型。
注意:pipeline本身没有提供任何训练相关功能,如果想要实现训练,可以参考官方的训练样例
1.2 官方Pipeline
以下表格是diffusers官方实现的Pipeline,每个Pipeline有对应的论文。
| Pipeline | Source | Tasks |
|---|---|---|
| dance diffusion | Dance Diffusion | Unconditional Audio Generation |
| ddpm | Denoising Diffusion Probabilistic Models | Unconditional Image Generation |
| ddim | Denoising Diffusion Implicit Models | Unconditional Image Generation |
| latent_diffusion | High-Resolution Image Synthesis with Latent Diffusion Models | Text-to-Image Generation |
| latent_diffusion_uncond | High-Resolution Image Synthesis with Latent Diffusion Models | Unconditional Image Generation |
| pndm | Pseudo Numerical Methods for Diffusion Models on Manifolds | Unconditional Image Generation |
| score_sde_ve | Score-Based Generative Modeling through Stochastic Differential Equations | Unconditional Image Generation |
| score_sde_vp | Score-Based Generative Modeling through Stochastic Differential Equations | Unconditional Image Generation |
| stable_diffusion | Stable Diffusion | Text-to-Image Generation |
| stable_diffusion | Stable Diffusion | Image-to-Image Text-Guided Generation |
| stable_diffusion | Stable Diffusion | Text-Guided Image Inpainting |
| stochastic_karras_ve | Elucidating the Design Space of Diffusion-Based Generative Models | Unconditional Image Generation |
2 Pipeline API接口
扩散模型包含多个独立的模型和组件,不同任务中模型独立训练,并且可以用其他模型替换。不同的Pipeline可能包含专有的函数接口,但所有Pipeline都有的共同函数如下:
-
from_pretrained(cls, pretrained_model_name_or_path, **kwargs): 参数
pretrained_model_name_or_path可以是Hugging Face Hub repository的 id, 例如: runwayml/stable-diffusion-v1-5 或本地路径:"./stable-diffusion". 为了确保所有模型和组件能被正确加载,需要提供一个model_index.json文件, 例如: runwayml/stable-diffusion-v1-5/model_index.json, 这个文件定义了所有要被加载的组件。其格式如下:<name>: ["<library>", "<class name>"],其中<name>是类<class name>实例的名称。此类可以在库"<library>"中加载到。 -
save_pretrained(self, save_directory) : 参数save_directory为本地目录路径,例如:
./stable-diffusion,所有的模型和组件会被保存。每个模型和组件创建一个对应的子目录,子目录名称为模型或组件的属性名称如./stable_diffusion/unet. 此外,还会再根目录创建model_index.json文件如:./stable_diffusion/model_index.json -
to(self, torch_device: Optional[Union[str, torch.device]] = None) 参数torch_device为
string或torch.device类型,将所有torch.nn.Module类型的对象转移到指定的device上,此函数与pytorch的to函数功能一致。 -
__call__函数执行推理,此函数定义了pipeline的推理逻辑,不同的Pipeline对应的推理输入差别很大,例如文生图PipelineStableDiffusionPipeline的输入应该是文本prompt,输出是生成的图。 而DDPMPipeline 则无需提供任何输入。因此读者需要根据实际的Pipeline功能以及查看相应的官方文档使用。
注意: 所有的Pipeline的
__call__函数会自动调用torch.no_grad函数禁用梯度,因为Pipeline不是用于训练。如果你在前向推理后有保存梯度的需求,可以自定义Pipeline,参考官方示例
3 使用示例
1 扩散模型:文生图
# make sure you're logged in with `huggingface-cli login`
from diffusers import StableDiffusionPipeline, LMSDiscreteScheduler

pipe = StableDiffusionPipeline.from_pretrained("runwayml/stable-diffusion-v1-5")
pipe = pipe.to("cuda")

prompt = "a photo of an astronaut riding a horse on mars"
image = pipe(prompt).images[0]

image.save("astronaut_rides_horse.png")
2 扩散模型:图生图
类StableDiffusionImg2ImgPipeline 接受一个文本prompt和初始图片作为条件,指导生成新图。
import requests
from PIL import Image
from io import BytesIO

from diffusers import StableDiffusionImg2ImgPipeline

# load the pipeline
device = "cuda"
pipe = StableDiffusionImg2ImgPipeline.from_pretrained(
    "runwayml/stable-diffusion-v1-5",
    torch_dtype=torch.float16,
).to(device)

# let's download an initial image
url = "https://raw.githubusercontent.com/CompVis/stable-diffusion/main/assets/stable-samples/img2img/sketch-mountains-input.jpg"

response = requests.get(url)
init_image = Image.open(BytesIO(response.content)).convert("RGB")
init_image = init_image.resize((768, 512))

prompt = "A fantasy landscape, trending on artstation"

images = pipe(prompt=prompt, image=init_image, strength=0.75, guidance_scale=7.5).images

images[0].save("fantasy_landscape.png")
可以在colab中直接运行colab
3 扩充模型:In-painting
类 StableDiffusionInpaintPipeline 接受文本prompt和mask,用于编辑图像指定区域。文章来源:https://www.toymoban.com/news/detail-721241.html
import PIL
import requests
import torch
from io import BytesIO

from diffusers import StableDiffusionInpaintPipeline

def download_image(url):
    response = requests.get(url)
    return PIL.Image.open(BytesIO(response.content)).convert("RGB")

img_url = "https://raw.githubusercontent.com/CompVis/latent-diffusion/main/data/inpainting_examples/overture-creations-5sI6fQgYIuo.png"
mask_url = "https://raw.githubusercontent.com/CompVis/latent-diffusion/main/data/inpainting_examples/overture-creations-5sI6fQgYIuo_mask.png"

init_image = download_image(img_url).resize((512, 512))
mask_image = download_image(mask_url).resize((512, 512))

pipe = StableDiffusionInpaintPipeline.from_pretrained(
    "runwayml/stable-diffusion-inpainting",
    torch_dtype=torch.float16,
)
pipe = pipe.to("cuda")

prompt = "Face of a yellow cat, high resolution, sitting on a park bench"
image = pipe(prompt=prompt, image=init_image, mask_image=mask_image).images[0]
可以在colab中直接运行 colab文章来源地址https://www.toymoban.com/news/detail-721241.html
到了这里,关于扩散模型Diffusers Pipeline API使用介绍的文章就介绍完了。如果您还想了解更多内容,请在右上角搜索TOY模板网以前的文章或继续浏览下面的相关文章,希望大家以后多多支持TOY模板网!


