实现聊天室功能
服务端代码:
pro文件需要导入 network
头文件:
#ifndef WIDGET_H
#define WIDGET_H

#include <QWidget>
#include <QTcpServer>//服务端
#include <QTcpSocket>//客户端
#include <QList>
#include <QMessageBox>
#include <QDebug>

QT_BEGIN_NAMESPACE
namespace Ui { class Widget; }
QT_END_NAMESPACE

class Widget : public QWidget
{
    Q_OBJECT

public:
    Widget(QWidget *parent = nullptr);
    ~Widget();

private slots:
    void on_startBtn_clicked();
public slots:
    void newConnectSlot();//建立连接的槽函数
    void readyReadSlot();//接收消息的槽函数

private:
    Ui::Widget *ui;

    //实例化服务器对象
    QTcpServer *server;
    //创建存放客户端信息的容器
    QList<QTcpSocket *> socketList;
};
#endif // WIDGET_H
widget.cpp
#include "widget.h"
#include "ui_widget.h"

Widget::Widget(QWidget *parent)
    : QWidget(parent)
    , ui(new Ui::Widget)
{
    ui->setupUi(this);

    //实例化服务器对象
    server=new QTcpServer(this);

}

Widget::~Widget()
{
    delete ui;
}


void Widget::on_startBtn_clicked()
{
    //监听任意ip的指定端口
    bool listen_res=server->listen(QHostAddress::Any,ui->portLine->text().toUInt());
    if(listen_res){
        //监听成功
        QMessageBox::information(this,"提示","设置监听成功",QMessageBox::Ok);

    }else{
        //监听失败
        QMessageBox::information(this,"提示","设置监听失败",QMessageBox::Ok);
        return;
    }
    //等待连接
    connect(server,&QTcpServer::newConnection,this,&Widget::newConnectSlot);
}

void Widget::newConnectSlot()
{
    //接收到newConnect信号之后的槽函数,处理接下来的操作

    //获取客户端的套接字,加入容器
    QTcpSocket *s=server->nextPendingConnection();
    socketList.push_back(s);
    qDebug() << "有新客户连接" << s->peerName() << ";" << s->peerAddress().toString() << ":" << QString::number(s->peerPort()) <<endl;
    //此时如果客户端向服务器发送数据,客户端会发送一个readyRead信号
    connect(s,&QTcpSocket::readyRead,this,&Widget::readyReadSlot);
}

void Widget::readyReadSlot()
{
    //客户端有数据发送,触发改槽函数
    //遍历容器,移除无效客户端,接收有效客户端消息
    for (int i=0;i<socketList.count();i++) {
        //如果是非链接状态就移除
        if(socketList.at(i)->state()==QAbstractSocket::UnconnectedState){
            socketList.removeAt(i);
        }
    }
    for (int i=0;i<socketList.count();i++) {
        //如果有字节,就读取并放到ui界面
        if(socketList.at(i)->bytesAvailable()){
            QByteArray msg=socketList.at(i)->readAll();
            QString msgInfo=socketList.at(i)->peerAddress().toString()+":"+QString::number(socketList.at(i)->peerPort())+":"+QString::fromLocal8Bit(msg);
            ui->listWidget->addItem(msgInfo);
            for (int j=0;j<socketList.count();j++) {
                socketList.at(j)->write(msg);
            }
        }
    }
}
ui:

客户端代码:
头文件
#ifndef WIDGET_H
#define WIDGET_H

#include <QWidget>
#include <QtDebug>
#include <QMessageBox>
#include <QTcpSocket>

QT_BEGIN_NAMESPACE
namespace Ui { class Widget; }
QT_END_NAMESPACE

class Widget : public QWidget
{
    Q_OBJECT

public:
    Widget(QWidget *parent = nullptr);
    ~Widget();

private slots:
    void on_connnectBtn_clicked();

    void on_disconnectBtn_clicked();

    void on_sendBtn_clicked();

public slots:
    void connnectedSlot();
    void readyReadSlot();
    void disconnectedSlot();

private:
    Ui::Widget *ui;

    //实例化客户端
    QTcpSocket *socket;
    //定义全局变量存储用户名
    QString username;
};
#endif // WIDGET_H
widget.cpp
#include "widget.h"
#include "ui_widget.h"

Widget::Widget(QWidget *parent)
    : QWidget(parent)
    , ui(new Ui::Widget)
{
    ui->setupUi(this);
    //实例化客户端
    socket=new QTcpSocket(this);
    //将发送和断开连接 的按钮默认设置不可用
    ui->sendBtn->setDisabled(true);
    ui->disconnectBtn->setDisabled(true);

    ui->accoutLine->setText("张三");
    ui->ipLine->setText("192.168.125.77");
    ui->portLine->setText("8888");
    //连接成功会触发connected信号,只需要一次
    connect(socket,&QTcpSocket::connected,this,&Widget::connnectedSlot);

    //收信号
    connect(socket,&QTcpSocket::readyRead,this,&Widget::readyReadSlot);

    connect(socket,&QTcpSocket::disconnected,this,&Widget::disconnectedSlot);
}

Widget::~Widget()
{
    delete ui;
}


void Widget::on_connnectBtn_clicked()
{
    //连接服务器
    username=ui->accoutLine->text();
    QString ip=ui->ipLine->text();
    quint16 port=ui->portLine->text().toUInt();
    socket->connectToHost(ip,port);
    //判断是否连接成功:连接成功后,户端会自动发射一个connected信号,

}

void Widget::connnectedSlot()
{
    QMessageBox::information(this,"提示","连接成功");

    QString msg=username+"进入聊天室";
    socket->write(msg.toLocal8Bit());

    ui->sendBtn->setDisabled(false);
    ui->connnectBtn->setDisabled(true);
    ui->disconnectBtn->setDisabled(false);

}

void Widget::on_disconnectBtn_clicked()
{

    QString msg=username+"离开聊天室";
    socket->write(msg.toLocal8Bit());
    socket->disconnectFromHost();

}

void Widget::on_sendBtn_clicked()
{
    if(ui->infoLine->text().isEmpty()){
        QMessageBox::information(this,"提示","发送的消息不能为空");
        return;
    }
    QString msg=ui->infoLine->text();
    socket->write(msg.toLocal8Bit());
    ui->infoLine->setText("");
}
void Widget::readyReadSlot(){
    QByteArray msg=socket->readAll();

    ui->listWidget->addItem(QString::fromLocal8Bit(msg));
}

void Widget::disconnectedSlot()
{
    ui->sendBtn->setDisabled(true);
    ui->disconnectBtn->setDisabled(true);
    ui->connnectBtn->setDisabled(false);
    QMessageBox::information(this,"提示","断开连接成功");
}
ui:

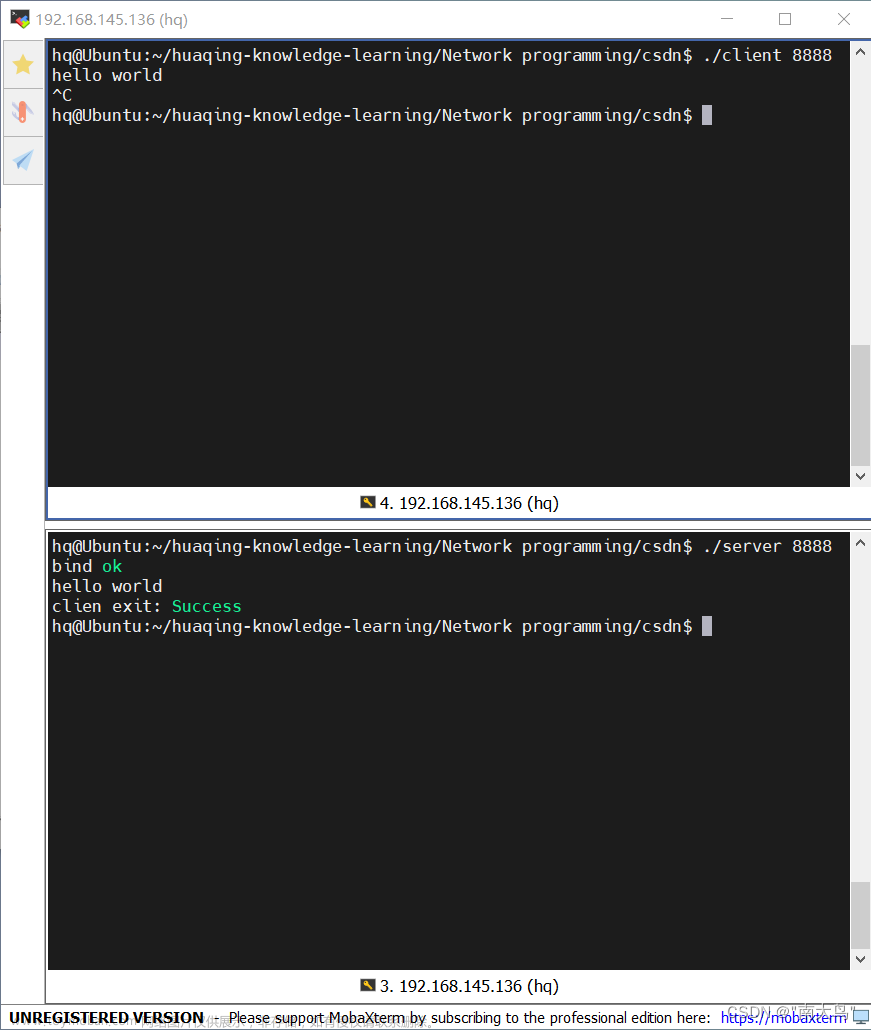
运行结果:客户端连接之后可以成功发送信息

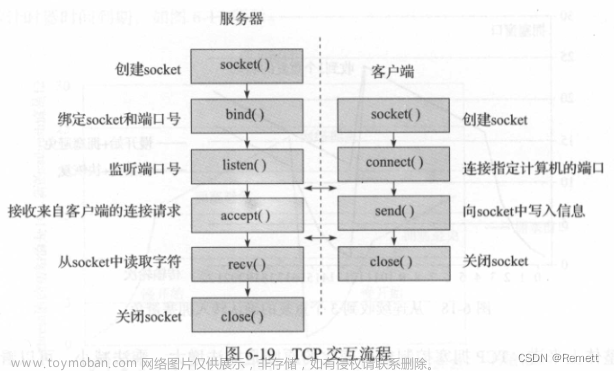
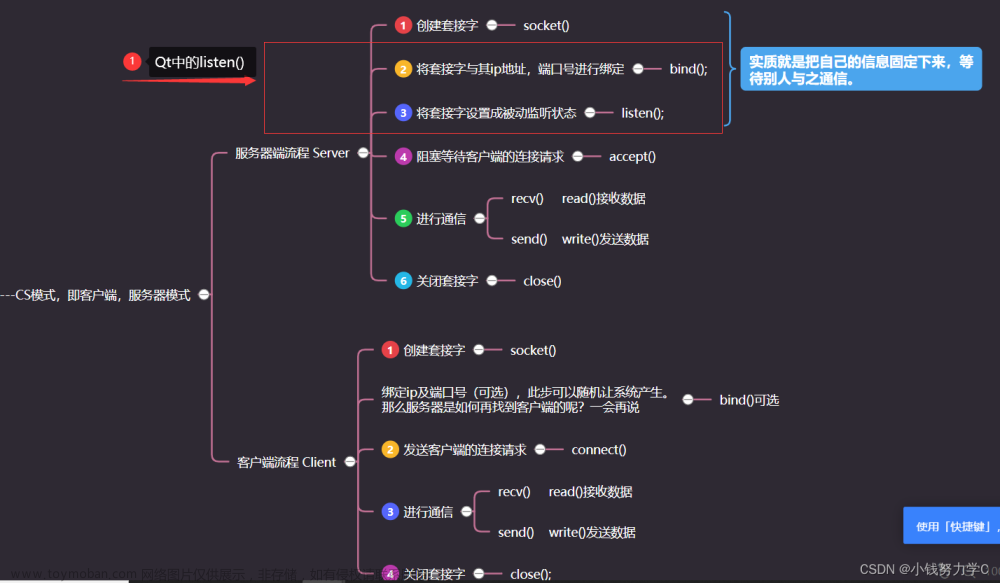
今日思维导图:

将聊天功能加入到仿qq登录之后:

代码:
page2.h:
#ifndef PAGE2_H
#define PAGE2_H

#include <QWidget>
#include <QMovie>
#include <QTcpSocket>
#include <QMessageBox>
#include <QDebug>
#define PORT 8888
#define IP "192.168.125.77"

namespace Ui {
class Page2;
}

class Page2 : public QWidget
{
    Q_OBJECT

public:
    explicit Page2(QWidget *parent = nullptr);
    ~Page2();
public slots:
    void login_slot();
    void connectedSlot();
    void readyReadSlot();
private slots:
    void on_sendBtn_clicked();

private:
    Ui::Page2 *ui;

    QTcpSocket *socket;

};

#endif // PAGE2_H
widget.h:
#ifndef WIDGET_H
#define WIDGET_H

#include <QWidget>
#include <QMovie>
#include <QMessageBox>
#include <QDebug>
#include <QMouseEvent>


QT_BEGIN_NAMESPACE
namespace Ui { class Widget; }
QT_END_NAMESPACE

class Widget : public QWidget
{
    Q_OBJECT

public:
    Widget(QWidget *parent = nullptr);
    ~Widget();

    void mousePressEvent(QMouseEvent *event) override;
    void mouseMoveEvent(QMouseEvent *event) override;

public slots:
    void loginButton_slot();


signals:
    void login_signal();

private:
    Ui::Widget *ui;

    QPoint p;//定义全局变量p,记录位置
public:
    static QString username;
};

#endif // WIDGET_H
main.cpp:
#include "widget.h"
#include "page2.h"

#include <QApplication>

int main(int argc, char *argv[])
{
    QApplication a(argc, argv);
    Widget w;
    w.show();

    Page2 p2;
    QObject::connect(&w,&Widget::login_signal,&p2,&Page2::login_slot);
    return a.exec();
}
page2.cpp:
#include "page2.h"
#include "widget.h"
#include "ui_page2.h"

Page2::Page2(QWidget *parent) :
    QWidget(parent),
    ui(new Ui::Page2)
{
    ui->setupUi(this);
    QMovie *movie = new QMovie(":/111/cai.gif");
    ui->label->setMovie(movie);
    ui->label->setScaledContents(true);
    movie->start();
    //实例化客户端
    socket=new QTcpSocket(this);
    qDebug() << "实例化客户端";
    //建立connected信号和指定槽函数的连接
    connect(socket,&QTcpSocket::connected,this,&Page2::connectedSlot);
    //建立readyRead信号和指定槽函数连接
    connect(socket,&QTcpSocket::readyRead,this,&Page2::readyReadSlot);

}

Page2::~Page2()
{
    delete ui;
}

void Page2::login_slot()
{
    qDebug() << "登录按钮";
    this->show();
    //连接客户端
    socket->connectToHost(IP,PORT);
}

void Page2::connectedSlot()
{
    //连接成功后触发该槽函数
    qDebug() << "连接成功";
    QMessageBox::information(this,"提示","连接成功");

    QString msg=Widget::username+"加入了聊天";
    socket->write(msg.toLocal8Bit());
}

void Page2::readyReadSlot()
{
    //收到服务端发送的消息时触发该槽函数
    QByteArray msg=socket->readAll();
    ui->listWidget->addItem(QString::fromLocal8Bit(msg));
}

void Page2::on_sendBtn_clicked()
{
    if(ui->infoEdit->toPlainText().isEmpty()){
        QMessageBox::information(this,"提示","发送的消息不能为空");
        return;
    }
    QString msg=ui->infoEdit->toPlainText();
    socket->write(msg.toLocal8Bit());
    ui->infoEdit->clear();
}
widget.cpp:
#include "widget.h"
#include "ui_widget.h"
QString Widget::username="";
Widget::Widget(QWidget *parent)
    : QWidget(parent)
    , ui(new Ui::Widget)
{
    ui->setupUi(this);
    this->setFixedSize(560,430);
    this->setStyleSheet("background-color:#faf7ec");
    this->setWindowFlag(Qt::FramelessWindowHint);//无边框
    QMovie *movie = new QMovie(":/111/cai.gif");
    ui->backLabel->setMovie(movie);
    ui->backLabel->setScaledContents(true);
    movie->start();

    ui->closeButton->setStyleSheet("border-image:url(:/111/basketball.png)");


    ui->avatorLabel->resize(60,60);
    ui->avatorLabel->setStyleSheet("border-image:url(:/111/user.png);border-radius:30px");

    ui->accountLabel->setPixmap(QPixmap(":/111/account.jpg"));
    //ui->accountLabel->resize(40,40);
    ui->accountLabel->setScaledContents(true);

    ui->passwdLabel->setPixmap(QPixmap(":/111/passwd.jpg"));
    //ui->passwdLabel->resize(40,40);
    ui->passwdLabel->setScaledContents(true);

    ui->accoountLine->setPlaceholderText("账号");
    ui->passwdLine->setPlaceholderText("密码");
    ui->passwdLine->setEchoMode(QLineEdit::Password);

    ui->loginLabel->setPixmap(QPixmap(":/111/2.png"));
    ui->loginLabel->setScaledContents(true);

    ui->loginButton->setStyleSheet("background-color:#409EFF;border-radius:5px");

    connect(ui->closeButton,SIGNAL(clicked()),this,SLOT(close()));

    connect(ui->loginButton,&QPushButton::clicked,this,&Widget::loginButton_slot);

}

Widget::~Widget()
{
    delete ui;
}


void Widget::loginButton_slot()
{
    //判断用户账号密码的正确性
    if(ui->accoountLine->text()=="admin"&&ui->passwdLine->text()=="123456"){
        username="admin";
        qDebug() << "登录成功" <<endl;
        QMessageBox::information(this,"提示","登录成功",QMessageBox::Ok);
        this->close();
        //开启新窗口,手动触发信号
        emit login_signal();
    }else{
        qDebug() << "账号或者密码错误" <<endl;
        int res=QMessageBox::information(this,"提示","账号或者密码错误,是否继续登录",QMessageBox::Ok|QMessageBox::No);
        if(res==QMessageBox::Ok){
            ui->passwdLine->setText("");
        }else{
            this->close();
        }

    }
}
void Widget::mousePressEvent(QMouseEvent *event){
    p=event->pos();
}
void Widget::mouseMoveEvent(QMouseEvent *event){
    if(event->buttons()==Qt::LeftButton)
    this->move(event->globalPos()-p);
}
page2.ui:

widget.ui:

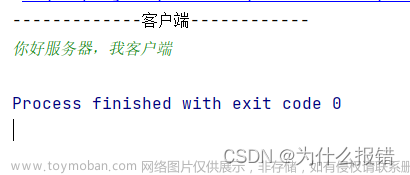
运行结果:文章来源:https://www.toymoban.com/news/detail-722496.html
 文章来源地址https://www.toymoban.com/news/detail-722496.html
到了这里,关于QTday05(TCP的服务端客户端通信)的文章就介绍完了。如果您还想了解更多内容,请在右上角搜索TOY模板网以前的文章或继续浏览下面的相关文章,希望大家以后多多支持TOY模板网!