一、项目概述
这个项目是一个简单的计算器应用,它可以执行加、减、乘、除四种基本运算等计算器的基本功能。我们将使用Android Studio作为开发工具。
二、项目设计
1. 在Android Studio中创建新的Android项目。
2. 在布局文件(`activity_main.xml`)中,我们将添加一个按钮和一个用于显示结果的文本视图。
3. 在代码文件(`MainActivity.java`)中,我们将处理用户的输入并显示计算结果。
三、项目开发
1. 布局文件
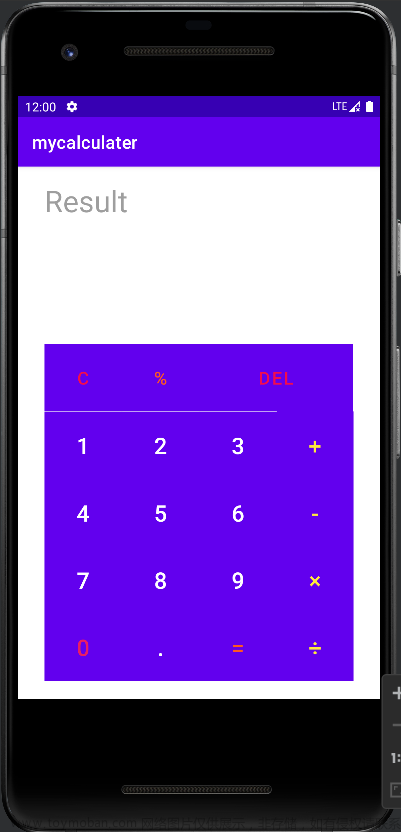
在布局文件`activity_main.xml`中实现前端页面效果。使用一些组件例如`EditText`用于输入过程和结果,`Button`用于执行计算。
<?xml version="1.0" encoding="utf-8"?>
<GridLayout xmlns:android="http://schemas.android.com/apk/res/android"
    xmlns:tools="http://schemas.android.com/tools"
    android:layout_width="match_parent"
    android:layout_height="match_parent"
    android:orientation="vertical"
    tools:context=".MainActivity">

    <GridLayout
        android:layout_width="match_parent"
        android:layout_height="wrap_content"
        android:layout_gravity="top"
        android:columnCount="1"
        android:orientation="vertical"
        android:rowCount="2">

        <EditText
            android:id="@+id/mresult"
            android:layout_width="match_parent"
            android:layout_height="100dp"
            android:enabled="false"
            android:hint="这里显示结果"
            android:textColor="@color/black" />


        <EditText
            android:id="@+id/mjsgc"
            android:layout_width="match_parent"
            android:layout_height="100dp"
            android:hint="这里显示计算过程" />
    </GridLayout>

    <GridLayout
        android:layout_width="match_parent"
        android:layout_height="wrap_content"
        android:layout_gravity="center|top"
        android:orientation="horizontal"

        android:columnCount="4"
        android:rowCount="5"
        >

        <Button
            android:id="@+id/btnqc"
            android:layout_width="180dp"
            android:layout_height="60dp"
            android:layout_columnSpan="2"
            android:text="C" />

        <Button
            android:id="@+id/btndel"
            android:layout_width="90dp"
            android:layout_height="60dp"
            android:layout_columnSpan="1"
            android:text="del" />

        <Button
            android:id="@+id/btnc"
            android:layout_width="90dp"
            android:layout_height="60dp"
            android:text="/" />

        <Button
            android:id="@+id/btn7"
            android:layout_width="90dp"
            android:layout_height="60dp"
            android:text="7" />

        <Button
            android:id="@+id/btn8"
            android:layout_width="90dp"
            android:layout_height="60dp"
            android:text="8" />

        <Button
            android:id="@+id/btn9"
            android:layout_width="90dp"
            android:layout_height="60dp"
            android:text="9" />

        <Button
            android:id="@+id/btnx"
            android:layout_width="90dp"
            android:layout_height="60dp"
            android:text="*" />


        <Button
            android:id="@+id/btn4"
            android:layout_width="90dp"
            android:layout_height="60dp"
            android:text="4" />

        <Button
            android:id="@+id/btn5"
            android:layout_width="90dp"
            android:layout_height="60dp"
            android:text="5" />

        <Button
            android:id="@+id/btn6"
            android:layout_width="90dp"
            android:layout_height="60dp"
            android:text="6" />

        <Button
            android:id="@+id/btnj"
            android:layout_width="90dp"
            android:layout_height="63dp"
            android:text="-" />

        <Button
            android:id="@+id/btn1"
            android:layout_width="90dp"
            android:layout_height="60dp"
            android:text="1" />

        <Button
            android:id="@+id/btn2"
            android:layout_width="90dp"
            android:layout_height="60dp"
            android:text="2" />

        <Button
            android:id="@+id/btn3"
            android:layout_width="90dp"
            android:layout_height="60dp"
            android:text="3" />


        <Button
            android:id="@+id/btn1j"
            android:layout_width="90dp"
            android:layout_height="60dp"
            android:layout_rowSpan="1"
            android:text="+" />

        <Button
            android:id="@+id/zhengfu"
            android:layout_width="90dp"
            android:layout_height="60dp"
            android:text="预留" />

        <Button
            android:id="@+id/btn0"
            android:layout_width="90dp"
            android:layout_height="60dp"
            android:layout_columnSpan="1"
            android:text="0" />

        <Button
            android:id="@+id/btnd"
            android:layout_width="wrap_content"
            android:layout_height="60dp"
            android:text="." />


        <Button
            android:id="@+id/btn1d"
            android:layout_width="90dp"
            android:layout_height="60dp"
            android:text="=" />

        <Space />
    </GridLayout>

</GridLayout>GridLayout布局:如果要实现行合并的布局效果,采用GridLayout布局是最简单轻松的实现方式。
常用属性:android:orientation设置水平或垂直显示 android:columnCount设置列数android:rowCount 设置行数
子控件属性:android:layout_rowSpan纵向跨合并几列 android:layout_columSpan横向合并几行 android:layout_gravity父组件的位置

上图是前端页面效果
2. 代码文件
在代码文件`MainActivity.java`中我们将添加按钮的点击事件监听器,处理用户输入,并显示计算结果。
package com.example.a4_11;


import androidx.appcompat.app.AppCompatActivity;

import android.os.Bundle;
import android.util.Log;
import android.view.View;
import android.widget.Button;
import android.widget.EditText;
import android.widget.Toast;

public class MainActivity extends AppCompatActivity implements View.OnClickListener {
    //显式结果和计算过程
    private EditText mresult, mjsgc;
    //数字0-9
    private Button btn1, btn2, btn3, btn4, btn5, btn6, btn7, btn8, btn9, btn0;
    private Button btnd; //小数点
    //运算符
    private Button btn1j, btnj, btnx, btnc, btn1d; //加减乘除等于

    //功能键
    private Button btndel, btnqc;//回退键和清除所有键
    boolean equals_flag = false;//等号标识

    boolean del_flag = false;

    @Override
    protected void onCreate(Bundle savedInstanceState) {
        super.onCreate(savedInstanceState);
        setContentView(R.layout.activity_main);
        //数字0-9
        btn1 = findViewById(R.id.btn1);
        btn2 = findViewById(R.id.btn2);
        btn3 = findViewById(R.id.btn3);
        btn4 = findViewById(R.id.btn4);
        btn5 = findViewById(R.id.btn5);
        btn6 = findViewById(R.id.btn6);
        btn7 = findViewById(R.id.btn7);
        btn8 = findViewById(R.id.btn8);
        btn9 = findViewById(R.id.btn9);
        btn0 = findViewById(R.id.btn0);
        //运算符
        btn1j = findViewById(R.id.btn1j);// +
        btnj = findViewById(R.id.btnj);// -
        btnx = findViewById(R.id.btnx);// *
        btnc = findViewById(R.id.btnc); // /
        btnd = findViewById(R.id.btnd);//小数点
        btn1d = findViewById(R.id.btn1d);// =

        btndel = findViewById(R.id.btndel);//退回
        btnqc = findViewById(R.id.btnqc);//清除

        mresult = findViewById(R.id.mresult);//结果框
        mjsgc = findViewById(R.id.mjsgc);//输入过程框

        //点击事件0-9
        btn0.setOnClickListener(this);
        btn1.setOnClickListener(this);
        btn2.setOnClickListener(this);
        btn3.setOnClickListener(this);
        btn4.setOnClickListener(this);
        btn5.setOnClickListener(this);
        btn6.setOnClickListener(this);
        btn7.setOnClickListener(this);
        btn8.setOnClickListener(this);
        btn9.setOnClickListener(this);
        btnd.setOnClickListener(this);
        //点击事件运算符
        btn1j.setOnClickListener(this);
        btnj.setOnClickListener(this);
        btnx.setOnClickListener(this);
        btnc.setOnClickListener(this);
        btn1d.setOnClickListener(this);

        btndel.setOnClickListener(this);
        btnqc.setOnClickListener(this);
    }

    //读取每个按钮的点击的内容
    @Override
    public void onClick(View v) {
        //获取输入框和结果框的内容
        String input = mjsgc.getText().toString();
        String output = mresult.getText().toString();
        switch (v.getId()) {
            case R.id.btn0:
            case R.id.btn1:
            case R.id.btn2:
            case R.id.btn3:
            case R.id.btn4:
            case R.id.btn5:
            case R.id.btn6:
            case R.id.btn7:
            case R.id.btn8:
            case R.id.btn9:
            case R.id.btnd:
                if (equals_flag) {
                    //按过等号之后,重新点数字们
                    equals_flag = false;
                    mjsgc.setText(((Button) v).getText());
                    mresult.setText(((Button) v).getText());
                } else {
                    mjsgc.setText(input + ((Button) v).getText());
                    mresult.setText(((Button) v).getText());
                }
                break;
            case R.id.btn1j:
            case R.id.btnj:
            case R.id.btnx:
            case R.id.btnc:
                if (equals_flag) {
                    //按过等号之后,重新点数字
                    equals_flag = false;
                    mjsgc.setText(output + " " + ((Button) v).getText() + " ");
                } else {
                    mjsgc.setText(input + " " + ((Button) v).getText() + " ");
                }
                break;
            case R.id.btndel:
                equals_flag = false;
                if (input.length() > 0) {//如果获取到的内容不为空
                    mjsgc.setText(input.substring(0, input.length() - 1));
                } else {
                    mresult.setText(null);
                    mjsgc.setText(null);
                }
                break;
            case R.id.btnqc:
                mresult.setText(null);
                mjsgc.setText(null);
                break;
            case R.id.btn1d://运算结果  =
                getResult();//调用处理结果集的方法
                break;
        }
    }

    //运算结果的方法
    public void getResult() {
        try {
            String JSGC = mjsgc.getText().toString();//获取计算过程文本框的内容
            double dResult = 0;
            int iResult = 0;

            //如果直接点等号
            if (JSGC.equals("") || JSGC == null) {
                return;
            }
            if (equals_flag) {
                equals_flag = false;
                return;
            }
            equals_flag = true;//点击过等号之后,标识亮起

            String s1, s2, op;

            //运算符前的数字
            s1 = JSGC.substring(0, JSGC.indexOf(" "));
            //运算符
            op = JSGC.substring(JSGC.indexOf(" ") + 1, JSGC.indexOf(" ") + 2);
            //运算符后的数字
            s2 = JSGC.substring(JSGC.indexOf(" ") + 3);

            double d1, d2;
            //s1转化成double型
            if (!s1.equals("")) {
                if (s1.charAt(0) == '.') {
                    s1 = "0" + s1;//如果简写小数(如0.03简写.03,需要帮它完整输出数字)
                }
                d1 = Double.parseDouble(s1);//正常转化
            } else {
                d1 = 0;//如果首次只输入了“运算符 数字”,如: + 4,则返回:0 + 4
                mjsgc.setText("0" + JSGC);
            }

            //s2转化成double型
            if (!s2.equals("")) {
                if (s2.charAt(0) == '.') {
                    s2 = "0" + s2;
                }
                d2 = Double.parseDouble(s2);
            } else {
                d2 = d1;
                if (s1.equals("")) {
                    mjsgc.setText("0" + JSGC + "0");//如果只输入了运算符,如 + ,输出0 + 0,得结果0
                } else {
                    mjsgc.setText(JSGC + s1);//如果不输入s2,如,9 * ,输出9 * 9 ,得结果81
                }
            }


            if (op.equals("+")) {//如果是 +
                dResult = d1 + d2;
            } else if (op.equals("-")) {
                dResult = d1 - d2;
            } else if (op.equals("*")) {
                dResult = d1 * d2;
            } else if (op.equals("/")) {
                if (d2 == 0) { //如果被除数是0
                    Toast.makeText(this, "除数不能为0", Toast.LENGTH_SHORT).show();
                    return;
                } else {//否则执行正常是除法运算
                    dResult = d1 / d2;
                }
            }


            if (s1.contains(".") || s2.contains(".") || op.equals("/")) {
                mresult.setText(dResult + "");//如果是小数、或者除法运算
            } else {
                iResult = (int) dResult; //否则都是整型
                mresult.setText(iResult + "");
            }

        } catch (Exception e) {
            Toast.makeText(this, e.toString(), Toast.LENGTH_SHORT).show();
            Log.i("JSQ", e.toString());
        }

    }
}
3. 运行项目
点击运行按钮,即可运行成功。

运行效果图
三、心得体会
1.理解布局设计
理解如何设计和实现一个计算器的用户界面是一个重要的步骤。我需要考虑如何将各种控件(如文本框,按钮等)放置在屏幕上以获得最佳的用户体验。
2.理解Android事件处理
当用户在计算器上进行操作时(如点击按钮或输入数字),需要有相应的事件处理逻辑来响应这些操作。这涉及到理解Android的事件处理机制,如点击事件,输入事件等。
3.学习与创新
开发Android计算器让我了解到,学习新的技术和知识是必要的,但更重要的是能够将这些知识应用到实际的问题中,并进行创新。这个过程让我对学习有了新的理解。
4.理解Android数据存储
在这个项目中,我需要在应用中存储一些数据,如用户输入的数字和操作。我需要了解如何使用Android的数据存储技术来实现这一点。
5.调试和测试
在开发过程中,我需要花大量的时间进行调试和测试,以确保计算器的功能正常,用户界面友好。这让我了解到测试的重要性,以及如何编写有效的测试用例来发现和修复错误。文章来源:https://www.toymoban.com/news/detail-722916.html
四、总结
这次项目中学习到如何在Android应用中实现计算器功能。如何在Activity中创建和管理视图。解如何使用XML布局文件来设计和布局界面。需要熟悉各种布局元素,如`GridLayout`。学习到如何使用各种UI组件来实现用户交互。这包括如何使用`EditText`、`Button`、`TextView`等组件来输入和显示文本。在实现计算器功能时,你需要了解各种运算的规则和算法。这包括加法、减法、乘法和除法的基本原理,以及如何处理浮点数和括号等复杂表达式。可以掌握Android应用开发的基本概念,包括布局、事件处理和计算功能。这将在Android开发领域的进一步学习打下坚实的基础。文章来源地址https://www.toymoban.com/news/detail-722916.html
到了这里,关于Android计算器实现的文章就介绍完了。如果您还想了解更多内容,请在右上角搜索TOY模板网以前的文章或继续浏览下面的相关文章,希望大家以后多多支持TOY模板网!