Celery 常用于 web 异步任务、定时任务等。
使用 redis 作为 Celery的「消息代理 / 消息中间件」。
这里通过Flask-Mail使用qq邮箱延时发送邮件作为示例
pip install celery
pip install redis
pip install Flask-Mail

1、使用flask发送邮件
使用 Flask-Mail 发送邮件需要进行一下配置,其中QQ邮箱授权码的获取方式如下所述:
app = Flask(__name__)
app.config['SECRET_KEY'] = 'top-secret!'

# Flask-Mail configuration
app.config['MAIL_SERVER'] = 'smtp.qq.com'
app.config['MAIL_PORT'] = 465
# 启用/禁用传输安全层加密
app.config['MAIL_USE_TLS'] = False
# 启用/禁用安全套接字层加密
app.config['MAIL_USE_SSL'] = True
app.config['MAIL_USERNAME'] = '我的QQ邮箱@qq.com'
app.config['MAIL_PASSWORD'] = '我的QQ邮箱授权码'
app.config['MAIL_DEFAULT_SENDER'] = '我的QQ邮箱@qq.com'

# Celery configuration
app.config['CELERY_BROKER_URL'] = 'redis://localhost:6379/0'
app.config['CELERY_RESULT_BACKEND'] = 'redis://localhost:6379/0'


# Initialize extensions
mail = Mail(app)

@app.route("/send_mail")
def index11():
    # sender:发件人    recipients:收件人
   msg = Message('Hello', sender = app.config['MAIL_DEFAULT_SENDER'], recipients = ['目标邮箱@qq.com'])
   msg.body = "来自python--flask框架发送的邮件内容~"
   mail.send(msg)#发送Message类对象的内容
   return "发送成功"
点进qq邮箱,在设置里面点击账号,向下滚动开启pop3服务获取授权码。


2、延时发送邮件
定义celery任务,与flask基本一样 只是前面多了修饰符@celery.task
@celery.task
def send_async_email(email_data):
    """Background task to send an email with Flask-Mail."""
    msg = Message(email_data['subject'],
                  sender=app.config['MAIL_DEFAULT_SENDER'],
                  recipients=[email_data['to']])
    msg.body = email_data['body']
    with app.app_context():
        mail.send(msg)
@app.route('/', methods=['GET', 'POST'])
def index():
    if request.method == 'GET':
        return render_template('index.html', email=session.get('email', ''))
    email = request.form['email']
    session['email'] = email

    # send the email
    email_data = {
        'subject': 'Hello from Flask',
        'to': email,
        'body': '来自python--flask框架延时发送的邮件内容~'
    }
    if request.form['submit'] == 'Send':
        # send right away
        send_async_email.delay(email_data)
        print('here!--')
        flash('Sending email to {0}'.format(email))
    else:
        # send in one minute
        send_async_email.apply_async(args=[email_data], countdown=60)
        flash('An email will be sent to {0} in one minute'.format(email))

    return redirect(url_for('index'))
3、生成带有状态信息进度条的异步任务
# bind为True,会传入self给被装饰的方法
@celery.task(bind=True)
def long_task(self):
    """带有进度条以及状态报告的 异步任务"""
    verb = ['正在', '准备', '目前', '处于', '进行']
    adjective = ['全速', '努力', '默默地', '认真', '快速']
    noun = ['打开', '启动', '修复', '加载', '检查']
    message = ''
    total = random.randint(10, 50)  # 随机取10~50的一个随机数
    for i in range(total):
        selectnow = random.random()
        print(selectnow)
        # 拼接上面三个lsit  随机的生成一些状态描述
        if not message or selectnow < 0.25:
            message = '{0} {1} {2}...'.format(random.choice(verb),
                                              random.choice(adjective),
                                              random.choice(noun))
        # 更新Celery任务状态
        self.update_state(state='PROGRESS',
                          meta={'current': i, 'total': total,
                                'status': message})
        time.sleep(1)
        # 返回字典
    return {'current': 100, 'total': 100, 'status': '任务完成!',
            'result': 42}


@app.route('/longtask', methods=['POST'])
def longtask():
    task = long_task.apply_async()
    return jsonify({}), 202, {'Location': url_for('taskstatus', task_id=task.id)}


@app.route('/status/<task_id>')
def taskstatus(task_id):
    task = long_task.AsyncResult(task_id)
    # print(task.state)
    if task.state == 'PENDING':
        # PENDING的时候  如果一直PENDING可能是celery没开启
        response = {
            'state': task.state,
            'current': 0,
            'total': 1,
            'status': 'Pending...'
        }
    elif task.state != 'FAILURE':
        # 加载的时候
        response = {
            'state': task.state,
            'current': task.info.get('current', 0),
            'total': task.info.get('total', 1),
            'status': task.info.get('status', '')
        }
        if 'result' in task.info:
            response['result'] = task.info['result']
    else:
        # 报错时候的输出
        response = {
            'state': task.state,
            'current': 1,
            'total': 1,
            'status': str(task.info),  # this is the exception raised
        }
    return jsonify(response)
4、完整代码
文件结构
--- current
    --- templates
        --- index.html
    --- asyn_001.py
这个是asyn_001.py
import os
import random
import time
from flask import Flask, request, render_template, session, flash, redirect, \
    url_for, jsonify
from flask_mail import Mail, Message
from celery import Celery


app = Flask(__name__)
app.config['SECRET_KEY'] = 'top-secret!'

# Flask-Mail configuration
app.config['MAIL_SERVER'] = 'smtp.qq.com'
app.config['MAIL_PORT'] = 465
# 启用/禁用传输安全层加密
app.config['MAIL_USE_TLS'] = False
# 启用/禁用安全套接字层加密
app.config['MAIL_USE_SSL'] = True
app.config['MAIL_USERNAME'] = '我的QQ邮箱@qq.com'
app.config['MAIL_PASSWORD'] = '我的QQ邮箱授权码'
app.config['MAIL_DEFAULT_SENDER'] = '我的QQ邮箱@qq.com'

# Celery configuration
app.config['CELERY_BROKER_URL'] = 'redis://localhost:6379/0'
app.config['CELERY_RESULT_BACKEND'] = 'redis://localhost:6379/0'


# Initialize extensions
mail = Mail(app)

@app.route("/send_mail")
def index11():
    # sender:发件人    recipients:收件人
   msg = Message('Hello', sender = app.config['MAIL_DEFAULT_SENDER'], recipients = ['目标邮箱@qq.com'])
   msg.body = "来自python--flask框架发送的邮件内容~"
   mail.send(msg)#发送Message类对象的内容
   return "发送成功"


# Initialize Celery
celery = Celery(app.name, broker=app.config['CELERY_BROKER_URL'])
celery.conf.update(app.config)


@celery.task
def send_async_email(email_data):
    """Background task to send an email with Flask-Mail."""
    msg = Message(email_data['subject'],
                  sender=app.config['MAIL_DEFAULT_SENDER'],
                  recipients=[email_data['to']])
    msg.body = email_data['body']
    with app.app_context():
        mail.send(msg)

@app.route('/', methods=['GET', 'POST'])
def index():
    if request.method == 'GET':
        return render_template('index.html', email=session.get('email', ''))
    email = request.form['email']
    session['email'] = email

    # send the email
    email_data = {
        'subject': 'Hello from Flask',
        'to': email,
        'body': '来自python--flask框架延时发送的邮件内容~'
    }
    if request.form['submit'] == 'Send':
        # send right away
        send_async_email.delay(email_data)
        print('here!--')
        flash('Sending email to {0}'.format(email))
    else:
        # send in one minute
        send_async_email.apply_async(args=[email_data], countdown=60)
        flash('An email will be sent to {0} in one minute'.format(email))

    return redirect(url_for('index'))


# bind为True,会传入self给被装饰的方法
@celery.task(bind=True)
def long_task(self):
    """带有进度条以及状态报告的 异步任务"""
    verb = ['正在', '准备', '目前', '处于', '进行']
    adjective = ['全速', '努力', '默默地', '认真', '快速']
    noun = ['打开', '启动', '修复', '加载', '检查']
    message = ''
    total = random.randint(10, 50)  # 随机取10~50的一个随机数
    for i in range(total):
        selectnow = random.random()
        print(selectnow)
        # 拼接上面三个lsit  随机的生成一些状态描述
        if not message or selectnow < 0.25:
            message = '{0} {1} {2}...'.format(random.choice(verb),
                                              random.choice(adjective),
                                              random.choice(noun))
        # 更新Celery任务状态
        self.update_state(state='PROGRESS',
                          meta={'current': i, 'total': total,
                                'status': message})
        time.sleep(1)
        # 返回字典
    return {'current': 100, 'total': 100, 'status': '任务完成!',
            'result': 42}


@app.route('/longtask', methods=['POST'])
def longtask():
    task = long_task.apply_async()
    return jsonify({}), 202, {'Location': url_for('taskstatus', task_id=task.id)}


@app.route('/status/<task_id>')
def taskstatus(task_id):
    task = long_task.AsyncResult(task_id)
    # print(task.state)
    if task.state == 'PENDING':
        # PENDING的时候  如果一直PENDING可能是celery没开启
        response = {
            'state': task.state,
            'current': 0,
            'total': 1,
            'status': 'Pending...'
        }
    elif task.state != 'FAILURE':
        # 加载的时候
        response = {
            'state': task.state,
            'current': task.info.get('current', 0),
            'total': task.info.get('total', 1),
            'status': task.info.get('status', '')
        }
        if 'result' in task.info:
            response['result'] = task.info['result']
    else:
        # 报错时候的输出
        response = {
            'state': task.state,
            'current': 1,
            'total': 1,
            'status': str(task.info),  # this is the exception raised
        }
    return jsonify(response)


if __name__ == '__main__':
    app.run(debug=True)
这个是index.html
<html>
<head>
<title>Flask + Celery 示例</title>
<style>
.progress {
width: 100%;
text-align: center;
}
</style>
</head>
<body>
<h1>Flask + Celery 示例</h1>
<h2>Example 1: 发送异步邮件</h2>
{% for message in get_flashed_messages() %}
<p style="color: red;">{{ message }}</p>
{% endfor %}
<form method="POST">
<p>Send test email to: <input type="text" name="email" value="{{ email }}"></p>
<input type="submit" name="submit" value="Send">
<input type="submit" name="submit" value="Send in 1 minute">
</form>
<hr>
<h2>Example 2: 生成进度条以及状态报告</h2>
<!--<button οnclick="start_long_task();">Start Long Calculation</button><br><br>-->
<button id="start-bg-job">Start Long Calculation</button><br><br>
<div id="progress"></div>
<script src="//cdnjs.cloudflare.com/ajax/libs/nanobar/0.2.1/nanobar.min.js"></script>
<script src="//cdnjs.cloudflare.com/ajax/libs/jquery/2.1.3/jquery.min.js"></script>
<script>
function start_long_task() {
// add task status elements
div = $('<div class="progress"><div></div><div>0%</div><div>...</div><div> </div></div><hr>');
$('#progress').append(div);
// create a progress bar
var nanobar = new Nanobar({
bg: '#44f',
target: div[0].childNodes[0]
});
// send ajax POST request to start background job
$.ajax({
type: 'POST',
url: '/longtask',
success: function(data, status, request) {
status_url = request.getResponseHeader('Location');
console.log("status_url", status_url,"nanobar", nanobar, "div[0]", div[0])
console.log("data", data)
update_progress(status_url, nanobar, div[0]);
},
error: function() {
alert('Unexpected error');
}
});
}
function update_progress(status_url, nanobar, status_div) {
// send GET request to status URL
$.getJSON(status_url, function(data) {
// update UI
percent = parseInt(data['current'] * 100 / data['total']);
nanobar.go(percent);
$(status_div.childNodes[1]).text(percent + '%');
$(status_div.childNodes[2]).text(data['status']);
if (data['state'] != 'PENDING' && data['state'] != 'PROGRESS') {
if ('result' in data) {
// show result
$(status_div.childNodes[3]).text('Result: ' + data['result']);
}
else {
// something unexpected happened
$(status_div.childNodes[3]).text('Result: ' + data['state']);
}
}
else {
// rerun in 2 seconds
setTimeout(function() {
update_progress(status_url, nanobar, status_div);
}, 2000);
}
});
}
$(function() {
$('#start-bg-job').click(start_long_task);
});
</script>
</body>
</html>
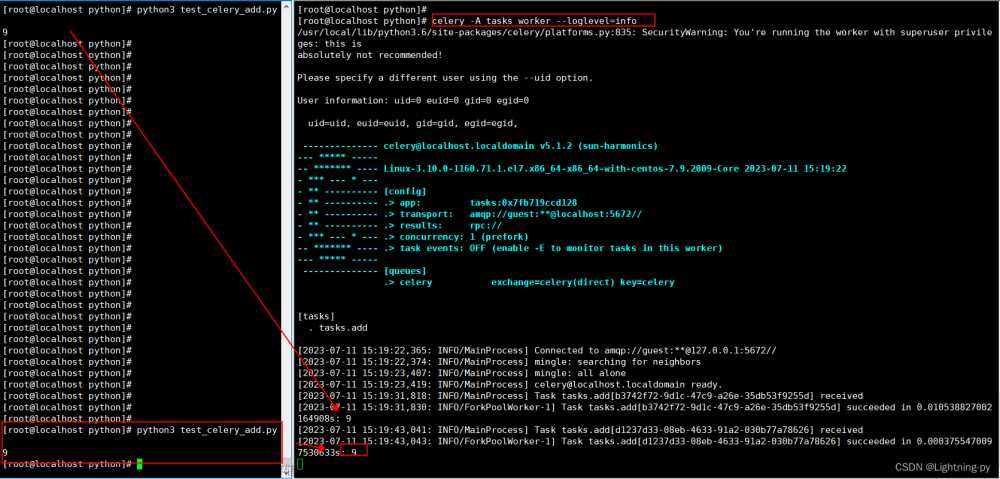
5、启动任务
终端cd到current文件夹所在目录
启动asyn_001程序,即可观察到异步任务的执行。
6、遇到的问题
在用5种的启动方法启动后,运行代码偶然间碰到下图这样的错误 一个快速的解决方法是使事情成为单线程的。为此,在启动 celery worker 时将 celery 的 worker pool 类型设置为solo文章来源:https://www.toymoban.com/news/detail-730258.html
celery -A your_proj worker -P solo -l info
参考1 Celery实现异步任务和定时任务的简单示例
参考2 Using Celery with Flask文章来源地址https://www.toymoban.com/news/detail-730258.html
到了这里,关于Celery结合flask完成异步任务与定时任务的文章就介绍完了。如果您还想了解更多内容,请在右上角搜索TOY模板网以前的文章或继续浏览下面的相关文章,希望大家以后多多支持TOY模板网!