version 4.4.7 学习总结
celery介绍
- python实现、开源、遵循BSD许可的分布式任务队列;
- 可以处理大量消息,简单、灵活、可靠的分布式系统,专注任务的实时处理和定时调度处理;
- 它是线程、进程分配任务的一种机制,官方仅做支持linux开发。
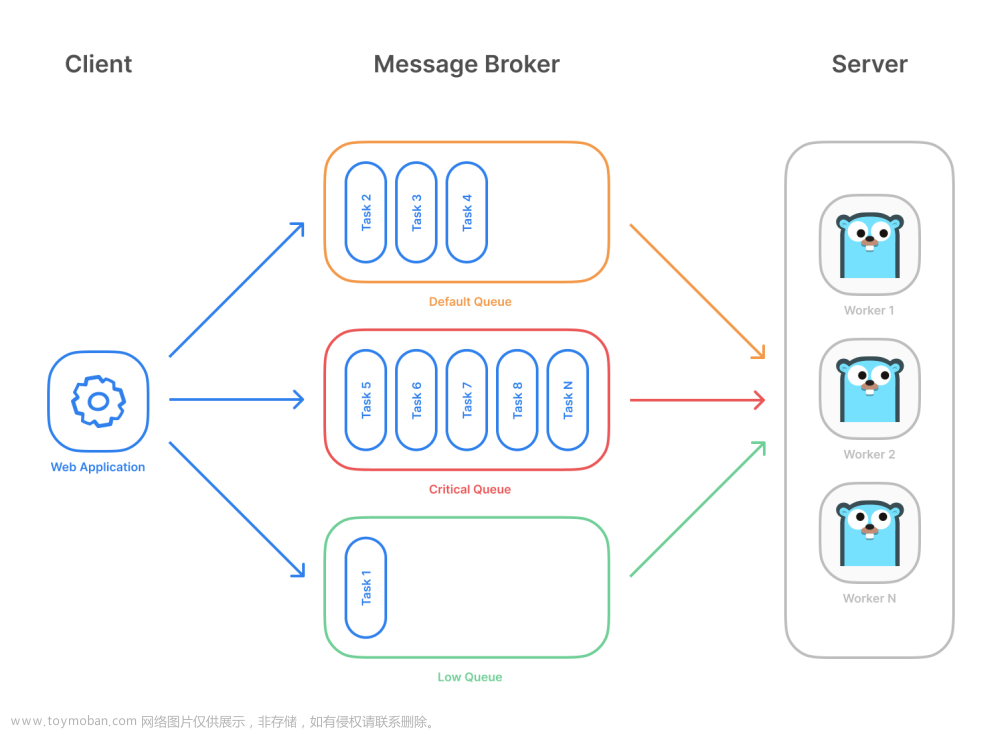
- 五大部分:
- task,任务
- beat,定时调度管理器
- broker,中间代理,用于存储消息、转发消息(如rabbitmq/redis)
- worker,工作进程,处理任务
- backend,存储任务执行结果 (如redis/mongodb)
兼容性
Celery version 4.0 runs on
Python ❨2.7, 3.4, 3.5❩
Celery 5.x
Python 3.5 or newer is required.
简单使用
安装
- pip 安装
# 官方仅支持linux(上线时),windows下也可以使用(测试)
pip3 install -U celery # -U升级所有包到最新
- 源码安装
下载
tar -zxvf celery-0.0.0.tar.gz
$ cd celery-0.0.0
$ python setup.py build
$ python setup.py install
使用方式
参考django-celery使用
Celery is a project with minimal funding, so we don’t support Microsoft Windows. Please don’t open any issues related to that platform.
功能介绍
Brokers:消息中间件
RabbitMQ, Redis, Amazon SQS, and more…
Concurrency,并发
prefork (multiprocessing),
eventlet, gevent 协成并发
thread (multithreaded)
solo (single threaded)
Result Stores,结果存储
AMQP, Redis
Memcached,
SQLAlchemy, Django ORM
Elasticsearch, Riak
MongoDB, CouchDB, Couchbase, ArangoDB
Amazon DynamoDB, Amazon S3
Serialization,序列化
pickle, json, yaml, msgpack.
zlib, bzip2 compression.
Monitoring,监控
监控worker进程执行情况。
Work-flows,工作流
including grouping, chaining, chunking, and more.
Time & Rate Limits,时间限制
一定时间内可以执行的任务数;
每个任务可以执行的时间;
Scheduling,定时调度
指定任务何时执行,定时周期性执行;
Resource Leak Protection,资源泄露保护
The --max-tasks-per-child option is used for user tasks leaking resources, like memory or file descriptors, that are simply out of your control.
User Components,用户组件
自定义worker进程等
常用案例
准备程序
pkg/celery.py
from celery import Celery


# 创建应用
app = Celery("app_name", broker="redis://@192.168.0.112:6379/0",
             backend="redis://@192.168.0.112:6379/1", include=["celery_pkg"])

# 自动发现任务
app.autodiscover_tasks(packages=["celery_pkg"])
pkg/tasks.py
import time
from .celery import app


# 定义任务
@app.task(bind=True)
def func1(task, a, b, c): # task的当前任务,一般写作self,不用自己传参
    n = 0
    while n < 3:
        time.sleep(3)
        print(n)
        n += 1

    try:
        raise ValueError("fail")
    except ValueError as e:
        task.retry(exc=e, throw=True, countdown=10, max_retries=3)
    return a + b + c


@app.task(ignore_result=True) # 该任务不存储结果
def func2(name):
    time.sleep(2)
    return name


from celery.exceptions import Ignore
@app.task(bind=True)
def func3(self, user):
    raise Ignore() # 让worker忽略当前任务
    #raise Retry()   告诉worker任务是重试
获取任务的返回值
- 提交任务使用delay(p1, p2, …),它是 apply_async((p1,p2,…), …) 的快捷写法;
- 返回一个AsyncResult 实例对象;
- 任务的状态celery.states.xxx
- PENDING,待执行或者未知的任务;
- STARTED,开始执行的任务;
- SUCCESS,成功的任务;
- FAILURE,失败的任务;
- RETRY,重试的任务;
- REVOKED,取消的任务;
- 更新任务的状态
- task.update_state(self, state, meta)
- 案例
@app.task(bind=True) # bind 绑定任务对象,传入upload_files
def upload_files(self, filenames):
    for i, file in enumerate(filenames):
        if not self.request.called_directly:
        	# 更新状态
            self.update_state(state='PROGRESS', # 自定义状态
                meta={'current': i, 'total': len(filenames)})
from pkg.tasks import func1, func2

In [3]: async_result = func1.delay(1,2,3) # 异步执行
In [4]: async_result
Out[4]: <AsyncResult: f133eb52-45b9-4593-807d-7b6cab8f6e54>

# 获取任务id
In [6]: async_result.id
Out[6]: 'f133eb52-45b9-4593-807d-7b6cab8f6e54'
# 任务的执行状态
In [7]: async_result.status
Out[7]: 'FAILURE'

In [10]: async_result.failed()
Out[10]: True

In [11]: async_result.successful()
Out[11]: False

In [12]: async_result.date_done
Out[12]: datetime.datetime(2023, 9, 25, 14, 25, 17, 38713)

# 获取任务返回值,会阻塞
In [14]: async_result.get(timeout=1, propagate=False) # 不要traceback信息
Out[14]: ValueError('fail')
AsyncResult实例对象必须调用get() or forget() 释放(存储)资源。
任务中使用logging
pass
定义任务基类
# tasks.py
from .celery import app # app.Task
from celery import Task


# 定义任务类
class MyTask(Task):
	def run(self, a, b):
		print("自定义任务.")
		return a + b

# 使用基类
@app.task(base=MyTask)
def func(a, b):
	return a + b

# or  app = Celery('tasks', task_cls='your.module.path:DatabaseTask')

# 数据库连接基类
class DatabaseTask(Task):
    _db = None
    @property
    def db(self):
        if self._db is None:
            self._db = Database.connect()
        return self._db
任务回调函数
after_return(self, status, retval, task_id, args, kwargs, einfo) 任务返回则调用
参数:
-
status – 当前任务状态
-
retval – 返回值
-
task_id
-
args – 执行时传的参数
-
kwargs 执行时传的参数
-
einfo – 异常对象
on_failure(self, exc, task_id, args, kwargs, einfo) 任务失败执行
参数:
- exc – 异常信息
on_retry(self, exc, task_id, args, kwargs, einfo) 任务重试时执行
on_success(self, retval, task_id, args, kwargs) 任务成功时执行
Requests and custom requests
Upon receiving a message to run a task, the worker creates a request to represent such demand.
Custom task classes may override which request class to use by changing the attribute celery.app.task.Task.Request. You may either assign the custom request class itself, or its fully qualified name.
The request has several responsibilities. Custom request classes should cover them all – they are responsible to actually run and trace the task. We strongly recommend to inherit from celery.worker.request.Request.
When using the pre-forking worker, the methods on_timeout() and on_failure() are executed in the main worker process. An application may leverage such facility to detect failures which are not detected using celery.app.task.Task.on_failure().
As an example, the following custom request detects and logs hard time limits, and other failures.
import logging
from celery.worker.request import Request
logger = logging.getLogger(‘my.package’)
class MyRequest(Request):
‘A minimal custom request to log failures and hard time limits.’
def on_timeout(self, soft, timeout):
    super(MyRequest, self).on_timeout(soft, timeout)
    if not soft:
       logger.warning(
           'A hard timeout was enforced for task %s',
           self.task.name
       )

def on_failure(self, exc_info, send_failed_event=True, return_ok=False):
    super(Request, self).on_failure(
        exc_info,
        send_failed_event=send_failed_event,
        return_ok=return_ok
    )
    logger.warning(
        'Failure detected for task %s',
        self.task.name
    )
class MyTask(Task):
Request = MyRequest # you can use a FQN ‘my.package:MyRequest’
@app.task(base=MyTask)
def some_longrunning_task():
# use your imagination
How it works
Here come the technical details. This part isn’t something you need to know, but you may be interested.
All defined tasks are listed in a registry. The registry contains a list of task names and their task classes. You can investigate this registry yourself:
from proj.celery import app
app.tasks
{‘celery.chord_unlock’:
<@task: celery.chord_unlock>,
‘celery.backend_cleanup’:
<@task: celery.backend_cleanup>,
‘celery.chord’:
<@task: celery.chord>}
This is the list of tasks built into Celery. Note that tasks will only be registered when the module they’re defined in is imported.
The default loader imports any modules listed in the imports setting.
The app.task() decorator is responsible for registering your task in the applications task registry.
When tasks are sent, no actual function code is sent with it, just the name of the task to execute. When the worker then receives the message it can look up the name in its task registry to find the execution code.
This means that your workers should always be updated with the same software as the client. This is a drawback, but the alternative is a technical challenge that’s yet to be solved.
Tips and Best Practices
Ignore results you don’t want
If you don’t care about the results of a task, be sure to set the ignore_result option, as storing results wastes time and resources.
@app.task(ignore_result=True)
def mytask():
something()
Results can even be disabled globally using the task_ignore_result setting.
Results can be enabled/disabled on a per-execution basis, by passing the ignore_result boolean parameter, when calling apply_async or delay.
@app.task
def mytask(x, y):
return x + y
No result will be stored
result = mytask.apply_async(1, 2, ignore_result=True)
print result.get() # -> None
Result will be stored
result = mytask.apply_async(1, 2, ignore_result=False)
print result.get() # -> 3
By default tasks will not ignore results (ignore_result=False) when a result backend is configured.
The option precedence order is the following:
Global task_ignore_result
ignore_result option
Task execution option ignore_result
More optimization tips
You find additional optimization tips in the Optimizing Guide.
Avoid launching synchronous subtasks
Having a task wait for the result of another task is really inefficient, and may even cause a deadlock if the worker pool is exhausted.
Make your design asynchronous instead, for example by using callbacks.
Bad:
@app.task
def update_page_info(url):
page = fetch_page.delay(url).get()
info = parse_page.delay(url, page).get()
store_page_info.delay(url, info)
@app.task
def fetch_page(url):
return myhttplib.get(url)
@app.task
def parse_page(page):
return myparser.parse_document(page)
@app.task
def store_page_info(url, info):
return PageInfo.objects.create(url, info)
Good:
def update_page_info(url):
# fetch_page -> parse_page -> store_page
chain = fetch_page.s(url) | parse_page.s() | store_page_info.s(url)
chain()
@app.task()
def fetch_page(url):
return myhttplib.get(url)
@app.task()
def parse_page(page):
return myparser.parse_document(page)
@app.task(ignore_result=True)
def store_page_info(info, url):
PageInfo.objects.create(url=url, info=info)
Here I instead created a chain of tasks by linking together different signature()’s. You can read about chains and other powerful constructs at Canvas: Designing Work-flows.
By default Celery will not allow you to run subtasks synchronously within a task, but in rare or extreme cases you might need to do so. WARNING: enabling subtasks to run synchronously is not recommended!
@app.task
def update_page_info(url):
page = fetch_page.delay(url).get(disable_sync_subtasks=False)
info = parse_page.delay(url, page).get(disable_sync_subtasks=False)
store_page_info.delay(url, info)
@app.task
def fetch_page(url):
return myhttplib.get(url)
@app.task
def parse_page(url, page):
return myparser.parse_document(page)
@app.task
def store_page_info(url, info):
return PageInfo.objects.create(url, info)
add a callback to a group of tasks
split a task into several chunks
optimize the worker
see a list of built-in task states
create custom task states
set a custom task name
任务的追踪、失败重试
pass
know what queue a task was delivered to
see a list of running workers
purge all messages
inspect what the workers are doing
see what tasks a worker has registered
migrate tasks to a new broker
see a list of event message types
contribute to Celery
learn about available configuration settings
get a list of people and companies using Celery
write my own remote control command
change worker queues at runtime
Jump to ⟶
Brokers
Applications
Tasks
Calling
Workers
Daemonizing
Monitoring
Optimizing
Security
Routing
Configuration
Django
Contributing
Signals
FAQ
API Reference
Installation
You can install Celery either via the Python Package Index (PyPI) or from source.
To install using pip:
$ pip install -U Celery
Bundles
Celery also defines a group of bundles that can be used to install Celery and the dependencies for a given feature.
You can specify these in your requirements or on the pip command-line by using brackets. Multiple bundles can be specified by separating them by commas.
$ pip install “celery[librabbitmq]”
$ pip install “celery[librabbitmq,redis,auth,msgpack]”
The following bundles are available:
Serializers
celery[auth]
for using the auth security serializer.
celery[msgpack]
for using the msgpack serializer.
celery[yaml]
for using the yaml serializer.
Concurrency
celery[eventlet]
for using the eventlet pool.
celery[gevent]
for using the gevent pool.
Transports and Backends
celery[librabbitmq]
for using the librabbitmq C library.
celery[redis]
for using Redis as a message transport or as a result backend.
celery[sqs]
for using Amazon SQS as a message transport (experimental).
celery[tblib]
for using the task_remote_tracebacks feature.
celery[memcache]
for using Memcached as a result backend (using pylibmc)
celery[pymemcache]
for using Memcached as a result backend (pure-Python implementation).
celery[cassandra]
for using Apache Cassandra as a result backend with DataStax driver.
celery[couchbase]
for using Couchbase as a result backend.
celery[arangodb]
for using ArangoDB as a result backend.
celery[elasticsearch]
for using Elasticsearch as a result backend.
celery[riak]
for using Riak as a result backend.
celery[dynamodb]
for using AWS DynamoDB as a result backend.
celery[zookeeper]
for using Zookeeper as a message transport.
celery[sqlalchemy]
for using SQLAlchemy as a result backend (supported).
celery[pyro]
for using the Pyro4 message transport (experimental).
celery[slmq]
for using the SoftLayer Message Queue transport (experimental).
celery[consul]
for using the Consul.io Key/Value store as a message transport or result backend (experimental).
celery[django]
specifies the lowest version possible for Django support.
You should probably not use this in your requirements, it’s here for informational purposes only.
Downloading and installing from source
Download the latest version of Celery from PyPI:
https://pypi.org/project/celery/
You can install it by doing the following,:
$ tar xvfz celery-0.0.0.tar.gz
$ cd celery-0.0.0
$ python setup.py build
python setup.py install
The last command must be executed as a privileged user if you aren’t currently using a virtualenv.
Using the development version
With pip
The Celery development version also requires the development versions of kombu, amqp, billiard, and vine.
You can install the latest snapshot of these using the following pip commands:
$ pip install https://github.com/celery/celery/zipball/master#egg=celery
$ pip install https://github.com/celery/billiard/zipball/master#egg=billiard
$ pip install https://github.com/celery/py-amqp/zipball/master#egg=amqp
$ pip install https://github.com/celery/kombu/zipball/master#egg=kombu
$ pip install https://github.com/celery/vine/zipball/master#egg=vine
With git
Please see the Contributing section.
Brokers
Release
4.4
Date
Jul 31, 2020
Celery supports several message transport alternatives.
Broker Instructions
Using RabbitMQ
Installation & Configuration
Installing the RabbitMQ Server
Setting up RabbitMQ
Installing RabbitMQ on macOS
Configuring the system host name
Starting/Stopping the RabbitMQ server
Installation & Configuration
RabbitMQ is the default broker so it doesn’t require any additional dependencies or initial configuration, other than the URL location of the broker instance you want to use:
broker_url = ‘amqp://myuser:mypassword@localhost:5672/myvhost’
For a description of broker URLs and a full list of the various broker configuration options available to Celery, see Broker Settings, and see below for setting up the username, password and vhost.
Installing the RabbitMQ Server
See Installing RabbitMQ over at RabbitMQ’s website. For macOS see Installing RabbitMQ on macOS.
Note
If you’re getting nodedown errors after installing and using rabbitmqctl then this blog post can help you identify the source of the problem:
http://www.somic.org/2009/02/19/on-rabbitmqctl-and-badrpcnodedown/
Setting up RabbitMQ
To use Celery we need to create a RabbitMQ user, a virtual host and allow that user access to that virtual host:
$ sudo rabbitmqctl add_user myuser mypassword
$ sudo rabbitmqctl add_vhost myvhost
$ sudo rabbitmqctl set_user_tags myuser mytag
$ sudo rabbitmqctl set_permissions -p myvhost myuser “." ".” “.*”
Substitute in appropriate values for myuser, mypassword and myvhost above.
See the RabbitMQ Admin Guide for more information about access control.
Installing RabbitMQ on macOS
The easiest way to install RabbitMQ on macOS is using Homebrew the new and shiny package management system for macOS.
First, install Homebrew using the one-line command provided by the Homebrew documentation:
ruby -e “$(curl -fsSL https://raw.github.com/Homebrew/homebrew/go/install)”
Finally, we can install RabbitMQ using brew:
$ brew install rabbitmq
After you’ve installed RabbitMQ with brew you need to add the following to your path to be able to start and stop the broker: add it to the start-up file for your shell (e.g., .bash_profile or .profile).
PATH=$PATH:/usr/local/sbin
Configuring the system host name
If you’re using a DHCP server that’s giving you a random host name, you need to permanently configure the host name. This is because RabbitMQ uses the host name to communicate with nodes.
Use the scutil command to permanently set your host name:
$ sudo scutil --set HostName myhost.local
Then add that host name to /etc/hosts so it’s possible to resolve it back into an IP address:
127.0.0.1 localhost myhost myhost.local
If you start the rabbitmq-server, your rabbit node should now be rabbit@myhost, as verified by rabbitmqctl:
$ sudo rabbitmqctl status
Status of node rabbit@myhost …
[{running_applications,[{rabbit,“RabbitMQ”,“1.7.1”},
{mnesia,“MNESIA CXC 138 12”,“4.4.12”},
{os_mon,“CPO CXC 138 46”,“2.2.4”},
{sasl,“SASL CXC 138 11”,“2.1.8”},
{stdlib,“ERTS CXC 138 10”,“1.16.4”},
{kernel,“ERTS CXC 138 10”,“2.13.4”}]},
{nodes,[rabbit@myhost]},
{running_nodes,[rabbit@myhost]}]
…done.
This is especially important if your DHCP server gives you a host name starting with an IP address, (e.g., 23.10.112.31.comcast.net). In this case RabbitMQ will try to use rabbit@23: an illegal host name.
Starting/Stopping the RabbitMQ server
To start the server:
$ sudo rabbitmq-server
you can also run it in the background by adding the -detached option (note: only one dash):
$ sudo rabbitmq-server -detached
Never use kill (kill(1)) to stop the RabbitMQ server, but rather use the rabbitmqctl command:
$ sudo rabbitmqctl stop
When the server is running, you can continue reading Setting up RabbitMQ.
Using Redis
Installation
For the Redis support you have to install additional dependencies. You can install both Celery and these dependencies in one go using the celery[redis] bundle:
$ pip install -U “celery[redis]”
Configuration
Configuration is easy, just configure the location of your Redis database:
app.conf.broker_url = ‘redis://localhost:6379/0’
Where the URL is in the format of:
redis://:password@hostname:port/db_number
all fields after the scheme are optional, and will default to localhost on port 6379, using database 0.
If a Unix socket connection should be used, the URL needs to be in the format:
redis+socket:///path/to/redis.sock
Specifying a different database number when using a Unix socket is possible by adding the virtual_host parameter to the URL:
redis+socket:///path/to/redis.sock?virtual_host=db_number
It is also easy to connect directly to a list of Redis Sentinel:
app.conf.broker_url = ‘sentinel://localhost:26379;sentinel://localhost:26380;sentinel://localhost:26381’
app.conf.broker_transport_options = { ‘master_name’: “cluster1” }
Visibility Timeout
The visibility timeout defines the number of seconds to wait for the worker to acknowledge the task before the message is redelivered to another worker. Be sure to see Caveats below.
This option is set via the broker_transport_options setting:
app.conf.broker_transport_options = {‘visibility_timeout’: 3600} # 1 hour.
The default visibility timeout for Redis is 1 hour.
Results
If you also want to store the state and return values of tasks in Redis, you should configure these settings:
app.conf.result_backend = ‘redis://localhost:6379/0’
For a complete list of options supported by the Redis result backend, see Redis backend settings.
If you are using Sentinel, you should specify the master_name using the result_backend_transport_options setting:
app.conf.result_backend_transport_options = {‘master_name’: “mymaster”}
Caveats
Visibility timeout
If a task isn’t acknowledged within the Visibility Timeout the task will be redelivered to another worker and executed.
This causes problems with ETA/countdown/retry tasks where the time to execute exceeds the visibility timeout; in fact if that happens it will be executed again, and again in a loop.
So you have to increase the visibility timeout to match the time of the longest ETA you’re planning to use.
Note that Celery will redeliver messages at worker shutdown, so having a long visibility timeout will only delay the redelivery of ‘lost’ tasks in the event of a power failure or forcefully terminated workers.
Periodic tasks won’t be affected by the visibility timeout, as this is a concept separate from ETA/countdown.
You can increase this timeout by configuring a transport option with the same name:
app.conf.broker_transport_options = {‘visibility_timeout’: 43200}
The value must be an int describing the number of seconds.
Key eviction
Redis may evict keys from the database in some situations
If you experience an error like:
InconsistencyError: Probably the key (‘_kombu.binding.celery’) has been
removed from the Redis database.
then you may want to configure the redis-server to not evict keys by setting the timeout parameter to 0 in the redis configuration file.
Group result ordering
Versions of Celery up to and including 4.4.6 used an unsorted list to store result objects for groups in the Redis backend. This can cause those results to be be returned in a different order to their associated tasks in the original group instantiation.
Celery 4.4.7 and up introduce an opt-in behaviour which fixes this issue and ensures that group results are returned in the same order the tasks were defined, matching the behaviour of other backends. This change is incompatible with workers running versions of Celery without this feature, so the feature must be turned on using the boolean result_chord_ordered option of the result_backend_transport_options setting, like so:
app.conf.result_backend_transport_options = {
‘result_chord_ordered’: True
}
Using Amazon SQS
Installation
For the Amazon SQS support you have to install additional dependencies. You can install both Celery and these dependencies in one go using the celery[sqs] bundle:
$ pip install celery[sqs]
Configuration
You have to specify SQS in the broker URL:
broker_url = ‘sqs://ABCDEFGHIJKLMNOPQRST:ZYXK7NiynGlTogH8Nj+P9nlE73sq3@’
where the URL format is:
sqs://aws_access_key_id:aws_secret_access_key@
Please note that you must remember to include the @ sign at the end and encode the password so it can always be parsed correctly. For example:
from kombu.utils.url import safequote
aws_access_key = safequote(“ABCDEFGHIJKLMNOPQRST”)
aws_secret_key = safequote(“ZYXK7NiynG/TogH8Nj+P9nlE73sq3”)
broker_url = “sqs://{aws_access_key}:{aws_secret_key}@”.format(
aws_access_key=aws_access_key, aws_secret_key=aws_secret_key,
)
The login credentials can also be set using the environment variables AWS_ACCESS_KEY_ID and AWS_SECRET_ACCESS_KEY, in that case the broker URL may only be sqs://.
If you are using IAM roles on instances, you can set the BROKER_URL to: sqs:// and kombu will attempt to retrieve access tokens from the instance metadata.
Options
Region
The default region is us-east-1 but you can select another region by configuring the broker_transport_options setting:
broker_transport_options = {‘region’: ‘eu-west-1’}
See also
An overview of Amazon Web Services regions can be found here:
http://aws.amazon.com/about-aws/globalinfrastructure/
Visibility Timeout
The visibility timeout defines the number of seconds to wait for the worker to acknowledge the task before the message is redelivered to another worker. Also see caveats below.
This option is set via the broker_transport_options setting:
broker_transport_options = {‘visibility_timeout’: 3600} # 1 hour.
The default visibility timeout is 30 seconds.
Polling Interval
The polling interval decides the number of seconds to sleep between unsuccessful polls. This value can be either an int or a float. By default the value is one second: this means the worker will sleep for one second when there’s no more messages to read.
You must note that more frequent polling is also more expensive, so increasing the polling interval can save you money.
The polling interval can be set via the broker_transport_options setting:
broker_transport_options = {‘polling_interval’: 0.3}
Very frequent polling intervals can cause busy loops, resulting in the worker using a lot of CPU time. If you need sub-millisecond precision you should consider using another transport, like RabbitMQ , or Redis .
Long Polling
SQS Long Polling is enabled by default and the WaitTimeSeconds parameter of ReceiveMessage operation is set to 10 seconds.
The value of WaitTimeSeconds parameter can be set via the broker_transport_options setting:
broker_transport_options = {‘wait_time_seconds’: 15}
Valid values are 0 to 20. Note that newly created queues themselves (also if created by Celery) will have the default value of 0 set for the “Receive Message Wait Time” queue property.
Queue Prefix
By default Celery won’t assign any prefix to the queue names, If you have other services using SQS you can configure it do so using the broker_transport_options setting:
broker_transport_options = {‘queue_name_prefix’: ‘celery-’}
Predefined Queues
If you want Celery to use a set of predefined queues in AWS, and to never attempt to list SQS queues, nor attempt to create or delete them, pass a map of queue names to URLs using the predefined_queue_urls setting:
broker_transport_options = {
‘predefined_queues’: {
‘my-q’: {
‘url’: ‘https://ap-southeast-2.queue.amazonaws.com/123456/my-q’,
‘access_key_id’: ‘xxx’,
‘secret_access_key’: ‘xxx’,
}
}
}
Caveats
If a task isn’t acknowledged within the visibility_timeout, the task will be redelivered to another worker and executed.
This causes problems with ETA/countdown/retry tasks where the time to execute exceeds the visibility timeout; in fact if that happens it will be executed again, and again in a loop.
So you have to increase the visibility timeout to match the time of the longest ETA you’re planning to use.
Note that Celery will redeliver messages at worker shutdown, so having a long visibility timeout will only delay the redelivery of ‘lost’ tasks in the event of a power failure or forcefully terminated workers.
Periodic tasks won’t be affected by the visibility timeout, as it is a concept separate from ETA/countdown.
The maximum visibility timeout supported by AWS as of this writing is 12 hours (43200 seconds):
broker_transport_options = {‘visibility_timeout’: 43200}
SQS doesn’t yet support worker remote control commands.
SQS doesn’t yet support events, and so cannot be used with celery events, celerymon, or the Django Admin monitor.
Results
Multiple products in the Amazon Web Services family could be a good candidate to store or publish results with, but there’s no such result backend included at this point.
Warning
Don’t use the amqp result backend with SQS.
It will create one queue for every task, and the queues will not be collected. This could cost you money that would be better spent contributing an AWS result store backend back to Celery 😃
Broker Overview
This is comparison table of the different transports supports, more information can be found in the documentation for each individual transport (see Broker Instructions).
Name
Status
Monitoring
Remote Control
RabbitMQ
Stable
Yes
Yes
Redis
Stable
Yes
Yes
Amazon SQS
Stable
No
No
Zookeeper
Experimental
No
No
Experimental brokers may be functional but they don’t have dedicated maintainers.
Missing monitor support means that the transport doesn’t implement events, and as such Flower, celery events, celerymon and other event-based monitoring tools won’t work.
Remote control means the ability to inspect and manage workers at runtime using the celery inspect and celery control commands (and other tools using the remote control API).
First Steps with Celery
Celery is a task queue with batteries included. It’s easy to use so that you can get started without learning the full complexities of the problem it solves. It’s designed around best practices so that your product can scale and integrate with other languages, and it comes with the tools and support you need to run such a system in production.
In this tutorial you’ll learn the absolute basics of using Celery.
Learn about;
Choosing and installing a message transport (broker).
Installing Celery and creating your first task.
Starting the worker and calling tasks.
Keeping track of tasks as they transition through different states, and inspecting return values.
Celery may seem daunting at first - but don’t worry - this tutorial will get you started in no time. It’s deliberately kept simple, so as to not confuse you with advanced features. After you have finished this tutorial, it’s a good idea to browse the rest of the documentation. For example the Next Steps tutorial will showcase Celery’s capabilities.
Choosing a Broker
RabbitMQ
Redis
Other brokers
Installing Celery
Application
Running the Celery worker server
Calling the task
Keeping Results
Configuration
Where to go from here
Troubleshooting
Worker doesn’t start: Permission Error
Result backend doesn’t work or tasks are always in PENDING state
Choosing a Broker
Celery requires a solution to send and receive messages; usually this comes in the form of a separate service called a message broker.
There are several choices available, including:
RabbitMQ
RabbitMQ is feature-complete, stable, durable and easy to install. It’s an excellent choice for a production environment. Detailed information about using RabbitMQ with Celery:
Using RabbitMQ
If you’re using Ubuntu or Debian install RabbitMQ by executing this command:
$ sudo apt-get install rabbitmq-server
Or, if you want to run it on Docker execute this:
$ docker run -d -p 5672:5672 rabbitmq
When the command completes, the broker will already be running in the background, ready to move messages for you: Starting rabbitmq-server: SUCCESS.
Don’t worry if you’re not running Ubuntu or Debian, you can go to this website to find similarly simple installation instructions for other platforms, including Microsoft Windows:
http://www.rabbitmq.com/download.html
Redis
Redis is also feature-complete, but is more susceptible to data loss in the event of abrupt termination or power failures. Detailed information about using Redis:
Using Redis
If you want to run it on Docker execute this:
$ docker run -d -p 6379:6379 redis
Other brokers
In addition to the above, there are other experimental transport implementations to choose from, including Amazon SQS.
See Broker Overview for a full list.
Installing Celery
Celery is on the Python Package Index (PyPI), so it can be installed with standard Python tools like pip or easy_install:
$ pip install celery
Application
The first thing you need is a Celery instance. We call this the Celery application or just app for short. As this instance is used as the entry-point for everything you want to do in Celery, like creating tasks and managing workers, it must be possible for other modules to import it.
In this tutorial we keep everything contained in a single module, but for larger projects you want to create a dedicated module.
Let’s create the file tasks.py:
from celery import Celery
app = Celery(‘tasks’, broker=‘pyamqp://guest@localhost//’)
@app.task
def add(x, y):
return x + y
The first argument to Celery is the name of the current module. This is only needed so that names can be automatically generated when the tasks are defined in the main module.
The second argument is the broker keyword argument, specifying the URL of the message broker you want to use. Here using RabbitMQ (also the default option).
See Choosing a Broker above for more choices – for RabbitMQ you can use amqp://localhost, or for Redis you can use redis://localhost.
You defined a single task, called add, returning the sum of two numbers.
Running the Celery worker server
You can now run the worker by executing our program with the worker argument:
$ celery -A tasks worker --loglevel=info
Note
See the Troubleshooting section if the worker doesn’t start.
In production you’ll want to run the worker in the background as a daemon. To do this you need to use the tools provided by your platform, or something like supervisord (see Daemonization for more information).
For a complete listing of the command-line options available, do:
$ celery worker --help
There are also several other commands available, and help is also available:
$ celery help
Calling the task
To call our task you can use the delay() method.
This is a handy shortcut to the apply_async() method that gives greater control of the task execution (see Calling Tasks):
from tasks import add
add.delay(4, 4)
The task has now been processed by the worker you started earlier. You can verify this by looking at the worker’s console output.
Calling a task returns an AsyncResult instance. This can be used to check the state of the task, wait for the task to finish, or get its return value (or if the task failed, to get the exception and traceback).
Results are not enabled by default. In order to do remote procedure calls or keep track of task results in a database, you will need to configure Celery to use a result backend. This is described in the next section.
Keeping Results
If you want to keep track of the tasks’ states, Celery needs to store or send the states somewhere. There are several built-in result backends to choose from: SQLAlchemy/Django ORM, MongoDB, Memcached, Redis, RPC (RabbitMQ/AMQP), and – or you can define your own.
For this example we use the rpc result backend, that sends states back as transient messages. The backend is specified via the backend argument to Celery, (or via the result_backend setting if you choose to use a configuration module):
app = Celery(‘tasks’, backend=‘rpc://’, broker=‘pyamqp://’)
Or if you want to use Redis as the result backend, but still use RabbitMQ as the message broker (a popular combination):
app = Celery(‘tasks’, backend=‘redis://localhost’, broker=‘pyamqp://’)
To read more about result backends please see Result Backends.
Now with the result backend configured, let’s call the task again. This time you’ll hold on to the AsyncResult instance returned when you call a task:
result = add.delay(4, 4)
The ready() method returns whether the task has finished processing or not:
result.ready()
False
You can wait for the result to complete, but this is rarely used since it turns the asynchronous call into a synchronous one:
result.get(timeout=1)
8
In case the task raised an exception, get() will re-raise the exception, but you can override this by specifying the propagate argument:
result.get(propagate=False)
If the task raised an exception, you can also gain access to the original traceback:
result.traceback
Warning
Backends use resources to store and transmit results. To ensure that resources are released, you must eventually call get() or forget() on EVERY AsyncResult instance returned after calling a task.
See celery.result for the complete result object reference.
Configuration
Celery, like a consumer appliance, doesn’t need much configuration to operate. It has an input and an output. The input must be connected to a broker, and the output can be optionally connected to a result backend. However, if you look closely at the back, there’s a lid revealing loads of sliders, dials, and buttons: this is the configuration.
The default configuration should be good enough for most use cases, but there are many options that can be configured to make Celery work exactly as needed. Reading about the options available is a good idea to familiarize yourself with what can be configured. You can read about the options in the Configuration and defaults reference.
The configuration can be set on the app directly or by using a dedicated configuration module. As an example you can configure the default serializer used for serializing task payloads by changing the task_serializer setting:
app.conf.task_serializer = ‘json’
If you’re configuring many settings at once you can use update:
app.conf.update(
task_serializer=‘json’,
accept_content=[‘json’], # Ignore other content
result_serializer=‘json’,
timezone=‘Europe/Oslo’,
enable_utc=True,
)
For larger projects, a dedicated configuration module is recommended. Hard coding periodic task intervals and task routing options is discouraged. It is much better to keep these in a centralized location. This is especially true for libraries, as it enables users to control how their tasks behave. A centralized configuration will also allow your SysAdmin to make simple changes in the event of system trouble.
You can tell your Celery instance to use a configuration module by calling the app.config_from_object() method:
app.config_from_object(‘celeryconfig’)
This module is often called “celeryconfig”, but you can use any module name.
In the above case, a module named celeryconfig.py must be available to load from the current directory or on the Python path. It could look something like this:
celeryconfig.py:
broker_url = ‘pyamqp://’
result_backend = ‘rpc://’
task_serializer = ‘json’
result_serializer = ‘json’
accept_content = [‘json’]
timezone = ‘Europe/Oslo’
enable_utc = True
To verify that your configuration file works properly and doesn’t contain any syntax errors, you can try to import it:
$ python -m celeryconfig
For a complete reference of configuration options, see Configuration and defaults.
To demonstrate the power of configuration files, this is how you’d route a misbehaving task to a dedicated queue:
celeryconfig.py:
task_routes = {
‘tasks.add’: ‘low-priority’,
}
Or instead of routing it you could rate limit the task instead, so that only 10 tasks of this type can be processed in a minute (10/m):
celeryconfig.py:
task_annotations = {
‘tasks.add’: {‘rate_limit’: ‘10/m’}
}
If you’re using RabbitMQ or Redis as the broker then you can also direct the workers to set a new rate limit for the task at runtime:
$ celery -A tasks control rate_limit tasks.add 10/m
worker@example.com: OK
new rate limit set successfully
See Routing Tasks to read more about task routing, and the task_annotations setting for more about annotations, or Monitoring and Management Guide for more about remote control commands and how to monitor what your workers are doing.
Where to go from here
If you want to learn more you should continue to the Next Steps tutorial, and after that you can read the User Guide.
Troubleshooting
There’s also a troubleshooting section in the Frequently Asked Questions.
Worker doesn’t start: Permission Error
If you’re using Debian, Ubuntu or other Debian-based distributions:
Debian recently renamed the /dev/shm special file to /run/shm.
A simple workaround is to create a symbolic link:
ln -s /run/shm /dev/shm
Others:
If you provide any of the --pidfile, --logfile or --statedb arguments, then you must make sure that they point to a file or directory that’s writable and readable by the user starting the worker.
Result backend doesn’t work or tasks are always in PENDING state
All tasks are PENDING by default, so the state would’ve been better named “unknown”. Celery doesn’t update the state when a task is sent, and any task with no history is assumed to be pending (you know the task id, after all).
Make sure that the task doesn’t have ignore_result enabled.
Enabling this option will force the worker to skip updating states.
Make sure the task_ignore_result setting isn’t enabled.
Make sure that you don’t have any old workers still running.
It’s easy to start multiple workers by accident, so make sure that the previous worker is properly shut down before you start a new one.
An old worker that isn’t configured with the expected result backend may be running and is hijacking the tasks.
The --pidfile argument can be set to an absolute path to make sure this doesn’t happen.
Make sure the client is configured with the right backend.
If, for some reason, the client is configured to use a different backend than the worker, you won’t be able to receive the result. Make sure the backend is configured correctly:
result = task.delay()
print(result.backend)
Next Steps
The First Steps with Celery guide is intentionally minimal. In this guide I’ll demonstrate what Celery offers in more detail, including how to add Celery support for your application and library.
This document doesn’t document all of Celery’s features and best practices, so it’s recommended that you also read the User Guide
Using Celery in your Application
Calling Tasks
Canvas: Designing Work-flows
Routing
Remote Control
Timezone
Optimization
What to do now?
Using Celery in your Application
Our Project
Project layout:
proj/init.py
/celery.py
/tasks.py
proj/celery.py
from future import absolute_import, unicode_literals
from celery import Celery
app = Celery(‘proj’,
broker=‘amqp://’,
backend=‘amqp://’,
include=[‘proj.tasks’])
Optional configuration, see the application user guide.
app.conf.update(
result_expires=3600,
)
if name == ‘main’:
app.start()
In this module you created our Celery instance (sometimes referred to as the app). To use Celery within your project you simply import this instance.
The broker argument specifies the URL of the broker to use.
See Choosing a Broker for more information.
The backend argument specifies the result backend to use.
It’s used to keep track of task state and results. While results are disabled by default I use the RPC result backend here because I demonstrate how retrieving results work later. You may want to use a different backend for your application. They all have different strengths and weaknesses. If you don’t need results, it’s better to disable them. Results can also be disabled for individual tasks by setting the @task(ignore_result=True) option.
See Keeping Results for more information.
The include argument is a list of modules to import when the worker starts. You need to add our tasks module here so that the worker is able to find our tasks.
proj/tasks.py
from future import absolute_import, unicode_literals
from .celery import app
@app.task
def add(x, y):
return x + y
@app.task
def mul(x, y):
return x * y
@app.task
def xsum(numbers):
return sum(numbers)
Starting the worker
The celery program can be used to start the worker (you need to run the worker in the directory above proj):
$ celery -A proj worker -l info
When the worker starts you should see a banner and some messages:
--------------- celery@halcyon.local v4.0 (latentcall)
— ***** -----
– ******* ---- [Configuration]
- *** — * — . broker: amqp://guest@localhost:5672//
- ** ---------- . app: main:0x1012d8590
- ** ---------- . concurrency: 8 (processes)
- ** ---------- . events: OFF (enable -E to monitor this worker)
- ** ----------
- *** — * — [Queues]
– ******* ---- . celery: exchange:celery(direct) binding:celery
— ***** -----
[2012-06-08 16:23:51,078: WARNING/MainProcess] celery@halcyon.local has started.
– The broker is the URL you specified in the broker argument in our celery module. You can also specify a different broker on the command-line by using the -b option.
– Concurrency is the number of prefork worker process used to process your tasks concurrently. When all of these are busy doing work, new tasks will have to wait for one of the tasks to finish before it can be processed.
The default concurrency number is the number of CPU’s on that machine (including cores). You can specify a custom number using the celery worker -c option. There’s no recommended value, as the optimal number depends on a number of factors, but if your tasks are mostly I/O-bound then you can try to increase it. Experimentation has shown that adding more than twice the number of CPU’s is rarely effective, and likely to degrade performance instead.
Including the default prefork pool, Celery also supports using Eventlet, Gevent, and running in a single thread (see Concurrency).
– Events is an option that causes Celery to send monitoring messages (events) for actions occurring in the worker. These can be used by monitor programs like celery events, and Flower – the real-time Celery monitor, which you can read about in the Monitoring and Management guide.
– Queues is the list of queues that the worker will consume tasks from. The worker can be told to consume from several queues at once, and this is used to route messages to specific workers as a means for Quality of Service, separation of concerns, and prioritization, all described in the Routing Guide.
You can get a complete list of command-line arguments by passing in the --help flag:
$ celery worker --help
These options are described in more detailed in the Workers Guide.
Stopping the worker
To stop the worker simply hit Control-c. A list of signals supported by the worker is detailed in the Workers Guide.
In the background
In production you’ll want to run the worker in the background, described in detail in the daemonization tutorial.
The daemonization scripts uses the celery multi command to start one or more workers in the background:
$ celery multi start w1 -A proj -l info
celery multi v4.0.0 (latentcall)
Starting nodes…
w1.halcyon.local: OK
You can restart it too:
$ celery multi restart w1 -A proj -l info
celery multi v4.0.0 (latentcall)
Stopping nodes…
w1.halcyon.local: TERM -> 64024
Waiting for 1 node…
w1.halcyon.local: OK
Restarting node w1.halcyon.local: OK
celery multi v4.0.0 (latentcall)
Stopping nodes…
w1.halcyon.local: TERM -> 64052
or stop it:
$ celery multi stop w1 -A proj -l info
The stop command is asynchronous so it won’t wait for the worker to shutdown. You’ll probably want to use the stopwait command instead, which ensures that all currently executing tasks are completed before exiting:
$ celery multi stopwait w1 -A proj -l info
Note
celery multi doesn’t store information about workers so you need to use the same command-line arguments when restarting. Only the same pidfile and logfile arguments must be used when stopping.
By default it’ll create pid and log files in the current directory. To protect against multiple workers launching on top of each other you’re encouraged to put these in a dedicated directory:
$ mkdir -p /var/run/celery
$ mkdir -p /var/log/celery
$ celery multi start w1 -A proj -l info --pidfile=/var/run/celery/%n.pid
–logfile=/var/log/celery/%n%I.log
With the multi command you can start multiple workers, and there’s a powerful command-line syntax to specify arguments for different workers too, for example:
$ celery multi start 10 -A proj -l info -Q:1-3 images,video -Q:4,5 data
-Q default -L:4,5 debug
For more examples see the multi module in the API reference.
About the --app argument
The --app argument specifies the Celery app instance to use, in the form of module.path:attribute
But it also supports a shortcut form. If only a package name is specified, it’ll try to search for the app instance, in the following order:
With --app=proj:
an attribute named proj.app, or
an attribute named proj.celery, or
any attribute in the module proj where the value is a Celery application, or
If none of these are found it’ll try a submodule named proj.celery:
an attribute named proj.celery.app, or
an attribute named proj.celery.celery, or
Any attribute in the module proj.celery where the value is a Celery application.
This scheme mimics the practices used in the documentation – that is, proj:app for a single contained module, and proj.celery:app for larger projects.
Calling Tasks
You can call a task using the delay() method:
from proj.tasks import add
add.delay(2, 2)
This method is actually a star-argument shortcut to another method called apply_async():
add.apply_async((2, 2))
The latter enables you to specify execution options like the time to run (countdown), the queue it should be sent to, and so on:
add.apply_async((2, 2), queue=‘lopri’, countdown=10)
In the above example the task will be sent to a queue named lopri and the task will execute, at the earliest, 10 seconds after the message was sent.
Applying the task directly will execute the task in the current process, so that no message is sent:
add(2, 2)
4
These three methods - delay(), apply_async(), and applying (call), make up the Celery calling API, which is also used for signatures.
A more detailed overview of the Calling API can be found in the Calling User Guide.
Every task invocation will be given a unique identifier (an UUID) – this is the task id.
The delay and apply_async methods return an AsyncResult instance, which can be used to keep track of the tasks execution state. But for this you need to enable a result backend so that the state can be stored somewhere.
Results are disabled by default because there is no result backend that suits every application; to choose one you need to consider the drawbacks of each individual backend. For many tasks keeping the return value isn’t even very useful, so it’s a sensible default to have. Also note that result backends aren’t used for monitoring tasks and workers: for that Celery uses dedicated event messages (see Monitoring and Management Guide).
If you have a result backend configured you can retrieve the return value of a task:
res = add.delay(2, 2)
res.get(timeout=1)
4
You can find the task’s id by looking at the id attribute:
res.id
d6b3aea2-fb9b-4ebc-8da4-848818db9114
You can also inspect the exception and traceback if the task raised an exception, in fact result.get() will propagate any errors by default:
res = add.delay(2, ‘2’)
res.get(timeout=1)
Traceback (most recent call last):
File “”, line 1, in
File “celery/result.py”, line 221, in get
return self.backend.wait_for_pending(
File “celery/backends/asynchronous.py”, line 195, in wait_for_pending
return result.maybe_throw(callback=callback, propagate=propagate)
File “celery/result.py”, line 333, in maybe_throw
self.throw(value, self._to_remote_traceback(tb))
File “celery/result.py”, line 326, in throw
self.on_ready.throw(*args, **kwargs)
File “vine/promises.py”, line 244, in throw
reraise(type(exc), exc, tb)
File “vine/five.py”, line 195, in reraise
raise value
TypeError: unsupported operand type(s) for +: ‘int’ and ‘str’
If you don’t wish for the errors to propagate, you can disable that by passing propagate:
res.get(propagate=False)
TypeError(“unsupported operand type(s) for +: ‘int’ and ‘str’”)
In this case it’ll return the exception instance raised instead – so to check whether the task succeeded or failed, you’ll have to use the corresponding methods on the result instance:
res.failed()
True
res.successful()
False
So how does it know if the task has failed or not? It can find out by looking at the tasks state:
res.state
‘FAILURE’
A task can only be in a single state, but it can progress through several states. The stages of a typical task can be:
PENDING -> STARTED -> SUCCESS
The started state is a special state that’s only recorded if the task_track_started setting is enabled, or if the @task(track_started=True) option is set for the task.
The pending state is actually not a recorded state, but rather the default state for any task id that’s unknown: this you can see from this example:
from proj.celery import app
res = app.AsyncResult(‘this-id-does-not-exist’)
res.state
‘PENDING’
If the task is retried the stages can become even more complex. To demonstrate, for a task that’s retried two times the stages would be:
PENDING -> STARTED -> RETRY -> STARTED -> RETRY -> STARTED -> SUCCESS
To read more about task states you should see the States section in the tasks user guide.
Calling tasks is described in detail in the Calling Guide.
Canvas: Designing Work-flows
You just learned how to call a task using the tasks delay method, and this is often all you need. But sometimes you may want to pass the signature of a task invocation to another process or as an argument to another function, for which Celery uses something called signatures.
A signature wraps the arguments and execution options of a single task invocation in such a way that it can be passed to functions or even serialized and sent across the wire.
You can create a signature for the add task using the arguments (2, 2), and a countdown of 10 seconds like this:
add.signature((2, 2), countdown=10)
tasks.add(2, 2)
There’s also a shortcut using star arguments:
add.s(2, 2)
tasks.add(2, 2)
And there’s that calling API again…
Signature instances also support the calling API, meaning they have delay and apply_async methods.
But there’s a difference in that the signature may already have an argument signature specified. The add task takes two arguments, so a signature specifying two arguments would make a complete signature:
s1 = add.s(2, 2)
res = s1.delay()
res.get()
4
But, you can also make incomplete signatures to create what we call partials:
incomplete partial: add(?, 2)
s2 = add.s(2)
s2 is now a partial signature that needs another argument to be complete, and this can be resolved when calling the signature:
resolves the partial: add(8, 2)
res = s2.delay(8)
res.get()
10
Here you added the argument 8 that was prepended to the existing argument 2 forming a complete signature of add(8, 2).
Keyword arguments can also be added later; these are then merged with any existing keyword arguments, but with new arguments taking precedence:
s3 = add.s(2, 2, debug=True)
s3.delay(debug=False) # debug is now False.
As stated, signatures support the calling API: meaning that
sig.apply_async(args=(), kwargs={}, **options)
Calls the signature with optional partial arguments and partial keyword arguments. Also supports partial execution options.
sig.delay(*args, **kwargs)
Star argument version of apply_async. Any arguments will be prepended to the arguments in the signature, and keyword arguments is merged with any existing keys.
So this all seems very useful, but what can you actually do with these? To get to that I must introduce the canvas primitives…
The Primitives
group
chain
chord
map
starmap
chunks
These primitives are signature objects themselves, so they can be combined in any number of ways to compose complex work-flows.
Note
These examples retrieve results, so to try them out you need to configure a result backend. The example project above already does that (see the backend argument to Celery).
Let’s look at some examples:
Groups
A group calls a list of tasks in parallel, and it returns a special result instance that lets you inspect the results as a group, and retrieve the return values in order.
from celery import group
from proj.tasks import add
group(add.s(i, i) for i in range(10))().get()
[0, 2, 4, 6, 8, 10, 12, 14, 16, 18]
Partial group
g = group(add.s(i) for i in range(10))
g(10).get()
[10, 11, 12, 13, 14, 15, 16, 17, 18, 19]
Chains
Tasks can be linked together so that after one task returns the other is called:
from celery import chain
from proj.tasks import add, mul
(4 + 4) * 8
chain(add.s(4, 4) | mul.s(8))().get()
64
or a partial chain:
(? + 4) * 8
g = chain(add.s(4) | mul.s(8))
g(4).get()
64
Chains can also be written like this:
(add.s(4, 4) | mul.s(8))().get()
64
Chords
A chord is a group with a callback:
from celery import chord
from proj.tasks import add, xsum
chord((add.s(i, i) for i in range(10)), xsum.s())().get()
90
A group chained to another task will be automatically converted to a chord:
(group(add.s(i, i) for i in range(10)) | xsum.s())().get()
90
Since these primitives are all of the signature type they can be combined almost however you want, for example:
upload_document.s(file) | group(apply_filter.s() for filter in filters)
Be sure to read more about work-flows in the Canvas user guide.
Routing
Celery supports all of the routing facilities provided by AMQP, but it also supports simple routing where messages are sent to named queues.
The task_routes setting enables you to route tasks by name and keep everything centralized in one location:
app.conf.update(
task_routes = {
‘proj.tasks.add’: {‘queue’: ‘hipri’},
},
)
You can also specify the queue at runtime with the queue argument to apply_async:
from proj.tasks import add
add.apply_async((2, 2), queue=‘hipri’)
You can then make a worker consume from this queue by specifying the celery worker -Q option:
$ celery -A proj worker -Q hipri
You may specify multiple queues by using a comma-separated list. For example, you can make the worker consume from both the default queue and the hipri queue, where the default queue is named celery for historical reasons:
$ celery -A proj worker -Q hipri,celery
The order of the queues doesn’t matter as the worker will give equal weight to the queues.
To learn more about routing, including taking use of the full power of AMQP routing, see the Routing Guide.
Remote Control
If you’re using RabbitMQ (AMQP), Redis, or Qpid as the broker then you can control and inspect the worker at runtime.
For example you can see what tasks the worker is currently working on:
$ celery -A proj inspect active
This is implemented by using broadcast messaging, so all remote control commands are received by every worker in the cluster.
You can also specify one or more workers to act on the request using the --destination option. This is a comma-separated list of worker host names:
$ celery -A proj inspect active --destination=celery@example.com
If a destination isn’t provided then every worker will act and reply to the request.
The celery inspect command contains commands that don’t change anything in the worker; it only returns information and statistics about what’s going on inside the worker. For a list of inspect commands you can execute:
$ celery -A proj inspect --help
Then there’s the celery control command, which contains commands that actually change things in the worker at runtime:
$ celery -A proj control --help
For example you can force workers to enable event messages (used for monitoring tasks and workers):
$ celery -A proj control enable_events
When events are enabled you can then start the event dumper to see what the workers are doing:
$ celery -A proj events --dump
or you can start the curses interface:
$ celery -A proj events
when you’re finished monitoring you can disable events again:
$ celery -A proj control disable_events
The celery status command also uses remote control commands and shows a list of online workers in the cluster:
$ celery -A proj status
You can read more about the celery command and monitoring in the Monitoring Guide.
Timezone
All times and dates, internally and in messages use the UTC timezone.
When the worker receives a message, for example with a countdown set it converts that UTC time to local time. If you wish to use a different timezone than the system timezone then you must configure that using the timezone setting:
app.conf.timezone = ‘Europe/London’
Optimization
The default configuration isn’t optimized for throughput. By default, it tries to walk the middle way between many short tasks and fewer long tasks, a compromise between throughput and fair scheduling.
If you have strict fair scheduling requirements, or want to optimize for throughput then you should read the Optimizing Guide.
If you’re using RabbitMQ then you can install the librabbitmq module, an AMQP client implemented in C:
$ pip install librabbitmq
What to do now?
Now that you have read this document you should continue to the User Guide.
There’s also an API reference if you’re so inclined.
Resources
Getting Help
Mailing list
IRC
Bug tracker
Wiki
Contributing
License
Getting Help
Mailing list
For discussions about the usage, development, and future of Celery, please join the celery-users mailing list.
IRC
Come chat with us on IRC. The #celery channel is located at the Freenode network.
Bug tracker
If you have any suggestions, bug reports, or annoyances please report them to our issue tracker at https://github.com/celery/celery/issues/
Wiki
https://github.com/celery/celery/wiki
Contributing
Development of celery happens at GitHub: https://github.com/celery/celery
You’re highly encouraged to participate in the development of celery. If you don’t like GitHub (for some reason) you’re welcome to send regular patches.
Be sure to also read the Contributing to Celery section in the documentation.
License
This software is licensed under the New BSD License. See the LICENSE file in the top distribution directory for the full license text.
User Guide
Release
4.4
Date
Jul 31, 2020
Application
Main Name
Configuration
Laziness
Breaking the chain
Abstract Tasks
The Celery library must be instantiated before use, this instance is called an application (or app for short).
The application is thread-safe so that multiple Celery applications with different configurations, components, and tasks can co-exist in the same process space.
Let’s create one now:
from celery import Celery
app = Celery()
app
The last line shows the textual representation of the application: including the name of the app class (Celery), the name of the current main module (main), and the memory address of the object (0x100469fd0).
Main Name
Only one of these is important, and that’s the main module name. Let’s look at why that is.
When you send a task message in Celery, that message won’t contain any source code, but only the name of the task you want to execute. This works similarly to how host names work on the internet: every worker maintains a mapping of task names to their actual functions, called the task registry.
Whenever you define a task, that task will also be added to the local registry:
@app.task
… def add(x, y):
… return x + y
add
<@task: main.add>
add.name
main.add
app.tasks[‘main.add’]
<@task: main.add>
and there you see that main again; whenever Celery isn’t able to detect what module the function belongs to, it uses the main module name to generate the beginning of the task name.
This is only a problem in a limited set of use cases:
If the module that the task is defined in is run as a program.
If the application is created in the Python shell (REPL).
For example here, where the tasks module is also used to start a worker with app.worker_main():
tasks.py:
from celery import Celery
app = Celery()
@app.task
def add(x, y): return x + y
if name == ‘main’:
app.worker_main()
When this module is executed the tasks will be named starting with “main”, but when the module is imported by another process, say to call a task, the tasks will be named starting with “tasks” (the real name of the module):
from tasks import add
add.name
tasks.add
You can specify another name for the main module:
app = Celery(‘tasks’)
app.main
‘tasks’
@app.task
… def add(x, y):
… return x + y
add.name
tasks.add
See also
Names
Configuration
There are several options you can set that’ll change how Celery works. These options can be set directly on the app instance, or you can use a dedicated configuration module.
The configuration is available as app.conf:
app.conf.timezone
‘Europe/London’
where you can also set configuration values directly:
app.conf.enable_utc = True
or update several keys at once by using the update method:
app.conf.update(
… enable_utc=True,
… timezone=‘Europe/London’,
…)
The configuration object consists of multiple dictionaries that are consulted in order:
Changes made at run-time.
The configuration module (if any)
The default configuration (celery.app.defaults).
You can even add new default sources by using the app.add_defaults() method.
See also
Go to the Configuration reference for a complete listing of all the available settings, and their default values.
config_from_object
The app.config_from_object() method loads configuration from a configuration object.
This can be a configuration module, or any object with configuration attributes.
Note that any configuration that was previously set will be reset when config_from_object() is called. If you want to set additional configuration you should do so after.
Example 1: Using the name of a module
The app.config_from_object() method can take the fully qualified name of a Python module, or even the name of a Python attribute, for example: “celeryconfig”, “myproj.config.celery”, or “myproj.config:CeleryConfig”:
from celery import Celery
app = Celery()
app.config_from_object(‘celeryconfig’)
The celeryconfig module may then look like this:
celeryconfig.py:
enable_utc = True
timezone = ‘Europe/London’
and the app will be able to use it as long as import celeryconfig is possible.
Example 2: Passing an actual module object
You can also pass an already imported module object, but this isn’t always recommended.
Tip
Using the name of a module is recommended as this means the module does not need to be serialized when the prefork pool is used. If you’re experiencing configuration problems or pickle errors then please try using the name of a module instead.
import celeryconfig
from celery import Celery
app = Celery()
app.config_from_object(celeryconfig)
Example 3: Using a configuration class/object
from celery import Celery
app = Celery()
class Config:
enable_utc = True
timezone = ‘Europe/London’
app.config_from_object(Config)
or using the fully qualified name of the object:
app.config_from_object(‘module:Config’)
config_from_envvar
The app.config_from_envvar() takes the configuration module name from an environment variable
For example – to load configuration from a module specified in the environment variable named CELERY_CONFIG_MODULE:
import os
from celery import Celery
#: Set default configuration module name
os.environ.setdefault(‘CELERY_CONFIG_MODULE’, ‘celeryconfig’)
app = Celery()
app.config_from_envvar(‘CELERY_CONFIG_MODULE’)
You can then specify the configuration module to use via the environment:
$ CELERY_CONFIG_MODULE=“celeryconfig.prod” celery worker -l info
Censored configuration
If you ever want to print out the configuration, as debugging information or similar, you may also want to filter out sensitive information like passwords and API keys.
Celery comes with several utilities useful for presenting the configuration, one is humanize():
app.conf.humanize(with_defaults=False, censored=True)
This method returns the configuration as a tabulated string. This will only contain changes to the configuration by default, but you can include the built-in default keys and values by enabling the with_defaults argument.
If you instead want to work with the configuration as a dictionary, you can use the table() method:
app.conf.table(with_defaults=False, censored=True)
Please note that Celery won’t be able to remove all sensitive information, as it merely uses a regular expression to search for commonly named keys. If you add custom settings containing sensitive information you should name the keys using a name that Celery identifies as secret.
A configuration setting will be censored if the name contains any of these sub-strings:
API, TOKEN, KEY, SECRET, PASS, SIGNATURE, DATABASE
Laziness
The application instance is lazy, meaning it won’t be evaluated until it’s actually needed.
Creating a Celery instance will only do the following:
Create a logical clock instance, used for events.
Create the task registry.
Set itself as the current app (but not if the set_as_current argument was disabled)
Call the app.on_init() callback (does nothing by default).
The app.task() decorators don’t create the tasks at the point when the task is defined, instead it’ll defer the creation of the task to happen either when the task is used, or after the application has been finalized,
This example shows how the task isn’t created until you use the task, or access an attribute (in this case repr()):
@app.task
def add(x, y):
… return x + y
type(add)
<class ‘celery.local.PromiseProxy’>
add.evaluated()
False
add # <-- causes repr(add) to happen
<@task: main.add>
add.evaluated()
True
Finalization of the app happens either explicitly by calling app.finalize() – or implicitly by accessing the app.tasks attribute.
Finalizing the object will:
Copy tasks that must be shared between apps
Tasks are shared by default, but if the shared argument to the task decorator is disabled, then the task will be private to the app it’s bound to.
Evaluate all pending task decorators.
Make sure all tasks are bound to the current app.
Tasks are bound to an app so that they can read default values from the configuration.
The “default app”
Celery didn’t always have applications, it used to be that there was only a module-based API, and for backwards compatibility the old API is still there until the release of Celery 5.0.
Celery always creates a special app - the “default app”, and this is used if no custom application has been instantiated.
The celery.task module is there to accommodate the old API, and shouldn’t be used if you use a custom app. You should always use the methods on the app instance, not the module based API.
For example, the old Task base class enables many compatibility features where some may be incompatible with newer features, such as task methods:
from celery.task import Task # << OLD Task base class.
from celery import Task # << NEW base class.
The new base class is recommended even if you use the old module-based API.
Breaking the chain
While it’s possible to depend on the current app being set, the best practice is to always pass the app instance around to anything that needs it.
I call this the “app chain”, since it creates a chain of instances depending on the app being passed.
The following example is considered bad practice:
from celery import current_app
class Scheduler(object):
def run(self):
    app = current_app
Instead it should take the app as an argument:
class Scheduler(object):
def __init__(self, app):
    self.app = app
Internally Celery uses the celery.app.app_or_default() function so that everything also works in the module-based compatibility API
from celery.app import app_or_default
class Scheduler(object):
def init(self, app=None):
self.app = app_or_default(app)
In development you can set the CELERY_TRACE_APP environment variable to raise an exception if the app chain breaks:
$ CELERY_TRACE_APP=1 celery worker -l info
Evolving the API
Celery has changed a lot from 2009 since it was initially created.
For example, in the beginning it was possible to use any callable as a task:
def hello(to):
return ‘hello {0}’.format(to)
from celery.execute import apply_async
apply_async(hello, (‘world!’,))
or you could also create a Task class to set certain options, or override other behavior
from celery.task import Task
from celery.registry import tasks
class Hello(Task):
queue = ‘hipri’
def run(self, to):
    return 'hello {0}'.format(to)
tasks.register(Hello)
Hello.delay(‘world!’)
Later, it was decided that passing arbitrary call-able’s was an anti-pattern, since it makes it very hard to use serializers other than pickle, and the feature was removed in 2.0, replaced by task decorators:
from celery.task import task
@task(queue=‘hipri’)
def hello(to):
return ‘hello {0}’.format(to)
Abstract Tasks
All tasks created using the task() decorator will inherit from the application’s base Task class.
You can specify a different base class using the base argument:
@app.task(base=OtherTask):
def add(x, y):
return x + y
To create a custom task class you should inherit from the neutral base class: celery.Task.
from celery import Task
class DebugTask(Task):
def __call__(self, *args, **kwargs):
    print('TASK STARTING: {0.name}[{0.request.id}]'.format(self))
    return self.run(*args, **kwargs)
Tip
If you override the task’s call method, then it’s very important that you also call self.run to execute the body of the task. Do not call super().call. The call method of the neutral base class celery.Task is only present for reference. For optimization, this has been unrolled into celery.app.trace.build_tracer.trace_task which calls run directly on the custom task class if no call method is defined.
The neutral base class is special because it’s not bound to any specific app yet. Once a task is bound to an app it’ll read configuration to set default values, and so on.
To realize a base class you need to create a task using the app.task() decorator:
@app.task(base=DebugTask)
def add(x, y):
return x + y
It’s even possible to change the default base class for an application by changing its app.Task() attribute:
from celery import Celery, Task
app = Celery()
class MyBaseTask(Task):
… queue = ‘hipri’
app.Task = MyBaseTask
app.Task
@app.task
… def add(x, y):
… return x + y
add
<@task: main.add>
add.class.mro()
[<class add of >,
,
,
<type ‘object’>]
Tasks
Tasks are the building blocks of Celery applications.
A task is a class that can be created out of any callable. It performs dual roles in that it defines both what happens when a task is called (sends a message), and what happens when a worker receives that message.
Every task class has a unique name, and this name is referenced in messages so the worker can find the right function to execute.
A task message is not removed from the queue until that message has been acknowledged by a worker. A worker can reserve many messages in advance and even if the worker is killed – by power failure or some other reason – the message will be redelivered to another worker.
Ideally task functions should be idempotent: meaning the function won’t cause unintended effects even if called multiple times with the same arguments. Since the worker cannot detect if your tasks are idempotent, the default behavior is to acknowledge the message in advance, just before it’s executed, so that a task invocation that already started is never executed again.
If your task is idempotent you can set the acks_late option to have the worker acknowledge the message after the task returns instead. See also the FAQ entry Should I use retry or acks_late?.
Note that the worker will acknowledge the message if the child process executing the task is terminated (either by the task calling sys.exit(), or by signal) even when acks_late is enabled. This behavior is by purpose as…
We don’t want to rerun tasks that forces the kernel to send a SIGSEGV (segmentation fault) or similar signals to the process.
We assume that a system administrator deliberately killing the task does not want it to automatically restart.
A task that allocates too much memory is in danger of triggering the kernel OOM killer, the same may happen again.
A task that always fails when redelivered may cause a high-frequency message loop taking down the system.
If you really want a task to be redelivered in these scenarios you should consider enabling the task_reject_on_worker_lost setting.
Warning
A task that blocks indefinitely may eventually stop the worker instance from doing any other work.
If your task does I/O then make sure you add timeouts to these operations, like adding a timeout to a web request using the requests library:
connect_timeout, read_timeout = 5.0, 30.0
response = requests.get(URL, timeout=(connect_timeout, read_timeout))
Time limits are convenient for making sure all tasks return in a timely manner, but a time limit event will actually kill the process by force so only use them to detect cases where you haven’t used manual timeouts yet.
The default prefork pool scheduler is not friendly to long-running tasks, so if you have tasks that run for minutes/hours make sure you enable the -Ofair command-line argument to the celery worker. See prefork-pool-prefetch for more information, and for the best performance route long-running and short-running tasks to dedicated workers (Automatic routing).
If your worker hangs then please investigate what tasks are running before submitting an issue, as most likely the hanging is caused by one or more tasks hanging on a network operation.
–
In this chapter you’ll learn all about defining tasks, and this is the table of contents:
Basics
Names
Task Request
Logging
Retrying
List of Options
States
Semipredicates
Custom task classes
How it works
Tips and Best Practices
Performance and Strategies
Example
Basics
You can easily create a task from any callable by using the task() decorator:
from .models import User
@app.task
def create_user(username, password):
User.objects.create(username=username, password=password)
There are also many options that can be set for the task, these can be specified as arguments to the decorator:
@app.task(serializer=‘json’)
def create_user(username, password):
User.objects.create(username=username, password=password)
How do I import the task decorator? And what’s “app”?
The task decorator is available on your Celery application instance, if you don’t know what this is then please read First Steps with Celery.
If you’re using Django (see First steps with Django), or you’re the author of a library then you probably want to use the shared_task() decorator:
from celery import shared_task
@shared_task
def add(x, y):
return x + y
Multiple decorators
When using multiple decorators in combination with the task decorator you must make sure that the task decorator is applied last (oddly, in Python this means it must be first in the list):
@app.task
@decorator2
@decorator1
def add(x, y):
return x + y
Bound tasks
A task being bound means the first argument to the task will always be the task instance (self), just like Python bound methods:
logger = get_task_logger(name)
@task(bind=True)
def add(self, x, y):
logger.info(self.request.id)
Bound tasks are needed for retries (using app.Task.retry()), for accessing information about the current task request, and for any additional functionality you add to custom task base classes.
Task inheritance
The base argument to the task decorator specifies the base class of the task:
import celery
class MyTask(celery.Task):
def on_failure(self, exc, task_id, args, kwargs, einfo):
    print('{0!r} failed: {1!r}'.format(task_id, exc))
@task(base=MyTask)
def add(x, y):
raise KeyError()
Names
Every task must have a unique name.
If no explicit name is provided the task decorator will generate one for you, and this name will be based on 1) the module the task is defined in, and 2) the name of the task function.
Example setting explicit name:
@app.task(name=‘sum-of-two-numbers’)
def add(x, y):
… return x + y
add.name
‘sum-of-two-numbers’
A best practice is to use the module name as a name-space, this way names won’t collide if there’s already a task with that name defined in another module.
@app.task(name=‘tasks.add’)
def add(x, y):
… return x + y
You can tell the name of the task by investigating its .name attribute:
add.name
‘tasks.add’
The name we specified here (tasks.add) is exactly the name that would’ve been automatically generated for us if the task was defined in a module named tasks.py:
tasks.py:
@app.task
def add(x, y):
return x + y
from tasks import add
add.name
‘tasks.add’
Automatic naming and relative imports
Absolute Imports
The best practice for developers targeting Python 2 is to add the following to the top of every module:
from future import absolute_import
This will force you to always use absolute imports so you will never have any problems with tasks using relative names.
Absolute imports are the default in Python 3 so you don’t need this if you target that version.
Relative imports and automatic name generation don’t go well together, so if you’re using relative imports you should set the name explicitly.
For example if the client imports the module “myapp.tasks” as “.tasks”, and the worker imports the module as “myapp.tasks”, the generated names won’t match and an NotRegistered error will be raised by the worker.
This is also the case when using Django and using project.myapp-style naming in INSTALLED_APPS:
INSTALLED_APPS = [‘project.myapp’]
If you install the app under the name project.myapp then the tasks module will be imported as project.myapp.tasks, so you must make sure you always import the tasks using the same name:
from project.myapp.tasks import mytask # << GOOD
from myapp.tasks import mytask # << BAD!!!
The second example will cause the task to be named differently since the worker and the client imports the modules under different names:
from project.myapp.tasks import mytask
mytask.name
‘project.myapp.tasks.mytask’
from myapp.tasks import mytask
mytask.name
‘myapp.tasks.mytask’
For this reason you must be consistent in how you import modules, and that is also a Python best practice.
Similarly, you shouldn’t use old-style relative imports:
from module import foo # BAD!
from proj.module import foo # GOOD!
New-style relative imports are fine and can be used:
from .module import foo # GOOD!
If you want to use Celery with a project already using these patterns extensively and you don’t have the time to refactor the existing code then you can consider specifying the names explicitly instead of relying on the automatic naming:
@task(name=‘proj.tasks.add’)
def add(x, y):
return x + y
Changing the automatic naming behavior
New in version 4.0.
There are some cases when the default automatic naming isn’t suitable. Consider having many tasks within many different modules:
project/
/init.py
/celery.py
/moduleA/
/init.py
/tasks.py
/moduleB/
/init.py
/tasks.py
Using the default automatic naming, each task will have a generated name like moduleA.tasks.taskA, moduleA.tasks.taskB, moduleB.tasks.test, and so on. You may want to get rid of having tasks in all task names. As pointed above, you can explicitly give names for all tasks, or you can change the automatic naming behavior by overriding app.gen_task_name(). Continuing with the example, celery.py may contain:
from celery import Celery
class MyCelery(Celery):
def gen_task_name(self, name, module):
    if module.endswith('.tasks'):
        module = module[:-6]
    return super(MyCelery, self).gen_task_name(name, module)
app = MyCelery(‘main’)
So each task will have a name like moduleA.taskA, moduleA.taskB and moduleB.test.
Warning
Make sure that your app.gen_task_name() is a pure function: meaning that for the same input it must always return the same output.
Task Request
app.Task.request contains information and state related to the currently executing task.
The request defines the following attributes:
id
The unique id of the executing task.
group
The unique id of the task’s group, if this task is a member.
chord
The unique id of the chord this task belongs to (if the task is part of the header).
correlation_id
Custom ID used for things like de-duplication.
args
Positional arguments.
kwargs
Keyword arguments.
origin
Name of host that sent this task.
retries
How many times the current task has been retried. An integer starting at 0.
is_eager
Set to True if the task is executed locally in the client, not by a worker.
eta
The original ETA of the task (if any). This is in UTC time (depending on the enable_utc setting).
expires
The original expiry time of the task (if any). This is in UTC time (depending on the enable_utc setting).
hostname
Node name of the worker instance executing the task.
delivery_info
Additional message delivery information. This is a mapping containing the exchange and routing key used to deliver this task. Used by for example app.Task.retry() to resend the task to the same destination queue. Availability of keys in this dict depends on the message broker used.
reply-to
Name of queue to send replies back to (used with RPC result backend for example).
called_directly
This flag is set to true if the task wasn’t executed by the worker.
timelimit
A tuple of the current (soft, hard) time limits active for this task (if any).
callbacks
A list of signatures to be called if this task returns successfully.
errback
A list of signatures to be called if this task fails.
utc
Set to true the caller has UTC enabled (enable_utc).
New in version 3.1.
headers
Mapping of message headers sent with this task message (may be None).
reply_to
Where to send reply to (queue name).
correlation_id
Usually the same as the task id, often used in amqp to keep track of what a reply is for.
New in version 4.0.
root_id
The unique id of the first task in the workflow this task is part of (if any).
parent_id
The unique id of the task that called this task (if any).
chain
Reversed list of tasks that form a chain (if any). The last item in this list will be the next task to succeed the current task. If using version one of the task protocol the chain tasks will be in request.callbacks instead.
Example
An example task accessing information in the context is:
@app.task(bind=True)
def dump_context(self, x, y):
print(‘Executing task id {0.id}, args: {0.args!r} kwargs: {0.kwargs!r}’.format(
self.request))
The bind argument means that the function will be a “bound method” so that you can access attributes and methods on the task type instance.
Logging
The worker will automatically set up logging for you, or you can configure logging manually.
A special logger is available named “celery.task”, you can inherit from this logger to automatically get the task name and unique id as part of the logs.
The best practice is to create a common logger for all of your tasks at the top of your module:
from celery.utils.log import get_task_logger
logger = get_task_logger(name)
@app.task
def add(x, y):
logger.info(‘Adding {0} + {1}’.format(x, y))
return x + y
Celery uses the standard Python logger library, and the documentation can be found here.
You can also use print(), as anything written to standard out/-err will be redirected to the logging system (you can disable this, see worker_redirect_stdouts).
Note
The worker won’t update the redirection if you create a logger instance somewhere in your task or task module.
If you want to redirect sys.stdout and sys.stderr to a custom logger you have to enable this manually, for example:
import sys
logger = get_task_logger(name)
@app.task(bind=True)
def add(self, x, y):
old_outs = sys.stdout, sys.stderr
rlevel = self.app.conf.worker_redirect_stdouts_level
try:
self.app.log.redirect_stdouts_to_logger(logger, rlevel)
print(‘Adding {0} + {1}’.format(x, y))
return x + y
finally:
sys.stdout, sys.stderr = old_outs
Note
If a specific Celery logger you need is not emitting logs, you should check that the logger is propagating properly. In this example “celery.app.trace” is enabled so that “succeeded in” logs are emitted:
import celery
import logging
@celery.signals.after_setup_logger.connect
def on_after_setup_logger(**kwargs):
logger = logging.getLogger(‘celery’)
logger.propagate = True
logger = logging.getLogger(‘celery.app.trace’)
logger.propagate = True
Note
If you want to completely disable Celery logging configuration, use the setup_logging signal:
import celery
@celery.signals.setup_logging.connect
def on_setup_logging(**kwargs):
pass
Argument checking
New in version 4.0.
Celery will verify the arguments passed when you call the task, just like Python does when calling a normal function:
@app.task
… def add(x, y):
… return x + y
Calling the task with two arguments works:
add.delay(8, 8)
<AsyncResult: f59d71ca-1549-43e0-be41-4e8821a83c0c>
Calling the task with only one argument fails:
add.delay(8)
Traceback (most recent call last):
File “”, line 1, in
File “celery/app/task.py”, line 376, in delay
return self.apply_async(args, kwargs)
File “celery/app/task.py”, line 485, in apply_async
check_arguments(*(args or ()), **(kwargs or {}))
TypeError: add() takes exactly 2 arguments (1 given)
You can disable the argument checking for any task by setting its typing attribute to False:
@app.task(typing=False)
… def add(x, y):
… return x + y
Works locally, but the worker receiving the task will raise an error.
add.delay(8)
<AsyncResult: f59d71ca-1549-43e0-be41-4e8821a83c0c>
Hiding sensitive information in arguments
New in version 4.0.
When using task_protocol 2 or higher (default since 4.0), you can override how positional arguments and keyword arguments are represented in logs and monitoring events using the argsrepr and kwargsrepr calling arguments:
add.apply_async((2, 3), argsrepr=‘(, )’)
charge.s(account, card=‘1234 5678 1234 5678’).set(
… kwargsrepr=repr({‘card’: ‘**** **** **** 5678’})
… ).delay()
Warning
Sensitive information will still be accessible to anyone able to read your task message from the broker, or otherwise able intercept it.
For this reason you should probably encrypt your message if it contains sensitive information, or in this example with a credit card number the actual number could be stored encrypted in a secure store that you retrieve and decrypt in the task itself.
Retrying
app.Task.retry() can be used to re-execute the task, for example in the event of recoverable errors.
When you call retry it’ll send a new message, using the same task-id, and it’ll take care to make sure the message is delivered to the same queue as the originating task.
When a task is retried this is also recorded as a task state, so that you can track the progress of the task using the result instance (see States).
Here’s an example using retry:
@app.task(bind=True)
def send_twitter_status(self, oauth, tweet):
try:
twitter = Twitter(oauth)
twitter.update_status(tweet)
except (Twitter.FailWhaleError, Twitter.LoginError) as exc:
raise self.retry(exc=exc)
Note
The app.Task.retry() call will raise an exception so any code after the retry won’t be reached. This is the Retry exception, it isn’t handled as an error but rather as a semi-predicate to signify to the worker that the task is to be retried, so that it can store the correct state when a result backend is enabled.
This is normal operation and always happens unless the throw argument to retry is set to False.
The bind argument to the task decorator will give access to self (the task type instance).
The exc argument is used to pass exception information that’s used in logs, and when storing task results. Both the exception and the traceback will be available in the task state (if a result backend is enabled).
If the task has a max_retries value the current exception will be re-raised if the max number of retries has been exceeded, but this won’t happen if:
An exc argument wasn’t given.
In this case the MaxRetriesExceededError exception will be raised.
There’s no current exception
If there’s no original exception to re-raise the exc argument will be used instead, so:
self.retry(exc=Twitter.LoginError())
will raise the exc argument given.
Using a custom retry delay
When a task is to be retried, it can wait for a given amount of time before doing so, and the default delay is defined by the default_retry_delay attribute. By default this is set to 3 minutes. Note that the unit for setting the delay is in seconds (int or float).
You can also provide the countdown argument to retry() to override this default.
@app.task(bind=True, default_retry_delay=30 * 60) # retry in 30 minutes.
def add(self, x, y):
try:
something_raising()
except Exception as exc:
# overrides the default delay to retry after 1 minute
raise self.retry(exc=exc, countdown=60)
Automatic retry for known exceptions
New in version 4.0.
Sometimes you just want to retry a task whenever a particular exception is raised.
Fortunately, you can tell Celery to automatically retry a task using autoretry_for argument in the task() decorator:
from twitter.exceptions import FailWhaleError
@app.task(autoretry_for=(FailWhaleError,))
def refresh_timeline(user):
return twitter.refresh_timeline(user)
If you want to specify custom arguments for an internal retry() call, pass retry_kwargs argument to task() decorator:
@app.task(autoretry_for=(FailWhaleError,),
retry_kwargs={‘max_retries’: 5})
def refresh_timeline(user):
return twitter.refresh_timeline(user)
This is provided as an alternative to manually handling the exceptions, and the example above will do the same as wrapping the task body in a try … except statement:
@app.task
def refresh_timeline(user):
try:
twitter.refresh_timeline(user)
except FailWhaleError as exc:
raise div.retry(exc=exc, max_retries=5)
If you want to automatically retry on any error, simply use:
@app.task(autoretry_for=(Exception,))
def x():
…
New in version 4.2.
If your tasks depend on another service, like making a request to an API, then it’s a good idea to use exponential backoff to avoid overwhelming the service with your requests. Fortunately, Celery’s automatic retry support makes it easy. Just specify the retry_backoff argument, like this:
from requests.exceptions import RequestException
@app.task(autoretry_for=(RequestException,), retry_backoff=True)
def x():
…
By default, this exponential backoff will also introduce random jitter to avoid having all the tasks run at the same moment. It will also cap the maximum backoff delay to 10 minutes. All these settings can be customized via options documented below.
New in version 4.4.
You can also set autoretry_for, retry_kwargs, retry_backoff, retry_backoff_max and retry_jitter options in class-based tasks:
class BaseTaskWithRetry(Task):
autoretry_for = (TypeError,)
retry_kwargs = {‘max_retries’: 5}
retry_backoff = True
retry_backoff_max = 700
retry_jitter = False
Task.autoretry_for
A list/tuple of exception classes. If any of these exceptions are raised during the execution of the task, the task will automatically be retried. By default, no exceptions will be autoretried.
Task.retry_kwargs
A dictionary. Use this to customize how autoretries are executed. Note that if you use the exponential backoff options below, the countdown task option will be determined by Celery’s autoretry system, and any countdown included in this dictionary will be ignored.
Task.retry_backoff
A boolean, or a number. If this option is set to True, autoretries will be delayed following the rules of exponential backoff. The first retry will have a delay of 1 second, the second retry will have a delay of 2 seconds, the third will delay 4 seconds, the fourth will delay 8 seconds, and so on. (However, this delay value is modified by retry_jitter, if it is enabled.) If this option is set to a number, it is used as a delay factor. For example, if this option is set to 3, the first retry will delay 3 seconds, the second will delay 6 seconds, the third will delay 12 seconds, the fourth will delay 24 seconds, and so on. By default, this option is set to False, and autoretries will not be delayed.
Task.retry_backoff_max
A number. If retry_backoff is enabled, this option will set a maximum delay in seconds between task autoretries. By default, this option is set to 600, which is 10 minutes.
Task.retry_jitter
A boolean. Jitter is used to introduce randomness into exponential backoff delays, to prevent all tasks in the queue from being executed simultaneously. If this option is set to True, the delay value calculated by retry_backoff is treated as a maximum, and the actual delay value will be a random number between zero and that maximum. By default, this option is set to True.
List of Options
The task decorator can take a number of options that change the way the task behaves, for example you can set the rate limit for a task using the rate_limit option.
Any keyword argument passed to the task decorator will actually be set as an attribute of the resulting task class, and this is a list of the built-in attributes.
General
Task.name
The name the task is registered as.
You can set this name manually, or a name will be automatically generated using the module and class name.
See also Names.
Task.request
If the task is being executed this will contain information about the current request. Thread local storage is used.
See Task Request.
Task.max_retries
Only applies if the task calls self.retry or if the task is decorated with the autoretry_for argument.
The maximum number of attempted retries before giving up. If the number of retries exceeds this value a MaxRetriesExceededError exception will be raised.
Note
You have to call retry() manually, as it won’t automatically retry on exception…
The default is 3. A value of None will disable the retry limit and the task will retry forever until it succeeds.
Task.throws
Optional tuple of expected error classes that shouldn’t be regarded as an actual error.
Errors in this list will be reported as a failure to the result backend, but the worker won’t log the event as an error, and no traceback will be included.
Example:
@task(throws=(KeyError, HttpNotFound)):
def get_foo():
something()
Error types:
Expected errors (in Task.throws)
Logged with severity INFO, traceback excluded.
Unexpected errors
Logged with severity ERROR, with traceback included.
Task.default_retry_delay
Default time in seconds before a retry of the task should be executed. Can be either int or float. Default is a three minute delay.
Task.rate_limit
Set the rate limit for this task type (limits the number of tasks that can be run in a given time frame). Tasks will still complete when a rate limit is in effect, but it may take some time before it’s allowed to start.
If this is None no rate limit is in effect. If it is an integer or float, it is interpreted as “tasks per second”.
The rate limits can be specified in seconds, minutes or hours by appending “/s”, “/m” or “/h” to the value. Tasks will be evenly distributed over the specified time frame.
Example: “100/m” (hundred tasks a minute). This will enforce a minimum delay of 600ms between starting two tasks on the same worker instance.
Default is the task_default_rate_limit setting: if not specified means rate limiting for tasks is disabled by default.
Note that this is a per worker instance rate limit, and not a global rate limit. To enforce a global rate limit (e.g., for an API with a maximum number of requests per second), you must restrict to a given queue.
Task.time_limit
The hard time limit, in seconds, for this task. When not set the workers default is used.
Task.soft_time_limit
The soft time limit for this task. When not set the workers default is used.
Task.ignore_result
Don’t store task state. Note that this means you can’t use AsyncResult to check if the task is ready, or get its return value.
Task.store_errors_even_if_ignored
If True, errors will be stored even if the task is configured to ignore results.
Task.serializer
A string identifying the default serialization method to use. Defaults to the task_serializer setting. Can be pickle, json, yaml, or any custom serialization methods that have been registered with kombu.serialization.registry.
Please see Serializers for more information.
Task.compression
A string identifying the default compression scheme to use.
Defaults to the task_compression setting. Can be gzip, or bzip2, or any custom compression schemes that have been registered with the kombu.compression registry.
Please see Compression for more information.
Task.backend
The result store backend to use for this task. An instance of one of the backend classes in celery.backends. Defaults to app.backend, defined by the result_backend setting.
Task.acks_late
If set to True messages for this task will be acknowledged after the task has been executed, not just before (the default behavior).
Note: This means the task may be executed multiple times should the worker crash in the middle of execution. Make sure your tasks are idempotent.
The global default can be overridden by the task_acks_late setting.
Task.track_started
If True the task will report its status as “started” when the task is executed by a worker. The default value is False as the normal behavior is to not report that level of granularity. Tasks are either pending, finished, or waiting to be retried. Having a “started” status can be useful for when there are long running tasks and there’s a need to report what task is currently running.
The host name and process id of the worker executing the task will be available in the state meta-data (e.g., result.info[‘pid’])
The global default can be overridden by the task_track_started setting.
See also
The API reference for Task.
States
Celery can keep track of the tasks current state. The state also contains the result of a successful task, or the exception and traceback information of a failed task.
There are several result backends to choose from, and they all have different strengths and weaknesses (see Result Backends).
During its lifetime a task will transition through several possible states, and each state may have arbitrary meta-data attached to it. When a task moves into a new state the previous state is forgotten about, but some transitions can be deduced, (e.g., a task now in the FAILED state, is implied to have been in the STARTED state at some point).
There are also sets of states, like the set of FAILURE_STATES, and the set of READY_STATES.
The client uses the membership of these sets to decide whether the exception should be re-raised (PROPAGATE_STATES), or whether the state can be cached (it can if the task is ready).
You can also define Custom states.
Result Backends
If you want to keep track of tasks or need the return values, then Celery must store or send the states somewhere so that they can be retrieved later. There are several built-in result backends to choose from: SQLAlchemy/Django ORM, Memcached, RabbitMQ/QPid (rpc), and Redis – or you can define your own.
No backend works well for every use case. You should read about the strengths and weaknesses of each backend, and choose the most appropriate for your needs.
Warning
Backends use resources to store and transmit results. To ensure that resources are released, you must eventually call get() or forget() on EVERY AsyncResult instance returned after calling a task.
See also
Task result backend settings
RPC Result Backend (RabbitMQ/QPid)
The RPC result backend (rpc://) is special as it doesn’t actually store the states, but rather sends them as messages. This is an important difference as it means that a result can only be retrieved once, and only by the client that initiated the task. Two different processes can’t wait for the same result.
Even with that limitation, it is an excellent choice if you need to receive state changes in real-time. Using messaging means the client doesn’t have to poll for new states.
The messages are transient (non-persistent) by default, so the results will disappear if the broker restarts. You can configure the result backend to send persistent messages using the result_persistent setting.
Database Result Backend
Keeping state in the database can be convenient for many, especially for web applications with a database already in place, but it also comes with limitations.
Polling the database for new states is expensive, and so you should increase the polling intervals of operations, such as result.get().
Some databases use a default transaction isolation level that isn’t suitable for polling tables for changes.
In MySQL the default transaction isolation level is REPEATABLE-READ: meaning the transaction won’t see changes made by other transactions until the current transaction is committed.
Changing that to the READ-COMMITTED isolation level is recommended.
Built-in States
PENDING
Task is waiting for execution or unknown. Any task id that’s not known is implied to be in the pending state.
STARTED
Task has been started. Not reported by default, to enable please see app.Task.track_started.
meta-data
pid and hostname of the worker process executing the task.
SUCCESS
Task has been successfully executed.
meta-data
result contains the return value of the task.
propagates
Yes
ready
Yes
FAILURE
Task execution resulted in failure.
meta-data
result contains the exception occurred, and traceback contains the backtrace of the stack at the point when the exception was raised.
propagates
Yes
RETRY
Task is being retried.
meta-data
result contains the exception that caused the retry, and traceback contains the backtrace of the stack at the point when the exceptions was raised.
propagates
No
REVOKED
Task has been revoked.
propagates
Yes
Custom states
You can easily define your own states, all you need is a unique name. The name of the state is usually an uppercase string. As an example you could have a look at the abortable tasks which defines a custom ABORTED state.
Use update_state() to update a task’s state:.
@app.task(bind=True)
def upload_files(self, filenames):
for i, file in enumerate(filenames):
if not self.request.called_directly:
self.update_state(state=‘PROGRESS’,
meta={‘current’: i, ‘total’: len(filenames)})
Here I created the state “PROGRESS”, telling any application aware of this state that the task is currently in progress, and also where it is in the process by having current and total counts as part of the state meta-data. This can then be used to create progress bars for example.
Creating pickleable exceptions
A rarely known Python fact is that exceptions must conform to some simple rules to support being serialized by the pickle module.
Tasks that raise exceptions that aren’t pickleable won’t work properly when Pickle is used as the serializer.
To make sure that your exceptions are pickleable the exception MUST provide the original arguments it was instantiated with in its .args attribute. The simplest way to ensure this is to have the exception call Exception.init.
Let’s look at some examples that work, and one that doesn’t:
OK:
class HttpError(Exception):
pass
BAD:
class HttpError(Exception):
def __init__(self, status_code):
    self.status_code = status_code
OK:
class HttpError(Exception):
def __init__(self, status_code):
    self.status_code = status_code
    Exception.__init__(self, status_code)  # <-- REQUIRED
So the rule is: For any exception that supports custom arguments *args, Exception.init(self, *args) must be used.
There’s no special support for keyword arguments, so if you want to preserve keyword arguments when the exception is unpickled you have to pass them as regular args:
class HttpError(Exception):
def __init__(self, status_code, headers=None, body=None):
    self.status_code = status_code
    self.headers = headers
    self.body = body

    super(HttpError, self).__init__(status_code, headers, body)
Semipredicates
The worker wraps the task in a tracing function that records the final state of the task. There are a number of exceptions that can be used to signal this function to change how it treats the return of the task.
Ignore
The task may raise Ignore to force the worker to ignore the task. This means that no state will be recorded for the task, but the message is still acknowledged (removed from queue).
This can be used if you want to implement custom revoke-like functionality, or manually store the result of a task.
Example keeping revoked tasks in a Redis set:
from celery.exceptions import Ignore
@app.task(bind=True)
def some_task(self):
if redis.ismember(‘tasks.revoked’, self.request.id):
raise Ignore()
Example that stores results manually:
from celery import states
from celery.exceptions import Ignore
@app.task(bind=True)
def get_tweets(self, user):
timeline = twitter.get_timeline(user)
if not self.request.called_directly:
self.update_state(state=states.SUCCESS, meta=timeline)
raise Ignore()
Reject
The task may raise Reject to reject the task message using AMQPs basic_reject method. This won’t have any effect unless Task.acks_late is enabled.
Rejecting a message has the same effect as acking it, but some brokers may implement additional functionality that can be used. For example RabbitMQ supports the concept of Dead Letter Exchanges where a queue can be configured to use a dead letter exchange that rejected messages are redelivered to.
Reject can also be used to re-queue messages, but please be very careful when using this as it can easily result in an infinite message loop.
Example using reject when a task causes an out of memory condition:
import errno
from celery.exceptions import Reject
@app.task(bind=True, acks_late=True)
def render_scene(self, path):
file = get_file(path)
try:
renderer.render_scene(file)
# if the file is too big to fit in memory
# we reject it so that it's redelivered to the dead letter exchange
# and we can manually inspect the situation.
except MemoryError as exc:
    raise Reject(exc, requeue=False)
except OSError as exc:
    if exc.errno == errno.ENOMEM:
        raise Reject(exc, requeue=False)

# For any other error we retry after 10 seconds.
except Exception as exc:
    raise self.retry(exc, countdown=10)
Example re-queuing the message:
from celery.exceptions import Reject
@app.task(bind=True, acks_late=True)
def requeues(self):
if not self.request.delivery_info[‘redelivered’]:
raise Reject(‘no reason’, requeue=True)
print(‘received two times’)
Consult your broker documentation for more details about the basic_reject method.
Retry
The Retry exception is raised by the Task.retry method to tell the worker that the task is being retried.
Custom task classes
All tasks inherit from the app.Task class. The run() method becomes the task body.
As an example, the following code,
@app.task
def add(x, y):
return x + y
will do roughly this behind the scenes:
class _AddTask(app.Task):
def run(self, x, y):
    return x + y
add = app.tasks[_AddTask.name]
Instantiation
A task is not instantiated for every request, but is registered in the task registry as a global instance.
This means that the init constructor will only be called once per process, and that the task class is semantically closer to an Actor.
If you have a task,
from celery import Task
class NaiveAuthenticateServer(Task):
def __init__(self):
    self.users = {'george': 'password'}

def run(self, username, password):
    try:
        return self.users[username] == password
    except KeyError:
        return False
And you route every request to the same process, then it will keep state between requests.
This can also be useful to cache resources, For example, a base Task class that caches a database connection:
from celery import Task
class DatabaseTask(Task):
_db = None
@property
def db(self):
    if self._db is None:
        self._db = Database.connect()
    return self._db
Per task usage
The above can be added to each task like this:
@app.task(base=DatabaseTask)
def process_rows():
for row in process_rows.db.table.all():
process_row(row)
The db attribute of the process_rows task will then always stay the same in each process.
App-wide usage
You can also use your custom class in your whole Celery app by passing it as the task_cls argument when instantiating the app. This argument should be either a string giving the python path to your Task class or the class itself:
from celery import Celery
app = Celery(‘tasks’, task_cls=‘your.module.path:DatabaseTask’)
This will make all your tasks declared using the decorator syntax within your app to use your DatabaseTask class and will all have a db attribute.
The default value is the class provided by Celery: ‘celery.app.task:Task’.
Handlers
after_return(self, status, retval, task_id, args, kwargs, einfo)
Handler called after the task returns.
Parameters
status – Current task state.
retval – Task return value/exception.
task_id – Unique id of the task.
args – Original arguments for the task that returned.
kwargs – Original keyword arguments for the task that returned.
Keyword Arguments
einfo – ExceptionInfo instance, containing the traceback (if any).
The return value of this handler is ignored.
on_failure(self, exc, task_id, args, kwargs, einfo)
This is run by the worker when the task fails.
Parameters
exc – The exception raised by the task.
task_id – Unique id of the failed task.
args – Original arguments for the task that failed.
kwargs – Original keyword arguments for the task that failed.
Keyword Arguments
einfo – ExceptionInfo instance, containing the traceback.
The return value of this handler is ignored.
on_retry(self, exc, task_id, args, kwargs, einfo)
This is run by the worker when the task is to be retried.
Parameters
exc – The exception sent to retry().
task_id – Unique id of the retried task.
args – Original arguments for the retried task.
kwargs – Original keyword arguments for the retried task.
Keyword Arguments
einfo – ExceptionInfo instance, containing the traceback.
The return value of this handler is ignored.
on_success(self, retval, task_id, args, kwargs)
Run by the worker if the task executes successfully.
Parameters
retval – The return value of the task.
task_id – Unique id of the executed task.
args – Original arguments for the executed task.
kwargs – Original keyword arguments for the executed task.
The return value of this handler is ignored.
Requests and custom requests
Upon receiving a message to run a task, the worker creates a request to represent such demand.
Custom task classes may override which request class to use by changing the attribute celery.app.task.Task.Request. You may either assign the custom request class itself, or its fully qualified name.
The request has several responsibilities. Custom request classes should cover them all – they are responsible to actually run and trace the task. We strongly recommend to inherit from celery.worker.request.Request.
When using the pre-forking worker, the methods on_timeout() and on_failure() are executed in the main worker process. An application may leverage such facility to detect failures which are not detected using celery.app.task.Task.on_failure().
As an example, the following custom request detects and logs hard time limits, and other failures.
import logging
from celery.worker.request import Request
logger = logging.getLogger(‘my.package’)
class MyRequest(Request):
‘A minimal custom request to log failures and hard time limits.’
def on_timeout(self, soft, timeout):
    super(MyRequest, self).on_timeout(soft, timeout)
    if not soft:
       logger.warning(
           'A hard timeout was enforced for task %s',
           self.task.name
       )

def on_failure(self, exc_info, send_failed_event=True, return_ok=False):
    super(Request, self).on_failure(
        exc_info,
        send_failed_event=send_failed_event,
        return_ok=return_ok
    )
    logger.warning(
        'Failure detected for task %s',
        self.task.name
    )
class MyTask(Task):
Request = MyRequest # you can use a FQN ‘my.package:MyRequest’
@app.task(base=MyTask)
def some_longrunning_task():
# use your imagination
How it works
Here come the technical details. This part isn’t something you need to know, but you may be interested.
All defined tasks are listed in a registry. The registry contains a list of task names and their task classes. You can investigate this registry yourself:
from proj.celery import app
app.tasks
{‘celery.chord_unlock’:
<@task: celery.chord_unlock>,
‘celery.backend_cleanup’:
<@task: celery.backend_cleanup>,
‘celery.chord’:
<@task: celery.chord>}
This is the list of tasks built into Celery. Note that tasks will only be registered when the module they’re defined in is imported.
The default loader imports any modules listed in the imports setting.
The app.task() decorator is responsible for registering your task in the applications task registry.
When tasks are sent, no actual function code is sent with it, just the name of the task to execute. When the worker then receives the message it can look up the name in its task registry to find the execution code.
This means that your workers should always be updated with the same software as the client. This is a drawback, but the alternative is a technical challenge that’s yet to be solved.
Tips and Best Practices
Ignore results you don’t want
If you don’t care about the results of a task, be sure to set the ignore_result option, as storing results wastes time and resources.
@app.task(ignore_result=True)
def mytask():
something()
Results can even be disabled globally using the task_ignore_result setting.
Results can be enabled/disabled on a per-execution basis, by passing the ignore_result boolean parameter, when calling apply_async or delay.
@app.task
def mytask(x, y):
return x + y
No result will be stored
result = mytask.apply_async(1, 2, ignore_result=True)
print result.get() # -> None
Result will be stored
result = mytask.apply_async(1, 2, ignore_result=False)
print result.get() # -> 3
By default tasks will not ignore results (ignore_result=False) when a result backend is configured.
The option precedence order is the following:
Global task_ignore_result
ignore_result option
Task execution option ignore_result
More optimization tips
You find additional optimization tips in the Optimizing Guide.
Avoid launching synchronous subtasks
Having a task wait for the result of another task is really inefficient, and may even cause a deadlock if the worker pool is exhausted.
Make your design asynchronous instead, for example by using callbacks.
Bad:
@app.task
def update_page_info(url):
page = fetch_page.delay(url).get()
info = parse_page.delay(url, page).get()
store_page_info.delay(url, info)
@app.task
def fetch_page(url):
return myhttplib.get(url)
@app.task
def parse_page(page):
return myparser.parse_document(page)
@app.task
def store_page_info(url, info):
return PageInfo.objects.create(url, info)
Good:
def update_page_info(url):
# fetch_page -> parse_page -> store_page
chain = fetch_page.s(url) | parse_page.s() | store_page_info.s(url)
chain()
@app.task()
def fetch_page(url):
return myhttplib.get(url)
@app.task()
def parse_page(page):
return myparser.parse_document(page)
@app.task(ignore_result=True)
def store_page_info(info, url):
PageInfo.objects.create(url=url, info=info)
Here I instead created a chain of tasks by linking together different signature()’s. You can read about chains and other powerful constructs at Canvas: Designing Work-flows.
By default Celery will not allow you to run subtasks synchronously within a task, but in rare or extreme cases you might need to do so. WARNING: enabling subtasks to run synchronously is not recommended!
@app.task
def update_page_info(url):
page = fetch_page.delay(url).get(disable_sync_subtasks=False)
info = parse_page.delay(url, page).get(disable_sync_subtasks=False)
store_page_info.delay(url, info)
@app.task
def fetch_page(url):
return myhttplib.get(url)
@app.task
def parse_page(url, page):
return myparser.parse_document(page)
@app.task
def store_page_info(url, info):
return PageInfo.objects.create(url, info)
Performance and Strategies
Granularity
The task granularity is the amount of computation needed by each subtask. In general it is better to split the problem up into many small tasks rather than have a few long running tasks.
With smaller tasks you can process more tasks in parallel and the tasks won’t run long enough to block the worker from processing other waiting tasks.
However, executing a task does have overhead. A message needs to be sent, data may not be local, etc. So if the tasks are too fine-grained the overhead added probably removes any benefit.
See also
The book Art of Concurrency has a section dedicated to the topic of task granularity [AOC1].
AOC1
Breshears, Clay. Section 2.2.1, “The Art of Concurrency”. O’Reilly Media, Inc. May 15, 2009. ISBN-13 978-0-596-52153-0.
Data locality
The worker processing the task should be as close to the data as possible. The best would be to have a copy in memory, the worst would be a full transfer from another continent.
If the data is far away, you could try to run another worker at location, or if that’s not possible - cache often used data, or preload data you know is going to be used.
The easiest way to share data between workers is to use a distributed cache system, like memcached.
See also
The paper Distributed Computing Economics by Jim Gray is an excellent introduction to the topic of data locality.
State
Since Celery is a distributed system, you can’t know which process, or on what machine the task will be executed. You can’t even know if the task will run in a timely manner.
The ancient async sayings tells us that “asserting the world is the responsibility of the task”. What this means is that the world view may have changed since the task was requested, so the task is responsible for making sure the world is how it should be; If you have a task that re-indexes a search engine, and the search engine should only be re-indexed at maximum every 5 minutes, then it must be the tasks responsibility to assert that, not the callers.
Another gotcha is Django model objects. They shouldn’t be passed on as arguments to tasks. It’s almost always better to re-fetch the object from the database when the task is running instead, as using old data may lead to race conditions.
Imagine the following scenario where you have an article and a task that automatically expands some abbreviations in it:
class Article(models.Model):
title = models.CharField()
body = models.TextField()
@app.task
def expand_abbreviations(article):
article.body.replace(‘MyCorp’, ‘My Corporation’)
article.save()
First, an author creates an article and saves it, then the author clicks on a button that initiates the abbreviation task:
article = Article.objects.get(id=102)
expand_abbreviations.delay(article)
Now, the queue is very busy, so the task won’t be run for another 2 minutes. In the meantime another author makes changes to the article, so when the task is finally run, the body of the article is reverted to the old version because the task had the old body in its argument.
Fixing the race condition is easy, just use the article id instead, and re-fetch the article in the task body:
@app.task
def expand_abbreviations(article_id):
article = Article.objects.get(id=article_id)
article.body.replace(‘MyCorp’, ‘My Corporation’)
article.save()
expand_abbreviations.delay(article_id)
There might even be performance benefits to this approach, as sending large messages may be expensive.
Database transactions
Let’s have a look at another example:
from django.db import transaction
from django.http import HttpResponseRedirect
@transaction.atomic
def create_article(request):
article = Article.objects.create()
expand_abbreviations.delay(article.pk)
return HttpResponseRedirect(‘/articles/’)
This is a Django view creating an article object in the database, then passing the primary key to a task. It uses the transaction.atomic decorator, that will commit the transaction when the view returns, or roll back if the view raises an exception.
There’s a race condition if the task starts executing before the transaction has been committed; The database object doesn’t exist yet!
The solution is to use the on_commit callback to launch your Celery task once all transactions have been committed successfully.
from django.db.transaction import on_commit
def create_article(request):
article = Article.objects.create()
on_commit(lambda: expand_abbreviations.delay(article.pk))
Note
on_commit is available in Django 1.9 and above, if you are using a version prior to that then the django-transaction-hooks library adds support for this.
Example
Let’s take a real world example: a blog where comments posted need to be filtered for spam. When the comment is created, the spam filter runs in the background, so the user doesn’t have to wait for it to finish.
I have a Django blog application allowing comments on blog posts. I’ll describe parts of the models/views and tasks for this application.
blog/models.py
The comment model looks like this:
from django.db import models
from django.utils.translation import ugettext_lazy as _
class Comment(models.Model):
name = models.CharField((‘name’), max_length=64)
email_address = models.EmailField((‘email address’))
homepage = models.URLField((‘home page’),
blank=True, verify_exists=False)
comment = models.TextField((‘comment’))
pub_date = models.DateTimeField((‘Published date’),
editable=False, auto_add_now=True)
is_spam = models.BooleanField((‘spam?’),
default=False, editable=False)
class Meta:
    verbose_name = _('comment')
    verbose_name_plural = _('comments')
In the view where the comment is posted, I first write the comment to the database, then I launch the spam filter task in the background.
blog/views.py
from django import forms
from django.http import HttpResponseRedirect
from django.template.context import RequestContext
from django.shortcuts import get_object_or_404, render_to_response
from blog import tasks
from blog.models import Comment
class CommentForm(forms.ModelForm):
class Meta:
    model = Comment
def add_comment(request, slug, template_name=‘comments/create.html’):
post = get_object_or_404(Entry, slug=slug)
remote_addr = request.META.get(‘REMOTE_ADDR’)
if request.method == 'post':
    form = CommentForm(request.POST, request.FILES)
    if form.is_valid():
        comment = form.save()
        # Check spam asynchronously.
        tasks.spam_filter.delay(comment_id=comment.id,
                                remote_addr=remote_addr)
        return HttpResponseRedirect(post.get_absolute_url())
else:
    form = CommentForm()

context = RequestContext(request, {'form': form})
return render_to_response(template_name, context_instance=context)
To filter spam in comments I use Akismet, the service used to filter spam in comments posted to the free blog platform Wordpress. Akismet is free for personal use, but for commercial use you need to pay. You have to sign up to their service to get an API key.
To make API calls to Akismet I use the akismet.py library written by Michael Foord.
blog/tasks.py
from celery import Celery
from akismet import Akismet
from django.core.exceptions import ImproperlyConfigured
from django.contrib.sites.models import Site
from blog.models import Comment
app = Celery(broker=‘amqp://’)
@app.task
def spam_filter(comment_id, remote_addr=None):
logger = spam_filter.get_logger()
logger.info(‘Running spam filter for comment %s’, comment_id)
comment = Comment.objects.get(pk=comment_id)
current_domain = Site.objects.get_current().domain
akismet = Akismet(settings.AKISMET_KEY, 'http://{0}'.format(domain))
if not akismet.verify_key():
    raise ImproperlyConfigured('Invalid AKISMET_KEY')


is_spam = akismet.comment_check(user_ip=remote_addr,
                    comment_content=comment.comment,
                    comment_author=comment.name,
                    comment_author_email=comment.email_address)
if is_spam:
    comment.is_spam = True
    comment.save()

return is_spam
Calling Tasks
Basics
Linking (callbacks/errbacks)
On message
ETA and Countdown
Expiration
Message Sending Retry
Connection Error Handling
Serializers
Compression
Connections
Routing options
Results options
Basics
This document describes Celery’s uniform “Calling API” used by task instances and the canvas.
The API defines a standard set of execution options, as well as three methods:
apply_async(args[, kwargs[, …]])
Sends a task message.
delay(*args, **kwargs)
Shortcut to send a task message, but doesn’t support execution options.
calling (call)
Applying an object supporting the calling API (e.g., add(2, 2)) means that the task will not be executed by a worker, but in the current process instead (a message won’t be sent).
Quick Cheat Sheet
T.delay(arg, kwarg=value)
Star arguments shortcut to .apply_async. (.delay(*args, **kwargs) calls .apply_async(args, kwargs)).
T.apply_async((arg,), {‘kwarg’: value})
T.apply_async(countdown=10)
executes in 10 seconds from now.
T.apply_async(eta=now + timedelta(seconds=10))
executes in 10 seconds from now, specified using eta
T.apply_async(countdown=60, expires=120)
executes in one minute from now, but expires after 2 minutes.
T.apply_async(expires=now + timedelta(days=2))
expires in 2 days, set using datetime.
Example
The delay() method is convenient as it looks like calling a regular function:
task.delay(arg1, arg2, kwarg1=‘x’, kwarg2=‘y’)
Using apply_async() instead you have to write:
task.apply_async(args=[arg1, arg2], kwargs={‘kwarg1’: ‘x’, ‘kwarg2’: ‘y’})
Tip
If the task isn’t registered in the current process you can use send_task() to call the task by name instead.
So delay is clearly convenient, but if you want to set additional execution options you have to use apply_async.
The rest of this document will go into the task execution options in detail. All examples use a task called add, returning the sum of two arguments:
@app.task
def add(x, y):
return x + y
There’s another way…
You’ll learn more about this later while reading about the Canvas, but signature’s are objects used to pass around the signature of a task invocation, (for example to send it over the network), and they also support the Calling API:
task.s(arg1, arg2, kwarg1=‘x’, kwargs2=‘y’).apply_async()
Linking (callbacks/errbacks)
Celery supports linking tasks together so that one task follows another. The callback task will be applied with the result of the parent task as a partial argument:
add.apply_async((2, 2), link=add.s(16))
What’s s?
The add.s call used here is called a signature. If you don’t know what they are you should read about them in the canvas guide. There you can also learn about chain: a simpler way to chain tasks together.
In practice the link execution option is considered an internal primitive, and you’ll probably not use it directly, but use chains instead.
Here the result of the first task (4) will be sent to a new task that adds 16 to the previous result, forming the expression (2 + 2) + 16 = 20
You can also cause a callback to be applied if task raises an exception (errback), but this behaves differently from a regular callback in that it will be passed the id of the parent task, not the result. This is because it may not always be possible to serialize the exception raised, and so this way the error callback requires a result backend to be enabled, and the task must retrieve the result of the task instead.
This is an example error callback:
@app.task
def error_handler(uuid):
result = AsyncResult(uuid)
exc = result.get(propagate=False)
print(‘Task {0} raised exception: {1!r}\n{2!r}’.format(
uuid, exc, result.traceback))
it can be added to the task using the link_error execution option:
add.apply_async((2, 2), link_error=error_handler.s())
In addition, both the link and link_error options can be expressed as a list:
add.apply_async((2, 2), link=[add.s(16), other_task.s()])
The callbacks/errbacks will then be called in order, and all callbacks will be called with the return value of the parent task as a partial argument.
On message
Celery supports catching all states changes by setting on_message callback.
For example for long-running tasks to send task progress you can do something like this:
@app.task(bind=True)
def hello(self, a, b):
time.sleep(1)
self.update_state(state=“PROGRESS”, meta={‘progress’: 50})
time.sleep(1)
self.update_state(state=“PROGRESS”, meta={‘progress’: 90})
time.sleep(1)
return ‘hello world: %i’ % (a+b)
def on_raw_message(body):
print(body)
a, b = 1, 1
r = hello.apply_async(args=(a, b))
print(r.get(on_message=on_raw_message, propagate=False))
Will generate output like this:
{‘task_id’: ‘5660d3a3-92b8-40df-8ccc-33a5d1d680d7’,
‘result’: {‘progress’: 50},
‘children’: [],
‘status’: ‘PROGRESS’,
‘traceback’: None}
{‘task_id’: ‘5660d3a3-92b8-40df-8ccc-33a5d1d680d7’,
‘result’: {‘progress’: 90},
‘children’: [],
‘status’: ‘PROGRESS’,
‘traceback’: None}
{‘task_id’: ‘5660d3a3-92b8-40df-8ccc-33a5d1d680d7’,
‘result’: ‘hello world: 10’,
‘children’: [],
‘status’: ‘SUCCESS’,
‘traceback’: None}
hello world: 10
ETA and Countdown
The ETA (estimated time of arrival) lets you set a specific date and time that is the earliest time at which your task will be executed. countdown is a shortcut to set ETA by seconds into the future.
result = add.apply_async((2, 2), countdown=3)
result.get() # this takes at least 3 seconds to return
20
The task is guaranteed to be executed at some time after the specified date and time, but not necessarily at that exact time. Possible reasons for broken deadlines may include many items waiting in the queue, or heavy network latency. To make sure your tasks are executed in a timely manner you should monitor the queue for congestion. Use Munin, or similar tools, to receive alerts, so appropriate action can be taken to ease the workload. See Munin.
While countdown is an integer, eta must be a datetime object, specifying an exact date and time (including millisecond precision, and timezone information):
from datetime import datetime, timedelta
tomorrow = datetime.utcnow() + timedelta(days=1)
add.apply_async((2, 2), eta=tomorrow)
Expiration
The expires argument defines an optional expiry time, either as seconds after task publish, or a specific date and time using datetime:
Task expires after one minute from now.
add.apply_async((10, 10), expires=60)
Also supports datetime
from datetime import datetime, timedelta
add.apply_async((10, 10), kwargs,
… expires=datetime.now() + timedelta(days=1)
When a worker receives an expired task it will mark the task as REVOKED (TaskRevokedError).
Message Sending Retry
Celery will automatically retry sending messages in the event of connection failure, and retry behavior can be configured – like how often to retry, or a maximum number of retries – or disabled all together.
To disable retry you can set the retry execution option to False:
add.apply_async((2, 2), retry=False)
Related Settings
task_publish_retry
task_publish_retry_policy
Retry Policy
A retry policy is a mapping that controls how retries behave, and can contain the following keys:
max_retries
Maximum number of retries before giving up, in this case the exception that caused the retry to fail will be raised.
A value of None means it will retry forever.
The default is to retry 3 times.
interval_start
Defines the number of seconds (float or integer) to wait between retries. Default is 0 (the first retry will be instantaneous).
interval_step
On each consecutive retry this number will be added to the retry delay (float or integer). Default is 0.2.
interval_max
Maximum number of seconds (float or integer) to wait between retries. Default is 0.2.
For example, the default policy correlates to:
add.apply_async((2, 2), retry=True, retry_policy={
‘max_retries’: 3,
‘interval_start’: 0,
‘interval_step’: 0.2,
‘interval_max’: 0.2,
})
the maximum time spent retrying will be 0.4 seconds. It’s set relatively short by default because a connection failure could lead to a retry pile effect if the broker connection is down – For example, many web server processes waiting to retry, blocking other incoming requests.
Connection Error Handling
When you send a task and the message transport connection is lost, or the connection cannot be initiated, an OperationalError error will be raised:
from proj.tasks import add
add.delay(2, 2)
Traceback (most recent call last):
File “”, line 1, in
File “celery/app/task.py”, line 388, in delay
return self.apply_async(args, kwargs)
File “celery/app/task.py”, line 503, in apply_async
**options
File “celery/app/base.py”, line 662, in send_task
amqp.send_task_message(P, name, message, **options)
File “celery/backends/rpc.py”, line 275, in on_task_call
maybe_declare(self.binding(producer.channel), retry=True)
File “/opt/celery/kombu/kombu/messaging.py”, line 204, in _get_channel
channel = self._channel = channel()
File “/opt/celery/py-amqp/amqp/connection.py”, line 272, in connect
self.transport.connect()
File “/opt/celery/py-amqp/amqp/transport.py”, line 100, in connect
self._connect(self.host, self.port, self.connect_timeout)
File “/opt/celery/py-amqp/amqp/transport.py”, line 141, in _connect
self.sock.connect(sa)
kombu.exceptions.OperationalError: [Errno 61] Connection refused
If you have retries enabled this will only happen after retries are exhausted, or when disabled immediately.
You can handle this error too:
from celery.utils.log import get_logger
logger = get_logger(name)
try:
… add.delay(2, 2)
… except add.OperationalError as exc:
… logger.exception(‘Sending task raised: %r’, exc)
Serializers
Security
The pickle module allows for execution of arbitrary functions, please see the security guide.
Celery also comes with a special serializer that uses cryptography to sign your messages.
Data transferred between clients and workers needs to be serialized, so every message in Celery has a content_type header that describes the serialization method used to encode it.
The default serializer is JSON, but you can change this using the task_serializer setting, or for each individual task, or even per message.
There’s built-in support for JSON, pickle, YAML and msgpack, and you can also add your own custom serializers by registering them into the Kombu serializer registry
See also
Message Serialization in the Kombu user guide.
Each option has its advantages and disadvantages.
json – JSON is supported in many programming languages, is now
a standard part of Python (since 2.6), and is fairly fast to decode using the modern Python libraries, such as simplejson.
The primary disadvantage to JSON is that it limits you to the following data types: strings, Unicode, floats, Boolean, dictionaries, and lists. Decimals and dates are notably missing.
Binary data will be transferred using Base64 encoding, increasing the size of the transferred data by 34% compared to an encoding format where native binary types are supported.
However, if your data fits inside the above constraints and you need cross-language support, the default setting of JSON is probably your best choice.
See http://json.org for more information.
Note
(From Python official docs https://docs.python.org/3.6/library/json.html) Keys in key/value pairs of JSON are always of the type str. When a dictionary is converted into JSON, all the keys of the dictionary are coerced to strings. As a result of this, if a dictionary is converted into JSON and then back into a dictionary, the dictionary may not equal the original one. That is, loads(dumps(x)) != x if x has non-string keys.
pickle – If you have no desire to support any language other than
Python, then using the pickle encoding will gain you the support of all built-in Python data types (except class instances), smaller messages when sending binary files, and a slight speedup over JSON processing.
See pickle for more information.
yaml – YAML has many of the same characteristics as json,
except that it natively supports more data types (including dates, recursive references, etc.).
However, the Python libraries for YAML are a good bit slower than the libraries for JSON.
If you need a more expressive set of data types and need to maintain cross-language compatibility, then YAML may be a better fit than the above.
See http://yaml.org/ for more information.
msgpack – msgpack is a binary serialization format that’s closer to JSON
in features. It’s very young however, and support should be considered experimental at this point.
See http://msgpack.org/ for more information.
The encoding used is available as a message header, so the worker knows how to deserialize any task. If you use a custom serializer, this serializer must be available for the worker.
The following order is used to decide the serializer used when sending a task:
The serializer execution option.
The Task.serializer attribute
The task_serializer setting.
Example setting a custom serializer for a single task invocation:
add.apply_async((10, 10), serializer=‘json’)
Compression
Celery can compress messages using the following builtin schemes:
brotli
brotli is optimized for the web, in particular small text documents. It is most effective for serving static content such as fonts and html pages.
To use it, install Celery with:
$ pip install celery[brotli]
bzip2
bzip2 creates smaller files than gzip, but compression and decompression speeds are noticeably slower than those of gzip.
To use it, please ensure your Python executable was compiled with bzip2 support.
If you get the following ImportError:
import bz2
Traceback (most recent call last):
File “”, line 1, in
ImportError: No module named ‘bz2’
it means that you should recompile your Python version with bzip2 support.
gzip
gzip is suitable for systems that require a small memory footprint, making it ideal for systems with limited memory. It is often used to generate files with the “.tar.gz” extension.
To use it, please ensure your Python executable was compiled with gzip support.
If you get the following ImportError:
import gzip
Traceback (most recent call last):
File “”, line 1, in
ImportError: No module named ‘gzip’
it means that you should recompile your Python version with gzip support.
lzma
lzma provides a good compression ratio and executes with fast compression and decompression speeds at the expense of higher memory usage.
To use it, please ensure your Python executable was compiled with lzma support and that your Python version is 3.3 and above.
If you get the following ImportError:
import lzma
Traceback (most recent call last):
File “”, line 1, in
ImportError: No module named ‘lzma’
it means that you should recompile your Python version with lzma support.
Alternatively, you can also install a backport using:
$ pip install celery[lzma]
zlib
zlib is an abstraction of the Deflate algorithm in library form which includes support both for the gzip file format and a lightweight stream format in its API. It is a crucial component of many software systems - Linux kernel and Git VCS just to name a few.
To use it, please ensure your Python executable was compiled with zlib support.
If you get the following ImportError:
import zlib
Traceback (most recent call last):
File “”, line 1, in
ImportError: No module named ‘zlib’
it means that you should recompile your Python version with zlib support.
zstd
zstd targets real-time compression scenarios at zlib-level and better compression ratios. It’s backed by a very fast entropy stage, provided by Huff0 and FSE library.
To use it, install Celery with:
$ pip install celery[zstd]
You can also create your own compression schemes and register them in the kombu compression registry.
The following order is used to decide the compression scheme used when sending a task:
The compression execution option.
The Task.compression attribute.
The task_compression attribute.
Example specifying the compression used when calling a task:
add.apply_async((2, 2), compression=‘zlib’)
Connections
Automatic Pool Support
Since version 2.3 there’s support for automatic connection pools, so you don’t have to manually handle connections and publishers to reuse connections.
The connection pool is enabled by default since version 2.5.
See the broker_pool_limit setting for more information.
You can handle the connection manually by creating a publisher:
results = []
with add.app.pool.acquire(block=True) as connection:
with add.get_publisher(connection) as publisher:
try:
for args in numbers:
res = add.apply_async((2, 2), publisher=publisher)
results.append(res)
print([res.get() for res in results])
Though this particular example is much better expressed as a group:
from celery import group
numbers = [(2, 2), (4, 4), (8, 8), (16, 16)]
res = group(add.s(i, j) for i, j in numbers).apply_async()
res.get()
[4, 8, 16, 32]
Routing options
Celery can route tasks to different queues.
Simple routing (name <-> name) is accomplished using the queue option:
add.apply_async(queue=‘priority.high’)
You can then assign workers to the priority.high queue by using the workers -Q argument:
$ celery -A proj worker -l info -Q celery,priority.high
See also
Hard-coding queue names in code isn’t recommended, the best practice is to use configuration routers (task_routes).
To find out more about routing, please see Routing Tasks.
Results options
You can enable or disable result storage using the task_ignore_result setting or by using the ignore_result option:
result = add.apply_async(1, 2, ignore_result=True)
result.get()
None
Do not ignore result (default)
…
result = add.apply_async(1, 2, ignore_result=False)
result.get()
3
If you’d like to store additional metadata about the task in the result backend set the result_extended setting to True.
See also
For more information on tasks, please see Tasks.
Advanced Options
These options are for advanced users who want to take use of AMQP’s full routing capabilities. Interested parties may read the routing guide.
exchange
Name of exchange (or a kombu.entity.Exchange) to send the message to.
routing_key
Routing key used to determine.
priority
A number between 0 and 255, where 255 is the highest priority.
Supported by: RabbitMQ, Redis (priority reversed, 0 is highest).
Canvas: Designing Work-flows
Signatures
Partials
Immutability
Callbacks
The Primitives
Chains
Groups
Chords
Map & Starmap
Chunks
Signatures
New in version 2.0.
You just learned how to call a task using the tasks delay method in the calling guide, and this is often all you need, but sometimes you may want to pass the signature of a task invocation to another process or as an argument to another function.
A signature() wraps the arguments, keyword arguments, and execution options of a single task invocation in a way such that it can be passed to functions or even serialized and sent across the wire.
You can create a signature for the add task using its name like this:
from celery import signature
signature(‘tasks.add’, args=(2, 2), countdown=10)
tasks.add(2, 2)
This task has a signature of arity 2 (two arguments): (2, 2), and sets the countdown execution option to 10.
or you can create one using the task’s signature method:
add.signature((2, 2), countdown=10)
tasks.add(2, 2)
There’s also a shortcut using star arguments:
add.s(2, 2)
tasks.add(2, 2)
Keyword arguments are also supported:
add.s(2, 2, debug=True)
tasks.add(2, 2, debug=True)
From any signature instance you can inspect the different fields:
s = add.signature((2, 2), {‘debug’: True}, countdown=10)
s.args
(2, 2)
s.kwargs
{‘debug’: True}
s.options
{‘countdown’: 10}
It supports the “Calling API” of delay, apply_async, etc., including being called directly (call).
Calling the signature will execute the task inline in the current process:
add(2, 2)
4
add.s(2, 2)()
4
delay is our beloved shortcut to apply_async taking star-arguments:
result = add.delay(2, 2)
result.get()
4
apply_async takes the same arguments as the app.Task.apply_async() method:
add.apply_async(args, kwargs, **options)
add.signature(args, kwargs, **options).apply_async()
add.apply_async((2, 2), countdown=1)
add.signature((2, 2), countdown=1).apply_async()
You can’t define options with s(), but a chaining set call takes care of that:
add.s(2, 2).set(countdown=1)
proj.tasks.add(2, 2)
Partials
With a signature, you can execute the task in a worker:
add.s(2, 2).delay()
add.s(2, 2).apply_async(countdown=1)
Or you can call it directly in the current process:
add.s(2, 2)()
4
Specifying additional args, kwargs, or options to apply_async/delay creates partials:
Any arguments added will be prepended to the args in the signature:
partial = add.s(2) # incomplete signature
partial.delay(4) # 4 + 2
partial.apply_async((4,)) # same
Any keyword arguments added will be merged with the kwargs in the signature, with the new keyword arguments taking precedence:
s = add.s(2, 2)
s.delay(debug=True) # -> add(2, 2, debug=True)
s.apply_async(kwargs={‘debug’: True}) # same
Any options added will be merged with the options in the signature, with the new options taking precedence:
s = add.signature((2, 2), countdown=10)
s.apply_async(countdown=1) # countdown is now 1
You can also clone signatures to create derivatives:
s = add.s(2)
proj.tasks.add(2)
s.clone(args=(4,), kwargs={‘debug’: True})
proj.tasks.add(4, 2, debug=True)
Immutability
New in version 3.0.
Partials are meant to be used with callbacks, any tasks linked, or chord callbacks will be applied with the result of the parent task. Sometimes you want to specify a callback that doesn’t take additional arguments, and in that case you can set the signature to be immutable:
add.apply_async((2, 2), link=reset_buffers.signature(immutable=True))
The .si() shortcut can also be used to create immutable signatures:
add.apply_async((2, 2), link=reset_buffers.si())
Only the execution options can be set when a signature is immutable, so it’s not possible to call the signature with partial args/kwargs.
Note
In this tutorial I sometimes use the prefix operator ~ to signatures. You probably shouldn’t use it in your production code, but it’s a handy shortcut when experimenting in the Python shell:
~sig
is the same as
sig.delay().get()
Callbacks
New in version 3.0.
Callbacks can be added to any task using the link argument to apply_async:
add.apply_async((2, 2), link=other_task.s())
The callback will only be applied if the task exited successfully, and it will be applied with the return value of the parent task as argument.
As I mentioned earlier, any arguments you add to a signature, will be prepended to the arguments specified by the signature itself!
If you have the signature:
sig = add.s(10)
then sig.delay(result) becomes:
add.apply_async(args=(result, 10))
…
Now let’s call our add task with a callback using partial arguments:
add.apply_async((2, 2), link=add.s(8))
As expected this will first launch one task calculating 2 + 2, then another task calculating 4 + 8.
The Primitives
New in version 3.0.
Overview
group
The group primitive is a signature that takes a list of tasks that should be applied in parallel.
chain
The chain primitive lets us link together signatures so that one is called after the other, essentially forming a chain of callbacks.
chord
A chord is just like a group but with a callback. A chord consists of a header group and a body, where the body is a task that should execute after all of the tasks in the header are complete.
map
The map primitive works like the built-in map function, but creates a temporary task where a list of arguments is applied to the task. For example, task.map([1, 2]) – results in a single task being called, applying the arguments in order to the task function so that the result is:
res = [task(1), task(2)]
starmap
Works exactly like map except the arguments are applied as *args. For example add.starmap([(2, 2), (4, 4)]) results in a single task calling:
res = [add(2, 2), add(4, 4)]
chunks
Chunking splits a long list of arguments into parts, for example the operation:
items = zip(range(1000), range(1000)) # 1000 items
add.chunks(items, 10)
will split the list of items into chunks of 10, resulting in 100 tasks (each processing 10 items in sequence).
The primitives are also signature objects themselves, so that they can be combined in any number of ways to compose complex work-flows.
Here’s some examples:
Simple chain
Here’s a simple chain, the first task executes passing its return value to the next task in the chain, and so on.
from celery import chain
2 + 2 + 4 + 8
res = chain(add.s(2, 2), add.s(4), add.s(8))()
res.get()
16
This can also be written using pipes:
(add.s(2, 2) | add.s(4) | add.s(8))().get()
16
Immutable signatures
Signatures can be partial so arguments can be added to the existing arguments, but you may not always want that, for example if you don’t want the result of the previous task in a chain.
In that case you can mark the signature as immutable, so that the arguments cannot be changed:
add.signature((2, 2), immutable=True)
There’s also a .si() shortcut for this, and this is the preferred way of creating signatures:
add.si(2, 2)
Now you can create a chain of independent tasks instead:
res = (add.si(2, 2) | add.si(4, 4) | add.si(8, 8))()
res.get()
16
res.parent.get()
8
res.parent.parent.get()
4
Simple group
You can easily create a group of tasks to execute in parallel:
from celery import group
res = group(add.s(i, i) for i in range(10))()
res.get(timeout=1)
[0, 2, 4, 6, 8, 10, 12, 14, 16, 18]
Simple chord
The chord primitive enables us to add a callback to be called when all of the tasks in a group have finished executing. This is often required for algorithms that aren’t embarrassingly parallel:
from celery import chord
res = chord((add.s(i, i) for i in range(10)), xsum.s())()
res.get()
90
The above example creates 10 task that all start in parallel, and when all of them are complete the return values are combined into a list and sent to the xsum task.
The body of a chord can also be immutable, so that the return value of the group isn’t passed on to the callback:
chord((import_contact.s© for c in contacts),
… notify_complete.si(import_id)).apply_async()
Note the use of .si above; this creates an immutable signature, meaning any new arguments passed (including to return value of the previous task) will be ignored.
Blow your mind by combining
Chains can be partial too:
c1 = (add.s(4) | mul.s(8))
(16 + 4) * 8
res = c1(16)
res.get()
160
this means that you can combine chains:
((4 + 16) * 2 + 4) * 8
c2 = (add.s(4, 16) | mul.s(2) | (add.s(4) | mul.s(8)))
res = c2()
res.get()
352
Chaining a group together with another task will automatically upgrade it to be a chord:
c3 = (group(add.s(i, i) for i in range(10)) | xsum.s())
res = c3()
res.get()
90
Groups and chords accepts partial arguments too, so in a chain the return value of the previous task is forwarded to all tasks in the group:
new_user_workflow = (create_user.s() | group(
… import_contacts.s(),
… send_welcome_email.s()))
… new_user_workflow.delay(username=‘artv’,
… first=‘Art’,
… last=‘Vandelay’,
… email=‘art@vandelay.com’)
If you don’t want to forward arguments to the group then you can make the signatures in the group immutable:
res = (add.s(4, 4) | group(add.si(i, i) for i in range(10)))()
res.get()
<GroupResult: de44df8c-821d-4c84-9a6a-44769c738f98 [
bc01831b-9486-4e51-b046-480d7c9b78de,
2650a1b8-32bf-4771-a645-b0a35dcc791b,
dcbee2a5-e92d-4b03-b6eb-7aec60fd30cf,
59f92e0a-23ea-41ce-9fad-8645a0e7759c,
26e1e707-eccf-4bf4-bbd8-1e1729c3cce3,
2d10a5f4-37f0-41b2-96ac-a973b1df024d,
e13d3bdb-7ae3-4101-81a4-6f17ee21df2d,
104b2be0-7b75-44eb-ac8e-f9220bdfa140,
c5c551a5-0386-4973-aa37-b65cbeb2624b,
83f72d71-4b71-428e-b604-6f16599a9f37]>
res.parent.get()
8
Chains
New in version 3.0.
Tasks can be linked together: the linked task is called when the task returns successfully:
res = add.apply_async((2, 2), link=mul.s(16))
res.get()
4
The linked task will be applied with the result of its parent task as the first argument. In the above case where the result was 4, this will result in mul(4, 16).
The results will keep track of any subtasks called by the original task, and this can be accessed from the result instance:
res.children
[<AsyncResult: 8c350acf-519d-4553-8a53-4ad3a5c5aeb4>]
res.children[0].get()
64
The result instance also has a collect() method that treats the result as a graph, enabling you to iterate over the results:
list(res.collect())
[(<AsyncResult: 7b720856-dc5f-4415-9134-5c89def5664e>, 4),
(<AsyncResult: 8c350acf-519d-4553-8a53-4ad3a5c5aeb4>, 64)]
By default collect() will raise an IncompleteStream exception if the graph isn’t fully formed (one of the tasks hasn’t completed yet), but you can get an intermediate representation of the graph too:
for result, value in res.collect(intermediate=True):
…
You can link together as many tasks as you like, and signatures can be linked too:
s = add.s(2, 2)
s.link(mul.s(4))
s.link(log_result.s())
You can also add error callbacks using the on_error method:
add.s(2, 2).on_error(log_error.s()).delay()
This will result in the following .apply_async call when the signature is applied:
add.apply_async((2, 2), link_error=log_error.s())
The worker won’t actually call the errback as a task, but will instead call the errback function directly so that the raw request, exception and traceback objects can be passed to it.
Here’s an example errback:
from future import print_function
import os
from proj.celery import app
@app.task
def log_error(request, exc, traceback):
with open(os.path.join(‘/var/errors’, request.id), ‘a’) as fh:
print(‘–\n\n{0} {1} {2}’.format(
task_id, exc, traceback), file=fh)
To make it even easier to link tasks together there’s a special signature called chain that lets you chain tasks together:
from celery import chain
from proj.tasks import add, mul
(4 + 4) * 8 * 10
res = chain(add.s(4, 4), mul.s(8), mul.s(10))
proj.tasks.add(4, 4) | proj.tasks.mul(8) | proj.tasks.mul(10)
Calling the chain will call the tasks in the current process and return the result of the last task in the chain:
res = chain(add.s(4, 4), mul.s(8), mul.s(10))()
res.get()
640
It also sets parent attributes so that you can work your way up the chain to get intermediate results:
res.parent.get()
64
res.parent.parent.get()
8
res.parent.parent
<AsyncResult: eeaad925-6778-4ad1-88c8-b2a63d017933>
Chains can also be made using the | (pipe) operator:
(add.s(2, 2) | mul.s(8) | mul.s(10)).apply_async()
Graphs
In addition you can work with the result graph as a DependencyGraph:
res = chain(add.s(4, 4), mul.s(8), mul.s(10))()
res.parent.parent.graph
285fa253-fcf8-42ef-8b95-0078897e83e6(1)
463afec2-5ed4-4036-b22d-ba067ec64f52(0)
872c3995-6fa0-46ca-98c2-5a19155afcf0(2)
285fa253-fcf8-42ef-8b95-0078897e83e6(1)
463afec2-5ed4-4036-b22d-ba067ec64f52(0)
You can even convert these graphs to dot format:
with open(‘graph.dot’, ‘w’) as fh:
… res.parent.parent.graph.to_dot(fh)
and create images:
$ dot -Tpng graph.dot -o graph.png
_images/result_graph.png
Groups
New in version 3.0.
A group can be used to execute several tasks in parallel.
The group function takes a list of signatures:
from celery import group
from proj.tasks import add
group(add.s(2, 2), add.s(4, 4))
(proj.tasks.add(2, 2), proj.tasks.add(4, 4))
If you call the group, the tasks will be applied one after another in the current process, and a GroupResult instance is returned that can be used to keep track of the results, or tell how many tasks are ready and so on:
g = group(add.s(2, 2), add.s(4, 4))
res = g()
res.get()
[4, 8]
Group also supports iterators:
group(add.s(i, i) for i in range(100))()
A group is a signature object, so it can be used in combination with other signatures.
Group Results
The group task returns a special result too, this result works just like normal task results, except that it works on the group as a whole:
from celery import group
from tasks import add
job = group([
… add.s(2, 2),
… add.s(4, 4),
… add.s(8, 8),
… add.s(16, 16),
… add.s(32, 32),
… ])
result = job.apply_async()
result.ready() # have all subtasks completed?
True
result.successful() # were all subtasks successful?
True
result.get()
[4, 8, 16, 32, 64]
The GroupResult takes a list of AsyncResult instances and operates on them as if it was a single task.
It supports the following operations:
successful()
Return True if all of the subtasks finished successfully (e.g., didn’t raise an exception).
failed()
Return True if any of the subtasks failed.
waiting()
Return True if any of the subtasks isn’t ready yet.
ready()
Return True if all of the subtasks are ready.
completed_count()
Return the number of completed subtasks.
revoke()
Revoke all of the subtasks.
join()
Gather the results of all subtasks and return them in the same order as they were called (as a list).
Chords
New in version 2.3.
Note
Tasks used within a chord must not ignore their results. If the result backend is disabled for any task (header or body) in your chord you should read “Important Notes.” Chords are not currently supported with the RPC result backend.
A chord is a task that only executes after all of the tasks in a group have finished executing.
Let’s calculate the sum of the expression 1 + 1 + 2 + 2 + 3 + 3 … n + n up to a hundred digits.
First you need two tasks, add() and tsum() (sum() is already a standard function):
@app.task
def add(x, y):
return x + y
@app.task
def tsum(numbers):
return sum(numbers)
Now you can use a chord to calculate each addition step in parallel, and then get the sum of the resulting numbers:
from celery import chord
from tasks import add, tsum
chord(add.s(i, i)
… for i in range(100))(tsum.s()).get()
9900
This is obviously a very contrived example, the overhead of messaging and synchronization makes this a lot slower than its Python counterpart:
sum(i + i for i in range(100))
The synchronization step is costly, so you should avoid using chords as much as possible. Still, the chord is a powerful primitive to have in your toolbox as synchronization is a required step for many parallel algorithms.
Let’s break the chord expression down:
callback = tsum.s()
header = [add.s(i, i) for i in range(100)]
result = chord(header)(callback)
result.get()
9900
Remember, the callback can only be executed after all of the tasks in the header have returned. Each step in the header is executed as a task, in parallel, possibly on different nodes. The callback is then applied with the return value of each task in the header. The task id returned by chord() is the id of the callback, so you can wait for it to complete and get the final return value (but remember to never have a task wait for other tasks)
Error handling
So what happens if one of the tasks raises an exception?
The chord callback result will transition to the failure state, and the error is set to the ChordError exception:
c = chord([add.s(4, 4), raising_task.s(), add.s(8, 8)])
result = c()
result.get()
Traceback (most recent call last):
File “”, line 1, in
File “/celery/result.py", line 120, in get
interval=interval)
File "/celery/backends/amqp.py”, line 150, in wait_for
raise meta[‘result’]
celery.exceptions.ChordError: Dependency 97de6f3f-ea67-4517-a21c-d867c61fcb47
raised ValueError(‘something something’,)
While the traceback may be different depending on the result backend used, you can see that the error description includes the id of the task that failed and a string representation of the original exception. You can also find the original traceback in result.traceback.
Note that the rest of the tasks will still execute, so the third task (add.s(8, 8)) is still executed even though the middle task failed. Also the ChordError only shows the task that failed first (in time): it doesn’t respect the ordering of the header group.
To perform an action when a chord fails you can therefore attach an errback to the chord callback:
@app.task
def on_chord_error(request, exc, traceback):
print(‘Task {0!r} raised error: {1!r}’.format(request.id, exc))
c = (group(add.s(i, i) for i in range(10)) |
… xsum.s().on_error(on_chord_error.s())).delay()
Important Notes
Tasks used within a chord must not ignore their results. In practice this means that you must enable a result_backend in order to use chords. Additionally, if task_ignore_result is set to True in your configuration, be sure that the individual tasks to be used within the chord are defined with ignore_result=False. This applies to both Task subclasses and decorated tasks.
Example Task subclass:
class MyTask(Task):
ignore_result = False
Example decorated task:
@app.task(ignore_result=False)
def another_task(project):
do_something()
By default the synchronization step is implemented by having a recurring task poll the completion of the group every second, calling the signature when ready.
Example implementation:
from celery import maybe_signature
@app.task(bind=True)
def unlock_chord(self, group, callback, interval=1, max_retries=None):
if group.ready():
return maybe_signature(callback).delay(group.join())
raise self.retry(countdown=interval, max_retries=max_retries)
This is used by all result backends except Redis and Memcached: they increment a counter after each task in the header, then applies the callback when the counter exceeds the number of tasks in the set.
The Redis and Memcached approach is a much better solution, but not easily implemented in other backends (suggestions welcome!).
Note
Chords don’t properly work with Redis before version 2.2; you’ll need to upgrade to at least redis-server 2.2 to use them.
Note
If you’re using chords with the Redis result backend and also overriding the Task.after_return() method, you need to make sure to call the super method or else the chord callback won’t be applied.
def after_return(self, *args, **kwargs):
do_something()
super(MyTask, self).after_return(*args, **kwargs)
Map & Starmap
map and starmap are built-in tasks that calls the task for every element in a sequence.
They differ from group in that
only one task message is sent
the operation is sequential.
For example using map:
from proj.tasks import add
~xsum.map([range(10), range(100)])
[45, 4950]
is the same as having a task doing:
@app.task
def temp():
return [xsum(range(10)), xsum(range(100))]
and using starmap:
~add.starmap(zip(range(10), range(10)))
[0, 2, 4, 6, 8, 10, 12, 14, 16, 18]
is the same as having a task doing:
@app.task
def temp():
return [add(i, i) for i in range(10)]
Both map and starmap are signature objects, so they can be used as other signatures and combined in groups etc., for example to call the starmap after 10 seconds:
add.starmap(zip(range(10), range(10))).apply_async(countdown=10)
Chunks
Chunking lets you divide an iterable of work into pieces, so that if you have one million objects, you can create 10 tasks with hundred thousand objects each.
Some may worry that chunking your tasks results in a degradation of parallelism, but this is rarely true for a busy cluster and in practice since you’re avoiding the overhead of messaging it may considerably increase performance.
To create a chunks signature you can use app.Task.chunks():
add.chunks(zip(range(100), range(100)), 10)
As with group the act of sending the messages for the chunks will happen in the current process when called:
from proj.tasks import add
res = add.chunks(zip(range(100), range(100)), 10)()
res.get()
[[0, 2, 4, 6, 8, 10, 12, 14, 16, 18],
[20, 22, 24, 26, 28, 30, 32, 34, 36, 38],
[40, 42, 44, 46, 48, 50, 52, 54, 56, 58],
[60, 62, 64, 66, 68, 70, 72, 74, 76, 78],
[80, 82, 84, 86, 88, 90, 92, 94, 96, 98],
[100, 102, 104, 106, 108, 110, 112, 114, 116, 118],
[120, 122, 124, 126, 128, 130, 132, 134, 136, 138],
[140, 142, 144, 146, 148, 150, 152, 154, 156, 158],
[160, 162, 164, 166, 168, 170, 172, 174, 176, 178],
[180, 182, 184, 186, 188, 190, 192, 194, 196, 198]]
while calling .apply_async will create a dedicated task so that the individual tasks are applied in a worker instead:
add.chunks(zip(range(100), range(100)), 10).apply_async()
You can also convert chunks to a group:
group = add.chunks(zip(range(100), range(100)), 10).group()
and with the group skew the countdown of each task by increments of one:
group.skew(start=1, stop=10)()
This means that the first task will have a countdown of one second, the second task a countdown of two seconds, and so on.
Workers Guide
Starting the worker
Stopping the worker
Restarting the worker
Process Signals
Variables in file paths
Concurrency
Remote control
Commands
Time Limits
Rate Limits
Max tasks per child setting
Max memory per child setting
Autoscaling
Queues
Inspecting workers
Additional Commands
Writing your own remote control commands
Starting the worker
Daemonizing
You probably want to use a daemonization tool to start the worker in the background. See Daemonization for help starting the worker as a daemon using popular service managers.
You can start the worker in the foreground by executing the command:
$ celery -A proj worker -l info
For a full list of available command-line options see worker, or simply do:
$ celery worker --help
You can start multiple workers on the same machine, but be sure to name each individual worker by specifying a node name with the --hostname argument:
$ celery -A proj worker --loglevel=INFO --concurrency=10 -n worker1@%h
$ celery -A proj worker --loglevel=INFO --concurrency=10 -n worker2@%h
$ celery -A proj worker --loglevel=INFO --concurrency=10 -n worker3@%h
The hostname argument can expand the following variables:
%h: Hostname, including domain name.
%n: Hostname only.
%d: Domain name only.
If the current hostname is george.example.com, these will expand to:
Variable
Template
Result
%h
worker1@%h
worker1@george.example.com
%n
worker1@%n
worker1@george
%d
worker1@%d
worker1@example.com
Note for supervisor users
The % sign must be escaped by adding a second one: %%h.
Stopping the worker
Shutdown should be accomplished using the TERM signal.
When shutdown is initiated the worker will finish all currently executing tasks before it actually terminates. If these tasks are important, you should wait for it to finish before doing anything drastic, like sending the KILL signal.
If the worker won’t shutdown after considerate time, for being stuck in an infinite-loop or similar, you can use the KILL signal to force terminate the worker: but be aware that currently executing tasks will be lost (i.e., unless the tasks have the acks_late option set).
Also as processes can’t override the KILL signal, the worker will not be able to reap its children; make sure to do so manually. This command usually does the trick:
$ pkill -9 -f ‘celery worker’
If you don’t have the pkill command on your system, you can use the slightly longer version:
$ ps auxww | awk ‘/celery worker/ {print $2}’ | xargs kill -9
Restarting the worker
To restart the worker you should send the TERM signal and start a new instance. The easiest way to manage workers for development is by using celery multi:
$ celery multi start 1 -A proj -l info -c4 --pidfile=/var/run/celery/%n.pid
$ celery multi restart 1 --pidfile=/var/run/celery/%n.pid
For production deployments you should be using init-scripts or a process supervision system (see Daemonization).
Other than stopping, then starting the worker to restart, you can also restart the worker using the HUP signal. Note that the worker will be responsible for restarting itself so this is prone to problems and isn’t recommended in production:
$ kill -HUP $pid
Note
Restarting by HUP only works if the worker is running in the background as a daemon (it doesn’t have a controlling terminal).
HUP is disabled on macOS because of a limitation on that platform.
Process Signals
The worker’s main process overrides the following signals:
TERM
Warm shutdown, wait for tasks to complete.
QUIT
Cold shutdown, terminate ASAP
USR1
Dump traceback for all active threads.
USR2
Remote debug, see celery.contrib.rdb.
Variables in file paths
The file path arguments for --logfile, --pidfile, and --statedb can contain variables that the worker will expand:
Node name replacements
%p: Full node name.
%h: Hostname, including domain name.
%n: Hostname only.
%d: Domain name only.
%i: Prefork pool process index or 0 if MainProcess.
%I: Prefork pool process index with separator.
For example, if the current hostname is george@foo.example.com then these will expand to:
–logfile=%p.log -> george@foo.example.com.log
–logfile=%h.log -> foo.example.com.log
–logfile=%n.log -> george.log
–logfile=%d.log -> example.com.log
Prefork pool process index
The prefork pool process index specifiers will expand into a different filename depending on the process that’ll eventually need to open the file.
This can be used to specify one log file per child process.
Note that the numbers will stay within the process limit even if processes exit or if autoscale/maxtasksperchild/time limits are used. That is, the number is the process index not the process count or pid.
%i - Pool process index or 0 if MainProcess.
Where -n worker1@example.com -c2 -f %n-%i.log will result in three log files:
worker1-0.log (main process)
worker1-1.log (pool process 1)
worker1-2.log (pool process 2)
%I - Pool process index with separator.
Where -n worker1@example.com -c2 -f %n%I.log will result in three log files:
worker1.log (main process)
worker1-1.log (pool process 1)
worker1-2.log (pool process 2)
Concurrency
By default multiprocessing is used to perform concurrent execution of tasks, but you can also use Eventlet. The number of worker processes/threads can be changed using the --concurrency argument and defaults to the number of CPUs available on the machine.
Number of processes (multiprocessing/prefork pool)
More pool processes are usually better, but there’s a cut-off point where adding more pool processes affects performance in negative ways. There’s even some evidence to support that having multiple worker instances running, may perform better than having a single worker. For example 3 workers with 10 pool processes each. You need to experiment to find the numbers that works best for you, as this varies based on application, work load, task run times and other factors.
Remote control
New in version 2.0.
The celery command
The celery program is used to execute remote control commands from the command-line. It supports all of the commands listed below. See Management Command-line Utilities (inspect/control) for more information.
pool support
prefork, eventlet, gevent, thread, blocking:solo (see note)
broker support
amqp, redis
Workers have the ability to be remote controlled using a high-priority broadcast message queue. The commands can be directed to all, or a specific list of workers.
Commands can also have replies. The client can then wait for and collect those replies. Since there’s no central authority to know how many workers are available in the cluster, there’s also no way to estimate how many workers may send a reply, so the client has a configurable timeout — the deadline in seconds for replies to arrive in. This timeout defaults to one second. If the worker doesn’t reply within the deadline it doesn’t necessarily mean the worker didn’t reply, or worse is dead, but may simply be caused by network latency or the worker being slow at processing commands, so adjust the timeout accordingly.
In addition to timeouts, the client can specify the maximum number of replies to wait for. If a destination is specified, this limit is set to the number of destination hosts.
Note
The solo pool supports remote control commands, but any task executing will block any waiting control command, so it is of limited use if the worker is very busy. In that case you must increase the timeout waiting for replies in the client.
The broadcast() function
This is the client function used to send commands to the workers. Some remote control commands also have higher-level interfaces using broadcast() in the background, like rate_limit(), and ping().
Sending the rate_limit command and keyword arguments:
app.control.broadcast(‘rate_limit’,
… arguments={‘task_name’: ‘myapp.mytask’,
… ‘rate_limit’: ‘200/m’})
This will send the command asynchronously, without waiting for a reply. To request a reply you have to use the reply argument:
app.control.broadcast(‘rate_limit’, {
… ‘task_name’: ‘myapp.mytask’, ‘rate_limit’: ‘200/m’}, reply=True)
[{‘worker1.example.com’: ‘New rate limit set successfully’},
{‘worker2.example.com’: ‘New rate limit set successfully’},
{‘worker3.example.com’: ‘New rate limit set successfully’}]
Using the destination argument you can specify a list of workers to receive the command:
app.control.broadcast(‘rate_limit’, {
… ‘task_name’: ‘myapp.mytask’,
… ‘rate_limit’: ‘200/m’}, reply=True,
… destination=[‘worker1@example.com’])
[{‘worker1.example.com’: ‘New rate limit set successfully’}]
Of course, using the higher-level interface to set rate limits is much more convenient, but there are commands that can only be requested using broadcast().
Commands
revoke: Revoking tasks
pool support
all, terminate only supported by prefork
broker support
amqp, redis
command
celery -A proj control revoke <task_id>
All worker nodes keeps a memory of revoked task ids, either in-memory or persistent on disk (see Persistent revokes).
When a worker receives a revoke request it will skip executing the task, but it won’t terminate an already executing task unless the terminate option is set.
Note
The terminate option is a last resort for administrators when a task is stuck. It’s not for terminating the task, it’s for terminating the process that’s executing the task, and that process may have already started processing another task at the point when the signal is sent, so for this reason you must never call this programmatically.
If terminate is set the worker child process processing the task will be terminated. The default signal sent is TERM, but you can specify this using the signal argument. Signal can be the uppercase name of any signal defined in the signal module in the Python Standard Library.
Terminating a task also revokes it.
Example
result.revoke()
AsyncResult(id).revoke()
app.control.revoke(‘d9078da5-9915-40a0-bfa1-392c7bde42ed’)
app.control.revoke(‘d9078da5-9915-40a0-bfa1-392c7bde42ed’,
… terminate=True)
app.control.revoke(‘d9078da5-9915-40a0-bfa1-392c7bde42ed’,
… terminate=True, signal=‘SIGKILL’)
Revoking multiple tasks
New in version 3.1.
The revoke method also accepts a list argument, where it will revoke several tasks at once.
Example
app.control.revoke([
… ‘7993b0aa-1f0b-4780-9af0-c47c0858b3f2’,
… ‘f565793e-b041-4b2b-9ca4-dca22762a55d’,
… ‘d9d35e03-2997-42d0-a13e-64a66b88a618’,
])
The GroupResult.revoke method takes advantage of this since version 3.1.
Persistent revokes
Revoking tasks works by sending a broadcast message to all the workers, the workers then keep a list of revoked tasks in memory. When a worker starts up it will synchronize revoked tasks with other workers in the cluster.
The list of revoked tasks is in-memory so if all workers restart the list of revoked ids will also vanish. If you want to preserve this list between restarts you need to specify a file for these to be stored in by using the –statedb argument to celery worker:
$ celery -A proj worker -l info --statedb=/var/run/celery/worker.state
or if you use celery multi you want to create one file per worker instance so use the %n format to expand the current node name:
celery multi start 2 -l info --statedb=/var/run/celery/%n.state
See also Variables in file paths
Note that remote control commands must be working for revokes to work. Remote control commands are only supported by the RabbitMQ (amqp) and Redis at this point.
Time Limits
New in version 2.0.
pool support
prefork/gevent
Soft, or hard?
The time limit is set in two values, soft and hard. The soft time limit allows the task to catch an exception to clean up before it is killed: the hard timeout isn’t catch-able and force terminates the task.
A single task can potentially run forever, if you have lots of tasks waiting for some event that’ll never happen you’ll block the worker from processing new tasks indefinitely. The best way to defend against this scenario happening is enabling time limits.
The time limit (–time-limit) is the maximum number of seconds a task may run before the process executing it is terminated and replaced by a new process. You can also enable a soft time limit (–soft-time-limit), this raises an exception the task can catch to clean up before the hard time limit kills it:
from myapp import app
from celery.exceptions import SoftTimeLimitExceeded
@app.task
def mytask():
try:
do_work()
except SoftTimeLimitExceeded:
clean_up_in_a_hurry()
Time limits can also be set using the task_time_limit / task_soft_time_limit settings.
Note
Time limits don’t currently work on platforms that don’t support the SIGUSR1 signal.
Changing time limits at run-time
New in version 2.3.
broker support
amqp, redis
There’s a remote control command that enables you to change both soft and hard time limits for a task — named time_limit.
Example changing the time limit for the tasks.crawl_the_web task to have a soft time limit of one minute, and a hard time limit of two minutes:
app.control.time_limit(‘tasks.crawl_the_web’,
soft=60, hard=120, reply=True)
[{‘worker1.example.com’: {‘ok’: ‘time limits set successfully’}}]
Only tasks that starts executing after the time limit change will be affected.
Rate Limits
Changing rate-limits at run-time
Example changing the rate limit for the myapp.mytask task to execute at most 200 tasks of that type every minute:
app.control.rate_limit(‘myapp.mytask’, ‘200/m’)
The above doesn’t specify a destination, so the change request will affect all worker instances in the cluster. If you only want to affect a specific list of workers you can include the destination argument:
app.control.rate_limit(‘myapp.mytask’, ‘200/m’,
… destination=[‘celery@worker1.example.com’])
Warning
This won’t affect workers with the worker_disable_rate_limits setting enabled.
Max tasks per child setting
New in version 2.0.
pool support
prefork
With this option you can configure the maximum number of tasks a worker can execute before it’s replaced by a new process.
This is useful if you have memory leaks you have no control over for example from closed source C extensions.
The option can be set using the workers --max-tasks-per-child argument or using the worker_max_tasks_per_child setting.
Max memory per child setting
New in version 4.0.
pool support
prefork
With this option you can configure the maximum amount of resident memory a worker can execute before it’s replaced by a new process.
This is useful if you have memory leaks you have no control over for example from closed source C extensions.
The option can be set using the workers --max-memory-per-child argument or using the worker_max_memory_per_child setting.
Autoscaling
New in version 2.2.
pool support
prefork, gevent
The autoscaler component is used to dynamically resize the pool based on load:
The autoscaler adds more pool processes when there is work to do,
and starts removing processes when the workload is low.
It’s enabled by the --autoscale option, which needs two numbers: the maximum and minimum number of pool processes:
–autoscale=AUTOSCALE
Enable autoscaling by providing
max_concurrency,min_concurrency. Example:
–autoscale=10,3 (always keep 3 processes, but grow to
10 if necessary).
You can also define your own rules for the autoscaler by subclassing Autoscaler. Some ideas for metrics include load average or the amount of memory available. You can specify a custom autoscaler with the worker_autoscaler setting.
Queues
A worker instance can consume from any number of queues. By default it will consume from all queues defined in the task_queues setting (that if not specified falls back to the default queue named celery).
You can specify what queues to consume from at start-up, by giving a comma separated list of queues to the -Q option:
$ celery -A proj worker -l info -Q foo,bar,baz
If the queue name is defined in task_queues it will use that configuration, but if it’s not defined in the list of queues Celery will automatically generate a new queue for you (depending on the task_create_missing_queues option).
You can also tell the worker to start and stop consuming from a queue at run-time using the remote control commands add_consumer and cancel_consumer.
Queues: Adding consumers
The add_consumer control command will tell one or more workers to start consuming from a queue. This operation is idempotent.
To tell all workers in the cluster to start consuming from a queue named “foo” you can use the celery control program:
$ celery -A proj control add_consumer foo
-> worker1.local: OK
started consuming from u’foo’
If you want to specify a specific worker you can use the --destination argument:
$ celery -A proj control add_consumer foo -d celery@worker1.local
The same can be accomplished dynamically using the app.control.add_consumer() method:
app.control.add_consumer(‘foo’, reply=True)
[{u’worker1.local’: {u’ok’: u"already consuming from u’foo’"}}]
app.control.add_consumer(‘foo’, reply=True,
… destination=[‘worker1@example.com’])
[{u’worker1.local’: {u’ok’: u"already consuming from u’foo’"}}]
By now we’ve only shown examples using automatic queues, If you need more control you can also specify the exchange, routing_key and even other options:
app.control.add_consumer(
… queue=‘baz’,
… exchange=‘ex’,
… exchange_type=‘topic’,
… routing_key=‘media.*’,
… options={
… ‘queue_durable’: False,
… ‘exchange_durable’: False,
… },
… reply=True,
… destination=[‘w1@example.com’, ‘w2@example.com’])
Queues: Canceling consumers
You can cancel a consumer by queue name using the cancel_consumer control command.
To force all workers in the cluster to cancel consuming from a queue you can use the celery control program:
$ celery -A proj control cancel_consumer foo
The --destination argument can be used to specify a worker, or a list of workers, to act on the command:
$ celery -A proj control cancel_consumer foo -d celery@worker1.local
You can also cancel consumers programmatically using the app.control.cancel_consumer() method:
app.control.cancel_consumer(‘foo’, reply=True)
[{u’worker1.local’: {u’ok’: u"no longer consuming from u’foo’"}}]
Queues: List of active queues
You can get a list of queues that a worker consumes from by using the active_queues control command:
$ celery -A proj inspect active_queues
[…]
Like all other remote control commands this also supports the --destination argument used to specify the workers that should reply to the request:
$ celery -A proj inspect active_queues -d celery@worker1.local
[…]
This can also be done programmatically by using the app.control.inspect.active_queues() method:
app.control.inspect().active_queues()
[…]
app.control.inspect([‘worker1.local’]).active_queues()
[…]
Inspecting workers
app.control.inspect lets you inspect running workers. It uses remote control commands under the hood.
You can also use the celery command to inspect workers, and it supports the same commands as the app.control interface.
Inspect all nodes.
i = app.control.inspect()
Specify multiple nodes to inspect.
i = app.control.inspect([‘worker1.example.com’,
‘worker2.example.com’])
Specify a single node to inspect.
i = app.control.inspect(‘worker1.example.com’)
Dump of registered tasks
You can get a list of tasks registered in the worker using the registered():
i.registered()
[{‘worker1.example.com’: [‘tasks.add’,
‘tasks.sleeptask’]}]
Dump of currently executing tasks
You can get a list of active tasks using active():
i.active()
[{‘worker1.example.com’:
[{‘name’: ‘tasks.sleeptask’,
‘id’: ‘32666e9b-809c-41fa-8e93-5ae0c80afbbf’,
‘args’: ‘(8,)’,
‘kwargs’: ‘{}’}]}]
Dump of scheduled (ETA) tasks
You can get a list of tasks waiting to be scheduled by using scheduled():
i.scheduled()
[{‘worker1.example.com’:
[{‘eta’: ‘2010-06-07 09:07:52’, ‘priority’: 0,
‘request’: {
‘name’: ‘tasks.sleeptask’,
‘id’: ‘1a7980ea-8b19-413e-91d2-0b74f3844c4d’,
‘args’: ‘[1]’,
‘kwargs’: ‘{}’}},
{‘eta’: ‘2010-06-07 09:07:53’, ‘priority’: 0,
‘request’: {
‘name’: ‘tasks.sleeptask’,
‘id’: ‘49661b9a-aa22-4120-94b7-9ee8031d219d’,
‘args’: ‘[2]’,
‘kwargs’: ‘{}’}}]}]
Note
These are tasks with an ETA/countdown argument, not periodic tasks.
Dump of reserved tasks
Reserved tasks are tasks that have been received, but are still waiting to be executed.
You can get a list of these using reserved():
i.reserved()
[{‘worker1.example.com’:
[{‘name’: ‘tasks.sleeptask’,
‘id’: ‘32666e9b-809c-41fa-8e93-5ae0c80afbbf’,
‘args’: ‘(8,)’,
‘kwargs’: ‘{}’}]}]
Statistics
The remote control command inspect stats (or stats()) will give you a long list of useful (or not so useful) statistics about the worker:
$ celery -A proj inspect stats
The output will include the following fields:
broker
Section for broker information.
connect_timeout
Timeout in seconds (int/float) for establishing a new connection.
heartbeat
Current heartbeat value (set by client).
hostname
Node name of the remote broker.
insist
No longer used.
login_method
Login method used to connect to the broker.
port
Port of the remote broker.
ssl
SSL enabled/disabled.
transport
Name of transport used (e.g., amqp or redis)
transport_options
Options passed to transport.
uri_prefix
Some transports expects the host name to be a URL.
redis+socket:///tmp/redis.sock
In this example the URI-prefix will be redis.
userid
User id used to connect to the broker with.
virtual_host
Virtual host used.
clock
Value of the workers logical clock. This is a positive integer and should be increasing every time you receive statistics.
uptime
Numbers of seconds since the worker controller was started
pid
Process id of the worker instance (Main process).
pool
Pool-specific section.
max-concurrency
Max number of processes/threads/green threads.
max-tasks-per-child
Max number of tasks a thread may execute before being recycled.
processes
List of PIDs (or thread-id’s).
put-guarded-by-semaphore
Internal
timeouts
Default values for time limits.
writes
Specific to the prefork pool, this shows the distribution of writes to each process in the pool when using async I/O.
prefetch_count
Current prefetch count value for the task consumer.
rusage
System usage statistics. The fields available may be different on your platform.
From getrusage(2):
stime
Time spent in operating system code on behalf of this process.
utime
Time spent executing user instructions.
maxrss
The maximum resident size used by this process (in kilobytes).
idrss
Amount of non-shared memory used for data (in kilobytes times ticks of execution)
isrss
Amount of non-shared memory used for stack space (in kilobytes times ticks of execution)
ixrss
Amount of memory shared with other processes (in kilobytes times ticks of execution).
inblock
Number of times the file system had to read from the disk on behalf of this process.
oublock
Number of times the file system has to write to disk on behalf of this process.
majflt
Number of page faults that were serviced by doing I/O.
minflt
Number of page faults that were serviced without doing I/O.
msgrcv
Number of IPC messages received.
msgsnd
Number of IPC messages sent.
nvcsw
Number of times this process voluntarily invoked a context switch.
nivcsw
Number of times an involuntary context switch took place.
nsignals
Number of signals received.
nswap
The number of times this process was swapped entirely out of memory.
total
Map of task names and the total number of tasks with that type the worker has accepted since start-up.
Additional Commands
Remote shutdown
This command will gracefully shut down the worker remotely:
app.control.broadcast(‘shutdown’) # shutdown all workers
app.control.broadcast(‘shutdown’, destination=‘worker1@example.com’)
Ping
This command requests a ping from alive workers. The workers reply with the string ‘pong’, and that’s just about it. It will use the default one second timeout for replies unless you specify a custom timeout:
app.control.ping(timeout=0.5)
[{‘worker1.example.com’: ‘pong’},
{‘worker2.example.com’: ‘pong’},
{‘worker3.example.com’: ‘pong’}]
ping() also supports the destination argument, so you can specify the workers to ping:
ping([‘worker2.example.com’, ‘worker3.example.com’])
[{‘worker2.example.com’: ‘pong’},
{‘worker3.example.com’: ‘pong’}]
Enable/disable events
You can enable/disable events by using the enable_events, disable_events commands. This is useful to temporarily monitor a worker using celery events/celerymon.
app.control.enable_events()
app.control.disable_events()
Writing your own remote control commands
There are two types of remote control commands:
Inspect command
Does not have side effects, will usually just return some value found in the worker, like the list of currently registered tasks, the list of active tasks, etc.
Control command
Performs side effects, like adding a new queue to consume from.
Remote control commands are registered in the control panel and they take a single argument: the current ControlDispatch instance. From there you have access to the active Consumer if needed.
Here’s an example control command that increments the task prefetch count:
from celery.worker.control import control_command
@control_command(
args=[(‘n’, int)],
signature=‘[N=1]’, # <- used for help on the command-line.
)
def increase_prefetch_count(state, n=1):
state.consumer.qos.increment_eventually(n)
return {‘ok’: ‘prefetch count incremented’}
Make sure you add this code to a module that is imported by the worker: this could be the same module as where your Celery app is defined, or you can add the module to the imports setting.
Restart the worker so that the control command is registered, and now you can call your command using the celery control utility:
$ celery -A proj control increase_prefetch_count 3
You can also add actions to the celery inspect program, for example one that reads the current prefetch count:
from celery.worker.control import inspect_command
@inspect_command()
def current_prefetch_count(state):
return {‘prefetch_count’: state.consumer.qos.value}
After restarting the worker you can now query this value using the celery inspect program:
$ celery -A proj inspect current_prefetch_count
Daemonization
Generic init-scripts
Init-script: celeryd
Example configuration
Using a login shell
Example Django configuration
Available options
Init-script: celerybeat
Example configuration
Example Django configuration
Available options
Troubleshooting
Usage systemd
Service file: celery.service
Example configuration
Service file: celerybeat.service
Running the worker with superuser privileges (root)
supervisor
launchd (macOS)
Most Linux distributions these days use systemd for managing the lifecycle of system and user services.
You can check if your Linux distribution uses systemd by typing:
$ systemd --version
systemd 237
+PAM +AUDIT +SELINUX +IMA +APPARMOR +SMACK +SYSVINIT +UTMP +LIBCRYPTSETUP +GCRYPT +GNUTLS +ACL +XZ +LZ4 +SECCOMP +BLKID +ELFUTILS +KMOD -IDN2 +IDN -PCRE2 default-hierarchy=hybrid
If you have output similar to the above, please refer to our systemd documentation for guidance.
However, the init.d script should still work in those Linux distributions as well since systemd provides the systemd-sysv compatibility layer which generates services automatically from the init.d scripts we provide.
If you package Celery for multiple Linux distributions and some do not support systemd or to other Unix systems as well, you may want to refer to our init.d documentation.
Generic init-scripts
See the extra/generic-init.d/ directory Celery distribution.
This directory contains generic bash init-scripts for the celery worker program, these should run on Linux, FreeBSD, OpenBSD, and other Unix-like platforms.
Init-script: celeryd
Usage
/etc/init.d/celeryd {start|stop|restart|status}
Configuration file
/etc/default/celeryd
To configure this script to run the worker properly you probably need to at least tell it where to change directory to when it starts (to find the module containing your app, or your configuration module).
The daemonization script is configured by the file /etc/default/celeryd. This is a shell (sh) script where you can add environment variables like the configuration options below. To add real environment variables affecting the worker you must also export them (e.g., export DISPLAY=“:0”)
Superuser privileges required
The init-scripts can only be used by root, and the shell configuration file must also be owned by root.
Unprivileged users don’t need to use the init-script, instead they can use the celery multi utility (or celery worker --detach):
$ celery multi start worker1
-A proj
–pidfile=“
H
O
M
E
/
r
u
n
/
c
e
l
e
r
y
/
−
−
l
o
g
f
i
l
e
=
"
HOME/run/celery/%n.pid" \ --logfile="
HOME/run/celery/−−logfile="HOME/log/celery/%n%I.log”
$ celery multi restart worker1
-A proj
–logfile="
H
O
M
E
/
l
o
g
/
c
e
l
e
r
y
/
−
−
p
i
d
f
i
l
e
=
"
HOME/log/celery/%n%I.log" \ --pidfile="
HOME/log/celery/−−pidfile="HOME/run/celery/%n.pid
$ celery multi stopwait worker1 --pidfile=“$HOME/run/celery/%n.pid”
Example configuration
This is an example configuration for a Python project.
/etc/default/celeryd:
Names of nodes to start
most people will only start one node:
CELERYD_NODES=“worker1”
but you can also start multiple and configure settings
for each in CELERYD_OPTS
#CELERYD_NODES=“worker1 worker2 worker3”
alternatively, you can specify the number of nodes to start:
#CELERYD_NODES=10
Absolute or relative path to the ‘celery’ command:
CELERY_BIN=“/usr/local/bin/celery”
#CELERY_BIN=“/virtualenvs/def/bin/celery”
App instance to use
comment out this line if you don’t use an app
CELERY_APP=“proj”
or fully qualified:
#CELERY_APP=“proj.tasks:app”
Where to chdir at start.
CELERYD_CHDIR=“/opt/Myproject/”
Extra command-line arguments to the worker
CELERYD_OPTS=“–time-limit=300 --concurrency=8”
Configure node-specific settings by appending node name to arguments:
#CELERYD_OPTS=“–time-limit=300 -c 8 -c:worker2 4 -c:worker3 2 -Ofair:worker1”
Set logging level to DEBUG
#CELERYD_LOG_LEVEL=“DEBUG”
%n will be replaced with the first part of the nodename.
CELERYD_LOG_FILE=“/var/log/celery/%n%I.log”
CELERYD_PID_FILE=“/var/run/celery/%n.pid”
Workers should run as an unprivileged user.
You need to create this user manually (or you can choose
a user/group combination that already exists (e.g., nobody).
CELERYD_USER=“celery”
CELERYD_GROUP=“celery”
If enabled pid and log directories will be created if missing,
and owned by the userid/group configured.
CELERY_CREATE_DIRS=1
Using a login shell
You can inherit the environment of the CELERYD_USER by using a login shell:
CELERYD_SU_ARGS=“-l”
Note that this isn’t recommended, and that you should only use this option when absolutely necessary.
Example Django configuration
Django users now uses the exact same template as above, but make sure that the module that defines your Celery app instance also sets a default value for DJANGO_SETTINGS_MODULE as shown in the example Django project in First steps with Django.
Available options
CELERY_APP
App instance to use (value for --app argument).
CELERY_BIN
Absolute or relative path to the celery program. Examples:
celery
/usr/local/bin/celery
/virtualenvs/proj/bin/celery
/virtualenvs/proj/bin/python -m celery
CELERYD_NODES
List of node names to start (separated by space).
CELERYD_OPTS
Additional command-line arguments for the worker, see celery worker –help for a list. This also supports the extended syntax used by multi to configure settings for individual nodes. See celery multi –help for some multi-node configuration examples.
CELERYD_CHDIR
Path to change directory to at start. Default is to stay in the current directory.
CELERYD_PID_FILE
Full path to the PID file. Default is /var/run/celery/%n.pid
CELERYD_LOG_FILE
Full path to the worker log file. Default is /var/log/celery/%n%I.log Note: Using %I is important when using the prefork pool as having multiple processes share the same log file will lead to race conditions.
CELERYD_LOG_LEVEL
Worker log level. Default is INFO.
CELERYD_USER
User to run the worker as. Default is current user.
CELERYD_GROUP
Group to run worker as. Default is current user.
CELERY_CREATE_DIRS
Always create directories (log directory and pid file directory). Default is to only create directories when no custom logfile/pidfile set.
CELERY_CREATE_RUNDIR
Always create pidfile directory. By default only enabled when no custom pidfile location set.
CELERY_CREATE_LOGDIR
Always create logfile directory. By default only enable when no custom logfile location set.
Init-script: celerybeat
Usage
/etc/init.d/celerybeat {start|stop|restart}
Configuration file
/etc/default/celerybeat or /etc/default/celeryd.
Example configuration
This is an example configuration for a Python project:
/etc/default/celerybeat:
Absolute or relative path to the ‘celery’ command:
CELERY_BIN=“/usr/local/bin/celery”
#CELERY_BIN=“/virtualenvs/def/bin/celery”
App instance to use
comment out this line if you don’t use an app
CELERY_APP=“proj”
or fully qualified:
#CELERY_APP=“proj.tasks:app”
Where to chdir at start.
CELERYBEAT_CHDIR=“/opt/Myproject/”
Extra arguments to celerybeat
CELERYBEAT_OPTS=“–schedule=/var/run/celery/celerybeat-schedule”
Example Django configuration
You should use the same template as above, but make sure the DJANGO_SETTINGS_MODULE variable is set (and exported), and that CELERYD_CHDIR is set to the projects directory:
export DJANGO_SETTINGS_MODULE=“settings”
CELERYD_CHDIR=“/opt/MyProject”
Available options
CELERY_APP
App instance to use (value for --app argument).
CELERYBEAT_OPTS
Additional arguments to celery beat, see celery beat --help for a list of available options.
CELERYBEAT_PID_FILE
Full path to the PID file. Default is /var/run/celeryd.pid.
CELERYBEAT_LOG_FILE
Full path to the log file. Default is /var/log/celeryd.log.
CELERYBEAT_LOG_LEVEL
Log level to use. Default is INFO.
CELERYBEAT_USER
User to run beat as. Default is the current user.
CELERYBEAT_GROUP
Group to run beat as. Default is the current user.
CELERY_CREATE_DIRS
Always create directories (log directory and pid file directory). Default is to only create directories when no custom logfile/pidfile set.
CELERY_CREATE_RUNDIR
Always create pidfile directory. By default only enabled when no custom pidfile location set.
CELERY_CREATE_LOGDIR
Always create logfile directory. By default only enable when no custom logfile location set.
Troubleshooting
If you can’t get the init-scripts to work, you should try running them in verbose mode:
sh -x /etc/init.d/celeryd start
This can reveal hints as to why the service won’t start.
If the worker starts with “OK” but exits almost immediately afterwards and there’s no evidence in the log file, then there’s probably an error but as the daemons standard outputs are already closed you’ll not be able to see them anywhere. For this situation you can use the C_FAKEFORK environment variable to skip the daemonization step:
C_FAKEFORK=1 sh -x /etc/init.d/celeryd start
and now you should be able to see the errors.
Commonly such errors are caused by insufficient permissions to read from, or write to a file, and also by syntax errors in configuration modules, user modules, third-party libraries, or even from Celery itself (if you’ve found a bug you should report it).
Usage systemd
extra/systemd/
Usage
systemctl {start|stop|restart|status} celery.service
Configuration file
/etc/conf.d/celery
Service file: celery.service
This is an example systemd file:
/etc/systemd/system/celery.service:
[Unit]
Description=Celery Service
After=network.target
[Service]
Type=forking
User=celery
Group=celery
EnvironmentFile=/etc/conf.d/celery
WorkingDirectory=/opt/celery
ExecStart=/bin/sh -c ‘${CELERY_BIN} multi start ${CELERYD_NODES}
-A
C
E
L
E
R
Y
A
P
P
−
−
p
i
d
f
i
l
e
=
{CELERY_APP} --pidfile=
CELERYAPP−−pidfile={CELERYD_PID_FILE}
–logfile=
C
E
L
E
R
Y
D
L
O
G
F
I
L
E
−
−
l
o
g
l
e
v
e
l
=
{CELERYD_LOG_FILE} --loglevel=
CELERYDLOGFILE−−loglevel={CELERYD_LOG_LEVEL}
C
E
L
E
R
Y
D
O
P
T
S
′
E
x
e
c
S
t
o
p
=
/
b
i
n
/
s
h
−
c
′
{CELERYD_OPTS}' ExecStop=/bin/sh -c '
CELERYDOPTS′ExecStop=/bin/sh−c′{CELERY_BIN} multi stopwait
C
E
L
E
R
Y
D
N
O
D
E
S
−
−
p
i
d
f
i
l
e
=
{CELERYD_NODES} \ --pidfile=
CELERYDNODES −−pidfile={CELERYD_PID_FILE}’
ExecReload=/bin/sh -c ‘${CELERY_BIN} multi restart ${CELERYD_NODES}
-A
C
E
L
E
R
Y
A
P
P
−
−
p
i
d
f
i
l
e
=
{CELERY_APP} --pidfile=
CELERYAPP−−pidfile={CELERYD_PID_FILE}
–logfile=
C
E
L
E
R
Y
D
L
O
G
F
I
L
E
−
−
l
o
g
l
e
v
e
l
=
{CELERYD_LOG_FILE} --loglevel=
CELERYDLOGFILE−−loglevel={CELERYD_LOG_LEVEL} ${CELERYD_OPTS}’
[Install]
WantedBy=multi-user.target
Once you’ve put that file in /etc/systemd/system, you should run systemctl daemon-reload in order that Systemd acknowledges that file. You should also run that command each time you modify it.
To configure user, group, chdir change settings: User, Group, and WorkingDirectory defined in /etc/systemd/system/celery.service.
You can also use systemd-tmpfiles in order to create working directories (for logs and pid).
file
/etc/tmpfiles.d/celery.conf
d /var/run/celery 0755 celery celery -
d /var/log/celery 0755 celery celery -
Example configuration
This is an example configuration for a Python project:
/etc/conf.d/celery:
Name of nodes to start
here we have a single node
CELERYD_NODES=“w1”
or we could have three nodes:
#CELERYD_NODES=“w1 w2 w3”
Absolute or relative path to the ‘celery’ command:
CELERY_BIN=“/usr/local/bin/celery”
#CELERY_BIN=“/virtualenvs/def/bin/celery”
App instance to use
comment out this line if you don’t use an app
CELERY_APP=“proj”
or fully qualified:
#CELERY_APP=“proj.tasks:app”
How to call manage.py
CELERYD_MULTI=“multi”
Extra command-line arguments to the worker
CELERYD_OPTS=“–time-limit=300 --concurrency=8”
- %n will be replaced with the first part of the nodename.
- %I will be replaced with the current child process index
and is important when using the prefork pool to avoid race conditions.
CELERYD_PID_FILE=“/var/run/celery/%n.pid”
CELERYD_LOG_FILE=“/var/log/celery/%n%I.log”
CELERYD_LOG_LEVEL=“INFO”
you may wish to add these options for Celery Beat
CELERYBEAT_PID_FILE=“/var/run/celery/beat.pid”
CELERYBEAT_LOG_FILE=“/var/log/celery/beat.log”
Service file: celerybeat.service
This is an example systemd file for Celery Beat:
/etc/systemd/system/celerybeat.service:
[Unit]
Description=Celery Beat Service
After=network.target
[Service]
Type=simple
User=celery
Group=celery
EnvironmentFile=/etc/conf.d/celery
WorkingDirectory=/opt/celery
ExecStart=/bin/sh -c ‘${CELERY_BIN} beat
-A
C
E
L
E
R
Y
A
P
P
−
−
p
i
d
f
i
l
e
=
{CELERY_APP} --pidfile=
CELERYAPP−−pidfile={CELERYBEAT_PID_FILE}
–logfile=
C
E
L
E
R
Y
B
E
A
T
L
O
G
F
I
L
E
−
−
l
o
g
l
e
v
e
l
=
{CELERYBEAT_LOG_FILE} --loglevel=
CELERYBEATLOGFILE−−loglevel={CELERYD_LOG_LEVEL}’
[Install]
WantedBy=multi-user.target
Running the worker with superuser privileges (root)
Running the worker with superuser privileges is a very dangerous practice. There should always be a workaround to avoid running as root. Celery may run arbitrary code in messages serialized with pickle - this is dangerous, especially when run as root.
By default Celery won’t run workers as root. The associated error message may not be visible in the logs but may be seen if C_FAKEFORK is used.
To force Celery to run workers as root use C_FORCE_ROOT.
When running as root without C_FORCE_ROOT the worker will appear to start with “OK” but exit immediately after with no apparent errors. This problem may appear when running the project in a new development or production environment (inadvertently) as root.
supervisor
extra/supervisord/
launchd (macOS)
extra/macOS
Periodic Tasks
Introduction
Time Zones
Entries
Available Fields
Crontab schedules
Solar schedules
Starting the Scheduler
Using custom scheduler classes
Introduction
celery beat is a scheduler; It kicks off tasks at regular intervals, that are then executed by available worker nodes in the cluster.
By default the entries are taken from the beat_schedule setting, but custom stores can also be used, like storing the entries in a SQL database.
You have to ensure only a single scheduler is running for a schedule at a time, otherwise you’d end up with duplicate tasks. Using a centralized approach means the schedule doesn’t have to be synchronized, and the service can operate without using locks.
Time Zones
The periodic task schedules uses the UTC time zone by default, but you can change the time zone used using the timezone setting.
An example time zone could be Europe/London:
timezone = ‘Europe/London’
This setting must be added to your app, either by configuring it directly using (app.conf.timezone = ‘Europe/London’), or by adding it to your configuration module if you have set one up using app.config_from_object. See Configuration for more information about configuration options.
The default scheduler (storing the schedule in the celerybeat-schedule file) will automatically detect that the time zone has changed, and so will reset the schedule itself, but other schedulers may not be so smart (e.g., the Django database scheduler, see below) and in that case you’ll have to reset the schedule manually.
Django Users
Celery recommends and is compatible with the new USE_TZ setting introduced in Django 1.4.
For Django users the time zone specified in the TIME_ZONE setting will be used, or you can specify a custom time zone for Celery alone by using the timezone setting.
The database scheduler won’t reset when timezone related settings change, so you must do this manually:
$ python manage.py shell
from djcelery.models import PeriodicTask
PeriodicTask.objects.update(last_run_at=None)
Django-Celery only supports Celery 4.0 and below, for Celery 4.0 and above, do as follow:
$ python manage.py shell
from django_celery_beat.models import PeriodicTask
PeriodicTask.objects.update(last_run_at=None)
Entries
To call a task periodically you have to add an entry to the beat schedule list.
from celery import Celery
from celery.schedules import crontab
app = Celery()
@app.on_after_configure.connect
def setup_periodic_tasks(sender, **kwargs):
# Calls test(‘hello’) every 10 seconds.
sender.add_periodic_task(10.0, test.s(‘hello’), name=‘add every 10’)
# Calls test('world') every 30 seconds
sender.add_periodic_task(30.0, test.s('world'), expires=10)

# Executes every Monday morning at 7:30 a.m.
sender.add_periodic_task(
    crontab(hour=7, minute=30, day_of_week=1),
    test.s('Happy Mondays!'),
)
@app.task
def test(arg):
print(arg)
Setting these up from within the on_after_configure handler means that we’ll not evaluate the app at module level when using test.s(). Note that on_after_configure is sent after the app is set up, so tasks outside the module where the app is declared (e.g. in a tasks.py file located by celery.Celery.autodiscover_tasks()) must use a later signal, such as on_after_finalize.
The add_periodic_task() function will add the entry to the beat_schedule setting behind the scenes, and the same setting can also be used to set up periodic tasks manually:
Example: Run the tasks.add task every 30 seconds.
app.conf.beat_schedule = {
‘add-every-30-seconds’: {
‘task’: ‘tasks.add’,
‘schedule’: 30.0,
‘args’: (16, 16)
},
}
app.conf.timezone = ‘UTC’
Note
If you’re wondering where these settings should go then please see Configuration. You can either set these options on your app directly or you can keep a separate module for configuration.
If you want to use a single item tuple for args, don’t forget that the constructor is a comma, and not a pair of parentheses.
Using a timedelta for the schedule means the task will be sent in 30 second intervals (the first task will be sent 30 seconds after celery beat starts, and then every 30 seconds after the last run).
A Crontab like schedule also exists, see the section on Crontab schedules.
Like with cron, the tasks may overlap if the first task doesn’t complete before the next. If that’s a concern you should use a locking strategy to ensure only one instance can run at a time (see for example Ensuring a task is only executed one at a time).
Available Fields
task
The name of the task to execute.
schedule
The frequency of execution.
This can be the number of seconds as an integer, a timedelta, or a crontab. You can also define your own custom schedule types, by extending the interface of schedule.
args
Positional arguments (list or tuple).
kwargs
Keyword arguments (dict).
options
Execution options (dict).
This can be any argument supported by apply_async() – exchange, routing_key, expires, and so on.
relative
If relative is true timedelta schedules are scheduled “by the clock.” This means the frequency is rounded to the nearest second, minute, hour or day depending on the period of the timedelta.
By default relative is false, the frequency isn’t rounded and will be relative to the time when celery beat was started.
Crontab schedules
If you want more control over when the task is executed, for example, a particular time of day or day of the week, you can use the crontab schedule type:
from celery.schedules import crontab
app.conf.beat_schedule = {
# Executes every Monday morning at 7:30 a.m.
‘add-every-monday-morning’: {
‘task’: ‘tasks.add’,
‘schedule’: crontab(hour=7, minute=30, day_of_week=1),
‘args’: (16, 16),
},
}
The syntax of these Crontab expressions are very flexible.
Some examples:
Example
Meaning
crontab()
Execute every minute.
crontab(minute=0, hour=0)
Execute daily at midnight.
crontab(minute=0, hour=‘*/3’)
Execute every three hours: midnight, 3am, 6am, 9am, noon, 3pm, 6pm, 9pm.
crontab(minute=0,
hour=‘0,3,6,9,12,15,18,21’)
Same as previous.
crontab(minute=‘*/15’)
Execute every 15 minutes.
crontab(day_of_week=‘sunday’)
Execute every minute (!) at Sundays.
crontab(minute=‘‘,
hour=’’, day_of_week=‘sun’)
Same as previous.
crontab(minute=‘*/10’,
hour=‘3,17,22’, day_of_week=‘thu,fri’)
Execute every ten minutes, but only between 3-4 am, 5-6 pm, and 10-11 pm on Thursdays or Fridays.
crontab(minute=0, hour=‘/2,/3’)
Execute every even hour, and every hour divisible by three. This means: at every hour except: 1am, 5am, 7am, 11am, 1pm, 5pm, 7pm, 11pm
crontab(minute=0, hour=‘*/5’)
Execute hour divisible by 5. This means that it is triggered at 3pm, not 5pm (since 3pm equals the 24-hour clock value of “15”, which is divisible by 5).
crontab(minute=0, hour=‘*/3,8-17’)
Execute every hour divisible by 3, and every hour during office hours (8am-5pm).
crontab(0, 0, day_of_month=‘2’)
Execute on the second day of every month.
crontab(0, 0,
day_of_month=‘2-30/2’)
Execute on every even numbered day.
crontab(0, 0,
day_of_month=‘1-7,15-21’)
Execute on the first and third weeks of the month.
crontab(0, 0, day_of_month=‘11’,
month_of_year=‘5’)
Execute on the eleventh of May every year.
crontab(0, 0,
month_of_year=‘*/3’)
Execute every day on the first month of every quarter.
See celery.schedules.crontab for more documentation.
Solar schedules
If you have a task that should be executed according to sunrise, sunset, dawn or dusk, you can use the solar schedule type:
from celery.schedules import solar
app.conf.beat_schedule = {
# Executes at sunset in Melbourne
‘add-at-melbourne-sunset’: {
‘task’: ‘tasks.add’,
‘schedule’: solar(‘sunset’, -37.81753, 144.96715),
‘args’: (16, 16),
},
}
The arguments are simply: solar(event, latitude, longitude)
Be sure to use the correct sign for latitude and longitude:
Sign
Argument
Meaning
latitude
North
latitude
South
longitude
East
longitude
West
Possible event types are:
Event
Meaning
dawn_astronomical
Execute at the moment after which the sky is no longer completely dark. This is when the sun is 18 degrees below the horizon.
dawn_nautical
Execute when there’s enough sunlight for the horizon and some objects to be distinguishable; formally, when the sun is 12 degrees below the horizon.
dawn_civil
Execute when there’s enough light for objects to be distinguishable so that outdoor activities can commence; formally, when the Sun is 6 degrees below the horizon.
sunrise
Execute when the upper edge of the sun appears over the eastern horizon in the morning.
solar_noon
Execute when the sun is highest above the horizon on that day.
sunset
Execute when the trailing edge of the sun disappears over the western horizon in the evening.
dusk_civil
Execute at the end of civil twilight, when objects are still distinguishable and some stars and planets are visible. Formally, when the sun is 6 degrees below the horizon.
dusk_nautical
Execute when the sun is 12 degrees below the horizon. Objects are no longer distinguishable, and the horizon is no longer visible to the naked eye.
dusk_astronomical
Execute at the moment after which the sky becomes completely dark; formally, when the sun is 18 degrees below the horizon.
All solar events are calculated using UTC, and are therefore unaffected by your timezone setting.
In polar regions, the sun may not rise or set every day. The scheduler is able to handle these cases (i.e., a sunrise event won’t run on a day when the sun doesn’t rise). The one exception is solar_noon, which is formally defined as the moment the sun transits the celestial meridian, and will occur every day even if the sun is below the horizon.
Twilight is defined as the period between dawn and sunrise; and between sunset and dusk. You can schedule an event according to “twilight” depending on your definition of twilight (civil, nautical, or astronomical), and whether you want the event to take place at the beginning or end of twilight, using the appropriate event from the list above.
See celery.schedules.solar for more documentation.
Starting the Scheduler
To start the celery beat service:
$ celery -A proj beat
You can also embed beat inside the worker by enabling the workers -B option, this is convenient if you’ll never run more than one worker node, but it’s not commonly used and for that reason isn’t recommended for production use:
$ celery -A proj worker -B
Beat needs to store the last run times of the tasks in a local database file (named celerybeat-schedule by default), so it needs access to write in the current directory, or alternatively you can specify a custom location for this file:
$ celery -A proj beat -s /home/celery/var/run/celerybeat-schedule
Note
To daemonize beat see Daemonization.
Using custom scheduler classes
Custom scheduler classes can be specified on the command-line (the --scheduler argument).
The default scheduler is the celery.beat.PersistentScheduler, that simply keeps track of the last run times in a local shelve database file.
There’s also the django-celery-beat extension that stores the schedule in the Django database, and presents a convenient admin interface to manage periodic tasks at runtime.
To install and use this extension:
Use pip to install the package:
$ pip install django-celery-beat
Add the django_celery_beat module to INSTALLED_APPS in your Django project’ settings.py:
INSTALLED_APPS = (
…,
‘django_celery_beat’,
)
Note that there is no dash in the module name, only underscores.
Apply Django database migrations so that the necessary tables are created:
$ python manage.py migrate
Start the celery beat service using the django_celery_beat.schedulers:DatabaseScheduler scheduler:
$ celery -A proj beat -l info --scheduler django_celery_beat.schedulers:DatabaseScheduler
Note: You may also add this as the beat_scheduler setting directly.
Visit the Django-Admin interface to set up some periodic tasks.
Routing Tasks
Note
Alternate routing concepts like topic and fanout is not available for all transports, please consult the transport comparison table.
Basics
Automatic routing
Changing the name of the default queue
How the queues are defined
Manual routing
Special Routing Options
RabbitMQ Message Priorities
Redis Message Priorities
AMQP Primer
Messages
Producers, consumers, and brokers
Exchanges, queues, and routing keys
Exchange types
Direct exchanges
Topic exchanges
Related API commands
Hands-on with the API
Routing Tasks
Defining queues
Specifying task destination
Routers
Broadcast
Basics
Automatic routing
The simplest way to do routing is to use the task_create_missing_queues setting (on by default).
With this setting on, a named queue that’s not already defined in task_queues will be created automatically. This makes it easy to perform simple routing tasks.
Say you have two servers, x, and y that handle regular tasks, and one server z, that only handles feed related tasks. You can use this configuration:
task_routes = {‘feed.tasks.import_feed’: {‘queue’: ‘feeds’}}
With this route enabled import feed tasks will be routed to the “feeds” queue, while all other tasks will be routed to the default queue (named “celery” for historical reasons).
Alternatively, you can use glob pattern matching, or even regular expressions, to match all tasks in the feed.tasks name-space:
app.conf.task_routes = {‘feed.tasks.*’: {‘queue’: ‘feeds’}}
If the order of matching patterns is important you should specify the router in items format instead:
task_routes = ([
(‘feed.tasks.', {‘queue’: ‘feeds’}),
('web.tasks.’, {‘queue’: ‘web’}),
(re.compile(r’(video|image).tasks…*'), {‘queue’: ‘media’}),
],)
Note
The task_routes setting can either be a dictionary, or a list of router objects, so in this case we need to specify the setting as a tuple containing a list.
After installing the router, you can start server z to only process the feeds queue like this:
user@z:/$ celery -A proj worker -Q feeds
You can specify as many queues as you want, so you can make this server process the default queue as well:
user@z:/$ celery -A proj worker -Q feeds,celery
Changing the name of the default queue
You can change the name of the default queue by using the following configuration:
app.conf.task_default_queue = ‘default’
How the queues are defined
The point with this feature is to hide the complex AMQP protocol for users with only basic needs. However – you may still be interested in how these queues are declared.
A queue named “video” will be created with the following settings:
{‘exchange’: ‘video’,
‘exchange_type’: ‘direct’,
‘routing_key’: ‘video’}
The non-AMQP backends like Redis or SQS don’t support exchanges, so they require the exchange to have the same name as the queue. Using this design ensures it will work for them as well.
Manual routing
Say you have two servers, x, and y that handle regular tasks, and one server z, that only handles feed related tasks, you can use this configuration:
from kombu import Queue
app.conf.task_default_queue = ‘default’
app.conf.task_queues = (
Queue(‘default’, routing_key=‘task.#’),
Queue(‘feed_tasks’, routing_key=‘feed.#’),
)
app.conf.task_default_exchange = ‘tasks’
app.conf.task_default_exchange_type = ‘topic’
app.conf.task_default_routing_key = ‘task.default’
task_queues is a list of Queue instances. If you don’t set the exchange or exchange type values for a key, these will be taken from the task_default_exchange and task_default_exchange_type settings.
To route a task to the feed_tasks queue, you can add an entry in the task_routes setting:
task_routes = {
‘feeds.tasks.import_feed’: {
‘queue’: ‘feed_tasks’,
‘routing_key’: ‘feed.import’,
},
}
You can also override this using the routing_key argument to Task.apply_async(), or send_task():
from feeds.tasks import import_feed
import_feed.apply_async(args=[‘http://cnn.com/rss’],
queue=‘feed_tasks’,
routing_key=‘feed.import’)
To make server z consume from the feed queue exclusively you can start it with the celery worker -Q option:
user@z:/$ celery -A proj worker -Q feed_tasks --hostname=z@%h
Servers x and y must be configured to consume from the default queue:
user@x:/$ celery -A proj worker -Q default --hostname=x@%h
user@y:/$ celery -A proj worker -Q default --hostname=y@%h
If you want, you can even have your feed processing worker handle regular tasks as well, maybe in times when there’s a lot of work to do:
user@z:/$ celery -A proj worker -Q feed_tasks,default --hostname=z@%h
If you have another queue but on another exchange you want to add, just specify a custom exchange and exchange type:
from kombu import Exchange, Queue
app.conf.task_queues = (
Queue(‘feed_tasks’, routing_key=‘feed.#’),
Queue(‘regular_tasks’, routing_key=‘task.#’),
Queue(‘image_tasks’, exchange=Exchange(‘mediatasks’, type=‘direct’),
routing_key=‘image.compress’),
)
If you’re confused about these terms, you should read up on AMQP.
See also
In addition to the Redis Message Priorities below, there’s Rabbits and Warrens, an excellent blog post describing queues and exchanges. There’s also The CloudAMQP tutorial, For users of RabbitMQ the RabbitMQ FAQ could be useful as a source of information.
Special Routing Options
RabbitMQ Message Priorities
supported transports
RabbitMQ
New in version 4.0.
Queues can be configured to support priorities by setting the x-max-priority argument:
from kombu import Exchange, Queue
app.conf.task_queues = [
Queue(‘tasks’, Exchange(‘tasks’), routing_key=‘tasks’,
queue_arguments={‘x-max-priority’: 10}),
]
A default value for all queues can be set using the task_queue_max_priority setting:
app.conf.task_queue_max_priority = 10
A default priority for all tasks can also be specified using the task_default_priority setting:
app.conf.task_default_priority = 5
Redis Message Priorities
supported transports
Redis
While the Celery Redis transport does honor the priority field, Redis itself has no notion of priorities. Please read this note before attempting to implement priorities with Redis as you may experience some unexpected behavior.
To start scheduling tasks based on priorities you need to configure queue_order_strategy transport option.
app.conf.broker_transport_options = {
‘queue_order_strategy’: ‘priority’,
}
The priority support is implemented by creating n lists for each queue. This means that even though there are 10 (0-9) priority levels, these are consolidated into 4 levels by default to save resources. This means that a queue named celery will really be split into 4 queues:
[‘celery0’, ‘celery3’, ‘celery6’, ‘celery9’]
If you want more priority levels you can set the priority_steps transport option:
app.conf.broker_transport_options = {
‘priority_steps’: list(range(10)),
‘queue_order_strategy’: ‘priority’,
}
That said, note that this will never be as good as priorities implemented at the server level, and may be approximate at best. But it may still be good enough for your application.
AMQP Primer
Messages
A message consists of headers and a body. Celery uses headers to store the content type of the message and its content encoding. The content type is usually the serialization format used to serialize the message. The body contains the name of the task to execute, the task id (UUID), the arguments to apply it with and some additional meta-data – like the number of retries or an ETA.
This is an example task message represented as a Python dictionary:
{‘task’: ‘myapp.tasks.add’,
‘id’: ‘54086c5e-6193-4575-8308-dbab76798756’,
‘args’: [4, 4],
‘kwargs’: {}}
Producers, consumers, and brokers
The client sending messages is typically called a publisher, or a producer, while the entity receiving messages is called a consumer.
The broker is the message server, routing messages from producers to consumers.
You’re likely to see these terms used a lot in AMQP related material.
Exchanges, queues, and routing keys
Messages are sent to exchanges.
An exchange routes messages to one or more queues. Several exchange types exists, providing different ways to do routing, or implementing different messaging scenarios.
The message waits in the queue until someone consumes it.
The message is deleted from the queue when it has been acknowledged.
The steps required to send and receive messages are:
Create an exchange
Create a queue
Bind the queue to the exchange.
Celery automatically creates the entities necessary for the queues in task_queues to work (except if the queue’s auto_declare setting is set to False).
Here’s an example queue configuration with three queues; One for video, one for images, and one default queue for everything else:
from kombu import Exchange, Queue
app.conf.task_queues = (
Queue(‘default’, Exchange(‘default’), routing_key=‘default’),
Queue(‘videos’, Exchange(‘media’), routing_key=‘media.video’),
Queue(‘images’, Exchange(‘media’), routing_key=‘media.image’),
)
app.conf.task_default_queue = ‘default’
app.conf.task_default_exchange_type = ‘direct’
app.conf.task_default_routing_key = ‘default’
Exchange types
The exchange type defines how the messages are routed through the exchange. The exchange types defined in the standard are direct, topic, fanout and headers. Also non-standard exchange types are available as plug-ins to RabbitMQ, like the last-value-cache plug-in by Michael Bridgen.
Direct exchanges
Direct exchanges match by exact routing keys, so a queue bound by the routing key video only receives messages with that routing key.
Topic exchanges
Topic exchanges matches routing keys using dot-separated words, and the wild-card characters: * (matches a single word), and # (matches zero or more words).
With routing keys like usa.news, usa.weather, norway.news, and norway.weather, bindings could be *.news (all news), usa.# (all items in the USA), or usa.weather (all USA weather items).
Related API commands
exchange.declare(exchange_name, type, passive,
durable, auto_delete, internal)
Declares an exchange by name.
See amqp:Channel.exchange_declare.
Keyword Arguments
passive – Passive means the exchange won’t be created, but you can use this to check if the exchange already exists.
durable – Durable exchanges are persistent (i.e., they survive a broker restart).
auto_delete – This means the exchange will be deleted by the broker when there are no more queues using it.
queue.declare(queue_name, passive, durable, exclusive, auto_delete)
Declares a queue by name.
See amqp:Channel.queue_declare
Exclusive queues can only be consumed from by the current connection. Exclusive also implies auto_delete.
queue.bind(queue_name, exchange_name, routing_key)
Binds a queue to an exchange with a routing key.
Unbound queues won’t receive messages, so this is necessary.
See amqp:Channel.queue_bind
queue.delete(name, if_unused=False, if_empty=False)
Deletes a queue and its binding.
See amqp:Channel.queue_delete
exchange.delete(name, if_unused=False)
Deletes an exchange.
See amqp:Channel.exchange_delete
Note
Declaring doesn’t necessarily mean “create”. When you declare you assert that the entity exists and that it’s operable. There’s no rule as to whom should initially create the exchange/queue/binding, whether consumer or producer. Usually the first one to need it will be the one to create it.
Hands-on with the API
Celery comes with a tool called celery amqp that’s used for command line access to the AMQP API, enabling access to administration tasks like creating/deleting queues and exchanges, purging queues or sending messages. It can also be used for non-AMQP brokers, but different implementation may not implement all commands.
You can write commands directly in the arguments to celery amqp, or just start with no arguments to start it in shell-mode:
$ celery -A proj amqp
-> connecting to amqp://guest@localhost:5672/.
-> connected.
1>
Here 1> is the prompt. The number 1, is the number of commands you have executed so far. Type help for a list of commands available. It also supports auto-completion, so you can start typing a command and then hit the tab key to show a list of possible matches.
Let’s create a queue you can send messages to:
$ celery -A proj amqp
1> exchange.declare testexchange direct
ok.
2> queue.declare testqueue
ok. queue:testqueue messages:0 consumers:0.
3> queue.bind testqueue testexchange testkey
ok.
This created the direct exchange testexchange, and a queue named testqueue. The queue is bound to the exchange using the routing key testkey.
From now on all messages sent to the exchange testexchange with routing key testkey will be moved to this queue. You can send a message by using the basic.publish command:
4> basic.publish ‘This is a message!’ testexchange testkey
ok.
Now that the message is sent you can retrieve it again. You can use the basic.get command here, that polls for new messages on the queue in a synchronous manner (this is OK for maintenance tasks, but for services you want to use basic.consume instead)
Pop a message off the queue:
5> basic.get testqueue
{‘body’: ‘This is a message!’,
‘delivery_info’: {‘delivery_tag’: 1,
‘exchange’: u’testexchange’,
‘message_count’: 0,
‘redelivered’: False,
‘routing_key’: u’testkey’},
‘properties’: {}}
AMQP uses acknowledgment to signify that a message has been received and processed successfully. If the message hasn’t been acknowledged and consumer channel is closed, the message will be delivered to another consumer.
Note the delivery tag listed in the structure above; Within a connection channel, every received message has a unique delivery tag, This tag is used to acknowledge the message. Also note that delivery tags aren’t unique across connections, so in another client the delivery tag 1 might point to a different message than in this channel.
You can acknowledge the message you received using basic.ack:
6> basic.ack 1
ok.
To clean up after our test session you should delete the entities you created:
7> queue.delete testqueue
ok. 0 messages deleted.
8> exchange.delete testexchange
ok.
Routing Tasks
Defining queues
In Celery available queues are defined by the task_queues setting.
Here’s an example queue configuration with three queues; One for video, one for images, and one default queue for everything else:
default_exchange = Exchange(‘default’, type=‘direct’)
media_exchange = Exchange(‘media’, type=‘direct’)
app.conf.task_queues = (
Queue(‘default’, default_exchange, routing_key=‘default’),
Queue(‘videos’, media_exchange, routing_key=‘media.video’),
Queue(‘images’, media_exchange, routing_key=‘media.image’)
)
app.conf.task_default_queue = ‘default’
app.conf.task_default_exchange = ‘default’
app.conf.task_default_routing_key = ‘default’
Here, the task_default_queue will be used to route tasks that doesn’t have an explicit route.
The default exchange, exchange type, and routing key will be used as the default routing values for tasks, and as the default values for entries in task_queues.
Multiple bindings to a single queue are also supported. Here’s an example of two routing keys that are both bound to the same queue:
from kombu import Exchange, Queue, binding
media_exchange = Exchange(‘media’, type=‘direct’)
CELERY_QUEUES = (
Queue(‘media’, [
binding(media_exchange, routing_key=‘media.video’),
binding(media_exchange, routing_key=‘media.image’),
]),
)
Specifying task destination
The destination for a task is decided by the following (in order):
The routing arguments to Task.apply_async().
Routing related attributes defined on the Task itself.
The Routers defined in task_routes.
It’s considered best practice to not hard-code these settings, but rather leave that as configuration options by using Routers; This is the most flexible approach, but sensible defaults can still be set as task attributes.
Routers
A router is a function that decides the routing options for a task.
All you need to define a new router is to define a function with the signature (name, args, kwargs, options, task=None, **kw):
def route_task(name, args, kwargs, options, task=None, **kw):
if name == ‘myapp.tasks.compress_video’:
return {‘exchange’: ‘video’,
‘exchange_type’: ‘topic’,
‘routing_key’: ‘video.compress’}
If you return the queue key, it’ll expand with the defined settings of that queue in task_queues:
{‘queue’: ‘video’, ‘routing_key’: ‘video.compress’}
becomes –>
{‘queue’: ‘video’,
‘exchange’: ‘video’,
‘exchange_type’: ‘topic’,
‘routing_key’: ‘video.compress’}
You install router classes by adding them to the task_routes setting:
task_routes = (route_task,)
Router functions can also be added by name:
task_routes = (‘myapp.routers.route_task’,)
For simple task name -> route mappings like the router example above, you can simply drop a dict into task_routes to get the same behavior:
task_routes = {
‘myapp.tasks.compress_video’: {
‘queue’: ‘video’,
‘routing_key’: ‘video.compress’,
},
}
The routers will then be traversed in order, it will stop at the first router returning a true value, and use that as the final route for the task.
You can also have multiple routers defined in a sequence:
task_routes = [
route_task,
{
‘myapp.tasks.compress_video’: {
‘queue’: ‘video’,
‘routing_key’: ‘video.compress’,
},
]
The routers will then be visited in turn, and the first to return a value will be chosen.
If you’re using Redis or RabbitMQ you can also specify the queue’s default priority in the route.
task_routes = {
‘myapp.tasks.compress_video’: {
‘queue’: ‘video’,
‘routing_key’: ‘video.compress’,
‘priority’: 10,
},
}
Similarly, calling apply_async on a task will override that default priority.
task.apply_async(priority=0)
Priority Order and Cluster Responsiveness
It is important to note that, due to worker prefetching, if a bunch of tasks submitted at the same time they may be out of priority order at first. Disabling worker prefetching will prevent this issue, but may cause less than ideal performance for small, fast tasks. In most cases, simply reducing worker_prefetch_multiplier to 1 is an easier and cleaner way to increase the responsiveness of your system without the costs of disabling prefetching entirely.
Note that priorities values are sorted in reverse when using the redis broker: 0 being highest priority.
Broadcast
Celery can also support broadcast routing. Here is an example exchange broadcast_tasks that delivers copies of tasks to all workers connected to it:
from kombu.common import Broadcast
app.conf.task_queues = (Broadcast(‘broadcast_tasks’),)
app.conf.task_routes = {
‘tasks.reload_cache’: {
‘queue’: ‘broadcast_tasks’,
‘exchange’: ‘broadcast_tasks’
}
}
Now the tasks.reload_cache task will be sent to every worker consuming from this queue.
Here is another example of broadcast routing, this time with a celery beat schedule:
from kombu.common import Broadcast
from celery.schedules import crontab
app.conf.task_queues = (Broadcast(‘broadcast_tasks’),)
app.conf.beat_schedule = {
‘test-task’: {
‘task’: ‘tasks.reload_cache’,
‘schedule’: crontab(minute=0, hour=‘*/3’),
‘options’: {‘exchange’: ‘broadcast_tasks’}
},
}
Broadcast & Results
Note that Celery result doesn’t define what happens if two tasks have the same task_id. If the same task is distributed to more than one worker, then the state history may not be preserved.
It’s a good idea to set the task.ignore_result attribute in this case.
Monitoring and Management Guide
Introduction
Workers
Management Command-line Utilities (inspect/control)
Commands
Specifying destination nodes
Flower: Real-time Celery web-monitor
Features
Usage
celery events: Curses Monitor
RabbitMQ
Inspecting queues
Redis
Inspecting queues
Munin
Events
Snapshots
Custom Camera
Real-time processing
Event Reference
Task Events
task-sent
task-received
task-started
task-succeeded
task-failed
task-rejected
task-revoked
task-retried
Worker Events
worker-online
worker-heartbeat
worker-offline
Introduction
There are several tools available to monitor and inspect Celery clusters.
This document describes some of these, as well as features related to monitoring, like events and broadcast commands.
Workers
Management Command-line Utilities (inspect/control)
celery can also be used to inspect and manage worker nodes (and to some degree tasks).
To list all the commands available do:
$ celery help
or to get help for a specific command do:
$ celery --help
Commands
shell: Drop into a Python shell.
The locals will include the celery variable: this is the current app. Also all known tasks will be automatically added to locals (unless the --without-tasks flag is set).
Uses Ipython, bpython, or regular python in that order if installed. You can force an implementation using --ipython, --bpython, or --python.
status: List active nodes in this cluster
$ celery -A proj status
result: Show the result of a task
$ celery -A proj result -t tasks.add 4e196aa4-0141-4601-8138-7aa33db0f577
Note that you can omit the name of the task as long as the task doesn’t use a custom result backend.
purge: Purge messages from all configured task queues.
This command will remove all messages from queues configured in the CELERY_QUEUES setting:
Warning
There’s no undo for this operation, and messages will be permanently deleted!
$ celery -A proj purge
You can also specify the queues to purge using the -Q option:
$ celery -A proj purge -Q celery,foo,bar
and exclude queues from being purged using the -X option:
$ celery -A proj purge -X celery
inspect active: List active tasks
$ celery -A proj inspect active
These are all the tasks that are currently being executed.
inspect scheduled: List scheduled ETA tasks
$ celery -A proj inspect scheduled
These are tasks reserved by the worker when they have an eta or countdown argument set.
inspect reserved: List reserved tasks
$ celery -A proj inspect reserved
This will list all tasks that have been prefetched by the worker, and is currently waiting to be executed (doesn’t include tasks with an ETA value set).
inspect revoked: List history of revoked tasks
$ celery -A proj inspect revoked
inspect registered: List registered tasks
$ celery -A proj inspect registered
inspect stats: Show worker statistics (see Statistics)
$ celery -A proj inspect stats
inspect query_task: Show information about task(s) by id.
Any worker having a task in this set of ids reserved/active will respond with status and information.
$ celery -A proj inspect query_task e9f6c8f0-fec9-4ae8-a8c6-cf8c8451d4f8
You can also query for information about multiple tasks:
$ celery -A proj inspect query_task id1 id2 … idN
control enable_events: Enable events
$ celery -A proj control enable_events
control disable_events: Disable events
$ celery -A proj control disable_events
migrate: Migrate tasks from one broker to another (EXPERIMENTAL).
$ celery -A proj migrate redis://localhost amqp://localhost
This command will migrate all the tasks on one broker to another. As this command is new and experimental you should be sure to have a backup of the data before proceeding.
Note
All inspect and control commands supports a --timeout argument, This is the number of seconds to wait for responses. You may have to increase this timeout if you’re not getting a response due to latency.
Specifying destination nodes
By default the inspect and control commands operates on all workers. You can specify a single, or a list of workers by using the --destination argument:
$ celery -A proj inspect -d w1@e.com,w2@e.com reserved
$ celery -A proj control -d w1@e.com,w2@e.com enable_events
Flower: Real-time Celery web-monitor
Flower is a real-time web based monitor and administration tool for Celery. It’s under active development, but is already an essential tool. Being the recommended monitor for Celery, it obsoletes the Django-Admin monitor, celerymon and the ncurses based monitor.
Flower is pronounced like “flow”, but you can also use the botanical version if you prefer.
Features
Real-time monitoring using Celery Events
Task progress and history
Ability to show task details (arguments, start time, run-time, and more)
Graphs and statistics
Remote Control
View worker status and statistics
Shutdown and restart worker instances
Control worker pool size and autoscale settings
View and modify the queues a worker instance consumes from
View currently running tasks
View scheduled tasks (ETA/countdown)
View reserved and revoked tasks
Apply time and rate limits
Configuration viewer
Revoke or terminate tasks
HTTP API
List workers
Shut down a worker
Restart worker’s pool
Grow worker’s pool
Shrink worker’s pool
Autoscale worker pool
Start consuming from a queue
Stop consuming from a queue
List tasks
List (seen) task types
Get a task info
Execute a task
Execute a task by name
Get a task result
Change soft and hard time limits for a task
Change rate limit for a task
Revoke a task
OpenID authentication
Screenshots
_images/dashboard.png
_images/monitor.png
More screenshots:
Usage
You can use pip to install Flower:
$ pip install flower
Running the flower command will start a web-server that you can visit:
$ celery -A proj flower
The default port is http://localhost:5555, but you can change this using the –port argument:文章来源:https://www.toymoban.com/news/detail-730306.html
$ celery -A proj flower –文章来源地址https://www.toymoban.com/news/detail-730306.html
到了这里,关于celery分布式异步任务队列-4.4.7的文章就介绍完了。如果您还想了解更多内容,请在右上角搜索TOY模板网以前的文章或继续浏览下面的相关文章,希望大家以后多多支持TOY模板网!