目录
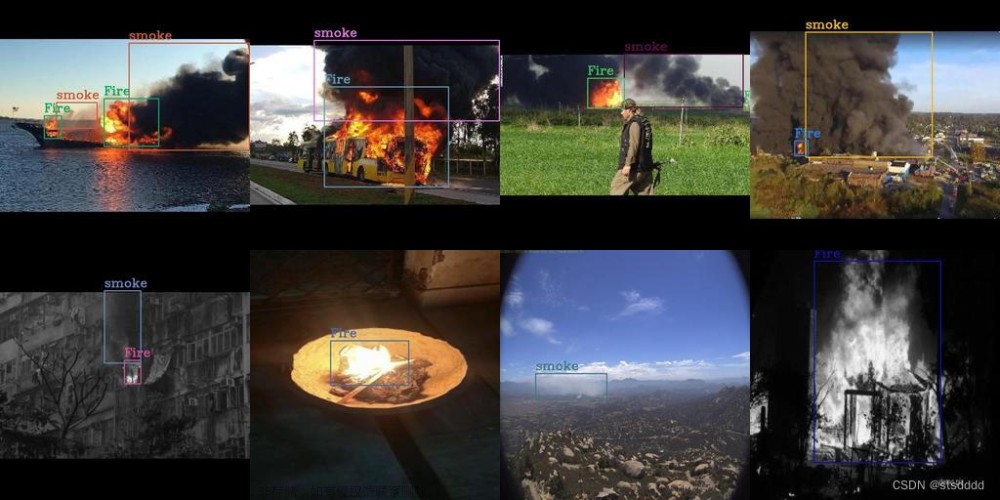
效果
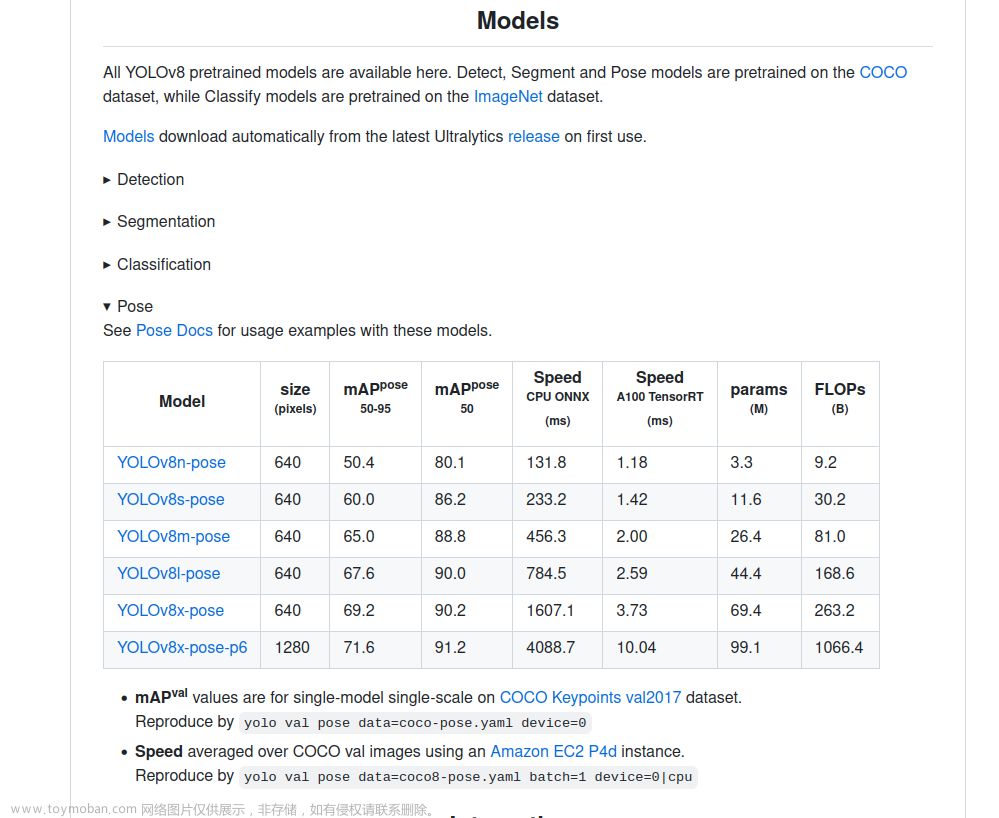
模型信息
项目
代码
下载
效果
模型信息
Model Properties
-------------------------
author:Ultralytics
task:detect
license:AGPL-3.0 https://ultralytics.com/license
version:8.0.172
stride:32
batch:1
imgsz:[640, 640]
names:{0: 'Fire'}
---------------------------------------------------------------
Inputs
-------------------------
name:images
tensor:Float[1, 3, 640, 640]
---------------------------------------------------------------
Outputs
-------------------------
name:output0
tensor:Float[1, 5, 8400]
---------------------------------------------------------------
项目
代码
/// <summary>
/// 结果绘制
/// </summary>
/// <param name="result">识别结果</param>
/// <param name="image">绘制图片</param>
/// <returns></returns>
public Mat draw_result(Result result, Mat image)
{
// 将识别结果绘制到图片上
for (int i = 0; i < result.length; i++)
{
//Console.WriteLine(result.rects[i]);
Cv2.Rectangle(image, result.rects[i], new Scalar(0, 0, 255), 2, LineTypes.Link8);
Cv2.Rectangle(image, new Point(result.rects[i].TopLeft.X-1, result.rects[i].TopLeft.Y - 20),
new Point(result.rects[i].BottomRight.X, result.rects[i].TopLeft.Y), new Scalar(0, 0, 255), -1);
Cv2.PutText(image, result.classes[i] + "-" + result.scores[i].ToString("0.00"),
new Point(result.rects[i].X, result.rects[i].Y - 4),
HersheyFonts.HersheySimplex, 0.6, new Scalar(0, 0, 0), 1);
}
return image;
}文章来源:https://www.toymoban.com/news/detail-733082.html
using Microsoft.ML.OnnxRuntime.Tensors;
using Microsoft.ML.OnnxRuntime;
using System;
using System.Collections.Generic;
using System.ComponentModel;
using System.Data;
using System.Drawing;
using System.Linq;
using System.Text;
using System.Windows.Forms;
using OpenCvSharp;
using static System.Net.Mime.MediaTypeNames;

namespace Onnx_Yolov8_Fire_Detect
{
    public partial class Form1 : Form
    {
        public Form1()
        {
            InitializeComponent();
        }

        string fileFilter = "*.*|*.bmp;*.jpg;*.jpeg;*.tiff;*.tiff;*.png";
        string image_path = "";
        string startupPath;
        string classer_path;
        DateTime dt1 = DateTime.Now;
        DateTime dt2 = DateTime.Now;
        string model_path;
        Mat image;
        DetectionResult result_pro;
        Mat result_image;

        SessionOptions options;
        InferenceSession onnx_session;
        Tensor<float> input_tensor;
        List<NamedOnnxValue> input_ontainer;
        IDisposableReadOnlyCollection<DisposableNamedOnnxValue> result_infer;
        DisposableNamedOnnxValue[] results_onnxvalue;

        Tensor<float> result_tensors;
        Result result;

        StringBuilder sb=new StringBuilder();
        private void Form1_Load(object sender, EventArgs e)
        {
            startupPath = System.Windows.Forms.Application.StartupPath;
            model_path = startupPath + "\\fire.onnx";
            classer_path = startupPath + "\\lable.txt";
            // 创建输出会话,用于输出模型读取信息
            options = new SessionOptions();
            options.LogSeverityLevel = OrtLoggingLevel.ORT_LOGGING_LEVEL_INFO;
            // 设置为CPU上运行
            options.AppendExecutionProvider_CPU(0);
            // 创建推理模型类,读取本地模型文件
            onnx_session = new InferenceSession(model_path, options);//model_path 为onnx模型文件的路径
            // 输入Tensor
            input_tensor = new DenseTensor<float>(new[] { 1, 3, 640, 640 });
            // 创建输入容器
            input_ontainer = new List<NamedOnnxValue>();
        }

        private void button1_Click(object sender, EventArgs e)
        {
            OpenFileDialog ofd = new OpenFileDialog();
            ofd.Filter = fileFilter;
            if (ofd.ShowDialog() != DialogResult.OK) return;
            pictureBox1.Image = null;
            image_path = ofd.FileName;
            pictureBox1.Image = new Bitmap(image_path);
            textBox1.Text = "";
            image = new Mat(image_path);
            pictureBox2.Image = null;
        }

        private void button2_Click(object sender, EventArgs e)
        {
            if (image_path == "")
            {
                return;
            }

            // 配置图片数据
            image = new Mat(image_path);
            int max_image_length = image.Cols > image.Rows ? image.Cols : image.Rows;
            Mat max_image = Mat.Zeros(new OpenCvSharp.Size(max_image_length, max_image_length), MatType.CV_8UC3);
            Rect roi = new Rect(0, 0, image.Cols, image.Rows);
            image.CopyTo(new Mat(max_image, roi));

            float[] result_array = new float[8400 * 1];
            float[] factors = new float[2];
            factors[0] = factors[1] = (float)(max_image_length / 640.0);

            // 将图片转为RGB通道
            Mat image_rgb = new Mat();
            Cv2.CvtColor(max_image, image_rgb, ColorConversionCodes.BGR2RGB);
            Mat resize_image = new Mat();
            Cv2.Resize(image_rgb, resize_image, new OpenCvSharp.Size(640, 640));

            // 输入Tensor
            for (int y = 0; y < resize_image.Height; y++)
            {
                for (int x = 0; x < resize_image.Width; x++)
                {
                    input_tensor[0, 0, y, x] = resize_image.At<Vec3b>(y, x)[0] / 255f;
                    input_tensor[0, 1, y, x] = resize_image.At<Vec3b>(y, x)[1] / 255f;
                    input_tensor[0, 2, y, x] = resize_image.At<Vec3b>(y, x)[2] / 255f;
                }
            }

            //将 input_tensor 放入一个输入参数的容器,并指定名称
            input_ontainer.Add(NamedOnnxValue.CreateFromTensor("images", input_tensor));

            dt1 = DateTime.Now;
            //运行 Inference 并获取结果
            result_infer = onnx_session.Run(input_ontainer);

            dt2 = DateTime.Now;

            // 将输出结果转为DisposableNamedOnnxValue数组
            results_onnxvalue = result_infer.ToArray();

            // 读取第一个节点输出并转为Tensor数据
            result_tensors = results_onnxvalue[0].AsTensor<float>();

            result_array = result_tensors.ToArray();

            resize_image.Dispose();
            image_rgb.Dispose();

            result_pro = new DetectionResult(classer_path, factors);
            result = result_pro.process_result(result_array);
            result_image = result_pro.draw_result(result, image.Clone());

            if (!result_image.Empty())
            {
                pictureBox2.Image = new Bitmap(result_image.ToMemoryStream());
                sb.Clear();
                sb.AppendLine("推理耗时:" + (dt2 - dt1).TotalMilliseconds + "ms");
                sb.AppendLine("------------------------------");

                for (int i = 0; i < result.length; i++)
                {
                    sb.AppendLine(string.Format("{0}:{1},({2},{3},{4},{5})"
                        , result.classes[i]
                        , result.scores[i].ToString("0.00")
                        , result.rects[i].TopLeft.X
                        , result.rects[i].TopLeft.Y
                        , result.rects[i].BottomRight.X
                        , result.rects[i].BottomRight.Y
                        ));
                }

                textBox1.Text = sb.ToString();
            }
            else
            {
                textBox1.Text = "无信息";
            }
        }
    }
}
下载
源码下载文章来源地址https://www.toymoban.com/news/detail-733082.html
到了这里,关于C# Onnx Yolov8 Fire Detect 火焰识别,火灾检测的文章就介绍完了。如果您还想了解更多内容,请在右上角搜索TOY模板网以前的文章或继续浏览下面的相关文章,希望大家以后多多支持TOY模板网!