提示:以下是本篇文章正文内容,Java 系列学习将会持续更新
一、CSRF跨站请求伪造攻击
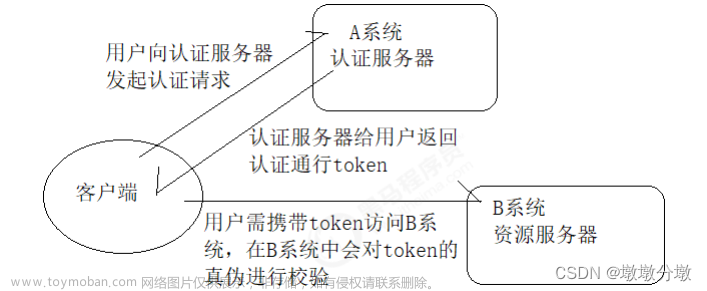
我们时常会在 QQ 上收到别人发送的钓鱼网站链接,只要你在登录QQ账号的情况下点击链接,那么不出意外,你的号已经在别人手中了。实际上这一类网站都属于恶意网站,专门用于盗取他人信息,执行非法操作,甚至获取他人账户中的财产,非法转账等。
我们在 JavaWeb 阶段已经了解了 Session 和 Cookie 的机制,在一开始的时候,服务端会给浏览器一个名为 JSESSION 的 Cookie 信息作为会话的唯一凭据,只要用户携带此 Cookie 访问我们的网站,那么我们就可以认定此会话属于哪个浏览器。因此,只要此会话的用户执行了登录操作,那么就可以随意访问个人信息等内容。

要完成一次CSRF攻击,受害者必须依次完成两个步骤:
- 登录受信任网站A,并在本地生成 Cookie。
- 在不登出A的情况下,访问危险网站B。
确实如此,我们无法保证以下情况不会发生:
- 你不能保证你登录了一个网站后,不再打开一个web页面并访问另外的网站。
- 你不能保证你关闭浏览器了后,你本地的Cookie立刻过期,你上次的会话已经结束。
- 上图中所谓的攻击网站,可能是一个存在其他漏洞的可信任的经常被人访问的网站。
显然,我们之前编写的图书管理系统就存在这样的安全漏洞,而SpringSecurity就很好地解决了这样的问题。
二、项目准备
我们还是基于之前的 SpringBoot 项目 - 图书管理系统进行改造,需要实现以下:
-
http://localhost:8080/index.html- 任何人都可以访问,不需要登录 -
http://localhost:8080/book/{bid}- 任何人都可以访问,不需要登录 -
http://localhost:8080/user/{bid}- 只有用户可以访问,必须登录 -
http://localhost:8080/borrow/{uid}- 只有管理员可以访问,必须登录
回到目录…文章来源:https://www.toymoban.com/news/detail-733990.html
三、认识 SpringSecurity
Spring Security 是针对Spring项目的安全框架,也是Spring Boot底层安全模块默认的技术选型,他可以实现强大的Web安全控制,对于安全控制,我们仅需要引入 spring-boot-starter-security 模块,进行少量的配置,即可实现强大的安全管理!
记住几个类:
-
WebSecurityConfigurerAdapter:自定义 Security 策略 -
AuthenticationManagerBuilder:自定义认证策略 -
@EnableWebSecurity:开启 WebSecurity 模式
Spring Security 的两个主要目标是 “认证” 和 “授权”(访问控制)。
-
“认证”(Authentication)
身份验证是关于验证您的凭据,如用户名/用户ID和密码,以验证您的身份。
身份验证通常通过用户名和密码完成,有时与身份验证因素结合使用。 -
“授权” (Authorization)
授权发生在系统成功验证您的身份后,最终会授予您访问资源(如信息,文件,数据库,资金,位置,几乎任何内容)的完全权限。
这个概念是通用的,而不是只在Spring Security 中存在。
参考官网:https://spring.io/projects/spring-security
相关帮助文档:https://docs.spring.io/spring-security/site/docs/3.0.7.RELEASE/reference
①先引入 SpringSecurity 依赖:
<dependency>
    <groupId>org.springframework.boot</groupId>
    <artifactId>spring-boot-starter-security</artifactId>
</dependency>
②实现 SpringSecurity 配置类: 我们可以在配置类中认证和授权
@EnableWebSecurity // 开启WebSecurity模式
public class SecurityConfig extends WebSecurityConfigurerAdapter {

}
回到目录…
3.1 认证
🎀①直接认证
@Override
protected void configure(AuthenticationManagerBuilder auth) throws Exception {

    BCryptPasswordEncoder encoder = new BCryptPasswordEncoder();// 必须加密,使用SpringSecurity提供的BCryptPasswordEncoder
    // 在内存中定义认证用户
    auth.inMemoryAuthentication().passwordEncoder(encoder)
            .withUser("aaa").password(encoder.encode("666")).roles("currentUser")
            .and()
            .withUser("bbb").password(encoder.encode("666")).roles("currentUser")
            .and()
            .withUser("root").password(encoder.encode("123456")).roles("admin");
}
SpringSecurity 的密码校验并不是直接使用原文进行比较,而是使用加密算法将密码进行加密(更准确地说应该进行Hash处理,此过程是不可逆的,无法解密),最后将用户提供的密码以同样的方式加密后与密文进行比较。
对于我们来说,用户提供的密码属于隐私信息,直接明文存储并不好,而且如果数据库内容被窃取,那么所有用户的密码将全部泄露,这是我们不希望看到的结果,我们需要一种既能隐藏用户密码也能完成认证的机制,而Hash处理就是一种很好的解决方案,通过将用户的密码进行Hash值计算,计算出来的结果无法还原为原文,如果需要验证是否与此密码一致,那么需要以同样的方式加密再比较两个Hash值是否一致,这样就很好的保证了用户密码的安全性。

此时,我们就可以成功登录了!
回到目录…
🎀②使用数据库认证
a. 首先,我们必须保证数据库中的 user.password 是通过 BCryptPasswordEncoder 加密过的,否则验证不通过。我们可以将加密后的密码插入到数据库中:
@Test
public void toEncoder() {
    BCryptPasswordEncoder encoder = new BCryptPasswordEncoder();
    System.out.println(encoder.encode("123456"));
}
b. 编写 UserMapper 中获取用户密码的 SQL
@Select("select password from user where name = #{name}")
String getPasswordByUsername(String name);
c. 然后我们需要创建一个 Service 实现,实现的是 UserDetailsService,它支持我们自己返回一个 UserDetails 对象,我们只需直接返回一个包含数据库中的用户名、密码等信息的 UserDetails 即可, SpringSecurity 会自动进行比对。
@Service
public class UserDetailsServiceImpl implements UserDetailsService {
    @Resource
    UserMapper userMapper;

    @Override
    public UserDetails loadUserByUsername(String s) throws UsernameNotFoundException {
        String password = userMapper.getPasswordByUsername(s);  //从数据库根据用户名获取密码
        if(password == null) {
            throw new UsernameNotFoundException("登录失败,用户名或密码错误!");
        }
        return User   // 这里需要返回 UserDetails,SpringSecurity 会根据给定的信息进行比对
                .withUsername(s)
                .password(password)   // 直接从数据库取的密码
                .roles("currentUser")   // 用户角色
                .build();
    }
}
d. 修改一下 Security 配置类:
@EnableWebSecurity
public class SecurityConfig extends WebSecurityConfigurerAdapter {
    @Resource
    private UserDetailsServiceImpl userDetailsService;
    @Override
    protected void configure(AuthenticationManagerBuilder auth) throws Exception {
        // 从数据库中认证
        auth
                .userDetailsService(userDetailsService)
                .passwordEncoder(new BCryptPasswordEncoder());
    }
}

此时,我们就可以使用数据库信息登录成功了!
回到目录…
3.2 授权
🍡①基于角色授权
@Override
protected void configure(HttpSecurity http) throws Exception {
    // 定制请求的授权规则
    http.authorizeRequests()
   	        .antMatchers("/index.html", "/book/*").permitAll() // 所有人都可以访问
  		    .antMatchers("/user/*").hasRole("currentUser") // 某个角色可以访问的页面
  		    .antMatchers("/borrow/*").hasRole("admin");
}
🍡②基于权限的授权
基于权限的授权与角色类似,需要以 hasAnyAuthority 或 hasAuthority 进行判断:
.anyRequest().hasAnyAuthority("page:index")
@Override
public UserDetails loadUserByUsername(String s) throws UsernameNotFoundException {
    String password = mapper.getPasswordByUsername(s);
    if(password == null)
        throw new UsernameNotFoundException("登录失败,用户名或密码错误!");
    return User
            .withUsername(user.getUsername())
            .password(user.getPassword())
            .authorities("page:index") // 权限
            .build();
}
🍡③使用注解判断权限
我们可以直接在需要添加权限验证的请求映射上添加注解:
@PreAuthorize("hasRole('currentUser')")   //判断是否为 currentUser 角色,只有此角色才可以访问
@RequestMapping("/hello")
public String index(){
    return "hello,world";
}
通过添加 @PreAuthorize 注解,在执行之前判断判断权限,如果没有对应的权限或是对应的角色,将无法访问页面。
同样的还有 @PostAuthorize 注解,但是它是在方法执行之后再进行拦截:
@PostAuthorize("hasRole('currentUser')")
@RequestMapping("/test")
public String index(){
    System.out.println("先执行,再拦截);
    return "test";
}
回到目录…
3.3 “记住我”
<input type="checkbox" name="remember"> 记住我
@Override
protected void configure(HttpSecurity http) throws Exception {
	// ........................
    http.rememberMe()  // 记住我
    	.rememberMeParameter("remember"); // 自定义页面的参数!
}
登录成功后,将 cookie 发送给浏览器保存,以后登录带上这个 cookie,只要通过检查就可以免登录了。如果点击注销,springsecurity 帮我们自动删除了这个 cookie。
3.4 登录和注销
💥①原生登录界面
首先我们要了解一下 SpringSecurity 是如何进行登陆验证的,我们可以观察一下默认的登陆界面中,表单内有哪些内容:
<div class="container">
      <form class="form-signin" method="post" action="/book_manager/login">
        <h2 class="form-signin-heading">Please sign in</h2>
        <p>
          <label for="username" class="sr-only">Username</label>
          <input type="text" id="username" name="username" class="form-control" placeholder="Username" required="" autofocus="">
        </p>
        <p>
          <label for="password" class="sr-only">Password</label>
          <input type="password" id="password" name="password" class="form-control" placeholder="Password" required="">
        </p>
<input name="_csrf" type="hidden" value="83421936-b84b-44e3-be47-58bb2c14571a">
        <button class="btn btn-lg btn-primary btn-block" type="submit">Sign in</button>
      </form>
</div>
我们发现,首先有一个用户名的输入框和一个密码的输入框,我们需要在其中填写用户名和密码,但是我们发现,除了这两个输入框以外,还有一个 input 标签,它是隐藏的,并且它存储了一串类似于 Hash 值的东西,名称为 "_csrf",其实看名字就知道,这玩意八成都是为了防止 CSRF 攻击而存在的。
- 从 Spring Security 4.0 开始,默认情况下会启用 CSRF 保护,以防止 CSRF 攻击应用程序,Spring Security CSRF 会针对 PATCH,POST,PUT 和 DELETE 方法的请求(不仅仅只是登录请求,这里指的是任何请求路径)进行防护。
- 而这里的登录表单正好是一个
POST类型的请求。在默认配置下,无论是否登录,页面中只要发起了 PATCH,POST,PUT 和 DELETE 请求 一定会被拒绝,并返回 403 错误 (注意,这里是个究极大坑) -
方案一:我们可以在配置类中加入
http.csrf().disable(); // 关闭csrf功能,我们采取此方案。 -
方案二:需要在请求的时候加入
csrfToken才行,也就是"83421936-b84b-44e3-be47-58bb2c14571a"。如果提交的是表单类型的数据,那么表单中必须包含此 Token 字符串,键名称为"_csrf";如果是 JSON 数据格式发送的,那么就需要在请求头中包含此 Token 字符串。
综上所述,我们最后提交的登录表单,除了必须的用户名和密码,还包含了一个 csrfToken 字符串用于验证,防止攻击。
回到目录…
💥②自定义登录界面
a. 先写一个登录页面:index.html
<!DOCTYPE html>
<html lang="en">
<head>
    <meta charset="UTF-8">
    <title>登录</title>
</head>
<body>
    <h1>用户登录</h1>
    <form action="/doLogin" method="post">
        用户名: <input type="text" name="username"><br>
        密码: <input type="password" name="password"><br>
        <input type="checkbox" name="remember"> 记住我<br>
        <button>登录</button>
    </form>
</body>
</html>
b. 编写 LoginController 登录相关的接口:
@Controller
public class LoginController {
    @GetMapping("/success") // 登录成功后跳转的页面
    public String loginSuccess() {
        return "redirect:/user/1";
    }
    @GetMapping("/failure") // 登录失败后跳转的页面
    public String loginFailure() {
        return "redirect:/index.html";
    }
}
c. 在配置类中设置:
@Override
protected void configure(HttpSecurity http) throws Exception {
	// .............................
    http.csrf().disable();

    http
            .formLogin()
            .loginPage("/index.html")  // 当用户未登录时,跳转到该自定义登录页面
            .loginProcessingUrl("/doLogin") // form表单提交地址(POST),不需要在控制层写 /doLogin
            .defaultSuccessUrl("/success")  // 登录成功后的页面
            .failureUrl("/failure"); // 登录失败后的页面
}
重启服务器就可以发现,使用了我们的自定义登录页面:
💥注销
注销接口:http://localhost:8080/logout ,同样可以自定义注销页面,这里就不做演示了。
http.logout().logoutSuccessUrl("/index.html");
回到目录…
3.4 SecurityContext
用户登录之后,怎么获取当前已经登录用户的信息呢?
方法一:通过使用 SecurityContextHolder 就可以很方便地得到 SecurityContext 对象了,我们可以直接使用 SecurityContext 对象来获取当前的认证信息:
@RequestMapping("/index")
public String index(){
    SecurityContext context = SecurityContextHolder.getContext();
    Authentication authentication = context.getAuthentication();
    // org.springframework.security.core.userdetails.User
    User user = (User) authentication.getPrincipal();
    System.out.println(user.getUsername());
    System.out.println(user.getAuthorities());
    return "index";
}
方法二:除了这种方式以外,我们还可以直接通过 @SessionAttribute 从 Session 中获取:
@RequestMapping("/index")
public String index(@SessionAttribute("SPRING_SECURITY_CONTEXT") SecurityContext context){
    Authentication authentication = context.getAuthentication();
    User user = (User) authentication.getPrincipal();
    System.out.println(user.getUsername());
    System.out.println(user.getAuthorities());
    return "index";
}
注意:SecurityContextHolder 默认的存储策略是 MODE_THREADLOCAL,它是基于 ThreadLocal 实现的,getContext() 方法本质上调用的是对应的存储策略实现的方法。如果我们这样编写,那么在默认情况下是无法获取到认证信息的:
@RequestMapping("/index")
public String index(){
    new Thread(() -> {   //创建一个子线程去获取
        SecurityContext context = SecurityContextHolder.getContext();
        Authentication authentication = context.getAuthentication();
        User user = (User) authentication.getPrincipal();   // 失败,无法获取认证信息
        System.out.println(user.getUsername());
        System.out.println(user.getAuthorities());
    });
    return "index";
}
SecurityContextHolderStrategy 有三个实现类:
- GlobalSecurityContextHolderStrategy:全局模式,不常用
- ThreadLocalSecurityContextHolderStrategy:基于ThreadLocal实现,线程内可见
- InheritableThreadLocalSecurityContextHolderStrategy:基于InheritableThreadLocal实现,线程和子线程可见
因此,如果上述情况需要在子线程中获取,那么需要修改 SecurityContextHolder 的存储策略,在初始化的时候设置:
@PostConstruct
public void init(){
    SecurityContextHolder.setStrategyName(SecurityContextHolder.MODE_INHERITABLETHREADLOCAL);
}
这样在子线程中也可以获取认证信息了。
因为用户的验证信息是基于 SecurityContext 进行判断的,我们可以直接修改 SecurityContext 的内容,来手动为用户进行登录:
@RequestMapping("/auth")
@ResponseBody
public String auth(){
	// 获取SecurityContext对象(当前会话肯定是没有登陆的)
    SecurityContext context = SecurityContextHolder.getContext();
    // 手动创建一个UsernamePasswordAuthenticationToken对象,也就是用户的认证信息,角色需要添加ROLE_前缀,权限直接写
    UsernamePasswordAuthenticationToken token = new UsernamePasswordAuthenticationToken("Test", null,
            AuthorityUtils.commaSeparatedStringToAuthorityList("ROLE_user"));
    		context.setAuthentication(token);  // 手动为SecurityContext设定认证信息
    return "Login success!";
}
在未登录的情况下,访问此地址将直接进行手动登录,再次访问 /index 页面,可以直接访问,说明手动设置认证信息成功。
疑惑:SecurityContext 这玩意不是默认线程独占吗,那每次请求都是一个新的线程,按理说上一次的 SecurityContext 对象应该没了才对啊,为什么再次请求依然能够继续使用上一次 SecurityContext 中的认证信息呢?
SecurityContext 的生命周期:请求到来时从 Session 中取出,放入 SecurityContextHolder 中,请求结束时从 SecurityContextHolder 取出,并放到 Session 中,实际上就是依靠 Session 来存储的,一旦会话过期验证信息也跟着消失。
回到目录…
总结:
提示:这里对文章进行总结:
本文是对SpringSecurity的学习,学习了它的两大功能:认证和授权,以及如何使用数据库进行认证,如何使用自定义的登录页面,最后也学习了使用SecurityContext获取认证用户的信息。之后的学习内容将持续更新!!!文章来源地址https://www.toymoban.com/news/detail-733990.html
到了这里,关于SpringBoot集成 SpringSecurity安全框架的文章就介绍完了。如果您还想了解更多内容,请在右上角搜索TOY模板网以前的文章或继续浏览下面的相关文章,希望大家以后多多支持TOY模板网!