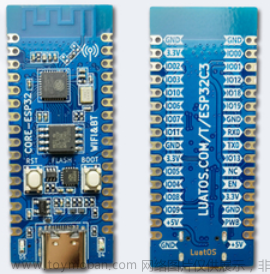
官方文档:https://esp-rs.github.io/book/introduction.html
安装 rust
curl --proto '=https' --tlsv1.2 -sSf https://sh.rustup.rs | sh
工具
risc:
rustup toolchain install nightly --component rust-src # nightly 支持 riscv
或使用安装工具同时支持 risc 和 xtensa:
cargo install espup

espup install
会在 /home/你的用户名/ 下生成一个 esport-esp.sh,如果要对工程运行 cargo build 或 cargo run 就需要提前引入到命令行里
建议在 ~/.bashrc 的最后新加一行 . $HOME/export-esp.sh
其内容是
export LIBCLANG_PATH="/home/xiaguangbo/.rustup/toolchains/esp/xtensa-esp32-elf-clang/esp-16.0.0-20230516/esp-clang/lib"
export PATH="/home/xiaguangbo/.rustup/toolchains/esp/xtensa-esp-elf/esp-13.2.0_20230928/xtensa-esp-elf/bin:$PATH"
export PATH="/home/xiaguangbo/.rustup/toolchains/esp/riscv32-esp-elf/esp-13.2.0_20230928/riscv32-esp-elf/bin:$PATH"
以上都需要:
rustup component add rustfmt --toolchain nightly-x86_64-unknown-linux-gnu # 支持代码格式化
cargo install ldproxy
cargo install cargo-generate

sudo apt install libudev-dev
cargo install espflash
两种工具链切换需要删除工程里的 target 文件夹
创建模板工程
使用 std 方式,不使用 no_std,std 依赖 esp-idf,但不需要手动下载,会在第一次编译时下载
riscv 和 xtensa 架构的都可以,支持列表看官方文档
工程名自己定义,这里以 hhhh 作工程名

xiaguangbo@debian:/media/xiaguangbo/linux_data/project/x/xfoc/project$ cargo generate esp-rs/esp-idf-template cargo
⚠️   Favorite `esp-rs/esp-idf-template` not found in config, using it as a git repository: https://github.com/esp-rs/esp-idf-template.git
🤷   Project Name: hhhh
🔧   Destination: /media/xiaguangbo/linux_data/project/x/xfoc/project/hhhh ...
🔧   project-name: hhhh ...
🔧   Generating template ...
✔ 🤷   Which MCU to target? · esp32c3
✔ 🤷   Configure advanced template options? · true
✔ 🤷   Enable STD support? · true
? 🤷   Configure project to use Dev Containers (VS Code and GitHub Codespaces)? ✔ 🤷   Configure project to use Dev Containers (VS Code and GitHub Codespaces)? · false
? 🤷   Configure project to support Wokwi simulation with Wokwi VS Code extensio✔ 🤷   Configure project to support Wokwi simulation with Wokwi VS Code extension? · false
✔ 🤷   Add CI files for GitHub Action? · false
✔ 🤷   ESP-IDF version (master = UNSTABLE) · master
🔧   Moving generated files into: `/media/xiaguangbo/linux_data/project/x/xfoc/project/hhhh`...
🔧   Initializing a fresh Git repository
✨   Done! New project created /media/xiaguangbo/linux_data/project/x/xfoc/project/hhhh
cd 到工程里

cargo run
第一次会在工程里下载 .embuild/espressif/esp-idf,可能会不断因网络问题失败,再执行。
可能会提示 riscv32-esp-elf-13.2.0_20230928-x86_64-linux-gnu.tar.xz 下载不下来,可以手动下载到 .embuild/espressif/dist 里。
可能会提示 git submodule update --init --recursive,就到 .embuild/espressif/esp-idf/master 里执行一下。
可能会提示 LIBCLANG_PATH、libclang.so 问题,sudo ln -sf /usr/lib/llvm-14/lib/libclang.so /lib32/libclang.so,自己的具体位置可以找找,没有就 apt 安装 clang

将 esp32c3 连接到电脑上,并把串口的权限改为 777。假设串口是 /dev/ttyUSB0,就执行 sudo chmod 777 /dev/ttyUSB0。每次 usb 断开连上都需要

cargo run
会让选择是哪个串口,选择对应的串口
会出现 Remember this serial port for future use?,输入 y
就会下载程序到 esp32c3 里并打开串口监控
手动打开串口监控:espflash monitor
cargo run 会检查 esp-idf,如果连不上 github/esp…仓库会报错。。。。vscode 的 rust-analyzer 插件也会因这个原因出问题
其他
可能会用到的命令:
git submodule update --init --recursive
git clone --recursive --depth 1 --shallow-submodules --branch master https://github.com/espressif/esp-idf.git /media/xiaguangbo/linux_data/project/x/xfoc/project/esp32s3/.embuild/espressif/esp-idf/master
示例
使用 i2c 读取 as5600 的测到的磁铁的角度
main.rs:文章来源:https://www.toymoban.com/news/detail-734144.html
use embedded_hal::blocking::delay::DelayMs;
use esp_idf_hal::delay::{FreeRtos, BLOCK};
use esp_idf_hal::i2c::*;
use esp_idf_hal::peripherals::Peripherals;
use esp_idf_hal::prelude::*;

const AS5600_ADDRESS: u8 = 0x36;
const ANGLE_HIGHT_REGISTER_ADDR: u8 = 0x0c;
const ANGLE_LOW_REGISTER_ADDR: u8 = 0x0d;

fn main() {
    // It is necessary to call this function once. Otherwise some patches to the runtime
    // implemented by esp-idf-sys might not link properly. See https://github.com/esp-rs/esp-idf-template/issues/71
    esp_idf_svc::sys::link_patches();

    // Bind the log crate to the ESP Logging facilities
    esp_idf_svc::log::EspLogger::initialize_default();

    log::info!("Hello, world!");

    let peripherals = Peripherals::take().unwrap();
    let i2c = peripherals.i2c0;
    let scl = peripherals.pins.gpio6;
    let sda = peripherals.pins.gpio7;

    let config = I2cConfig::new().baudrate(100.kHz().into());
    let mut i2c = I2cDriver::new(i2c, sda, scl, &config).unwrap();

    loop {
        FreeRtos.delay_ms(500u32);

        i2c.write(AS5600_ADDRESS, &[ANGLE_HIGHT_REGISTER_ADDR], BLOCK)
            .unwrap();
        let mut buffer_h: [u8; 1] = [0; 1];
        i2c.read(AS5600_ADDRESS, &mut buffer_h, BLOCK).unwrap();

        i2c.write(AS5600_ADDRESS, &[ANGLE_LOW_REGISTER_ADDR], BLOCK)
            .unwrap();
        let mut buffer_l: [u8; 1] = [0; 1];
        i2c.read(AS5600_ADDRESS, &mut buffer_l, BLOCK).unwrap();

        log::info!(
            "as5600: {}",
            (((buffer_h[0] as u16) << 8 | (buffer_l[0] as u16)) as f32) / 4096.0 * 360.0
        );
    }
}
Cargo.toml:文章来源地址https://www.toymoban.com/news/detail-734144.html
[dependencies]
...
esp-idf-hal = "*"
embedded-hal = "*"
到了这里,关于esp32 rust linux的文章就介绍完了。如果您还想了解更多内容,请在右上角搜索TOY模板网以前的文章或继续浏览下面的相关文章,希望大家以后多多支持TOY模板网!


