目录
1.实验目的
2.开发过程
一、界面框架设计思路
Ⅰ:顶部标题区域top.xml
Ⅰ:底部功能选择区域botten.xml
Ⅲ:中间显示区域
①:创建不同的Fragment.java及layout
②:activity_main.xml整体框架搭建编辑
③:实现Fragment的隐藏和显示
1.在主函数中定义控件
2.定义隐藏显示fragment函数
3.对控件进行监听
4.对细节进行调整
5.整体思路
3.运行截图
4.代码地址
1.实验目的
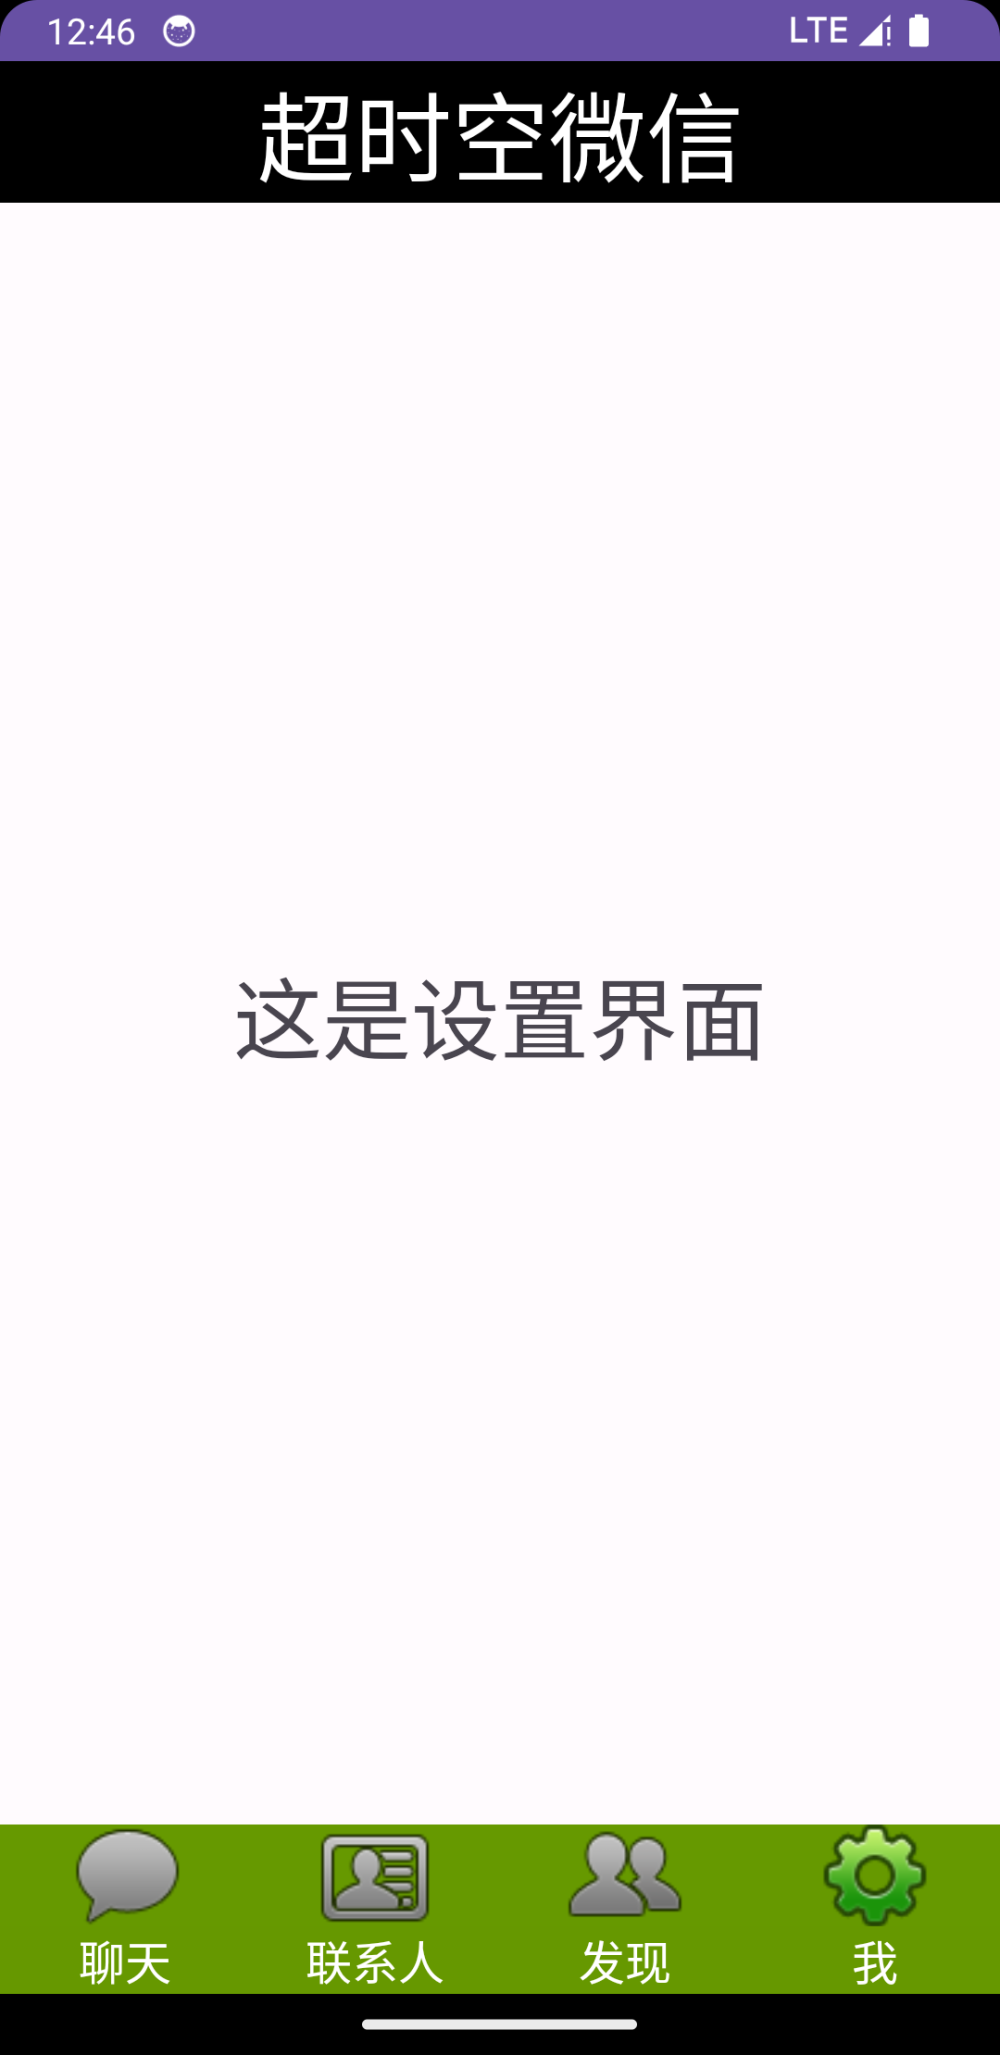
请开发一个类似微信的主页面框架,UI布局为上中下结构,包含4个tab页面;开发技术为:layout xml、控件、监听,fragment。
2.开发过程
一、界面框架设计思路
界面分为三部分
①:是顶部标题
②:是底部功能选择区域
③:是中间显示区域
Ⅰ:顶部标题区域top.xml
新建一个layout,起名top.xml
该部分的实现方法为:最外层使用一个水平的linearlayout布局,然后使用一个textview即可
并确定好背景色字体大小等属性。
<?xml version="1.0" encoding="utf-8"?>
<LinearLayout xmlns:android="http://schemas.android.com/apk/res/android"
    android:layout_width="match_parent"
    android:layout_height="50dp"
    android:gravity="center"
    android:background="@color/black"
    android:orientation="vertical"
    >
    <TextView
        android:id="@+id/textView0"
        android:layout_width="wrap_content"
        android:layout_height="40dp"
        android:layout_gravity="center"
        android:layout_weight="1"
        android:textSize="40sp"
        android:textColor="@color/white"
        android:text="微信" />
</LinearLayout>
效果

Ⅰ:底部功能选择区域botten.xml
该部分的设计思路如下:在该部分中一共有四个图片以及四个文本,每一个文本和一个图片组成一个垂直方向的元素,四个元素又组成一个水平方向的大框架。因此对于此部分,最外层采用水平的linearlayout的布局,在水平布局下又放四个垂直方向的linearlayout的布局,在每个垂直布局下又放上一个imageview和一个textview(imageview放在textview上层)即可。
<?xml version="1.0" encoding="utf-8"?>
<LinearLayout xmlns:android="http://schemas.android.com/apk/res/android"
    xmlns:app="http://schemas.android.com/apk/res-auto"
    android:layout_width="match_parent"
    android:layout_height="80dp"
    >

    <LinearLayout
        android:id="@+id/lot1"
        android:layout_width="wrap_content"
        android:layout_height="match_parent"
        android:layout_weight="1"
        android:gravity="center"
        android:orientation="vertical"
        >

        <ImageView
            android:id="@+id/imageView1"
            android:layout_width="match_parent"
            android:layout_height="wrap_content"
            app:srcCompat="?attr/actionModeCopyDrawable" />

        <TextView
            android:id="@+id/textView1"
            android:layout_width="match_parent"
            android:layout_height="wrap_content"
            android:gravity="center"
            android:text="聊天"

            />
    </LinearLayout>

    <LinearLayout
        android:id="@+id/lout2"
        android:layout_width="wrap_content"
        android:layout_height="match_parent"
        android:layout_weight="1"
        android:gravity="center"
        android:orientation="vertical">

        <ImageView
            android:id="@+id/imageView2"
            android:layout_width="match_parent"
            android:layout_height="wrap_content"
            app:srcCompat="?attr/actionModeCopyDrawable" />

        <TextView
            android:id="@+id/textView2"
            android:layout_width="match_parent"
            android:layout_height="wrap_content"
            android:gravity="center"
            android:text="联系人" />
    </LinearLayout>

    <LinearLayout
        android:id="@+id/lout3"
        android:layout_width="wrap_content"
        android:layout_height="match_parent"
        android:layout_weight="1"
        android:gravity="center"
        android:orientation="vertical">

        <ImageView
            android:id="@+id/imageView3"
            android:layout_width="match_parent"
            android:layout_height="wrap_content"
            app:srcCompat="?attr/actionModeCopyDrawable" />

        <TextView
            android:id="@+id/textView3"
            android:layout_width="match_parent"
            android:layout_height="wrap_content"
            android:gravity="center"
            android:text="朋友圈" />
    </LinearLayout>

    <LinearLayout
        android:id="@+id/lout4"
        android:layout_width="wrap_content"
        android:layout_height="match_parent"
        android:layout_weight="1"
        android:gravity="center"
        android:orientation="vertical">
        <ImageView
            android:id="@+id/imageView4"
            android:layout_width="match_parent"
            android:layout_height="wrap_content"
            app:srcCompat="?attr/actionModeCopyDrawable" />
        <TextView
            android:id="@+id/textView4"
            android:layout_width="match_parent"
            android:layout_height="wrap_content"
            android:gravity="center"
            android:text="设置" />
    </LinearLayout>
</LinearLayout>
效果

文章来源:https://www.toymoban.com/news/detail-736066.html
Ⅲ:中间显示区域
①:创建对应的四个Fragment.xml文件
chat_fragment.xml
<?xml version="1.0" encoding="utf-8"?>
<LinearLayout xmlns:android="http://schemas.android.com/apk/res/android"
    android:layout_width="match_parent"
    android:layout_height="match_parent">
    <TextView
        android:id="@+id/textView5"
        android:layout_width="match_parent"
        android:layout_height="match_parent"
        android:layout_weight="1"
        android:text="这是聊天页面"
        android:gravity="center"
        android:layout_gravity="center"
        android:textSize="30sp"
        />
</LinearLayout>
package com.example.wechat;
import android.os.Bundle;
import androidx.fragment.app.Fragment;
import android.view.LayoutInflater;
import android.view.View;
import android.view.ViewGroup;
public class chatFragment extends Fragment {
    public chatFragment() {
        // Required empty public constructor
    }

    @Override
    public View onCreateView(LayoutInflater inflater, ViewGroup container,
                             Bundle savedInstanceState) {
        // Inflate the layout for this fragment
        return inflater.inflate(R.layout.chat_fragment, container, false);
    }
}
同样的模式编写另外三个.xml
②:activity_main.xml整体框架搭建
整体框架就是将top,bottem以及中间的主内容进行拼接,那么最外层就需要使用一个垂直方向的lineaarlayout,然后将top和bottom部分liclude进来(top在上,bottom在下,中间放主内容),同时中间的主内容使用framelayout,以便进行接下来的交互设计。
<?xml version="1.0" encoding="utf-8"?>
<androidx.constraintlayout.widget.ConstraintLayout xmlns:android="http://schemas.android.com/apk/res/android"
    xmlns:app="http://schemas.android.com/apk/res-auto"
    xmlns:tools="http://schemas.android.com/tools"
    android:layout_width="match_parent"
    android:layout_height="match_parent"
    tools:context=".MainActivity">

    <LinearLayout
        android:layout_width="match_parent"
        android:layout_height="match_parent"
        android:orientation="vertical">

        <include layout="@layout/top"/>
        <FrameLayout
            android:id="@+id/content"
            android:layout_width="match_parent"
            android:layout_height="0dp"
            android:layout_weight="1"
            >
        </FrameLayout>
        <include layout="@layout/botten"/>
    </LinearLayout>

</androidx.constraintlayout.widget.ConstraintLayout>
③:实现Fragment的隐藏和显示
我们需要将四个Fragment隐藏起来,只有在点击相应的导航时才会出现相应的Frgment,而另外三个将会继续隐藏起来,那么实现方法如下:
1.在主函数中定义控件
private Fragment setragment=new setragment();
    private  Fragment chatFragment=new chatFragment();
    private  Fragment discoverFragment = new discoverFragment();
    private  Fragment linmanFragment =new linmanFragment();
    private FragmentManager fragmentManager;
    private LinearLayout LinearLayout1,LinearLayout2,LinearLayout3,LinearLayout4;
    private TextView  textView;
2.定义隐藏显示fragment函数
 private  void showfragment(int i){
        androidx.fragment.app.FragmentTransaction transaction = fragmentManager.beginTransaction();
        hideFragment(transaction);
        switch (i) {
            case 0:
                transaction.show(chatFragment);
                LinearLayout1.setBackgroundColor(Color.BLACK);
                break;
            case 1:
                transaction.show(linmanFragment);
                break;
            case 2:
                transaction.show(discoverFragment);
                break;
            case 3:
                transaction.show(setragment);
                break;
            default:
                break;
        }
        transaction.commit();
    }
 private void hideFragment(androidx.fragment.app.FragmentTransaction transaction) {
        transaction.hide(setragment);
        transaction.hide(chatFragment);
        transaction.hide(discoverFragment);
        transaction.hide(linmanFragment);
    }
3.对控件进行监听
 @Override
    protected void onCreate(Bundle savedInstanceState) {
        super.onCreate(savedInstanceState);
        setContentView(R.layout.activity_main);
        LinearLayout1 = findViewById(R.id.lot1);
        LinearLayout2=findViewById(R.id.lout2);
        LinearLayout3=findViewById(R.id.lout3);
        LinearLayout4=findViewById(R.id.lout4);
        textView=findViewById(R.id.textView0);
        LinearLayout1.setOnClickListener((View.OnClickListener) this);
        LinearLayout2.setOnClickListener((View.OnClickListener) this);
        LinearLayout3.setOnClickListener((View.OnClickListener) this);
        LinearLayout4.setOnClickListener((View.OnClickListener) this);
        initFragment();
    }

 @Override
    public void onClick(View v){
        switch (v.getId()){
            case R.id.lot1:
                showfragment(0);
                showcolor(0);

                break;
            case R.id.lout2:
                showfragment(1);
                showcolor(1);
                break;
            case R.id.lout3:t:
                showfragment(2);
                showcolor(2);
                break;
            case R.id.lout4:
                showfragment(3);
                showcolor(3);
                break;
            default:
                break;

        }
    }
4.对细节进行调整
private void showcolor(int i) {
        LinearLayout1.setBackgroundColor(Color.WHITE);
        LinearLayout2.setBackgroundColor(Color.WHITE);
        LinearLayout3.setBackgroundColor(Color.WHITE);
        LinearLayout4.setBackgroundColor(Color.WHITE);
        switch (i) {
            case 0:
                LinearLayout1.setBackgroundColor(Color.GREEN);
                textView.setText("微信");
                break;
            case 1:
                LinearLayout2.setBackgroundColor(Color.GREEN);
                textView.setText("通讯录");
                break;
            case 2:
                LinearLayout3.setBackgroundColor(Color.GREEN);
                textView.setText("朋友圈");
                break;
            case 3:
                LinearLayout4.setBackgroundColor(Color.GREEN);
                textView.setText("设置");
                break;
            default:
                break;

        }
    }
5.整体思路
通过监听用户点击来实现页面变化
主要过程是onClick()函数判断点击位置,showfragment()改变成对应页面
3.运行截图

4.代码地址
https://gitee.com/Jasonnoon/weichat11.githttps://gitee.com/Jasonnoon/weichat11.git文章来源地址https://www.toymoban.com/news/detail-736066.html
到了这里,关于UI界面开发- android studio搭建类微信界面的文章就介绍完了。如果您还想了解更多内容,请在右上角搜索TOY模板网以前的文章或继续浏览下面的相关文章,希望大家以后多多支持TOY模板网!


