1.Flink数据源
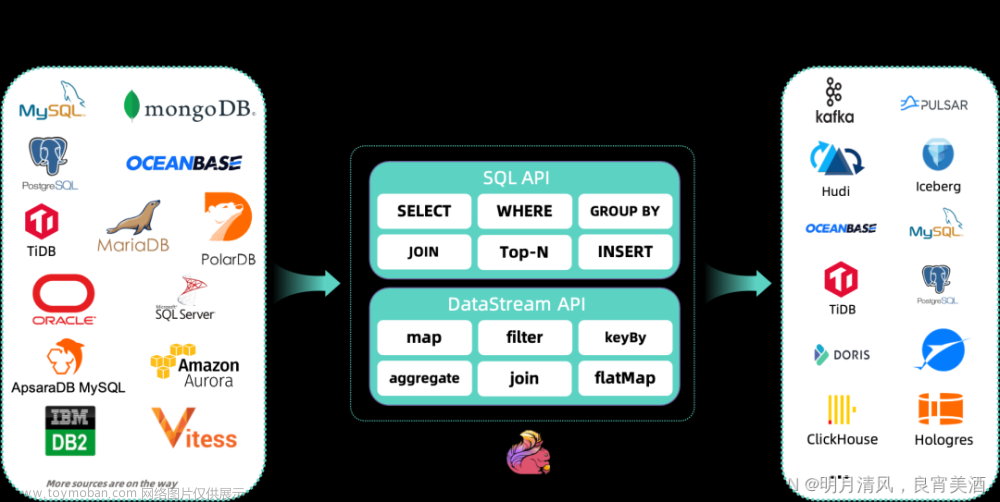
Flink可以从各种数据源获取数据,然后构建DataStream 进行处理转换。source就是整个数据处理程序的输入端。
数据集合 数据文件 Socket数据 kafka数据 自定义Source
2.案例
2.1.从集合中获取数据
创建 FlinkSource_List 类,再创建个 Student 类(姓名、年龄、性别三个属性就行,反正测试用)
package com.qiyu;

import org.apache.flink.streaming.api.datastream.DataStream;
import org.apache.flink.streaming.api.environment.StreamExecutionEnvironment;

import java.util.ArrayList;

/**
 * @author MR.Liu
 * @version 1.0
 * @data 2023-10-18 16:13
 */
public class FlinkSource_List {
    public static void main(String[] args) throws Exception {
        StreamExecutionEnvironment env =
                StreamExecutionEnvironment.getExecutionEnvironment();
        env.setParallelism(1);
        ArrayList<Student> clicks = new ArrayList<>();
        clicks.add(new Student("Mary",25,1));
        clicks.add(new Student("Bob",26,2));
        DataStream<Student> stream = env.fromCollection(clicks);
        stream.print();
        env.execute();
    }
}
运行结果:
Student{name='Mary', age=25, sex=1}
Student{name='Bob', age=26, sex=2}
2.2.从文件中读取数据
文件数据:
spark
hello world kafka spark
hadoop spark
package com.qiyu;

import org.apache.flink.streaming.api.datastream.DataStream;
import org.apache.flink.streaming.api.environment.StreamExecutionEnvironment;

/**
 * @author MR.Liu
 * @version 1.0
 * @data 2023-10-18 16:31
 */
public class FlinkSource_File {
    public static void main(String[] args) throws Exception {
        StreamExecutionEnvironment env =
                StreamExecutionEnvironment.getExecutionEnvironment();
        env.setParallelism(1);
        DataStream<String> stream = env.readTextFile("input/words.txt");
        stream.print();
        env.execute();
    }
}
运行结果:(没做任何处理)
spark
hello world kafka spark
hadoop spark
2.3.从Socket中读取数据
package com.qiyu;

import org.apache.flink.streaming.api.datastream.DataStreamSource;
import org.apache.flink.streaming.api.environment.StreamExecutionEnvironment;

/**
 * @author MR.Liu
 * @version 1.0
 * @data 2023-10-18 17:41
 */
public class FlinkSource_Socket {
    public static void main(String[] args) throws Exception {
        StreamExecutionEnvironment env =
                StreamExecutionEnvironment.getExecutionEnvironment();
        // 2. 读取文本流
        DataStreamSource<String> lineDSS = env.socketTextStream("192.168.220.130",
                7777);
        lineDSS.print();
        env.execute();
    }
}
运行结果:
服务器上执行:
nc -lk 7777疯狂输出

控制台打印结果
6> hello
7> world
2.4.从Kafka中读取数据
pom.xml 添加Kafka连接依赖
      <dependency>
        <groupId>org.apache.flink</groupId>
        <artifactId>flink-connector-kafka_${scala.binary.version}</artifactId>
        <version>${flink.version}</version>
      </dependency>
package com.qiyu;
import org.apache.flink.api.common.serialization.SimpleStringSchema;
import org.apache.flink.streaming.api.datastream.DataStreamSource;
import org.apache.flink.streaming.api.environment.StreamExecutionEnvironment;
import org.apache.flink.streaming.connectors.kafka.FlinkKafkaConsumer;
import java.util.Properties;
/**
* @author MR.Liu
* @version 1.0
* @data 2023-10-19 10:01
*/
public class FlinkSource_Kafka {
public static void main(String[] args) throws Exception {
StreamExecutionEnvironment env =
StreamExecutionEnvironment.getExecutionEnvironment();
env.setParallelism(1);
Properties properties = new Properties();
properties.setProperty("bootstrap.servers", "hadoop102:9092");
properties.setProperty("group.id", "consumer-group");
properties.setProperty("key.deserializer",
"org.apache.kafka.common.serialization.StringDeserializer");
properties.setProperty("value.deserializer",
"org.apache.kafka.common.serialization.StringDeserializer");
properties.setProperty("auto.offset.reset", "latest");
DataStreamSource<String> stream = env.addSource(
new FlinkKafkaConsumer<String>("clicks", new SimpleStringSchema(), properties
));
stream.print("Kafka");
env.execute();
}
}
启动 zk 和kafka
创建topic
bin/kafka-topics.sh --create --bootstrap-server hadoop102:9092 --replication-factor 1 --partitions 1 --topic clicks生产者、消费者命令
bin/kafka-console-producer.sh --bootstrap-server hadoop102:9092  --topic clicks
bin/kafka-console-consumer.sh --bootstrap-server hadoop102:9092  --topic clicks --from-beginning
启动生产者命令后疯狂输入
运行java类,运行结果:和生产者输入的是一样的
Kafka> flinks
Kafka> hadoop
Kafka> hello
Kafka> nihaop
2.5.从自定义Source中读取数据
大多数情况下,前面几个数据源已经满足需求了。但是遇到特殊情况我们需要自定义的数据源。实现方式如下:
1.编辑自定义源Source
package com.qiyu;

import org.apache.flink.streaming.api.functions.source.SourceFunction;

import java.util.Calendar;
import java.util.Random;

/**
 * @author MR.Liu
 * @version 1.0
 * @data 2023-10-19 10:37
 */

/***
 * 主要实现2个方法 run() 和 cancel()
 */
public class FlinkSource_Custom implements SourceFunction<Student> {


    // 声明一个布尔变量,作为控制数据生成的标识位
    private Boolean running = true;

    @Override
    public void run(SourceContext<Student> sourceContext) throws Exception {
        Random random = new Random(); // 在指定的数据集中随机选取数据
        String[] name = {"Mary", "Alice", "Bob", "Cary"};
        int[] sex = {1,2};
        int age = 0;
        while (running) {
            sourceContext.collect(new Student(
                    name[random.nextInt(name.length)],
                    sex[random.nextInt(sex.length)],
                    random.nextInt(100)
            ));
            // 隔 1 秒生成一个点击事件,方便观测
            Thread.sleep(1000);
        }
    }

    @Override
    public void cancel() {
        running = false;
    }
}
2.编写主程序
package com.qiyu;

import org.apache.flink.streaming.api.datastream.DataStreamSource;
import org.apache.flink.streaming.api.environment.StreamExecutionEnvironment;

/**
 * @author MR.Liu
 * @version 1.0
 * @data 2023-10-19 10:46
 */
public class FlinkSource_Custom2 {
    public static void main(String[] args) throws Exception {
        StreamExecutionEnvironment env =
                StreamExecutionEnvironment.getExecutionEnvironment();
        env.setParallelism(1);
//有了自定义的 source function,调用 addSource 方法
        DataStreamSource<Student> stream = env.addSource(new FlinkSource_Custom());
        stream.print("SourceCustom");
        env.execute();
    }
}
运行主程序,运行结果:
SourceCustom> Student{name='Mary', age=1, sex=46}
SourceCustom> Student{name='Cary', age=2, sex=52}
SourceCustom> Student{name='Bob', age=1, sex=14}
SourceCustom> Student{name='Alice', age=1, sex=84}
SourceCustom> Student{name='Alice', age=2, sex=82}
SourceCustom> Student{name='Cary', age=1, sex=28}文章来源:https://www.toymoban.com/news/detail-739375.html.............文章来源地址https://www.toymoban.com/news/detail-739375.html
到了这里,关于Flink学习之旅:(三)Flink源算子(数据源)的文章就介绍完了。如果您还想了解更多内容,请在右上角搜索TOY模板网以前的文章或继续浏览下面的相关文章,希望大家以后多多支持TOY模板网!