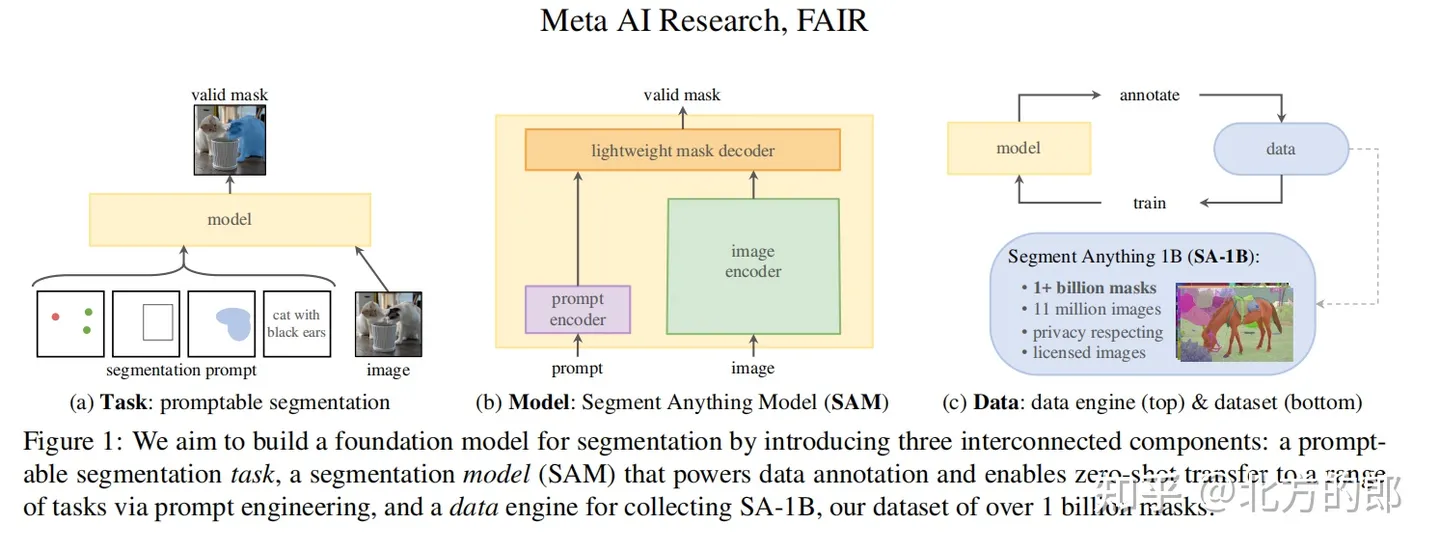
近日,Meta AI在官网发布了基础模型 Segment Anything Model(SAM)并开源,其本质是用GPT的方式(基于Transform 模型架构)让计算机具备理解了图像里面的一个个“对象”的通用能力。SAM模型建立了一个可以接受文本提示、基于海量数据(603138)训练而获得泛化能力的图像分割大模型。图像分割是计算机视觉中的一项重要任务,有助于识别和确认图像中的不同物体,把它们从背景中分离出来,这在自动驾驶(检测其他汽车、行人和障碍物)、医学成像(提取特定结构或潜在病灶)等应用中特别重要。文章来源:https://www.toymoban.com/news/detail-752540.html
下面是 java 使用 onnx 进行推理的分割代码,提示抠图点进行分割,目前还没有文本交互式提示的部署按理。代码如下:文章来源地址https://www.toymoban.com/news/detail-752540.html
package tool.deeplearning;

import ai.onnxruntime.*;
import org.opencv.core.*;
import org.opencv.imgcodecs.Imgcodecs;
import org.opencv.imgproc.Imgproc;

import javax.imageio.ImageIO;
import javax.swing.*;
import java.awt.*;
import java.awt.image.BufferedImage;
import java.io.ByteArrayInputStream;
import java.io.File;
import java.nio.FloatBuffer;
import java.util.*;


/**
*   @desc : meta-ai sam , 使用抠图点进行分割
*   @auth : tyf
*   @date : 2023-04-25  09:34:40
*/
public class metaai_sam_test {


    // 模型1
    public static OrtEnvironment env1;
    public static OrtSession session1;

    // 模型2
    public static OrtEnvironment env2;
    public static OrtSession session2;


    // 模型1
    public static void init1(String weight) throws Exception{
        // opencv 库
        System.loadLibrary(Core.NATIVE_LIBRARY_NAME);

        env1 = OrtEnvironment.getEnvironment();
        session1 = env1.createSession(weight, new OrtSession.SessionOptions());

        // 打印模型信息,获取输入输出的shape以及类型:
        System.out.println("---------模型1输入-----------");
        session1.getInputInfo().entrySet().stream().forEach(n->{
            String inputName = n.getKey();
            NodeInfo inputInfo = n.getValue();
            long[] shape = ((TensorInfo)inputInfo.getInfo()).getShape();
            String javaType = ((TensorInfo)inputInfo.getInfo()).type.toString();
            System.out.println(inputName+" -> "+ Arrays.toString(shape)+" -> "+javaType);
        });
        System.out.println("---------模型1输出-----------");
        session1.getOutputInfo().entrySet().stream().forEach(n->{
            String outputName = n.getKey();
            NodeInfo outputInfo = n.getValue();
            long[] shape = ((TensorInfo)outputInfo.getInfo()).getShape();
            String javaType = ((TensorInfo)outputInfo.getInfo()).type.toString();
            System.out.println(outputName+" -> "+Arrays.toString(shape)+" -> "+javaType);
        });
//        session1.getMetadata().getCustomMetadata().entrySet().forEach(n->{
//            System.out.println("元数据:"+n.getKey()+","+n.getValue());
//        });

    }

    // 模型2
    public static void init2(String weight) throws Exception{
        // opencv 库
        System.loadLibrary(Core.NATIVE_LIBRARY_NAME);

        env2 = OrtEnvironment.getEnvironment();
        session2 = env2.createSession(weight, new OrtSession.SessionOptions());

        // 打印模型信息,获取输入输出的shape以及类型:
        System.out.println("---------模型2输入-----------");
        session2.getInputInfo().entrySet().stream().forEach(n->{
            String inputName = n.getKey();
            NodeInfo inputInfo = n.getValue();
            long[] shape = ((TensorInfo)inputInfo.getInfo()).getShape();
            String javaType = ((TensorInfo)inputInfo.getInfo()).type.toString();
            System.out.println(inputName+" -> "+ Arrays.toString(shape)+" -> "+javaType);
        });
        System.out.println("---------模型2输出-----------");
        session2.getOutputInfo().entrySet().stream().forEach(n->{
            String outputName = n.getKey();
            NodeInfo outputInfo = n.getValue();
            long[] shape = ((TensorInfo)outputInfo.getInfo()).getShape();
            String javaType = ((TensorInfo)outputInfo.getInfo()).type.toString();
            System.out.println(outputName+" -> "+Arrays.toString(shape)+" -> "+javaType);
        });
//        session2.getMetadata().getCustomMetadata().entrySet().forEach(n->{
//            System.out.println("元数据:"+n.getKey()+","+n.getValue());
//        });

    }


    public static class ImageObj{

        // 原始图片
        Mat src;
        Mat dst_3_1024_1024;
        BufferedImage image_3_1024_1024;
        float[][][] image_embeddings;
        ArrayList<float[]> points;
        float[][] info;
        public ImageObj(String image) {
            this.src = this.readImg(image);
            this.dst_3_1024_1024 = this.resizeWithoutPadding(src,1024,1024);
            this.image_3_1024_1024 = mat2BufferedImage(this.dst_3_1024_1024);
        }
        public void setPoints(ArrayList<float[]> points) {

            this.points = points;
        }

        public Mat readImg(String path){
            Mat img = Imgcodecs.imread(path);
            return img;
        }
        public Mat resizeWithoutPadding(Mat src,int inputWidth,int inputHeight){
            Mat resizedImage = new Mat();
            Size size = new Size(inputWidth, inputHeight);
            Imgproc.resize(src, resizedImage, size, 0, 0, Imgproc.INTER_AREA);
            return resizedImage;
        }
        public float[] chw2chw(float[][][] chw,int c,int h,int w){
            float[] res = new float[ c * h * w ];

            int index = 0;
            for(int i=0;i<c;i++){
                for(int j=0;j<h;j++){
                    for(int k=0;k<w;k++){
                        float d = chw[i][j][k];
                        res[index] = d;
                        index++;
                    }
                }
            }

            return res;
        }

        // 推理1
        public void infenence1() throws Exception{
            Imgproc.cvtColor(dst_3_1024_1024, dst_3_1024_1024, Imgproc.COLOR_BGR2RGB);
            dst_3_1024_1024.convertTo(dst_3_1024_1024, CvType.CV_32FC1);
            float[] whc = new float[ 3 * 1024 * 1024];
            dst_3_1024_1024.get(0, 0, whc);
            float[] chw = new float[whc.length];
            int j = 0;
            for (int ch = 0; ch < 3; ++ch) {
                for (int i = ch; i < whc.length; i += 3) {
                    chw[j] = whc[i];
                    j++;
                }
            }
            float mean = 0.0f;
            float std = 0.0f;
            for (int i = 0; i < chw.length; i++) {
                mean += chw[i];
            }
            mean /= chw.length;
            for (int i = 0; i < chw.length; i++) {
                std += Math.pow(chw[i] - mean, 2);
            }
            std = (float) Math.sqrt(std / chw.length);
            for (int i = 0; i < chw.length; i++) {
                chw[i] = (chw[i] - mean) / std;
            }
            OnnxTensor tensor = OnnxTensor.createTensor(env1, FloatBuffer.wrap(chw), new long[]{1,3,1024,1024});
            OrtSession.Result res = session1.run(Collections.singletonMap("x", tensor));
            float[][][] image_embeddings  = ((float[][][][])(res.get(0)).getValue())[0];
            this.image_embeddings = image_embeddings;

        }

        // 推理2
        public void infenence2() throws Exception{


            float[] chw = this.chw2chw(this.image_embeddings,256,64,64);
            OnnxTensor _image_embeddings = OnnxTensor.createTensor(env2, FloatBuffer.wrap(chw), new long[]{1,256, 64, 64});

            float[] pc = new float[points.size()*2];
            float[] pc_label = new float[points.size()];

            for(int i=0;i<points.size();i++){
                float[] xyl = points.get(i);
                pc[i*2] = xyl[0] * 1024f / Float.valueOf(src.width());
                pc[i*2+1] = xyl[1] * 1024f / Float.valueOf(src.height());
                pc_label[i] = xyl[2];
            }

            OnnxTensor _point_coords = OnnxTensor.createTensor(env2, FloatBuffer.wrap(pc), new long[]{1,points.size(),2});
            OnnxTensor _point_labels = OnnxTensor.createTensor(env2, FloatBuffer.wrap(pc_label), new long[]{1,points.size()});

            OnnxTensor _orig_im_size = OnnxTensor.createTensor(env2, FloatBuffer.wrap(new float[]{1024,1024}), new long[]{2});


            OnnxTensor _has_mask_input = OnnxTensor.createTensor(env2, FloatBuffer.wrap(new float[]{0}), new long[]{1});

            float[] ar_256_156 = new float[256*256];
            for(int i=0;i<256*156;i++){
                ar_256_156[i] = 0;
            }
            OnnxTensor _mask_input = OnnxTensor.createTensor(env2, FloatBuffer.wrap(ar_256_156), new long[]{1,1,256,256});

            // 封装参数
            Map<String,OnnxTensor> in = new HashMap<>();
            in.put("image_embeddings",_image_embeddings);
            in.put("point_coords", _point_coords);
            in.put("point_labels",_point_labels);
            in.put("has_mask_input",_has_mask_input);
            in.put("orig_im_size",_orig_im_size);
            in.put("mask_input",_mask_input);


            // 推理
            OrtSession.Result res = session2.run(in);

            float[][][] masks  = ((float[][][][])(res.get(0)).getValue())[0];
            float[][] iou_predictions  = ((float[][])(res.get(1)).getValue());
            float[][][][] low_res_masks  = ((float[][][][])(res.get(2)).getValue());


            int count = masks.length;

            for(int i=0;i < count;i++){
                float[][] info = masks[i];
                this.info = info;
                break;

            }

        }

        public BufferedImage mat2BufferedImage(Mat mat){
            BufferedImage bufferedImage = null;
            try {
                MatOfByte matOfByte = new MatOfByte();
                Imgcodecs.imencode(".jpg", mat, matOfByte);
                byte[] byteArray = matOfByte.toArray();
                ByteArrayInputStream byteArrayInputStream = new ByteArrayInputStream(byteArray);
                bufferedImage = ImageIO.read(byteArrayInputStream);
            } catch (Exception e) {
                e.printStackTrace();
            }
            return bufferedImage;
        }

        public BufferedImage resize(BufferedImage img, int newWidth, int newHeight) {
            Image scaledImage = img.getScaledInstance(newWidth, newHeight, Image.SCALE_SMOOTH);
            BufferedImage scaledBufferedImage = new BufferedImage(newWidth, newHeight, BufferedImage.TYPE_INT_ARGB);
            Graphics2D g2d = scaledBufferedImage.createGraphics();
            g2d.drawImage(scaledImage, 0, 0, null);
            g2d.dispose();
            return scaledBufferedImage;
        }

        public void show(){


            int sub_w = info.length;
            int sub_h = info[0].length;

            for(int j=0;j<sub_w;j++){
                for(int k=0;k<sub_h;k++){
                    float da = info[j][k];
                    da = da + 1;
                    if(da>0.5){
                        // 修改颜色为绿色
                        image_3_1024_1024.setRGB(k,j, Color.GREEN.getRGB());
                    }
                }
            }

            BufferedImage showImg = resize(image_3_1024_1024,src.width(),src.height());

            // 弹窗显示
            JFrame frame = new JFrame();
            frame.setTitle("Meta-ai: SAM");
            JPanel content = new JPanel();
            content.add(new JLabel(new ImageIcon(showImg)));
            frame.add(content);
            frame.pack();
            frame.setVisible(true);


        }

    }


    public static void main(String[] args) throws Exception{


        init1(new File("").getCanonicalPath()+
                "\\src\\main\\resources\\deeplearning\\metaai_sam\\encoder-vit_b.quant.onnx");

        init2(new File("").getCanonicalPath()+
                "\\src\\main\\resources\\deeplearning\\metaai_sam\\decoder-vit_b.quant.onnx");


        // 图片
        ImageObj imageObj = new ImageObj(new File("").getCanonicalPath()+
                "\\src\\main\\resources\\deeplearning\\metaai_sam\\truck.jpg");


        // 提示,这里使用抠图点进行提示,可以设置多个提示点
        ArrayList<float[]> points = new ArrayList<>();
        points.add(new float[]{514,357,1});// 车窗户
        points.add(new float[]{555,377,1});// 车窗户
        points.add(new float[]{556,387,1});// 车窗户
        imageObj.setPoints(points);

        // 推理
        imageObj.infenence1();
        imageObj.infenence2();

        // 显示
        imageObj.show();


    }


}
到了这里,关于使用 java-onnx 部署 Meta-ai Segment anything 分割一切的文章就介绍完了。如果您还想了解更多内容,请在右上角搜索TOY模板网以前的文章或继续浏览下面的相关文章,希望大家以后多多支持TOY模板网!