项目中引用AndServer
implementation 'com.yanzhenjie.andserver:api:2.1.10'
在项目的根build.gradle文件(不是app那个moudle的build.gradle)最顶部添加:文章来源:https://www.toymoban.com/news/detail-753554.html
buildscript {
    repositories {
        mavenCentral()
    }

    dependencies {
        classpath 'com.yanzhenjie.andserver:plugin:2.1.10'
    }
}
在当前的moudle(一般就是app)的build.gradle里面的plugins里面添加:
id 'com.yanzhenjie.andserver'
plugins
plugins {
    id 'com.android.application'
    id 'com.yanzhenjie.andserver'
}
build.gradle里面dependencies的添加
    implementation 'com.yanzhenjie.andserver:api:2.1.10'
    annotationProcessor 'com.yanzhenjie.andserver:processor:2.1.10'
代码
package com.dzdpencrypt.dzdp;

import androidx.appcompat.app.AppCompatActivity;

import android.os.Bundle;

import com.yanzhenjie.andserver.AndServer;
import com.yanzhenjie.andserver.Server;

import java.util.concurrent.TimeUnit;

public class MainActivity extends AppCompatActivity {
    private Server mServer;

    @Override
    protected void onCreate(Bundle savedInstanceState) {
        super.onCreate(savedInstanceState);
        setContentView(R.layout.activity_main);
        if (!isServiceRunning(getApplicationContext(), KeepAliveService.class)) {
            Log.d(LOG_TAG, "检测到服务未在运行,启动服务");
            serviceIntent = new Intent(this, KeepAliveService.class);
            startService(serviceIntent);
        } else {
            Log.d(LOG_TAG, "检测到服务正在运行,无需再次启动");
        }

        TextView textView = findViewById(R.id.ipsd);   # 绑定textview的相关id
        textView.setText(NetUtils.getLocalIPAddress().getHostAddress() + ":9999");   # app中textview显示ip+端口
        mServer = AndServer.webServer(this)
                .port(9999)
                .timeout(10, TimeUnit.SECONDS).listener(new Server.ServerListener() {
                    @Override
                    public void onStarted() {

                        System.out.println("服务器绑定地址:"+NetUtils.getLocalIPAddress().getHostAddress());
                    }

                    @Override
                    public void onStopped() {

                    }

                    @Override
                    public void onException(Exception e) {

                    }
                })
                .build();

        mServer.startup();
    }

    @Override
    protected void onDestroy() {
        super.onDestroy();
        mServer.shutdown();
    }
}
以上代码启动在Android手机(设备)上的http服务器,服务器绑定端口9999文章来源地址https://www.toymoban.com/news/detail-753554.html
spring样式的restful代码实现
package com.dzdpencrypt.service;

import com.yanzhenjie.andserver.annotation.GetMapping;
import com.yanzhenjie.andserver.annotation.PathVariable;
import com.yanzhenjie.andserver.annotation.PostMapping;
import com.yanzhenjie.andserver.annotation.QueryParam;
import com.yanzhenjie.andserver.annotation.RequestBody;
import com.yanzhenjie.andserver.annotation.RequestParam;
import com.yanzhenjie.andserver.annotation.RestController;

import org.json.JSONObject;


@RestController
public class ServerController {
    @GetMapping("/")
    public String ping() {
        return "SERVER OK";
    }

    @PostMapping("/user/login")
    public JSONObject login(@RequestBody String str) throws Exception {
        JSONObject jsonObject = new JSONObject(str);
        return jsonObject;
    }

    @GetMapping("/user/item")
    public JSONObject requestItem(@RequestParam("name") String name,
                                 @RequestParam("id") String id) throws Exception {
        JSONObject jsonObject = new JSONObject();
        jsonObject.put("name", name);
        jsonObject.put("id", id);

        return jsonObject;
    }

    @GetMapping("/user/{userId}")
    public JSONObject getUser(@PathVariable("userId") String userId,
                           @QueryParam("key") String key) throws Exception{
        JSONObject user = new JSONObject();
        user.put("id", userId);
        user.put("key", key);
        user.put("year", 2022);

        return user;
    }
}
NetUtils.java-------获取当前Android手机的IP地址
package com.dzdpencrypt.service;

import java.net.InetAddress;
import java.net.NetworkInterface;
import java.net.SocketException;
import java.util.Enumeration;
import java.util.regex.Pattern;

public class NetUtils {
    private static final Pattern IPV4_PATTERN = Pattern.compile(
            "^(" + "([0-9]|[1-9][0-9]|1[0-9]{2}|2[0-4][0-9]|25[0-5])\\.){3}" +
                    "([0-9]|[1-9][0-9]|1[0-9]{2}|2[0-4][0-9]|25[0-5])$");

    public static boolean isIPv4Address(String input) {
        return IPV4_PATTERN.matcher(input).matches();
    }

    public static InetAddress getLocalIPAddress() {
        Enumeration<NetworkInterface> enumeration = null;
        try {
            enumeration = NetworkInterface.getNetworkInterfaces();
        } catch (SocketException e) {
            e.printStackTrace();
        }
        if (enumeration != null) {
            while (enumeration.hasMoreElements()) {
                NetworkInterface nif = enumeration.nextElement();
                Enumeration<InetAddress> inetAddresses = nif.getInetAddresses();
                if (inetAddresses != null) {
                    while (inetAddresses.hasMoreElements()) {
                        InetAddress inetAddress = inetAddresses.nextElement();
                        if (!inetAddress.isLoopbackAddress() && isIPv4Address(inetAddress.getHostAddress())) {
                            return inetAddress;
                        }
                    }
                }
            }
        }
        return null;
    }
}
AndroidManifest.xml配置网络权限
    <uses-permission android:name="android.permission.INTERNET"/>
    <uses-permission android:name="android.permission.WRITE_EXTERNAL_STORAGE"/>
    <uses-permission android:name="android.permission.READ_EXTERNAL_STORAGE"/>
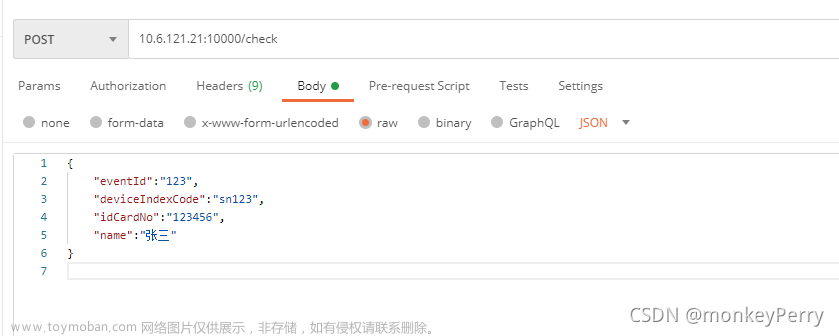
测试
- get测试

- post测试
-

可结合https://blog.csdn.net/zyc3545/article/details/109150010此篇文章合并到一块
到了这里,关于Android设备搭建http服务---------AndServer的文章就介绍完了。如果您还想了解更多内容,请在右上角搜索TOY模板网以前的文章或继续浏览下面的相关文章,希望大家以后多多支持TOY模板网!