系列文章
Android高级UI进阶之路(一) —— View的基础知识
Android高级UI进阶之路(二) —— 深入理解Android8.0 View的触摸事件分发机制
Android高级UI进阶之路(三) —— 理解View的工作原理及自定义View入门
Android高级UI进阶之路(四) —— Paint渲染滤镜xfermode使用
Android高级UI进阶之路(五) —— Canvas详解
Android高级UI进阶之路(六) —— PathMeasure-制作路径动画
Android高级UI进阶之路(七) —— SVG基础使用(绘制中国地图)
前言
前面陆陆续续写了几篇 高级 UI 系列文章 ,感觉还不错。因为工作内容原因作者对 UI 开发涉及的很少,所以打算写一点关于 UI 的文章,也算是给自己一个全面的复习。本篇文章还是 基本概念 + 实战来讲解。
概念
SVG 的全称是 (Scalable Vector Graphics) 它是一个可缩放的矢量图形,是专门用于网络的矢量图标准,与矢量图相对应的是位图,Bitmap 就是位图,它由一个个像素点组成,当图片放大到一定大小时, 就会出现马赛克现象,Photoshop 就是常用的位图处理软件,而矢量图则由一个个点组成,经过数学计算利用直线和曲线绘制而成,无论如何放大,都不会出现马赛克问题,illustrator 就是常用的矢量图绘图软件。
SVG VS Bitmap
好处:
SVG 使用 XML 格式定义图形,,可被非常用的多的工具读取和修改;
SVG 由点来存储,由计算机根据点信息绘图,不会失真,无须根据分辨率适配多套图标;
SVG 的占用空间比 Bitmap 小,比如一张 500px * 500px 的图像,转成 SVG 后占用的空间大小是 20KB, 而 PNG 图片则需要 732KB 的空间。
SVG 可以转换 Path 路径,与 Path 动画相结合,可以形成更丰富的动画。
vector 标签
在 Android 中, SVG 矢量图是使用标签定义的,并存放在 res/drawable/ 目录下。一段简单的 SVG 图像代码定义如下:
<vector xmlns:android="http://schemas.android.com/apk/res/android" xmlns:tools="http://schemas.android.com/tools"
        android:height="24dp"
        android:viewportHeight="1024"
        android:viewportWidth="1024"
        android:width="24dp"
        tools:ignore="MissingDefaultResource">
    <path android:fillColor="#040000"
          android:pathData="M513.29,738h-2.3V0h2.3z"/>
    <path android:fillColor="#040000"
          android:pathData="M512.08,727.97S482.38,896.04 480.09,939.08c-0.76,14.31 -9.58,84.92 32.88,84.92"/>
    <path android:fillColor="#040000"
          android:pathData="M511.02,1024c42.47,0 33.66,-70.6 32.89,-84.92 -2.3,-43.04 -31.99,-211.11 -31.99,-211.11"/>
</vector>
它定义的图像如下所示:

上面水滴形状就是呈现出来的对应的图像,在这段代码中,首先使用 vector 标签来指定这是一幅 SVG 图像,而它有下面几个属性。
width/height : 表示该 SVG 宽高
viewportHeight/viewportWidth: 表示 SVG 图形划分的比例
path 标签
常用属性
标签名称 |
说明 |
android:name |
声明一个标记,类似于 ID ,便于对其做动画的时候顺利地找到该节点 |
android:pathData |
对 SVG 矢量图的描述 |
android:strokeWidth |
画笔的宽度 |
android:fillColor |
填充颜色 |
android:fillAlpha |
填充颜色的透明度 |
android:strokeColor |
描边颜色 |
android:strokeWidth |
描边宽度 |
android:strokeAlpha |
描边透明度 |
android:strokeLineJoin |
用于指定折线拐角形状,取值有 miter (结合处为锐角)、round(结合处为圆弧)、bevel(结合处为直线) |
android:strokeLineCap |
画出线条的终点的形状(线帽),取值有 butt(无限帽) 、round (圆形线帽)、square(方形线帽) |
android:strokeMiterLimit |
设置斜角的上限 |
android:trimPathStart 属性
该属性用于指定路径从哪里开始,取值 0 ~ 1,表示路径开始位置的百分比。当取值为 0 时,表示从头部开始;当取值为 1 时,整条路径不可见。
android:trimPathEnd 属性
该属性用于指定路径的结束位置,取值为 0 ~ 1 ,表示路径结束位置的百分比。当取值为 1 时,路径正常结束;当取值为 0 时,表示从头开始位置就已经结束了,整条路径不可见。
android:trimPathOffset 属性
该属性用于指定结果路径的位移距离,取值为 0 ~ 1 。当取值为 0 时,不进行位移;当取值为 1 时,位移整条路径的长度。
android:pathData 属性
在 path 标签中,主要通过 pathData 属性来指定 SVG 图像的显示内容。而 pathData 属性初 M 和 L 指令以外,还有更多的指定。
指令 |
对应 |
说明 |
M |
moveto(M x,y) |
将画笔移动到指定的地方 |
L |
lineto(L X,Y) |
画直线到指定的坐标位置 |
H |
Horizontal lineto(H X) |
画水平线到指定的 X 坐标位置 |
V |
Vertical lineto(V Y) |
画垂直线到指定的 Y 坐标位置 |
C |
curveto(C X1,Y1,X2,Y2,ENDX,ENDY) |
三阶贝济埃曲线 |
S |
Smooth curveto(S X2,Y2,ENDX,ENDY) |
三阶贝济埃曲线 |
Q |
Quadratic Belzier curve(Q X,Y,ENDX,ENDY) |
二阶贝济埃曲线 |
T |
smooth quadratic Belaizer curveto(T ENDX,ENDY) |
映射前面路径后的终点 |
A |
elliptic Arc(A RX,RY,XROTATION,FLAYG1,FLAY2,X,Y) |
弧线 |
Z |
Closepath |
关闭路径 |
制作 SVG 图像
方法一: 设计软件
如有你有绘图基础,则可以使用 Illustrator 或在线 SVG 工具制作 SVG 图像,比如:editor.method.ac/ ,或通过 SVG 源文件下载网站下载后进行编辑。
方法二: Iconfont
阿里巴巴的矢量图库

Android 中引入 SVG 图像
准备工作
我们知道在 Android 中是不支持直接使用 SVG 图像解析的,我们必须将 SVG图像转换为 vector 标签描述,这里有 2 种方法;
方法一: 在线转换
点击跳转在线转换网站

方法二: AS 转

按照我上面的步骤,就可以生成 Vector 图像了
基础使用
下面对 ImageView 怎么直接使用 vector 进行说明(ps:这里用的 androidx 版本,如果是低版本需要自己去做兼容);
在 ImageView 中使用
<?xml version="1.0" encoding="utf-8"?>
<RelativeLayout xmlns:android="http://schemas.android.com/apk/res/android"
                xmlns:tools="http://schemas.android.com/tools"
                android:orientation="vertical"
                android:layout_width="match_parent"
                android:layout_height="match_parent" tools:ignore="MissingDefaultResource">

    <ImageView
            android:id="@+id/iv"
            android:layout_centerInParent="true"
            android:layout_width="match_parent"
            android:src="@drawable/ic_line"
            android:layout_height="500dp"/>

</RelativeLayout>
进阶使用
前面讲解了 vector 标签,静态显示 vector 和制作 SVG 图像的方法,那么该小节就讲解动态的 vector, 动态的 vector 所实现的效果才是 SVG 图像在 Android 应用中的精髓。
要实现 Vector 动画,首先需要 Vector 图像和它所对应的动画,这里依然使用上一小节水滴状态的图像,
先来看一下效果:

给 path 定义 name,如下所示

定义一个 Animator 文件,以表示对这幅 Vector 图像做动画
<?xml version="1.0" encoding="utf-8"?>
<objectAnimator xmlns:android="http://schemas.android.com/apk/res/android"
                android:propertyName="trimPathStart"
                android:valueFrom="1"
                android:valueTo="0"
                android:duration="3000"
>
</objectAnimator>
需要注意的是,这里的文件是对应 Vector 中 path 标签的,这里动画效果是动态改变 path 标签的 trimPathStart 属性值,从 0 ~ 1 。
定义 animated-vector 进行关联
<?xml version="1.0" encoding="utf-8"?>
<animated-vector xmlns:android="http://schemas.android.com/apk/res/android"
                 xmlns:tools="http://schemas.android.com/tools" android:drawable="@drawable/ic_line"
                 tools:targetApi="lollipop">

    <target android:animation="@anim/anim_start"
            android:name="num_1"></target>
    <target android:animation="@anim/anim_start"
            android:name="num_2"></target>

    <target android:animation="@anim/anim_start"
            android:name="num_3"></target>
</animated-vector>
在上述代码中,drawable 代表关联的 vector 图像,target 代表将 path name 和动画进行关联
代码中进行设置
class SVGDemo1Activity : AppCompatActivity() {

    @RequiresApi(Build.VERSION_CODES.LOLLIPOP)
    override fun onCreate(savedInstanceState: Bundle?) {
        super.onCreate(savedInstanceState)
        setContentView(R.layout.activity_svg)
        startAnimatabe()
    }

    private fun startAnimatabe() {
        val animatedVectorDrawable = AnimatedVectorDrawableCompat.create(this, R.drawable.line_animated_vector)
        iv.setImageDrawable(animatedVectorDrawable)
        val animatable = iv.drawable as Animatable
        animatable.start()
    }
}
实战
输入搜索动画
利用在线绘制 SVG 图标网站 制作搜索图标
可以自己随意捣鼓绘制,绘制好了之后点击视图->源代码,将 SVG 代码复制出来保存成 search_svg.xml
在线转换 svg2vector
点击空白或者直接将 SVG 拖拽指定区域进行转换
将转换好的 Android 格式的 vector 导入 AS

开始制作动画关联
//1.在 /res/aniamator 文件夹下 定义动画
<?xml version="1.0" encoding="utf-8"?>
<objectAnimator xmlns:android="http://schemas.android.com/apk/res/android"
                android:propertyName="trimPathStart"
                android:valueFrom="1"
                android:valueTo="0"
                android:duration="2000"
>
</objectAnimator>

//2\. 在/res/drawable/ 定义 vector
<?xml version="1.0" encoding="utf-8"?>
<vector xmlns:android="http://schemas.android.com/apk/res/android"
    android:width="580dp"
    android:height="400dp"
    android:viewportWidth="580"
    android:viewportHeight="400">

    <path
        android:name="svg_1"
        android:strokeColor="#000"
        android:strokeWidth="1.5"
        android:pathData="M 164.54545 211.91761 L 380 212.8267" />
    <path
        android:name="svg_2"
        android:strokeColor="#000"
        android:strokeWidth="1.5"
        android:pathData="M 360 180.09943 C 366.024924042 180.09943 370.90909 184.780091469 370.90909 190.55398 C 370.90909 196.327868531 366.024924042 201.00853 360 201.00853 C 353.975075958 201.00853 349.09091 196.327868531 349.09091 190.55398 C 349.09091 184.780091469 353.975075958 180.09943 360 180.09943 Z" />
    <path
        android:name="svg_3"
        android:strokeColor="#000"
        android:strokeWidth="1.5"
        android:pathData="M 369.09091 197.37216 L 380.90909 208.28125" />
</vector>

//3\. 在/res/drawable/ 关联动画和 vector
<?xml version="1.0" encoding="utf-8"?>
<animated-vector xmlns:android="http://schemas.android.com/apk/res/android"
                 xmlns:tools="http://schemas.android.com/tools"
                 android:drawable="@drawable/search_svg"
                 tools:targetApi="lollipop">

    <target android:animation="@animator/anim_start"
            android:name="svg_1"></target>
    <target android:animation="@animator/anim_start"
            android:name="svg_2"></target>

    <target android:animation="@animator/anim_start"
            android:name="svg_3"></target>
</animated-vector>
效果

警车灯闪烁

今日头条下拉刷新动画
来一个复杂组合动画,请看下面效果图:

准备 vector 数据
<vector xmlns:android="http://schemas.android.com/apk/res/android"
        android:width="200dp"
        android:height="200dp"
        android:viewportHeight="200"
        android:viewportWidth="200">

    <path
            android:name="tt_1"
            android:fillColor="#C2BFBF"
            android:pathData="
            M20,30
            L100,30
            M100,30
            L100,90
            M100,90
            L20,90
            M20,90
            L20,30"
            android:strokeColor="#C2BFBF"
            android:strokeLineCap="round"
            android:strokeWidth="6"/>
    <path
            android:name="tt_2"
            android:pathData="
            M120,30
            L180,30
            M120,60
            L180,60
            M120,90
            L180,90"
            android:strokeColor="#C2BFBF"
            android:strokeLineCap="round"
            android:strokeWidth="6"/>
    <path
            android:name="tt_3"
            android:pathData="
            M20,120
            L180,120
            M20,150
            L180,150
            M20,180
            L180,180"
            android:strokeColor="#C2BFBF"
            android:strokeLineCap="round"
            android:strokeWidth="6"/>

    <path
            android:pathData="
            M0,0
            L200,0
            M200,0
            L200,200
            M200,200
            L0,200
            M0,200
            L0,0"
            android:strokeColor="#C2BFBF"
            android:strokeLineCap="round"
            android:strokeWidth="6"/>
</vector>
定义顺时针执行动画并做 pathData 变换
这里拿其中一个位置变化来举例说明:
<?xml version="1.0" encoding="utf-8"?>
<set xmlns:android="http://schemas.android.com/apk/res/android"

     android:ordering="sequentially">//按顺序执行

    //依次执行 pathData 位置变换
    <objectAnimator
            android:duration="600"
            android:interpolator="@android:interpolator/decelerate_cubic"
            android:propertyName="pathData"
            android:valueFrom="
            M20,30
            L100,30
            M100,30
            L100,90
            M100,90
            L20,90
            M20,90
            L20,30"
            android:valueTo="
            M100,30
            L180,30
            M180,30
            L180,90
            M180,90
            L100,90
            M100,90
            L100,30"
            android:valueType="pathType" />
    <objectAnimator

            android:duration="600"
            android:interpolator="@android:interpolator/decelerate_cubic"
            android:propertyName="pathData"
            android:valueFrom="
            M100,30
            L180,30
            M180,30
            L180,90
            M180,90
            L100,90
            M100,90
            L100,30"
            android:valueTo="
            M100,120
            L180,120
            M180,120
            L180,180
            M180,180
            L100,180
            M100,180
            L100,120"
            android:valueType="pathType" />
    <objectAnimator

            android:duration="600"
            android:interpolator="@android:interpolator/decelerate_cubic"
            android:propertyName="pathData"
            android:valueFrom="
            M100,120
            L180,120
            M180,120
            L180,180
            M180,180
            L100,180
            M100,180
            L100,120"
            android:valueTo="
            M20,120
            L100,120
            M100,120
            L100,180
            M100,180
            L20,180
            M20,180
            L20,120"
            android:valueType="pathType" />
    <objectAnimator

            android:duration="600"
            android:interpolator="@android:interpolator/decelerate_cubic"
            android:propertyName="pathData"
            android:valueFrom="
            M20,120
            L100,120
            M100,120
            L100,180
            M100,180
            L20,180
            M20,180
            L20,120"
            android:valueTo="
            M20,30
            L100,30
            M100,30
            L100,90
            M100,90
            L20,90
            M20,90
            L20,30"
            android:valueType="pathType" />
</set>
如果对标签中的定义还不了解的先去看下文章中 path 标签 中的说明。如果不理解标签意思,根本就看不懂。
进行关联
<?xml version="1.0" encoding="utf-8"?>
<animated-vector xmlns:android="http://schemas.android.com/apk/res/android"
                 xmlns:tools="http://schemas.android.com/tools"
                 android:drawable="@drawable/ic_toutiao"

                 tools:targetApi="lollipop">

    <target
            android:animation="@animator/tt_path_one"
            android:name="tt_1"/>

    <target
            android:animation="@animator/tt_path_two"
            android:name="tt_2"/>

    <target
            android:animation="@animator/tt_path_three"
            android:name="tt_3"/>

</animated-vector>
代码控制重复执行
class SVGDemo1Activity : AppCompatActivity() {

    var reStartTT = @SuppressLint("HandlerLeak")
    object : Handler() {
        override fun handleMessage(msg: Message) {
            super.handleMessage(msg)
            startAnimatabe(R.drawable.line_animated_toutiao, true)
        }
    }

    @RequiresApi(Build.VERSION_CODES.LOLLIPOP)
    override fun onCreate(savedInstanceState: Bundle?) {
        super.onCreate(savedInstanceState)
        setContentView(R.layout.activity_svg)

        //水滴动画
        startWaterDropAnimator.setOnClickListener {
            startAnimatabe(R.drawable.line_animated_vector, false)
        }
        //搜索动画
        startSearchAnimator.setOnClickListener {
            startAnimatabe(R.drawable.line_animated_search, false)
        }
        //执行警车动画
        startPoliceCarAnimator.setOnClickListener {
            startAnimatabe(R.drawable.line_animated_car, false)
        }
        //执行头条动画
        startTTAnimator.setOnClickListener {
            startAnimatabe(R.drawable.line_animated_toutiao, true)
        }
    }

    private fun startAnimatabe(lineAnimatedVector: Int, isRegister: Boolean): Animatable {
        val animatedVectorDrawable = AnimatedVectorDrawableCompat.create(this, lineAnimatedVector)
        iv.setImageDrawable(animatedVectorDrawable)
        val animatable = iv.drawable as Animatable
        animatable.start()
        animatedVectorDrawable!!.registerAnimationCallback(object : Animatable2Compat.AnimationCallback() {
            override fun onAnimationEnd(drawable: Drawable?) {
                super.onAnimationEnd(drawable)
                if (!isRegister) return
                animatedVectorDrawable.unregisterAnimationCallback(this)
                //重新开始在 xml 设置 restart 无效暂时用 Handler 实现了。
                reStartTT.sendEmptyMessage(0)

            }
        })
        return animatable

    }
}
绘制中国地图
该篇之前实现 SVG pathData 都是利用 ImageView 来实现,并不是所有的场合都适合上面的方式,比如我想要实现 pathData 区域点击,那么上面所讲的方式应该是不能实现,下面我们以一个实例来看怎么自定义 View 实现 PathData 和 pathData 区域点击事件。
下面我们利用 path 来绘制一个中国地图,先来看一个最终效果图,如下:
看起来是不是很炫,还不错,嘿嘿,下面我们就来看一下如何实现。
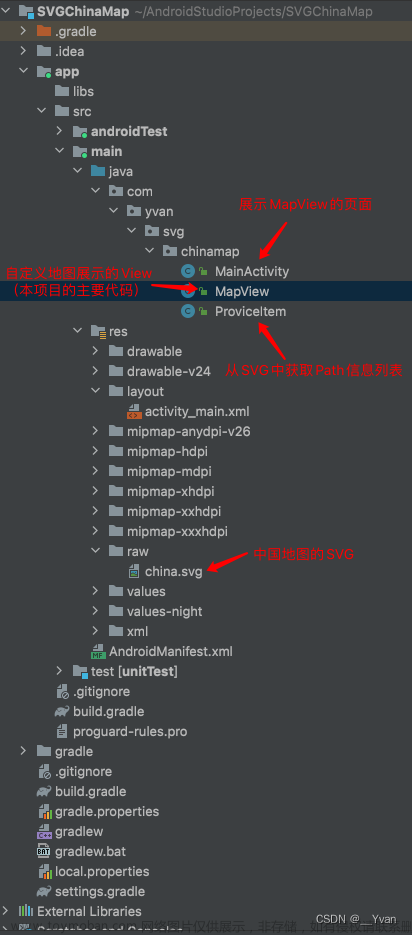
准备地图 SVG
首先去下载地图数据
选择下载免费的地图数据

* 找到对应的国家点击下载 svg 数据

* 选择对应的地图数据,我这里下载的是高质量的 SVG
SVG to Vector xml
将下载好的 china.svg 格式的文件转为 vector 节点的 xml 数据 或者用 AS 自带转也行,看个人爱好。

转好之后放入 AS 中,如下所示

现在有了这些数据,我们就可以解析 xml path 节点,拿到 pathData 数据我们不就可以绘制 path 了嘛。下面就开始解析 xml ,解析的方法很多种,我们这里用 dom 解析。
开始解析 xml
解析 xml 有很多种方式,这里就直接使用 DOM 解析,pathData2Path 我这里直接用 Android SDK 提供的 android.support.v4.graphics#PathParser 由于源码中它被标注了 hide 属性 ,我们需要直接将它 copy 到我们自己项目中, 具体转化请看如下代码:
        /**
         * 开始解析 xml
         */
        public fun dom2xml(stream: InputStream?): MutableList<MapData> {
            mapDataLists.clear()
            //dom
            val newInstance = DocumentBuilderFactory.newInstance()
            val newDocumentBuilder = newInstance.newDocumentBuilder()
            //拿到 Docment 对象
            val document = newDocumentBuilder.parse(stream)
            //获取 xml 中属于 path 节点的所有信息
            val elementsByTagName = document.getElementsByTagName(PATH_TAG)

            //定义四个点,确定整个 map 的范围
            var left = -1f
            var right = -1f
            var top = -1f
            var bottom = -1f
            //开始遍历标签,拿到 path 数据组
            for (pathData in 0 until elementsByTagName.length) {
                val item = elementsByTagName.item(pathData) as Element
                val name = item.getAttribute("android:name")
                val fillColor = item.getAttribute("android:fillColor")
                val strokeColor = item.getAttribute("android:strokeColor")
                val strokeWidth = item.getAttribute("android:strokeWidth")
                val pathData = item.getAttribute("android:pathData")
                val path = PathParser.createPathFromPathData(pathData)
                mapDataLists.add(MapData(name, fillColor, strokeColor, strokeWidth, path))
                //获取控件的宽高
                val rect = RectF()
                //获取到每个省份的边界
                path.computeBounds(rect, true)
                //遍历取出每个path中的left取所有的最小值
                left = if (left == -1f) rect.left else Math.min(left, rect.left)
                //遍历取出每个path中的right取所有的最大值
                right = if (right == -1f) rect.right else Math.max(right, rect.right)
                //遍历取出每个path中的top取所有的最小值
                top = if (top == -1f) rect.top else Math.min(top, rect.top)
                //遍历取出每个path中的bottom取所有的最大值
                bottom = if (bottom == -1f) rect.bottom else Math.max(bottom, rect.bottom)
            }
            //MAP 的矩形区域
            MAP_RECTF = RectF(left, top, right, bottom)
            return mapDataLists;
        }
进行控件测量适配横竖屏切换和宽高定义 wrap_content 模式
    /**
     * 开始测量
     */
    override fun onMeasure(widthMeasureSpec: Int, heightMeasureSpec: Int) {
        super.onMeasure(widthMeasureSpec, heightMeasureSpec)
        //测量模式
        var widthMode = MeasureSpec.getMode(widthMeasureSpec)
        var heightMode = MeasureSpec.getMode(heightMeasureSpec)
        //测量大小
        widthSize = MeasureSpec.getSize(widthMeasureSpec)
        heightSize = MeasureSpec.getSize(heightMeasureSpec)

        if (!MAP_RECTF.isEmpty && mMapRectHeight != 0f && mMapRectWidth != 0f) {
            //显示比例
            scaleHeightValues = heightSize / mMapRectHeight
            scaleWidthValues = widthSize / mMapRectWidth
        }

        //xml 文件中宽高 wrap_content
        if (widthMode == MeasureSpec.AT_MOST || heightMode == MeasureSpec.AT_MOST) {
            //如果是横屏宽保留最大,高需要适配
            if (widthSize < heightSize && mMapRectHeight != 0f) {
                setMeasuredDimension(widthSize, (mMapRectHeight * scaleWidthValues).toInt())
            } else {
                setMeasuredDimension(widthSize, heightSize)
            }
        } else {
            setMeasuredDimension(widthSize, heightSize)
        }
    }
开始绘制 path
    /**
     * 绘制 Map 数据
     */
    @SuppressLint("Range")
    private fun drawMap(canvas: Canvas) {
        canvas.save()
        if (widthSize > heightSize) {
            canvas.scale(scaleWidthValues, scaleHeightValues)
        } else {
            canvas.scale(scaleWidthValues, scaleWidthValues)
        }

        mapDataList.forEach { data ->
            run {
                if (data.isSelect) {
                    drawPath(data, canvas, Color.RED)
                } else {
                    drawPath(data, canvas, Color.parseColor(data.fillColor))
                }
            }
        }
        canvas.restore()
        canvas.drawText("中国🇨🇳地图", widthSize / 2 - mPaintTextTitle.measureText("中国🇨🇳地图") / 2f, 100f, mPaintTextTitle)
    }

    /**
     * 开始绘制 Path
     */
    private fun drawPath(
        data: MapData,
        canvas: Canvas,
        magenta: Int
    ) {
        mPaintPath.setColor(magenta)
        mPaintPath.setStyle(Paint.Style.FILL)
        mPaintPath.setTextSize(30f)
        mPaintPath.setStrokeWidth(data.strokeWidth.toFloat())
        canvas.drawPath(data.pathData, mPaintPath)
        val rectF = RectF()
        data.pathData.computeBounds(rectF, true)
        canvas.drawText(
            if (data.name.isEmpty()) "" else data.name,
            rectF.centerX() - mPaintText.measureText(data.name) / 2,
            rectF.centerY(), mPaintText
        )
    }
给地图添加各自的点击事件
    override fun onTouchEvent(event: MotionEvent): Boolean {
        when (event.action) {
            MotionEvent.ACTION_DOWN -> return true
            MotionEvent.ACTION_UP -> {
                handlerTouch(event.getX(), event.getY())
            }
        }
        return super.onTouchEvent(event)
    }

    /**
     * 处理点击事件
     */
    private fun handlerTouch(x: Float, y: Float) {
        if (mapDataList.size == 0) return

        var xScale = 0f
        var yScale = 0f

        if (widthSize > heightSize) {
            xScale = scaleWidthValues
            yScale = scaleHeightValues
        } else {
            xScale = scaleWidthValues
            yScale = scaleWidthValues
        }
        mapDataList.forEach { data ->
            run {
                data.isSelect = false
                if (isTouchRegion(x / xScale, y / yScale, data.pathData)) {
                    data.isSelect = true
                    postInvalidate()
                }
            }
        }
    }
}

/**
 * 判断是否在点击区域内
 */
fun isTouchRegion(x: Float, y: Float, path: Path): Boolean {
    //创建一个矩形
    val rectF = RectF()
    //获取到当前省份的矩形边界
    path.computeBounds(rectF, true)
    //创建一个区域对象
    val region = Region()
    //将path对象放入到Region区域对象中
    region.setPath(path, Region(rectF.left.toInt(), rectF.top.toInt(), rectF.right.toInt(), rectF.bottom.toInt()))
    //返回是否这个区域包含传进来的坐标
    return region.contains(x.toInt(), y.toInt())
}
到这里 SVG 知识已经讲解完了,觉得还不过瘾的可以自己尝试一下其他国家的地图绘制。
总结
这里一定要注意在低版本上使用 SVG 存在兼容问题,需要各自查阅资料解决。文章来源:https://www.toymoban.com/news/detail-753729.html
不知道还有没有记得上一篇 [高级 UI 成长之路 (六) PathMeasure 制作路径动画] 中我提到了只要给我一个 Path 数据,我就能绘制出图形,看完该篇是不是认为说的没毛病吧。建议大家在项目上多使用 SVG ,好处文章开头也提到了,这里就不在啰嗦了。到这里 SVG 制作图像和动画效果就全部讲完了。文章来源地址https://www.toymoban.com/news/detail-753729.html
到了这里,关于Android高级UI进阶之路(七)——SVG基础使用(绘制中国地图)的文章就介绍完了。如果您还想了解更多内容,请在右上角搜索TOY模板网以前的文章或继续浏览下面的相关文章,希望大家以后多多支持TOY模板网!