目录
一. unordered系列关联式容器
二. unordered_map的文档介绍
接口使用
三. 底层实现
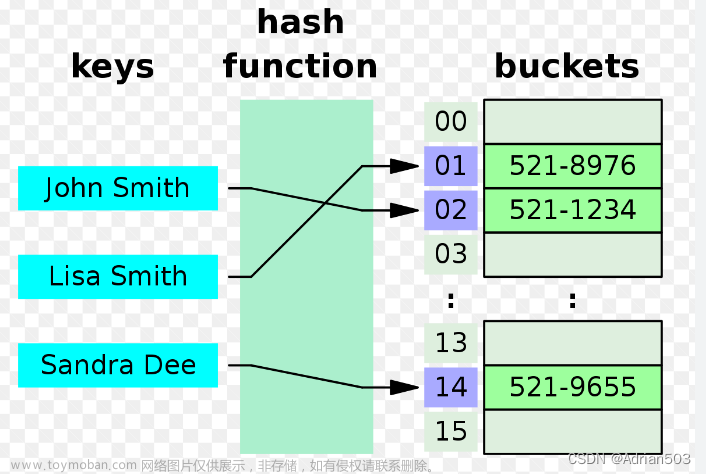
(1)哈希概念
例:
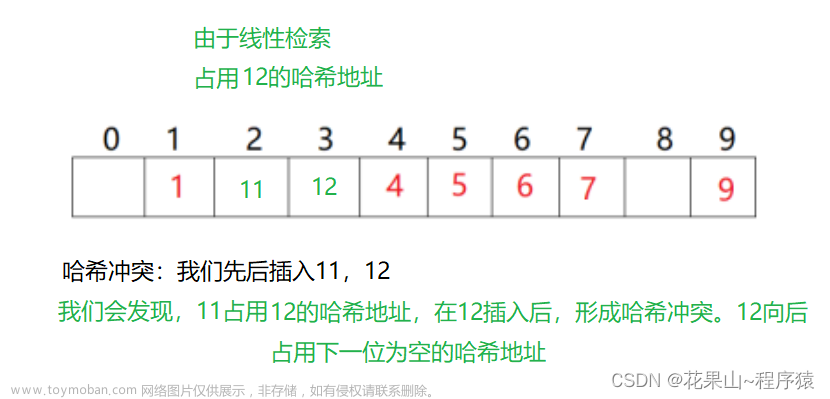
(2)哈希冲突
(3)冲突解决
1.闭散列
闭散列框架
插入
查找
删除
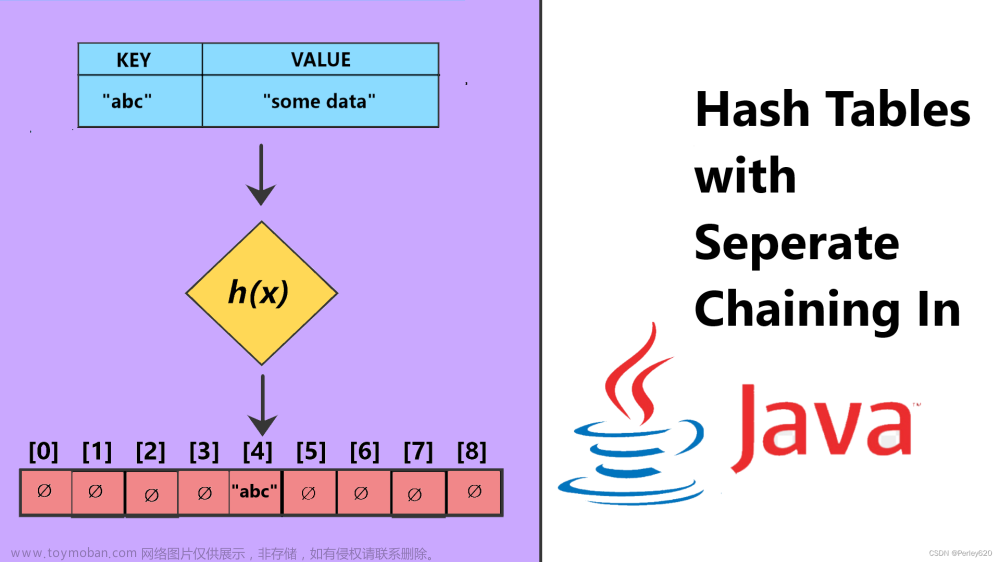
2.开散列(使用较多)
开散列框架
插入
查找
删除
(4)哈希函数
1. 直接定址法--(常用)
2. 除留余数法--(常用)
四,优化
下期预告:封装哈希
结语

一. unordered系列关联式容器
二. unordered_map的文档介绍
接口使用
unordered_map与unordered_set用法跟map与set基本类似 ,同时也有unordered_multimap及mutiset的类型,支持数据冗余 。
这里推荐大家直接使用文档查询即可:
unordered_map - C++ Reference (cplusplus.com)
void func()
{
	unordered_map<string, int> mp;
	unordered_set<int> st;

	st.insert(1);
	st.insert(3);
	st.insert(7);
	st.insert(2);

	mp.insert(make_pair("a", 1));
	mp.insert(make_pair("k", 3));
	mp.insert(make_pair("z", 7));
	mp.insert(make_pair("c", 4));

	// 迭代器
	unordered_set<int>::iterator it = st.begin();
	while (it != st.end())
	{
		cout << *it << " ";
		++it;
	}

	cout << endl;

	mp["a"] = 100;  // unordered_map方括号的使用跟map差不多

	// 范围for
	for (auto& e : mp)
	{
		cout << e.first << " :" << e.second << " ";
	}
}
三. 底层实现
(1)哈希概念
例:
数据集合{1,7,6,4,5,9};
哈希函数设置为:hash(key) = key % capacity; capacity为存储元素底层空间总的大小

(2)哈希冲突
(3)冲突解决
解决哈希冲突两种常见的方法是:闭散列和开散列
1.闭散列
上面哈希概念的例子,也就是闭散列一个案例。
线性探测 :从发生冲突的位置开始,依次向后探测,直到寻找到下一个空位置为止。
但说到插入,我们要考虑一些效率方面的问题。
思考:哈希表什么情况下进行扩容?如何扩容?

可知,负载因子在达到一定值时,哈希表的效率就会下降,我们要做的就是在这时对哈希表进行扩容,降低负载因子。
可是,一但扩容,size发生改变,那么哈希地址就会发生改变,如:13 % 10 = 3,扩容后, 13 % 20 = 13,我们就找不到13,所以我们需要重新重组哈希表。
闭散列框架
    enum state
	{
		EMPTY,
		EXIST,
		DELETE
	};

	template <class K, class V>
	struct HashData
	{
		pair<K, V> _kv; // 数据内容先设置为pair
		state st;       // 数据,状态标识

        HashData()
			:st(EMPTY)
		{}

		HashData(const pair<K, V>& pa )
			:_kv(pa)
			,st(EXIST)
		{}
	};


	template <class K, class V>
	class HashTable
	{
	public:
		typedef HashData<K, V>  HashData;

    private:
		vector<HashData> _tables;  // .size()表示的是多少个哈希地址
		size_t _n;      // 已经占用的哈希地址
	};
}
插入
        bool insert(const pair<K, V>& pa)
		{
			// 检查是否需要扩容
			if (_tables.size() == 0 || _n * 10 / _tables.capacity() > 7) //负载因子设置 7
			{
				int new_size = _tables.size() == 0 ? 10 : _tables.size() * 2;
				// 重组哈希表
				HashTable<K,V> tmp;
				tmp._tables.resize(new_size);
				for (auto& data : _tables)
				{
					if (data.st == EXIST)
						tmp.insert(data._kv);
				}
				_tables.swap(tmp._tables);   //利用vector自带的swap函数
			}
            // 插入
			size_t hashi = pa.first % _tables.size();
			// 线性探索
			size_t i = 1;
			size_t index = hashi;
			while (_tables[index].st == EXIST)
			{
				index = hashi + i;
				index %= _tables.size();
				i++;
			}

			_tables[index]._kv = pa;
			_tables[index].st = EXIST;
			_n++;
			return true;
		}
查找
本质上,通过个寻找到哈希地址,然后从哈希地址处向后寻找,遇到空标记或者转一圈后返回;
        bool find(const K& data)
		{
			return _find(data) == -1 ? false : true;
		}

        size_t _find(const K& data)
		{
			size_t hashi = data % _tables.size();
			// 线性探索
			size_t i = 1;
			size_t index = hashi;
			while (_tables[index].st == EXIST)
			{
				if (_tables[index]._kv.first == data)
					return index;
				index = hashi + i;
				index %= _tables.size();
				i++;

				// 去寻找值时,外一出现全是删除与存在的情况
				if (index == hashi)
					break; // 说明已经经过一圈
			}
			return -1; // 表示未找到
		}
删除
        bool erase(const K& data)
		{
			auto cur = _find(data);
			if (cur != -1)
			{
				_tables[cur].st = DELETE;
                _n--;
				cout << "擦除成功" << endl;
				return 1;
			}
			else
			{
				cout << "未找到" << endl;
				return -1;
			}
		}
2.开散列(使用较多)

开散列框架
开散列的框架,较闭散列有着不同的框架。
    template <class K, class V>
	struct Node_Data
	{
		typedef Node_Data<K, V> Node_data;
		pair<K, V> _kv;
		Node_data* _downstars = nullptr;

		Node_Data(const pair<K,V>& pa = pair<K, V>())
			:_kv(pa)
		{}
	};

	template <class K, class V>
	class HashTable
	{
	public:
		typedef Node_Data<K, V> Node_Data;

    private:
		vector<Node_Data*> _tables;  // 存放各个哈希地址的第一个结点地址的指针数组
		size_t _n = 0;                  // 哈希桶中,数据个数
	};


}
插入
每个哈希桶中刚好挂一个节点,再继续插入元素时,每一次都会发生哈希冲突,因此,在元素个数刚好等于桶的个数时,可以给哈希表增容。
        bool insert(const pair<K, V>& pa)
		{
            // 开散列增容
			// 考虑扩容:负载因子为1,2,3都可以
			if (_tables.size() == 0 || _n * 10 / _tables.size() > 10)
			{
				size_t  new_size = _tables.size() == 0 ? 10 : _tables.size() * 2;
			     // 开始扩容
				vector<Node_Data*> new_tables;
				new_tables.resize(new_size);
				size_t i;
				for (auto& data : _tables)
				{
					// 处理桶内的数据,重新插入新节点
					Node_Data* cur = data;
					while (cur)
					{
						Node_Data* room = cur->_downstars;
						size_t new_hashi = cur->_kv.first % new_tables.size();
						// 处理结点关系
						Node_Data* tmp = new_tables[new_hashi];
						new_tables[new_hashi] = cur;
						cur->_downstars = tmp;
						cur = room;
					}
				}
				_tables.swap(new_tables);
			}

            // 开散列插入
			size_t hashi = pa.first % _tables.size();
			Node_Data* new_node = new Node_Data(pa);
			new_node->_downstars = _tables[hashi];
			_tables[hashi] = new_node;
			_n++;
			return true;
		}
查找
在单链表中查找,这个还是非常简单的。
        bool find(const K& order)
		{
			return _find(order) == nullptr ? false : true;
		}

        Node_Data* _find(const K& order)
		{
			if (!_tables.size())
				return nullptr;

			size_t hashi = order % _tables.size();
			auto cur = _tables[hashi];
			while (cur)
			{
				if (cur->_kv.first == order)
					return cur;
				cur = cur->_downstars;
			}
			return nullptr;
		}
删除
在单链表中删除,还是稍微麻烦了一点。
        bool erase(const K& order)
		{
			auto cur = _find(order);
			if (!cur)
			{
				cout << "擦除失败: 不存在" << endl;
				return false;
			}
			size_t index = order % _tables.size();
			Node_Data* tmp = _tables[index];

			while (tmp)
			{
				if (cur == tmp)
				{
					break;
				}
				else if (cur == tmp->_downstars)
				{
					break;
				}
				tmp = tmp->_downstars;
			}
			// 开始处理节点
			if (tmp == _tables[index])  // 如果擦除的是头,那要置空的包括指针数组
			{
				_tables[index] = cur->_downstars;
			}
			else   // 非单链表头,删除(中间删除)
			{
				tmp->_downstars = cur->_downstars;
			}

			delete (cur);
			cout << "擦除成功" << endl;
			return true;
		}
(4)哈希函数
哈希函数的定义域必须包括需要存储的全部关键码,而如果散列表允许有m个地址时,其值域必须在0到m-1之间哈希函数计算出来的地址能均匀分布在整个空间中哈希函数应该比较简单
1. 直接定址法--(常用)
2. 除留余数法--(常用)
四,优化
    template <class type>
	struct Hashstr
	{
		int operator()(const type& sd)
		{
			return sd;
		}
	};

	template<>  // 类模板,其实这个可以使用重载符号也可以
	struct Hashstr<string>
	{
		size_t operator()(const string& str)
		{
			size_t sum = 0;
			for (auto e : str)
			{
				sum += e;
				sum *= 31;   // 为了减少冲突的概率,每个字符的ASCill值都得相乘一个数。啥为什么是31? 因为这是大量实验的结果
			}
			return sum;
		}
	};


// 在HashTable 类中需要,添加类模板
template <class K, class V, class Hashstr = Hashstr<K>>
	class HashTable
	{
	public:
		typedef Node_Data<K, V> Node_Data;
......这些就是哈希底层细节的精华部分。文章来源:https://www.toymoban.com/news/detail-759522.html
下期预告:封装哈希
结语
本小节就到这里了,感谢小伙伴的浏览,如果有什么建议,欢迎在评论区评论,如果给小伙伴带来一些收获请留下你的小赞,你的点赞和关注将会成为博主创作的动力。文章来源地址https://www.toymoban.com/news/detail-759522.html
到了这里,关于从底层认识哈希表【C++】的文章就介绍完了。如果您还想了解更多内容,请在右上角搜索TOY模板网以前的文章或继续浏览下面的相关文章,希望大家以后多多支持TOY模板网!


