torch.nn.Sequential
简单介绍
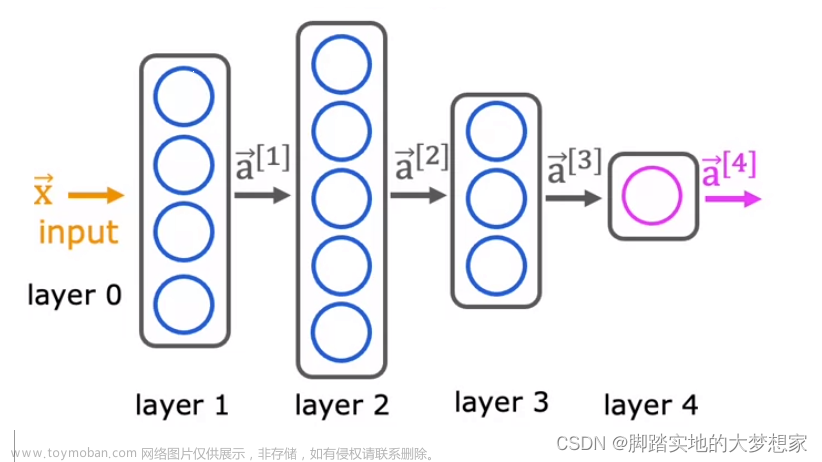
nn.Sequential是一个有序的容器,该类将按照传入构造器的顺序,依次创建相应的函数,并记录在Sequential类对象的数据结构中,同时以神经网络模块为元素的有序字典也可以作为传入参数。
因此,Sequential可以看成是有多个函数运算对象,串联成的神经网络,其返回的是Module类型的神经网络对象。
构建实例
参数列表
- 以参数列表的方式来实例化
print("利用系统提供的神经网络模型类:Sequential,以参数列表的方式来实例化神经网络模型对象")
# A sequential container. Modules will be added to it in the order they are passed in the constructor.
# Example of using Sequential
model_c = nn.Sequential(
						nn.Linear(28*28, 32),
						nn.ReLU(),
						nn.Linear(32, 10),
						nn.Softmax(dim=1)
					)
print(model_c)

print("\n显示网络模型参数")
print(model_c.parameters)

print("\n定义神经网络样本输入")
x_input = torch.randn(2, 28, 28, 1)
print(x_input.shape)

print("\n使用神经网络进行预测")
y_pred = model.forward(x_input.view(x_input.size()[0],-1))
print(y_pred)
利用系统提供的神经网络模型类:Sequential,以参数列表的方式来实例化神经网络模型对象
Sequential(
  (0): Linear(in_features=784, out_features=32, bias=True)
  (1): ReLU()
  (2): Linear(in_features=32, out_features=10, bias=True)
  (3): Softmax(dim=1)
)

显示网络模型参数
<bound method Module.parameters of Sequential(
  (0): Linear(in_features=784, out_features=32, bias=True)
  (1): ReLU()
  (2): Linear(in_features=32, out_features=10, bias=True)
  (3): Softmax(dim=1)
)>

定义神经网络样本输入
torch.Size([2, 28, 28, 1])

使用神经网络进行预测
tensor([[-0.1526,  0.0437, -0.1685,  0.0034, -0.0675,  0.0423,  0.2807,  0.0527,
         -0.1710,  0.0668],
        [-0.1820,  0.0860,  0.0174,  0.0883,  0.2046, -0.1609,  0.0165, -0.2392,
         -0.2348,  0.1697]], grad_fn=<AddmmBackward>)
字典
- 以字典的方式实例化
# Example of using Sequential with OrderedDict
print("利用系统提供的神经网络模型类:Sequential,以字典的方式来实例化神经网络模型对象")
model = nn.Sequential(OrderedDict([('h1', nn.Linear(28*28, 32)),
                                     ('relu1', nn.ReLU()),
                                     ('out', nn.Linear(32, 10)),
                                     ('softmax', nn.Softmax(dim=1))]))

print(model)

print("\n显示网络模型参数")
print(model.parameters)

print("\n定义神经网络样本输入")
x_input = torch.randn(2, 28, 28, 1)
print(x_input.shape)

print("\n使用神经网络进行预测")
y_pred = model.forward(x_input.view(x_input.size()[0],-1))
print(y_pred)
利用系统提供的神经网络模型类:Sequential,以字典的方式来实例化神经网络模型对象
Sequential(
  (h1): Linear(in_features=784, out_features=32, bias=True)
  (relu1): ReLU()
  (out): Linear(in_features=32, out_features=10, bias=True)
  (softmax): Softmax(dim=1)
)

显示网络模型参数
<bound method Module.parameters of Sequential(
  (h1): Linear(in_features=784, out_features=32, bias=True)
  (relu1): ReLU()
  (out): Linear(in_features=32, out_features=10, bias=True)
  (softmax): Softmax(dim=1)
)>

定义神经网络样本输入
torch.Size([2, 28, 28, 1])

使用神经网络进行预测
tensor([[0.1249, 0.1414, 0.0708, 0.1031, 0.1080, 0.1351, 0.0859, 0.0947, 0.0753,
         0.0607],
        [0.0982, 0.1102, 0.0929, 0.0855, 0.0848, 0.1076, 0.1077, 0.0949, 0.1153,
         0.1029]], grad_fn=<SoftmaxBackward>)
基本操作
- 查看结构
通过打印 Sequential对象来查看它的结构
print(net)
# Sequential(
#   (0): Linear(in_features=20, out_features=10, bias=True)
#   (1): ReLU()
#   (2): Linear(in_features=10, out_features=5, bias=True)
# )
- 索引
我们可以使用索引来查看其子模块
print(net[0])
# Linear(in_features=20, out_features=10, bias=True)
print(net[1])
# ReLU()
- 长度
print(len(net))
# 3
- 修改子模块
net[1] = nn.Sigmoid()
print(net)
# Sequential(
#   (0): Linear(in_features=20, out_features=10, bias=True)
#   (1): Sigmoid()
#   (2): Linear(in_features=10, out_features=5, bias=True)
# )
- 删除子模块
del net[2]
print(net)
# Sequential(
#   (0): Linear(in_features=20, out_features=10, bias=True)
#   (1): Sigmoid()
# )
- 添加子模块
net.append(nn.Linear(10, 2))  # 均会添加到末尾
print(net)
# Sequential(
#   (0): Linear(in_features=20, out_features=10, bias=True)
#   (1): Sigmoid()
#   (2): Linear(in_features=10, out_features=2, bias=True)
# )
- 遍历
net = nn.Sequential(
    nn.Linear(20, 10),
    nn.ReLU(),
    nn.Linear(10, 5)
)

for sub_module in net:
    print(sub_module)
# Linear(in_features=20, out_features=10, bias=True)
# ReLU()
# Linear(in_features=10, out_features=5, bias=True)
- 嵌套
'''在一个 Sequential 中嵌套两个 Sequential'''
seq_1 = nn.Sequential(nn.Linear(15, 10), nn.ReLU(), nn.Linear(10, 5))
seq_2 = nn.Sequential(nn.Linear(25, 15), nn.Sigmoid(), nn.Linear(15, 10))
seq_3 = nn.Sequential(seq_1, seq_2)
print(seq_3)
# Sequential(
#   (0): Sequential(
#     (0): Linear(in_features=15, out_features=10, bias=True)
#     (1): ReLU()
#     (2): Linear(in_features=10, out_features=5, bias=True)
#   )
#   (1): Sequential(
#     (0): Linear(in_features=25, out_features=15, bias=True)
#     (1): Sigmoid()
#     (2): Linear(in_features=15, out_features=10, bias=True)
#   )
# )
''''使用多级索引进行访问'''
print(seq_3[1])
# Sequential(
#   (0): Linear(in_features=25, out_features=15, bias=True)
#   (1): Sigmoid()
#   (2): Linear(in_features=15, out_features=10, bias=True)
# )
print(seq_3[0][1])
# ReLU()
'''使用双重循环进行遍历'''
for seq in seq_3:
    for module in seq:
        print(module)
# Linear(in_features=15, out_features=10, bias=True)
# ReLU()
# Linear(in_features=10, out_features=5, bias=True)
# Linear(in_features=25, out_features=15, bias=True)
# Sigmoid()
# Linear(in_features=15, out_features=10, bias=True)
参考
PyTorch学习笔记(六)–Sequential类、参数管理与GPU_Lareges的博客-CSDN博客_sequential类文章来源:https://www.toymoban.com/news/detail-759916.html
[Pytorch系列-30]:神经网络基础 - torch.nn库五大基本功能:nn.Parameter、nn.Linear、nn.functioinal、nn.Module、nn.Sequentia_文火冰糖的硅基工坊的博客-CSDN博客_torch库nn文章来源地址https://www.toymoban.com/news/detail-759916.html
到了这里,关于【torch.nn.Sequential】序列容器的介绍和使用的文章就介绍完了。如果您还想了解更多内容,请在右上角搜索TOY模板网以前的文章或继续浏览下面的相关文章,希望大家以后多多支持TOY模板网!