目录
前言
一、stm32cubeMX的串口配置
二、空闲中断+dma接收
三、ESP8266.c和ESP8266.h
ESP8266.h
ESP8266.c
注意事项
四、与手机通信例程
步骤:
例程代码main.c
运行结果
五、相关问题
总结
相关的app和源码
前言
前提:
1.掌握串口通信和ESP8266的使用方法
串口通信:单片机串口通信不理解?STM32的USART和UART差在哪里?几分钟给你讲清楚!(STM32教程基于HAL库和CUBEIDE)_哔哩哔哩_bilibili
ESP8266的使用
STM32HAL库使用ESP8266模块_hal esp8266_啵啵520520的博客-CSDN博客
2.这次采用的空闲中断+dma来和ESP8266通信,接收ESP8266发来的不定长数据
STM32 hal库串口空闲中断最新用法_hal 串口空闲中断_北世安的博客-CSDN博客
3.板子是魔女开发板,主控芯片是STM32F103RCT6
4.文章末尾会附带我写好的重定向和esp8266通信代码,调用api即可
一、stm32cubeMX的串口配置
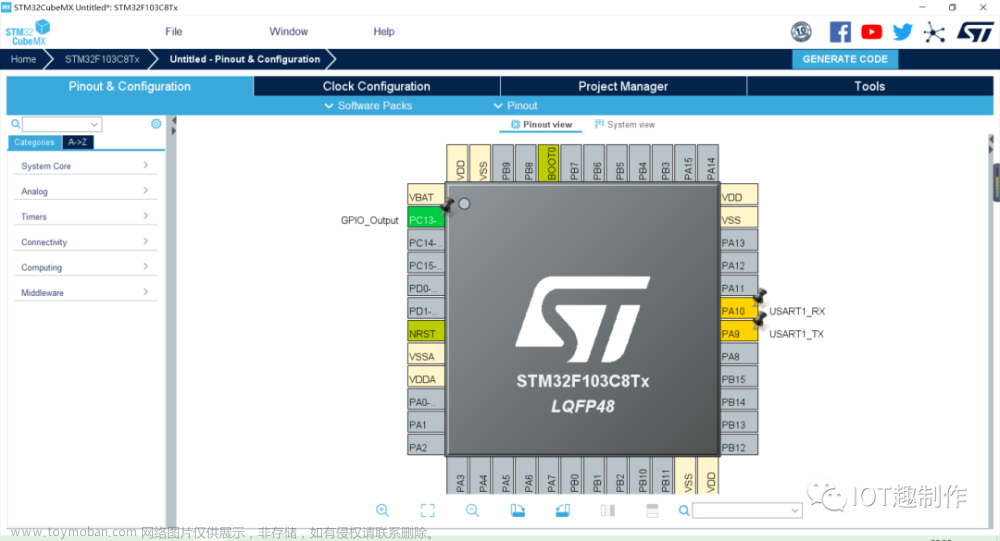
采用串口1与pc通信
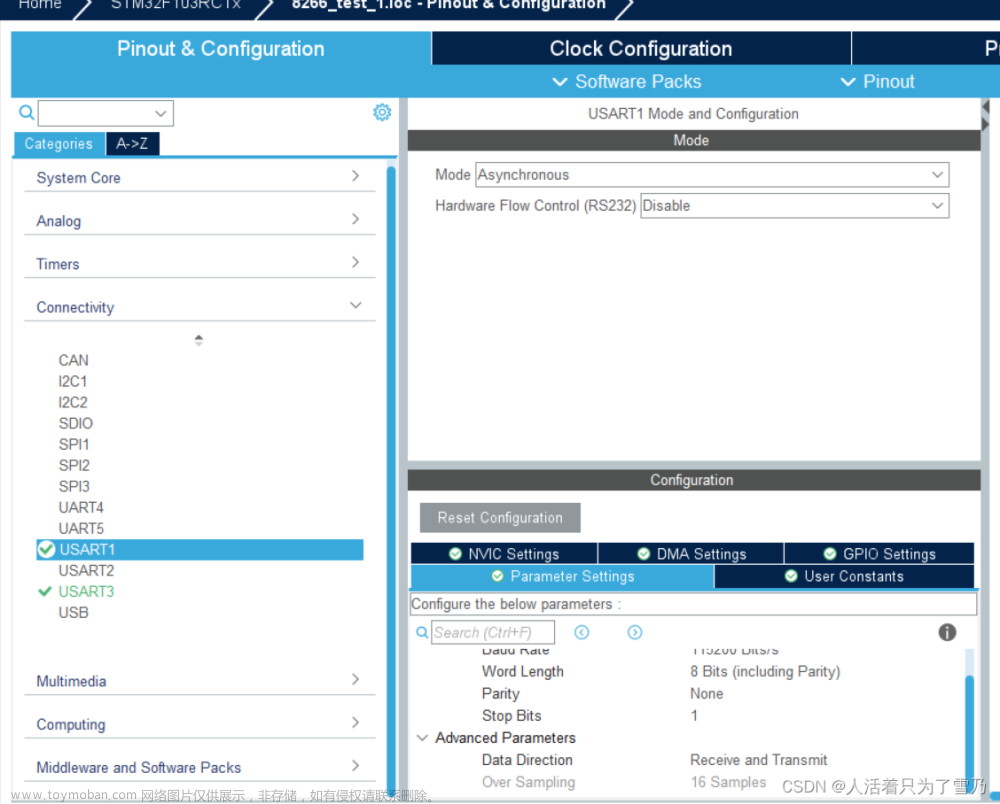
采用串口3与8266通信

开启dma和中断,把串口3的rx的dma通道优先级调高(比串口1的rx的dma通道的优先级高就行)
如果没调高,可能会出现没能及时收到8266回复的信息的问题。

二、空闲中断+dma接收
HAL_UARTEx_ReceiveToIdle_DMA(&huart1,PCRxbuf,sizeof(PCRxbuf));//使能空闲dma中断
HAL_UARTEx_RxEventCallback(UART_HandleTypeDef *huart, uint16_t Size)//中断回调函数
当开启空闲接收中断后,当2个字节的时间内没有新的数据来,或者到达你设置的最大接收值,就会进入到这个中断回调函数中,其中Size就是此次接收到的函数
三、ESP8266.c和ESP8266.h
ESP8266.h
#ifndef _ESP_8266_H
#define _ESP_8266_H
#include "main.h"
#include <stdio.h>
#define LENGTH 1024
extern uint8_t ESP8266Rxbuf[LENGTH];//存放来自8266的回复

void ESP8266_Init(UART_HandleTypeDef *uart);//初始化函数
uint8_t sendATTo8266(uint8_t *str);//向8266发送AT指令
uint8_t sendStringTo8266(uint8_t *str);//向8266发送字符串
void recStringBy8266(uint16_t Size);//接收来自8266的字符串
void linkWifi(char *ssid,char *pwd);//连接wifi,ssid wifi:名字,pwd:wifi密码
void linkTCP(char *addr,char *port);//建立TCP连接,addr:IP地址 port:端口
void StartCipsend(char *addr,char *port);//开始透明传输
#endif
ESP8266.c
#include "ESP8266.h"
#include "dma.h"
#include "usart.h"
#include "gpio.h"
#include "string.h"
 UART_HandleTypeDef *uart8266;
 uint8_t ESP8266Rxbuf[LENGTH];//存放8266的消息
 uint8_t CIPMODE=0;//透明传输模式标志位
 uint8_t TESTMODE=0;//测试模式标志位
	int replyFlag=0;//8266回复标志位
/*8266初始化*/
void ESP8266_Init(UART_HandleTypeDef *uart){
	uart8266=uart;
	HAL_Delay(2000);//8266上电后要等待一段时间才能正常运行
	HAL_UART_Transmit(uart8266,"AT+RESTORE\r\n",12,0xff);//发送恢复出厂化设置的指令
	HAL_Delay(5000);//等待恢复出厂设置完成
	HAL_UARTEx_ReceiveToIdle_DMA(uart8266,ESP8266Rxbuf,sizeof(ESP8266Rxbuf));//开启接收8266的消息
}
/*检查AT指令是否合规*/
/*0 不合规 1 合规*/
uint8_t checkAT(uint8_t *str,int len){
	int i=0;
	for(i=0;i<len;i++){
		if(*(str+i)=='\r'||*(str+i)=='\n'){
			if(i<len-2){
				return 0;
			}
			else if(*(str+i)=='\r'&&*(str+i+1)=='\n'){
				return 1;
			}
		}
	}
	return 0;
}
/*发送AT指令*/
/*0 发送失败,1 发送成功*/
uint8_t sendATTo8266(uint8_t *str){
	int len=strlen((char *)str);
	if(0==checkAT(str,len)){
		printf("AT error\n");
		return 0;
	}
	else{
		printf("AT right\n");
		if(HAL_OK==HAL_UART_Transmit(uart8266,str,len,0xff)){
			printf("%.*s send to 8266 ok!\n",len-2,str);
			return 1;
		}
		else{
			printf("%.*s send to 8266 error!\n",len-2,str);
			return 0;
		}
	}
}
/*接收来自8266的AT消息回复*/
void recATBy8266(uint16_t Size){
	HAL_UART_DMAStop(uart8266);//先暂停接收
//		printf("wifibuf:%s\n",WifiRxbuf);
	int i=0;
	do{  //判断消息里有没有OK或者ERROR,8266回复的消息里都会带有OK或者ERROR
		if(ESP8266Rxbuf[i]=='O'&&ESP8266Rxbuf[i+1]=='K'){
			memset(ESP8266Rxbuf,0,sizeof(ESP8266Rxbuf));
			HAL_Delay(2000);//收到OK,延时,等后续的消息发送完成
			printf("8266 say OK\r\n");
			replyFlag=1;//收到回复的标志位置1
//			printf("OK replyFlag:%d\n",replyFlag);
			HAL_UARTEx_ReceiveToIdle_DMA(uart8266,ESP8266Rxbuf,sizeof(ESP8266Rxbuf));//开启下次接收
			return;
			}
		else if(ESP8266Rxbuf[i]=='E'&&ESP8266Rxbuf[i+1]=='R'&&ESP8266Rxbuf[i+2]=='R'&&ESP8266Rxbuf[i+3]=='O'&&ESP8266Rxbuf[i+4]=='R'){
			HAL_UART_Transmit(uart8266,"AT\r\n",4,0xff);//如果返回是error,那么下一条还是发送失败,所以用个AT指令来抵掉这次发送失败
			HAL_Delay(4000);//延时等抵消成功
			printf("\n8266 say ERROR\r\n");
			replyFlag=2;//收到回复的标志位置2
//			printf("ERROR replyFlag:%d\n",replyFlag);
			memset(ESP8266Rxbuf,0,sizeof(ESP8266Rxbuf));
			HAL_UARTEx_ReceiveToIdle_DMA(uart8266,ESP8266Rxbuf,sizeof(ESP8266Rxbuf));
			return;
			}
		}while(++i<Size);
	/*8266回复的消息有些是分包发回的,即OK或者ERROR可能在后续的包里面*/
	memset(ESP8266Rxbuf,0,sizeof(ESP8266Rxbuf));//清空接收下一数据包
	HAL_UARTEx_ReceiveToIdle_DMA(uart8266,ESP8266Rxbuf,sizeof(ESP8266Rxbuf));//开始接收下一数据包
}
/*向8266发送字符串*/
/*0:发送失败,1:发送成功*/
uint8_t sendStringTo8266(uint8_t *str)
{
	uint16_t Size = strlen((char *)str);
	if(CIPMODE==1){//判断是否为透明传输模式,是的话直接进行发送
		HAL_UART_Transmit(uart8266,str,Size,0xff);
		if(!strcmp((char *)str,"+++")){//如果发送的是“+++”(不带\r\n就是关闭透明传输模式)
			printf("\nclose CIPSEND\n");
			CIPMODE=0;
		}
		return 1;
	}
	/*这个是我编写的调试模式,不用发给8266*/
	/*调试模式下,就相当于PC直接与8266通信*/
	else if(!strcmp((char *)str,"AT+TESTMODE\r\n")){
		if(TESTMODE==0){
			printf("open testmode\n");
			TESTMODE=1;
		}
		else{
			printf("close testmode\n");
			TESTMODE=0;
		}
		return 0;
	}
	if(HAL_OK==HAL_UART_Transmit(uart8266,str,Size,0xff)){//发送成功
		if(!strcmp((char *)str,"AT+CIPSEND\r\n")){//判断是否是开启透明传输模式的指令
			printf("open CIPSEND\n");
			uint32_t t=0;
			while(replyFlag==0){//等待8266回复
				HAL_Delay(1000);
				t++;
				if(t>40){
				printf("open CIPSEND error\n");
				return 0;
				}
			}
			CIPMODE=1;//收到回复就把标志位置1
		}
		return 1;
	}
	else{
		return 0;
	}

}
/*向8266发送消息并且确认回复*/
/*0:发送失败或者没收到回复或者回复ERROR*/
/*1:发送成功且收到OK回复*/
uint8_t sendTo8266(uint8_t *str){
	if(sendStringTo8266(str)){
		uint32_t t=0;

//		uint32_t t=4000*3127;//臭狗屎,慎用,用于调试,看看回复标志位什么时候置1。
//		while(t--){
//			printf("t=%d flag=%d\n",t,replyFlag);
//		}
		while(replyFlag==0){//等待回复
			HAL_Delay(1000);
			t++;
			if(t>40){//超时
				printf("time out error\n");
				return 0;
			}
		}
		if(replyFlag==1){//判断是不是OK回复。
			replyFlag=0;
			return 1;
		}
		else{
			printf("error\n");
			replyFlag=0;
			return 0;
		}

	}
	else{
		replyFlag=0;
		return 0;
	}
}
/*处理来自8266的消息*/
void recStringBy8266(uint16_t Size)
{
	if(CIPMODE!=0||TESTMODE!=0){//如果是透明传输模式或者调试模式,直接显示
		printf("%s\n",ESP8266Rxbuf);
		memset(ESP8266Rxbuf,0,sizeof(ESP8266Rxbuf));
		HAL_UARTEx_ReceiveToIdle_DMA(uart8266,ESP8266Rxbuf,sizeof(ESP8266Rxbuf));
	}
	else{//否则就是处理AT消息回复
		recATBy8266(Size);
	}
}
/*连接wifi*/
/*过程
1.设置为STA模式:AT+CWMODE=1\r\n
2.重启8266模块执行设置:AT+RST\r\n
3.连接wifi:AT+CWJAP="wifi名","密码"\r\n
*/
void linkWifi(char *ssid,char *pwd){
	printf("Start link wifi:\n");
	printf("Set CWMODE=1\n");
	if(sendTo8266("AT+CWMODE=1\r\n")){
		printf("Set CWMODE success!\n");
	}
	else{
		printf("Set CWMODE fail!\n");
	}
	printf("8266 RESTART\n");
	if(sendTo8266("AT+RST\r\n")){
		printf("8266 RESTART success!\n");
	}
	else{
		printf("8266 RESTART fail!\n");
	}
	printf("link wifi:%s %s\n",ssid,pwd);
	char str[50];//一定要是char类型的数组,否则sprintf会报错,不知道怎么解决
	sprintf(str,"AT+CWJAP=\"%s\",\"%s\"\r\n",ssid,pwd);//在stdio.h库中
	if(sendTo8266(str)){
		printf("link wifi success!\n");
	}
	else{
		printf("link wifi fail!\n");
	}

}
/*建立TCP连接*/
void linkTCP(char *addr,char *port){
	printf("link TCP: %s %s\n",addr,port);
	char str[50];
	sprintf(str,"AT+CIPSTART=\"TCP\",\"%s\",%s\r\n",addr,port);
	if(sendTo8266(str)){
		printf("link tcp success!\n");
	}
	else{
		printf("link tcp fail!\n");
	}
}
/*开始透明传输*/
/*过程
1.连接TCP
2.设置为透明传输模式:AT+CIPMODE=1\r\n
3.开启透明传输:AT+CIPSEND\r\n
*/
void StartCipsend(char *addr,char *port){
	linkTCP(addr,port);
	printf("Set Cipmode=1\n");
	if(sendTo8266("AT+CIPMODE=1\r\n")){
		printf("Set Cipmode=1 success!\n");
	}
	else{
		printf("Set Cipmode=1 fail!\n");
	}
	printf("Start cipsend\n");
	if(sendTo8266("AT+CIPSEND\r\n")){
		printf("Start cipsend success!\n");
	}
	else{
		printf("Start cipsend fail!\n");
	}
}
注意事项
里面用到了prinf向PC机发送信息,所以要使printf重定向到串口1
可以参考(printf和scanf的串口重定向,格式化输入输出_scanf重定向到串口_蚂蚁爬爬爬的博客-CSDN博客
或者直接用我后面提供的OutIn.c和OutIn.h就可以
(注:我这用的是标准库方式重定向,也就是方法2,记得不要勾选MicorLib,还有修改和主机通信的串口)


四、与手机通信例程
步骤:
1.手机和开发板连接同个wifi,如果是热点的话,一定要设为2.4GHz频段
2.手机安装“TCP链接”app,开启口,应用上方可以看到IP地址和端口号

3.修改例程里的相关参数,编译下载烧录即可

例程代码main.c
/* USER CODE BEGIN Header */
/**
  ******************************************************************************
  * @file           : main.c
  * @brief          : Main program body
  ******************************************************************************
  * @attention
  *
  * Copyright (c) 2023 STMicroelectronics.
  * All rights reserved.
  *
  * This software is licensed under terms that can be found in the LICENSE file
  * in the root directory of this software component.
  * If no LICENSE file comes with this software, it is provided AS-IS.
  *
  ******************************************************************************
  */
/* USER CODE END Header */
/* Includes ------------------------------------------------------------------*/
#include "main.h"
#include "dma.h"
#include "usart.h"
#include "gpio.h"

/* Private includes ----------------------------------------------------------*/
/* USER CODE BEGIN Includes */
#include "string.h"
#include "stdio.h"
#include "ESP8266.h"
#include "OutIn.h"
/* USER CODE END Includes */

/* Private typedef -----------------------------------------------------------*/
/* USER CODE BEGIN PTD */

/* USER CODE END PTD */

/* Private define ------------------------------------------------------------*/
/* USER CODE BEGIN PD */

/* USER CODE END PD */

/* Private macro -------------------------------------------------------------*/
/* USER CODE BEGIN PM */

/* USER CODE END PM */

/* Private variables ---------------------------------------------------------*/

/* USER CODE BEGIN PV */
 uint8_t PCRxbuf[LENGTH];

/* USER CODE END PV */

/* Private function prototypes -----------------------------------------------*/
void SystemClock_Config(void);
/* USER CODE BEGIN PFP */

/* USER CODE END PFP */

/* Private user code ---------------------------------------------------------*/
/* USER CODE BEGIN 0 */
void HAL_Delay(uint32_t Delay){//用自己写的延时,这样就能在中断回调里使用
	uint32_t t=Delay*3127;
	while(t--);
}

/* USER CODE END 0 */

/**
  * @brief  The application entry point.
  * @retval int
  */
int main(void)
{
  /* USER CODE BEGIN 1 */

  /* USER CODE END 1 */

  /* MCU Configuration--------------------------------------------------------*/

  /* Reset of all peripherals, Initializes the Flash interface and the Systick. */
  HAL_Init();

  /* USER CODE BEGIN Init */

  /* USER CODE END Init */

  /* Configure the system clock */
  SystemClock_Config();

  /* USER CODE BEGIN SysInit */

  /* USER CODE END SysInit */

  /* Initialize all configured peripherals */
  MX_GPIO_Init();
  MX_DMA_Init();
  MX_USART1_UART_Init();
  MX_USART3_UART_Init();
  /* USER CODE BEGIN 2 */
  HAL_UARTEx_ReceiveToIdle_DMA(&huart1,PCRxbuf,sizeof(PCRxbuf));
  ESP8266_Init(&huart3);
  /* USER CODE END 2 */
	linkWifi("Lzl","L123456@");
	StartCipsend("192.168.21.243","1234");
  /* Infinite loop */
  /* USER CODE BEGIN WHILE */
  while (1)
  {
    /* USER CODE END WHILE */

    /* USER CODE BEGIN 3 */

  }
  /* USER CODE END 3 */
}

/**
  * @brief System Clock Configuration
  * @retval None
  */
void SystemClock_Config(void)
{
  RCC_OscInitTypeDef RCC_OscInitStruct = {0};
  RCC_ClkInitTypeDef RCC_ClkInitStruct = {0};

  /** Initializes the RCC Oscillators according to the specified parameters
  * in the RCC_OscInitTypeDef structure.
  */
  RCC_OscInitStruct.OscillatorType = RCC_OSCILLATORTYPE_HSE;
  RCC_OscInitStruct.HSEState = RCC_HSE_ON;
  RCC_OscInitStruct.HSEPredivValue = RCC_HSE_PREDIV_DIV1;
  RCC_OscInitStruct.HSIState = RCC_HSI_ON;
  RCC_OscInitStruct.PLL.PLLState = RCC_PLL_ON;
  RCC_OscInitStruct.PLL.PLLSource = RCC_PLLSOURCE_HSE;
  RCC_OscInitStruct.PLL.PLLMUL = RCC_PLL_MUL9;
  if (HAL_RCC_OscConfig(&RCC_OscInitStruct) != HAL_OK)
  {
    Error_Handler();
  }

  /** Initializes the CPU, AHB and APB buses clocks
  */
  RCC_ClkInitStruct.ClockType = RCC_CLOCKTYPE_HCLK|RCC_CLOCKTYPE_SYSCLK
                              |RCC_CLOCKTYPE_PCLK1|RCC_CLOCKTYPE_PCLK2;
  RCC_ClkInitStruct.SYSCLKSource = RCC_SYSCLKSOURCE_PLLCLK;
  RCC_ClkInitStruct.AHBCLKDivider = RCC_SYSCLK_DIV1;
  RCC_ClkInitStruct.APB1CLKDivider = RCC_HCLK_DIV2;
  RCC_ClkInitStruct.APB2CLKDivider = RCC_HCLK_DIV1;

  if (HAL_RCC_ClockConfig(&RCC_ClkInitStruct, FLASH_LATENCY_2) != HAL_OK)
  {
    Error_Handler();
  }
}

/* USER CODE BEGIN 4 */

void HAL_UARTEx_RxEventCallback(UART_HandleTypeDef *huart, uint16_t Size){

	if(huart==&huart1)
	{
//		printf("tx size : %d\n",Size);
		sendStringTo8266(PCRxbuf);
//		printf("text:%s\n",PCRxbuf);
//		printf("sizeof:%d strlen:%d\n",sizeof(PCRxbuf),strlen(PCRxbuf));
		memset(PCRxbuf,0,sizeof(PCRxbuf));
		HAL_UARTEx_ReceiveToIdle_DMA(&huart1,PCRxbuf,sizeof(PCRxbuf));
//		printf("huart1 dma open!\n");
	}
	if(huart==&huart3){
//		printf("size:%d\n",Size);
		recStringBy8266(Size);

	}

}
/* USER CODE END 4 */

/**
  * @brief  This function is executed in case of error occurrence.
  * @retval None
  */
void Error_Handler(void)
{
  /* USER CODE BEGIN Error_Handler_Debug */
  /* User can add his own implementation to report the HAL error return state */
  __disable_irq();
  while (1)
  {
  }
  /* USER CODE END Error_Handler_Debug */
}

#ifdef  USE_FULL_ASSERT
/**
  * @brief  Reports the name of the source file and the source line number
  *         where the assert_param error has occurred.
  * @param  file: pointer to the source file name
  * @param  line: assert_param error line source number
  * @retval None
  */
void assert_failed(uint8_t *file, uint32_t line)
{
  /* USER CODE BEGIN 6 */
  /* User can add his own implementation to report the file name and line number,
     ex: printf("Wrong parameters value: file %s on line %d\r\n", file, line) */
  /* USER CODE END 6 */
}
#endif /* USE_FULL_ASSERT */
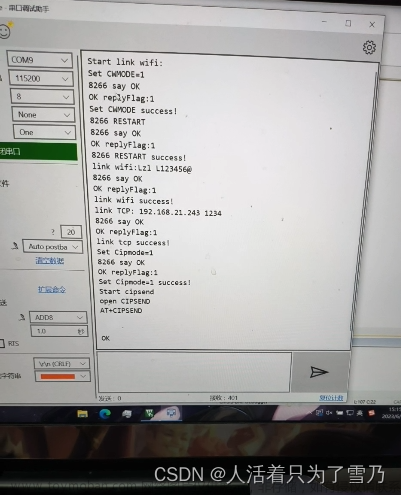
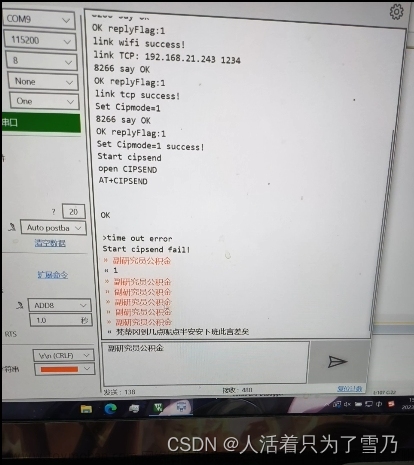
运行结果
五、相关问题
1.正常情况下,在中断回调函数的延时函数是会出现问题的
详细请参考:(STM32 HAL库 中断处理中使用延时函数(HAL_Delay)_中断中延时_Dir_xr的博客-CSDN博客
所以我们在主函数里写一个延时函数
2.当给8266发送重启或者恢复出厂化等一些指令时,8266在回复OK后,还会回复一些其他东西,其中就有些乱码,导致的问题是,接收到2个字符的乱码,无法进入中断回调函数,但是会失能你的接收,所以就没法再接收8266的信息了,就要再次使能接收才行。你可以进入测试模式,或者直接硬件连接8266与其直接通信,看看效果。
这个问题我一直都还不懂怎么解决,我采用的方法是延时一段时间,等OK后的乱码消息发送完后再使能接收,治标不治本,后面解决了会更新这篇文章。
3.对于不同指令,8266回复时间不一样,也就是说有些能很快收到OK或者ERROR,有些就不行,代码里我给的是40s内,如果后面出现replayFlag与你想要的效果不一样,可以取消掉我那几条pintf和那个臭狗屎代码来测试问题在哪,大概率是时间问题,改成40s以上应该会解决,看个人实际情况,来修改我代码中的一些延时来提高通信速率。
总结
相关的app和源码
链接:https://pan.baidu.com/s/17Lzfma5iekRKTS21OrY9Qg?pwd=0407
提取码:0407
以上本文的内容,只是简单的与手机APP通信,后续会更新stm32hal库与其他外设的使用或者其他内容,有什么疑问可以私信。文章来源:https://www.toymoban.com/news/detail-761498.html
如果这对你有用的话,麻烦点赞+收藏,这对我来说真的重要文章来源地址https://www.toymoban.com/news/detail-761498.html
到了这里,关于入门stm32:STM32hal库实现ESP8266与手机通信(不定长数据收发和ESP8266使用的一些问题)的文章就介绍完了。如果您还想了解更多内容,请在右上角搜索TOY模板网以前的文章或继续浏览下面的相关文章,希望大家以后多多支持TOY模板网!


