说在前头,文本主要参考:
SpringBoot+WebSocket+Netty实现消息推送
Netty-11-channelHandler的生命周期
springboot整合netty指北
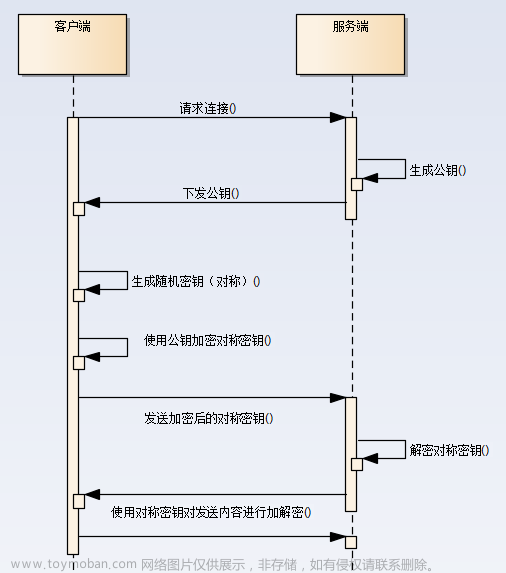
首先需要了解下channel建立的生命周期
ChannelHandler的顺序如下:
handlerAdded() –> channelRegistered() –> channelActive() –> channelRead() –> channelReadComplete()
注意本次实现的重点是:在建立websocket时从请求标头header或者第一次消息对话时获取用户信息(如jwt的令牌等)来校验用户身份是关键
1.NettyConfig
定义一个管理所有的channel组单例
import io.netty.channel.Channel;
import io.netty.channel.group.ChannelGroup;
import io.netty.channel.group.DefaultChannelGroup;
import io.netty.util.concurrent.GlobalEventExecutor;

import java.util.concurrent.ConcurrentHashMap;

/**
 * @author sixiaojie
 * @date 2020-03-28-15:07
 */
public class NettyConfig {
    /**
     * 定义一个channel组,管理所有的channel
     * GlobalEventExecutor.INSTANCE 是全局的事件执行器,是一个单例
     */
    private static ChannelGroup channelGroup = new DefaultChannelGroup(GlobalEventExecutor.INSTANCE);

    /**
     * 存放用户与Chanel的对应信息,用于给指定用户发送消息
     */
    private static ConcurrentHashMap<String,Channel> userChannelMap = new ConcurrentHashMap<>();

    private NettyConfig() {}

    /**
     * 获取channel组
     * @return
     */
    public static ChannelGroup getChannelGroup() {
        return channelGroup;
    }

    /**
     * 获取用户channel map
     * @return
     */
    public static ConcurrentHashMap<String,Channel> getUserChannelMap(){
        return userChannelMap;
    }
}
2.ChannelInboundHandlerAdapter
继承Channel处理器并实现channelRead作为连接认证
众所周知 WebSocket不能自定义header,那怎么在header中加入token呢
查看js中websocket,发现
new WebSocket(url [protocols]);
websocket的子协议可以是一个数组,这个值无论在 HTTP 中也好、在 WebSocket 中也罢,都是前后端之间的“约定”,得两端都得遵守才行,那把用户认证信息放在数组中的第一个下标位置,后端就能正常拿到
曲线救国(不是
//这里用的飞书小程序
	//websocket
    let socket = tt.connectSocket({
        url: "ws://localhost:58080/webSocket",
        header:{},
        protocols:[token],
        success() {
            console.log('Build WebSocketTask success');
        },
        fail(err) {
            console.error('Build WebSocketTask failed', err);
        }
    });
import com.feishu.estate.netty.nettypush.config.NettyConfig;
import io.jsonwebtoken.Claims;
import io.netty.channel.Channel;
import io.netty.channel.ChannelHandler;
import io.netty.channel.ChannelHandlerContext;
import io.netty.channel.ChannelInboundHandlerAdapter;
import io.netty.handler.codec.http.FullHttpRequest;
import io.netty.handler.codec.http.HttpHeaders;
import io.netty.util.AttributeKey;
import lombok.RequiredArgsConstructor;
import lombok.extern.slf4j.Slf4j;
import org.springframework.beans.factory.annotation.Autowired;
import org.springframework.stereotype.Component;

/**
 * FullHttpRequest
 */

@ChannelHandler.Sharable
@Slf4j
@Component
@RequiredArgsConstructor(onConstructor = @__(@Autowired))
public class AuthHandler extends ChannelInboundHandlerAdapter {


    @Override
    public void channelRead(ChannelHandlerContext ctx, Object msg) throws Exception {
        if (msg instanceof FullHttpRequest) {
            // 获取请求头中的身份验证令牌
            FullHttpRequest request = (FullHttpRequest) msg;
            HttpHeaders headers = request.headers();
            if (headers.size() < 1) {
                ctx.channel().close();
                return;
            }
            String uid = headers.get("Sec-WebSocket-Protocol");
            log.debug("Authentication success. uid: {}", uid);
            // 将用户ID作为自定义属性加入到channel中,方便随时channel中获取用户ID
            AttributeKey<String> key = AttributeKey.valueOf("userId");
            ctx.channel().attr(key).setIfAbsent(uid);
            // 关联channel
            NettyConfig.getUserChannelMap().put(uid,ctx.channel());

            ctx.pipeline().remove(this);
            // 对事件进行传播,知道完成WebSocket连接。
            ctx.fireChannelRead(msg);
        } else {
            ctx.channel().close();
        }
    }

    @Override
    public void exceptionCaught(ChannelHandlerContext ctx, Throwable cause) throws Exception {
        cause.printStackTrace();

        ctx.channel().close();
    }
}
这里偷下懒,正常从header中拿到子协议之后,转成数组取第一个元素,可以自己做一些解析,如jwt令牌如下
 /**
     * 从令牌中获取数据声明
     *
     * @param token 令牌
     * @return 数据声明
     */
    private Claims parseToken(String token)
    {
        return Jwts.parser()
                .setSigningKey(secret)
                .parseClaimsJws(token)
                .getBody();
    }
3.SimpleChannelInboundHandler
用来处理文本帧的处理器
在这里重写了handlerAdded,参照本文开始的说明,会第一个执行,然后执行第2步的校验,在测试的过程中发现一些h5无法在建立websocket链接时无法传递子协议,那么可以放在第一次消息发送中channelRead0处理。
import cn.hutool.json.JSONObject;
import cn.hutool.json.JSONUtil;
import com.feishu.estate.netty.nettypush.config.NettyConfig;
import io.jsonwebtoken.Claims;
import io.jsonwebtoken.Jwts;
import io.netty.channel.ChannelHandler;
import io.netty.channel.ChannelHandlerContext;
import io.netty.channel.SimpleChannelInboundHandler;
import io.netty.handler.codec.http.HttpHeaders;
import io.netty.handler.codec.http.websocketx.TextWebSocketFrame;
import io.netty.util.AttributeKey;
import org.slf4j.Logger;
import org.slf4j.LoggerFactory;
import org.springframework.beans.factory.annotation.Value;
import org.springframework.stereotype.Component;


/**
 * TextWebSocketFrame类型, 表示一个文本帧
 * @author sixiaojie
 * @date 2020-03-28-13:47
 */
@Component
@ChannelHandler.Sharable
public class WebSocketHandler extends SimpleChannelInboundHandler<TextWebSocketFrame> {
    private static final Logger log = LoggerFactory.getLogger(NettyServer.class);
    // 令牌秘钥
    @Value("${token.secret}")
    private String secret;

    /**
     * 一旦连接,第一个被执行
     * @param ctx
     * @throws Exception
     */
    @Override
    public void handlerAdded(ChannelHandlerContext ctx) throws Exception {
        log.info("handlerAdded 被调用"+ctx.channel().id().asLongText());
        // 添加到channelGroup 通道组
        NettyConfig.getChannelGroup().add(ctx.channel());
    }


    /**
     * 读取数据
     */
    @Override
    protected void channelRead0(ChannelHandlerContext ctx, TextWebSocketFrame msg) throws Exception {
        log.info("服务器收到消息:{}",msg.text());

//        // 获取用户ID
//        JSONObject jsonObject = JSONUtil.parseObj(msg.text());
//        String uid = jsonObject.getStr("uid");
//
//        // 将用户ID作为自定义属性加入到channel中,方便随时channel中获取用户ID
//        AttributeKey<String> key = AttributeKey.valueOf("userId");
//        ctx.channel().attr(key).setIfAbsent(uid);
//
//        // 关联channel
//        NettyConfig.getUserChannelMap().put(uid,ctx.channel());

        // 回复消息
        ctx.channel().writeAndFlush(new TextWebSocketFrame("服务器连接成功!"));
    }

    @Override
    public void handlerRemoved(ChannelHandlerContext ctx) throws Exception {
        log.info("handlerRemoved 被调用"+ctx.channel().id().asLongText());
        // 删除通道
        NettyConfig.getChannelGroup().remove(ctx.channel());
        removeUserId(ctx);
    }

    @Override
    public void exceptionCaught(ChannelHandlerContext ctx, Throwable cause) throws Exception {
        log.info("异常:{}",cause.getMessage());
        // 删除通道
        NettyConfig.getChannelGroup().remove(ctx.channel());
        removeUserId(ctx);
        ctx.close();
    }

    /**
     * 删除用户与channel的对应关系
     * @param ctx
     */
    private void removeUserId(ChannelHandlerContext ctx){
        AttributeKey<String> key = AttributeKey.valueOf("userId");
        String userId = ctx.channel().attr(key).get();
        NettyConfig.getUserChannelMap().remove(userId);
    }
}
本地测试的前端代码
<!DOCTYPE html>
<html lang="en">
<head>
    <meta charset="UTF-8">
    <title>Title</title>
</head>
<body>
<script>
    var socket;
    // 判断当前浏览器是否支持webSocket
    if(window.WebSocket){
        socket = new WebSocket('ws://localhost:58080/webSocket','custome-protocol')
        // 相当于channel的read事件,ev 收到服务器回送的消息
        socket.onmessage = function (ev) {
            var rt = document.getElementById("responseText");
            rt.value = rt.value + "\n" + ev.data;
        }
        // 相当于连接开启
        socket.onopen = function (ev) {
            // 设置请求头
            var rt = document.getElementById("responseText");
            rt.value =  "连接开启了..."
            socket.send(
                JSON.stringify({
                    // 连接成功将,用户ID传给服务端
                    uid: "123456"
                })
            );
        }
        // 相当于连接关闭
        socket.onclose = function (ev) {
            var rt = document.getElementById("responseText");
            rt.value = rt.value + "\n" + "连接关闭了...";
        }
        socket.addEventListener('beforeSend', function(event) {
            event.target.setRequestHeader('Authorization', 'Bearer ' + '1111');
            event.target.setRequestHeader('Custom-Header', 'value');
        });
    }else{
        alert("当前浏览器不支持webSocket")
    }


</script>
    <form onsubmit="return false">
        <textarea id="responseText" style="height: 150px; width: 300px;"></textarea>
        <input type="button" value="清空内容" onclick="document.getElementById('responseText').value=''">
    </form>
</body>
</html>
4.加一个心跳处理
import io.netty.channel.ChannelHandlerContext;
import io.netty.channel.ChannelInboundHandlerAdapter;
import io.netty.handler.timeout.IdleState;
import io.netty.handler.timeout.IdleStateEvent;

/**
 * 若连续2次无读事件,则关闭这个客户端channel
 * @author sixiaojie
 * @date 2020-08-21-16:14
 */

public class HeartBeatHandler extends ChannelInboundHandlerAdapter {

    private int lossConnectCount = 0;
    @Override
    public void userEventTriggered(ChannelHandlerContext ctx, Object evt) throws Exception {
        if (evt instanceof IdleStateEvent){
            IdleStateEvent event = (IdleStateEvent)evt;
            if (event.state()== IdleState.READER_IDLE){
                lossConnectCount ++;
                if (lossConnectCount > 2){
                    ctx.channel().close();
                }
            }
        }else {
            super.userEventTriggered(ctx,evt);
        }
    }
}
5.NettyServer实现WebSocket
将上面的自定义实现的处理器都丢进去
import io.netty.bootstrap.ServerBootstrap;
import io.netty.channel.ChannelFuture;
import io.netty.channel.ChannelInitializer;
import io.netty.channel.EventLoopGroup;
import io.netty.channel.nio.NioEventLoopGroup;
import io.netty.channel.socket.SocketChannel;
import io.netty.channel.socket.nio.NioServerSocketChannel;
import io.netty.handler.codec.http.HttpObjectAggregator;
import io.netty.handler.codec.http.HttpServerCodec;
import io.netty.handler.codec.http.websocketx.WebSocketServerProtocolHandler;
import io.netty.handler.codec.serialization.ObjectEncoder;
import io.netty.handler.stream.ChunkedWriteHandler;
import io.netty.handler.timeout.IdleStateHandler;
import org.slf4j.Logger;
import org.slf4j.LoggerFactory;
import org.springframework.beans.factory.annotation.Autowired;
import org.springframework.beans.factory.annotation.Value;
import org.springframework.stereotype.Component;

import javax.annotation.PostConstruct;
import javax.annotation.PreDestroy;
import java.net.InetSocketAddress;

/**
 * @author sixiaojie
 * @date 2020-03-28-13:44
 */

@Component
public class NettyServer{
    private static final Logger log = LoggerFactory.getLogger(NettyServer.class);
    /**
     * webSocket协议名
     */
    private static final String WEBSOCKET_PROTOCOL = "WebSocket";

    /**
     * 端口号
     */
    @Value("${webSocket.netty.port:58080}")
    private int port;

    /**
     * webSocket路径
     */
    @Value("${webSocket.netty.path:/webSocket}")
    private String webSocketPath;

    @Autowired
    private WebSocketHandler webSocketHandler;

    @Autowired
    private AuthHandler authHandler;

    private EventLoopGroup bossGroup;
    private EventLoopGroup workGroup;

    /**
     * 启动
     * @throws InterruptedException
     */
    private void start() throws InterruptedException {
        bossGroup = new NioEventLoopGroup();
        workGroup = new NioEventLoopGroup();
        ServerBootstrap bootstrap = new ServerBootstrap();
        // bossGroup辅助客户端的tcp连接请求, workGroup负责与客户端之前的读写操作
        bootstrap.group(bossGroup,workGroup);
        // 设置NIO类型的channel
        bootstrap.channel(NioServerSocketChannel.class);
        // 设置监听端口
        bootstrap.localAddress(new InetSocketAddress(port));
        // 连接到达时会创建一个通道
        bootstrap.childHandler(new ChannelInitializer<SocketChannel>() {

            @Override
            protected void initChannel(SocketChannel ch) throws Exception {
                // 流水线管理通道中的处理程序(Handler),用来处理业务
                // webSocket协议本身是基于http协议的,所以这边也要使用http编解码器
                ch.pipeline().addLast(new HttpServerCodec());
                ch.pipeline().addLast(new ObjectEncoder());
                // 以块的方式来写的处理器
                ch.pipeline().addLast(new ChunkedWriteHandler());
                /*
                说明:
                1、http数据在传输过程中是分段的,HttpObjectAggregator可以将多个段聚合
                2、这就是为什么,当浏览器发送大量数据时,就会发送多次http请求
                 */
                ch.pipeline().addLast(new HttpObjectAggregator(8192));
                // 自定义的handler,处理身份验证
                ch.pipeline().addLast(authHandler);
                //针对客户端,若10s内无读事件则触发心跳处理方法HeartBeatHandler#userEventTriggered
                ch.pipeline().addLast(new IdleStateHandler(10 , 0 , 0));
                //自定义空闲状态检测(自定义心跳检测handler)
                ch.pipeline().addLast(new HeartBeatHandler());
                /*
                说明:
                1、对应webSocket,它的数据是以帧(frame)的形式传递
                2、浏览器请求时 ws://localhost:58080/xxx 表示请求的uri
                3、核心功能是将http协议升级为ws协议,保持长连接
                */
                ch.pipeline().addLast(new WebSocketServerProtocolHandler(webSocketPath, WEBSOCKET_PROTOCOL, true, 65536 * 10));
                // 自定义的handler,处理业务逻辑
                ch.pipeline().addLast(webSocketHandler);

            }
        });
        // 配置完成,开始绑定server,通过调用sync同步方法阻塞直到绑定成功
        ChannelFuture channelFuture = bootstrap.bind().sync();
        log.info("Server started and listen on:{}",channelFuture.channel().localAddress());
        // 对关闭通道进行监听
        channelFuture.channel().closeFuture().sync();
    }

    /**
     * 释放资源
     * @throws InterruptedException
     */
    @PreDestroy
    public void destroy() throws InterruptedException {
        if(bossGroup != null){
            bossGroup.shutdownGracefully().sync();
        }
        if(workGroup != null){
            workGroup.shutdownGracefully().sync();
        }
    }
    @PostConstruct()
    public void init() {
        //需要开启一个新的线程来执行netty server 服务器
        new Thread(() -> {
            try {
                start();
            } catch (InterruptedException e) {
                e.printStackTrace();
            }
        }).start();

    }


}
6.把发送消息Service补上
本文没有实现分布式的情况下如何处理消息发送,需要的同学可以参考文章的第一个链接文章来源:https://www.toymoban.com/news/detail-762660.html
/**
 * @author sixiaojie
 * @date 2020-03-30-17:06
 */
public interface PushService {
    /**
     * 推送给指定用户
     * @param userId
     * @param msg
     */
    void pushMsgToOne(String userId,String msg);

    /**
     * 推送给所有用户
     * @param msg
     */
    void pushMsgToAll(String msg);
}
import com.feishu.estate.netty.nettypush.config.NettyConfig;
import com.feishu.estate.netty.nettypush.constant.BaseConstant;
import com.feishu.estate.netty.nettypush.pubsub.NettyPushMessageBody;
import io.netty.channel.Channel;
import io.netty.handler.codec.http.websocketx.TextWebSocketFrame;
import org.springframework.beans.factory.annotation.Autowired;
import org.springframework.data.redis.core.RedisTemplate;
import org.springframework.stereotype.Service;

import java.util.Objects;
import java.util.concurrent.ConcurrentHashMap;

/**
 * @author sixiaojie
 * @date 2020-03-30-20:10
 */
@Service
public class PushServiceImpl implements PushService {
//    @Autowired
//    private RedisTemplate redisTemplate;

    @Override
    public void pushMsgToOne(String userId, String msg){
        ConcurrentHashMap<String, Channel> userChannelMap = NettyConfig.getUserChannelMap();
        Channel channel = userChannelMap.get(userId);
        if(!Objects.isNull(channel)){
            // 如果该用户的客户端是与本服务器建立的channel,直接推送消息
            channel.writeAndFlush(new TextWebSocketFrame(msg));
        }else {
            // 发布,给其他服务器消费
//            NettyPushMessageBody pushMessageBody = new NettyPushMessageBody();
//            pushMessageBody.setUserId(userId);
//            pushMessageBody.setMessage(msg);
//            redisTemplate.convertAndSend(BaseConstant.PUSH_MESSAGE_TO_ONE,pushMessageBody);
        }

    }
    @Override
    public void pushMsgToAll(String msg){
        // 发布,给其他服务器消费
//        redisTemplate.convertAndSend(BaseConstant.PUSH_MESSAGE_TO_ALL,msg);
        NettyConfig.getChannelGroup().writeAndFlush(new TextWebSocketFrame(msg));
    }
}
ok,到此就大概完成了用netty搭建websocket文章来源地址https://www.toymoban.com/news/detail-762660.html
到了这里,关于基于Springboot用Netty实现WebSocket及用户身份校验的文章就介绍完了。如果您还想了解更多内容,请在右上角搜索TOY模板网以前的文章或继续浏览下面的相关文章,希望大家以后多多支持TOY模板网!