Vue项目配置
使用Vite创建一个Vue项目,点我查看如何创建
配置打包路径
在Nginx中如果是二级目录,例如
/web时,需要设置线上的打包路径
在项目跟路径下创建两个文件:.env.production、.env.development,写入一下内容:
##生产环境
NODE_ENV = 'production'
VITE_BASE_PATH = /form-designer/
##开发环境
NODE_ENV = 'development'
VITE_BASE_PATH = '/'
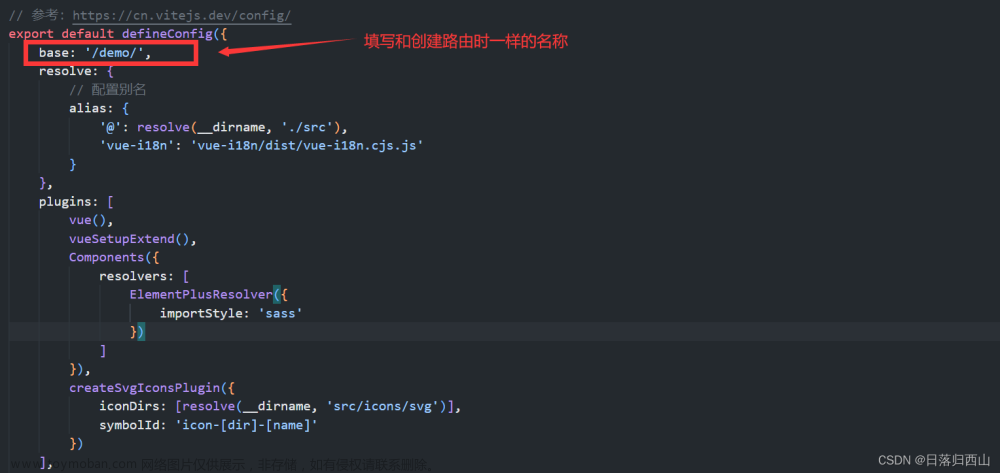
在vite.config.js中配置base属性,打开配置文件:
import { defineConfig, loadEnv } from 'vite'
import vue from '@vitejs/plugin-vue'

// https://vitejs.dev/config/
export default defineConfig(({ mode }) =>{
  // 获取 .env 环境配置文件
  const env = loadEnv(mode, process.cwd());
  return {
    base: env.VITE_BASE_PATH,
    plugins: [vue()],
  }
})
修改package.json,添加build命令:
"scripts": {
  "dev": "vite",
  "build": "vite build --mode production",
  "preview": "vite preview"
},
配置路由
路由有两种模式:Hash和History
Hash模式
该模式下无需做过多配置
const router = createRouter({
  history: createWebHashHistory(''),
  routes,
  ....
});
history模式
该模式需要设置base路径
const router = createRouter({
  history: createWebHistory(import.meta.env.VITE_BASE_PATH),
  routes,
  ....
});
打包项目
使用下面命令打包
npm run build
压缩文件夹,方便上传到服务器进行打包部署
tar -zcvf dist.tar.gz dist/
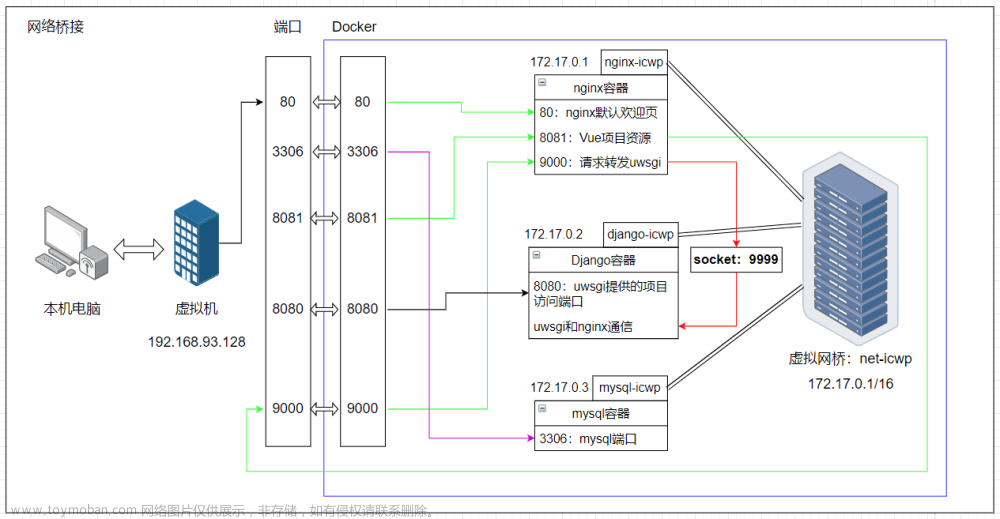
Docker配置
工作系统中需要安装Docker环境,打包镜像用。这里以CentOS为例安装Docker
使用下面命令安装:
curl -fsSL https://get.docker.com | bash -s docker --mirror Aliyun
出现命令提示,即为安装成功:
[root@swcode docker]# docker

Usage:  docker [OPTIONS] COMMAND

A self-sufficient runtime for containers

Common Commands:
  run         Create and run a new container from an image
  exec        Execute a command in a running container
  ps          List containers
  build       Build an image from a Dockerfile
  pull        Download an image from a registry
  push        Upload an image to a registry
  images      List images
  login       Log in to a registry
  logout      Log out from a registry
  search      Search Docker Hub for images
  version     Show the Docker version information
  info        Display system-wide information
配置Docker镜像源:
进入下面目录:
cd /etc/docker/
创建daemon.json,写入下面内容:
{
  "registry-mirrors": ["http://hub-mirror.c.163.com","https://docker.mirrors.ustc.edu.cn","https://mirror.baidubce.com","https://registry.docker-cn.com"]
}
阿里云的镜像加速很好用的,点我获取加速地址
使配置生效
systemctl daemon-reload
systemctl restart docker
制作镜像
将文件上传到服务器上进行打包和发布,Dockerfile和要打包的文件需要在同一个目录下,确保服务器上已经安装Docker环境。
Dockerfile
# Docker image for vue application
# VERSION 1.0.0
# Author: swcode

### 基础镜像,使用nginx镜像
FROM nginx

#作者
MAINTAINER swcode <2627311935@qq.com>

#应用构建成功后的文件被复制到镜像内
COPY dist /usr/share/nginx/html/form-designer/

#拷贝.conf文件到镜像下,替换掉原有的nginx.conf
COPY nginx.conf /etc/nginx/nginx.conf

#启动容器时的进程
ENTRYPOINT nginx -g "daemon off;"
Nginx配置
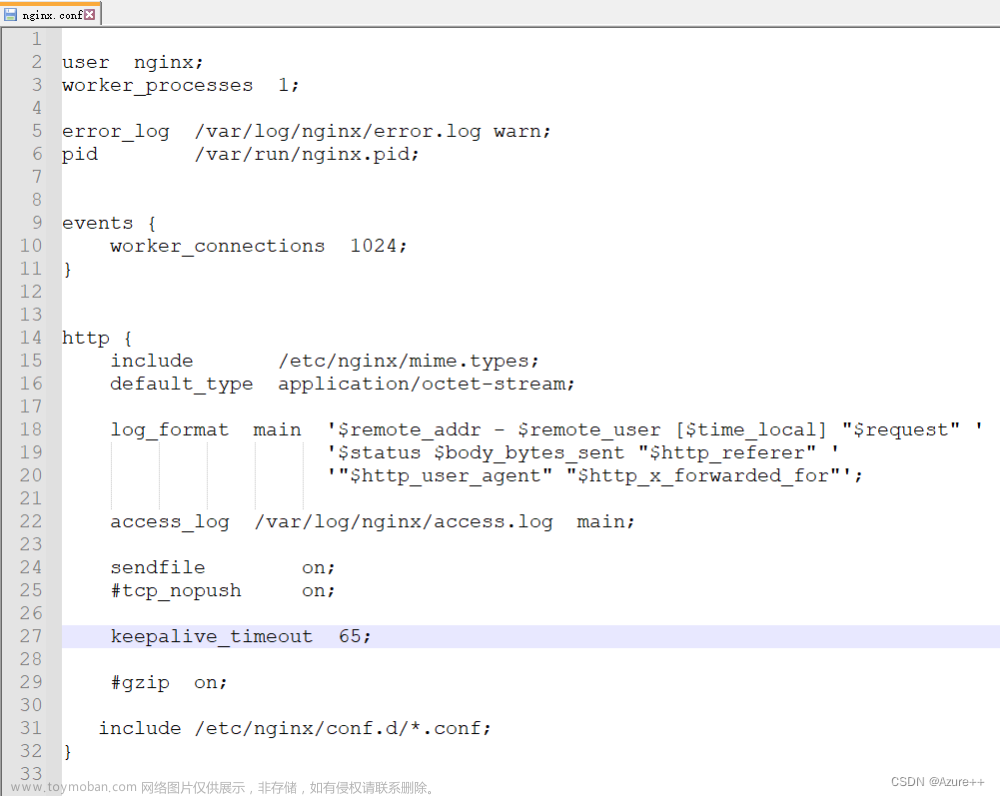
创建nginx.conf配置文件,基于location实现二级访问目录,修改配置信息:
worker_processes  1;

events {
    worker_connections  1024;
}

http {
    include       mime.types;
    default_type  application/json;
    sendfile        on;
    keepalive_timeout  65;

    server {
        listen       80;
        server_name  localhost;
        location / {
            root    /usr/share/nginx/html;
            index   index.html index.htm;
        }

        location ^~/form-designer {
            alias       /usr/share/nginx/html/form-designer;
            index       index.html index.htm;
      			# 路由为 history 模式需要设置该项
            try_files   $uri $uri/ /form-designer/index.html;
        }

        # 代理服务
        location /api {
            default_type  application/json;
            #internal;
            keepalive_timeout   30s;
            keepalive_requests  1000;
            #支持keep-alive
            proxy_http_version 1.1;
            # 路径重写 /api/user => /user
            rewrite /api(/.*) $1 break;
            proxy_pass_request_headers on;
            proxy_next_upstream error timeout;
            # Docker同一网络内部使用服务名访问
            proxy_pass http://microService:8800;
        }

        error_page   500 502 503 504  /50x.html;
        location = /50x.html {
            root   html;
        }

    }
    include servers/*;
}
注意!配置了root之后,其他的二级目录需要使用alias
如果是Docker部署,且后端项目和前端项目在同一自定义网络下(使用Docker Compose编排),代理地址使用服务名即可
上传文件
将dist.tar.gz上传到服务器,使用下面命令解压
tar -zxvf dist.tar.gz
确保下面三个文件在同一目录
Dockerfile
nginx.conf
dist/
build镜像
使用下面命令,build镜像
docker build -t form-designer .
- form-designer:表示镜像名
- ‘.’:表示当前目录
ngnix没有指定版本会自动拉取最新版,等待镜像build。。。
[root@swcode dockerfile]# docker build -t form-designer .
[+] Building 0.1s (8/8) FINISHED
 => [internal] load build definition from Dockerfile                                                                                                        0.0s
 => => transferring dockerfile: 469B                                                                                                                        0.0s
 => [internal] load .dockerignore                                                                                                                           0.0s
 => => transferring context: 2B                                                                                                                             0.0s
 => [internal] load metadata for docker.io/library/nginx:latest                                                                                             0.0s
 => [1/3] FROM docker.io/library/nginx                                                                                                                      0.0s
 => [internal] load build context                                                                                                                           0.0s
 => => transferring context: 1.15kB                                                                                                                         0.0s
 => CACHED [2/3] COPY dist /usr/share/nginx/html/form-designer/                                                                                             0.0s
 => [3/3] COPY nginx.conf /etc/nginx/nginx.conf                                                                                                             0.0s
 => exporting to image                                                                                                                                      0.0s
 => => exporting layers                                                                                                                                     0.0s
 => => writing image sha256:3212e45813e7d278aa33982cc7373e55418b9a3ed65c0249b8fd55c70bf6ee32                                                                0.0s
 => => naming to docker.io/library/form-designer
使用docker命令查看镜像
[root@swcode dockerfile]# docker images
REPOSITORY      TAG       IMAGE ID       CREATED          SIZE
form-designer   latest    372e067b2c6a   48 minutes ago   190MB
运行容器
使用下面命令运行容器:
docker run --name form-designer-web -p 81:80 -d form-designer
- form-designer-web:是容器名
- form-designer:是镜像名
- -p 81:80:表示服务器端口(外部)81映射到容器内部端口80
使用docker命令查看容器
[root@swcode dockerfile]# docker ps
CONTAINER ID   IMAGE           COMMAND                  CREATED          STATUS          PORTS                NAMES
65f0979310a1   form-designer   "/bin/sh -c 'nginx -…"   48 minutes ago   Up 48 minutes   0.0.0.0:81->80/tcp   form-designer-web
访问网站
访问网址:http://ip:81/form-designer文章来源:https://www.toymoban.com/news/detail-771280.html
 文章来源地址https://www.toymoban.com/news/detail-771280.html
其他命令
删除镜像
docker rmi [镜像名 | 镜像ID]
删除容器
docker rm -f [容器名 | 容器ID]
到了这里,关于使用Docker将Vite Vue项目部署到Nginx二级目录的文章就介绍完了。如果您还想了解更多内容,请在右上角搜索TOY模板网以前的文章或继续浏览下面的相关文章,希望大家以后多多支持TOY模板网!