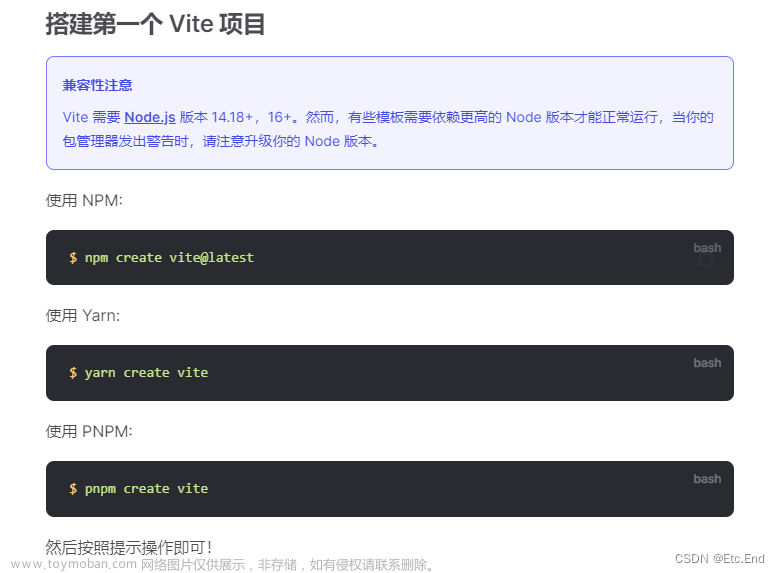
TypeScript快速上手语法+结合vue3用法
前言:
本篇内容不涉及TypeScript安装以及配置,具体安装及配置篇可以看下面目录,本篇只涉及TypeScript语法相关内容,及结合vue3的用法。不讲废话,简单直接直接开撸。
目录
TypeScript的具体安装及配置
TypeScript快速上手语法+结合vue3用法
1、定义原始类型
2、定义object 类型
3.定义数组类型
4.定义元祖类型
5.定义enum 类型
6.定义函数类型
7.定义任意类型
8.隐式类型推断
9.类型断言
10、 接口 interface
11、类 Class
12.类与接口
13.抽象类
14. 泛型 Generics
Vue3+TS基础语法
🧨🧨🧨定义data
🧨🧨🧨定义props
🧨🧨🧨定义methods
vue-router
在setup中使用
🧨🧨🧨 vuex
在setup中使用
模块
🧨🧨🧨 在setup如何定义变量(字符串,对象,数组)
Watch和WatchEffect
Vue3生命周期调用

1、定义原始类型
const a: string = 'foo'
const b: number = 100
const c: boolean = true
const d: void = undefined
const e: null = null
const f: undefined = undefined
const g: symbol = Symlol()
2、定义object 类型
const foo: object = function () {} // [] // {}
const obj: { foo: number,bar: string } = { foo: 123, bar: 'string' }
3.定义数组类型
// 第一种定义方式,元素类型设置为 *number*
const arr1: Array<number> = [1, 2, 3]
// 第二种定义方式,较为常见
const arr2: number[] = [1, 2, 3]

// 例子
function sum (...args: number[]) {
    // 传统做法是要判断传入的参数是否是数字,
       而TypeScript中只需要像上面这样对参数做一个类型注解,就行了
    return args.reduce(prev, current) => prev + current, 0)
}

sum(1, 2, 3, 'foo') // 这里传入了一个非数字的值就会报错
4.定义元祖类型
const tuple: [number, string] = [18, 'foo']
// const tuple: [number, string] = [18, 18] 类型不匹配,会报错
// const tuple: [number, string] = [18, 'foo', 'xxx'] 数量不匹配,会报错

// 访问
const age = tuple[0]
const name = tuple[1]

// 解构
const [age, name] = tuple
5.定义enum 类型
// enum 对象的属性可以不用赋值,默认从0开始递增,
   也可以赋值Draft = 5,后面的就从5开始递增
   也可以给具体的值,比如 Draft = 'xxx',这样后面的属性都要给具体的值
enum PostStatus {
    Draft = 0,
    Unpublished = 1,
    Published = 2
}

const post = {
    title: 'Hello TypeScript',
    content: 'TypeScript is a typed superset of JavaScript.',
    status: PostStatus.Draft // 0 // 1 // 2
}
6.定义函数类型
// 声明式函数
// 参数a和b是number类型,函数返回是string类型,
// 参数后带问号代表是可选参数
// 当参数数量不固定的时候可以使用rest运算符来接受参数,类型是一个值为number的数组
function func1 (a: number, b?: number, ...rest: number[]): string {
    return 'func1'
}

// 函数表达式定义函数
const func2 = function (a: number, b: number): string {
    return 'func2'
}

// 如果把一个函数作为参数传递,类似callback函数。
function fntD(callback: (bl: boolean) => boolean) {
    callback(true)
}
function callback(bl: boolean): boolean {
    console.log(bl)
    return bl
}
const dResult = fntD(callback)
7.定义任意类型
// value 可以接受任意类型
function stringfy (value: any) {
    return JSON.stringify(value)
}

stringify('string')
stringify(10)
stringify(true)

// foo 可以任意赋值
let foo: any = 'string'
foo = 100
8.隐式类型推断
// age 赋值为 number 类型
let age = 18 // number

age = 'string' // 会警告错误,因为age是number类型

let foo // 没有赋值,就是any类型

foo = 100
foo = 'string'
9.类型断言
// 假定这个 nums 来自一个明确的接口
const nums = [110, 120, 119, 112]

// 这里TypeScript推断res的类型为 number|undefined
// 因为它并不知道这个i到底在数组中有没有
const res = nums.find(i => i > 0)

// 这里就会报错警告
const square = res * res

// 如果我们直接 断言 这个 res 就是 number 类型
const num1 = res as number

// 这里就不会报错了
const square = res * res
10、 接口 interface
接口用来约定对象的结构,一个对象要实现一个接口,就必须拥有这个接口中所包含的所有成员
interface Post {
    title: string
    content: string
}

function printPost (post: Post) {
    console.log(post.title)
    console.log(post.content)
}

printPost({
    title: 'Hello TypeScript',
    content: 'A JavaScript superset'
})

// 特殊的接口成员 可选成员 只读成员
interface Post{
    title: string
    content: string
    subtitle?: string // 加问号就是可选成员
    readonly summary: string // 加 readonly 就是只读成员
}

const hello: Post = {
    title: 'Hello TypeScript',
    content: 'A javascript superset',
    summary: 'a javascript'
}

hello.summary = 'other' // 会报错,因为 summary 是只读成员

// 动态成员
interface Cache {
    [prop: string]: string
}

const cache: Cache = {}

cache.foo = 'value1'
cache.bar = 'value2'
11、类 Class
Class Person {
    // 在这里赋值,和在构造函数中初始化必须两者选其一
    name: string // = 'init name' 这里可以直接初始化
    private age: number // 这里定义 age 为私有属性
    protected gender: boolean // 受保护的类型
    readonly national: string // 只读属性,一经初始化,不可更改

    constructor (name: string, age: number) {
        // 需要在上面标注出构造函数中属性的类型
        this.name = name
        this.age = age
        this.gender = true
        this.national = national
    }

    sayHi (msg: string): void {
        console.log(`I am ${this.name}, ${msg}`)
        console.log(this.age)
    }
}

const tom = new Person('tom', 18)
console.log(tom.name) // tom
console.log(tom.age) // 报错,因为 age 是私有属性,所以访问不到
console.log(tom.gender) // 报错,因为 gender 是受保护的属性,这里访问不到

// 在下方新声明一个类 student 继承与 Person
class Student extends Person {
    constructor (name: string, age: number) {
    super(name, age)
    console.log(this.gender) // 这里就一个访问到 受保护的属性 gender
}
12.类与接口
interface Eat {
    eat (food: string): void
}

interface Run {
    run (distance: number): void
}

// Person类,实现了 Eat 和 Run 两个接口
class Person implements Eat, Run {
    eat (food: string): void {
        console.log(`优雅的进餐:${food}`)
    }

    run (distance: number) {
        console.log(`直立行走:${distance}`)
    }
}

// Animal类,实现了 Eat 和 Run 两个接口
class Animal implements Eat, Run {
    eat (food: string): void {
        console.log(`饥不择食的吃:${food}`)
    }

    run (distance: number) {
        console.log(`爬行:${distance}`)
    }
}
13.抽象类
abstract 定义抽象类,抽象类只能被继承,不能通过 new 的方式创建实例对象
// 定义一个抽象类 Animal
abstract class Animal {
    eat (food: string): void {
        console.log(`饥不择食的吃:${food}`)
    }

    // 定义一个抽象方法 run,可以不需要方法体。
    // 定义了抽象方法之后,子类中必须实现这个抽象方法
    abstract run (distance: number): void
}

class Dog extends Animal {
    run(distance: number): void {
        console.log('四脚爬行', distance)
    }
}

const d = new Dog()
d.eat('嘎嘎') // 饥不择食的吃:嘎嘎
d.run(100) // 四脚爬行 100
14. 泛型 Generics
泛型是指在定义接口函数类的时候,没有指定具体的类型,等到我们在使用的时候再去指定具体的类型的这种特征
// 这里声明一个创建 number 类型数组的函数 creatNumberArray
function createNumberArray (length: number, value: number): number[] {
    // 这里的Array是 any 类型,所以要给它指定一个 Number 类型
    const arr = Array<number>(length).fill(value)
    return arr
}

// 这里声明一个创建 String 类型数组的函数 createStringArray
function createStringArray (length: number, value: string): string[] {
    const arr = Array<string>(length).fill(value)
    return arr
}

// 因为上面的两个函数代码有冗余,所以这里我们可以使用 泛型
// 一般我们使用 T 来作为泛型参数的名称,然后把函数中不明确的类型都改为 T 来做代表
function createArray<T> (length: number, value: T): T[] {
    const arr = Array<T>(length).fill(value)
    return arr
}

// 然后使用泛型的时候 传递 T 的类型
const res = creatArray<string>(3,'foo')

// const res = createNumberArray(3, 100)
// res => [100, 100, 100]
==============================分割线=============================
下面是结合vue3的项目写法
Vue3+TS基础语法
🧨🧨🧨定义data
script标签上lang="ts"
定义一个类型type或者接口interface来约束data
可以使用ref或者toRefs来定义响应式数据
使用ref在setup读取的时候需要获取xxx.value,但在template中不需要
使用reactive时,可以用toRefs解构导出,在template就可以直接使用了
<script lang="ts">
import { defineComponent, reactive, ref, toRefs } from 'vue';

type Todo = {
  id: number,
  name: string,
  completed: boolean
}

export default defineComponent({
  const data = reactive({
    todoList: [] as Todo[]
  })
  const count = ref(0);
  console.log(count.value)
  return {
    ...toRefs(data)
  }
})
</script>
🧨🧨🧨定义props
props需要使用PropType泛型来约束。
<script lang="ts">
import { defineComponent, PropType} from 'vue';

interface UserInfo = {
  id: number,
  name: string,
  age: number
}

export default defineComponent({
  props: {
    userInfo: {
      type: Object as PropType<UserInfo>, // 泛型类型
      required: true
    }
  },
})
</script>
复制代码
defineProps 和 defineEmits
注意:defineProps 和 defineEmits 都是只在
为了声明 props 和 emits 选项且具备完整的类型推断,可以使用 defineProps 和 defineEmits API,它们在 <script setup> 中都是自动可用的:
- defineProps 和 defineEmits 都是只在 <script setup> 中才能使用的****编译器宏。他们不需要导入,且会在处理 <script setup> 的时候被编译处理掉。
- defineProps 接收与 props 选项相同的值,defineEmits 也接收 emits 选项相同的值。
- defineProps 和 defineEmits 在选项传入后,会提供恰当的类型推断。
- 传入到 defineProps 和 defineEmits 的选项会从 setup 中提升到模块的范围。因此,传入的选项不能引用在 setup 范围中声明的局部变量。这样做会引起编译错误。但是,它可以引用导入的绑定,因为它们也在模块范围内。
父组件
//父组件

<script setup lang="ts">
    import TestPropsPmit from './components/test-props-emit/index.vue';
    import { ref } from 'vue';

    // 定义字符串变量
    const msg = ref('欢迎使用vite!')
	// 调用事件
    const handleChange = (params:string) =>{
        console.log(params);
    }
</script>
<template>
	<TestPropsPmit :msg="msg" @on-change="handleChange"></TestPropsPmit>
</template>
子组件
//子组件

<template>
    <p>{{props.msg}}</p>
    <button @click="handleClick">点击我调用父组件方法</button>
</template>
<script setup lang="ts">
    const props = defineProps({
         msg:{
            type: String,
            default: () => '默认值'
         }
    })
    const  emit = defineEmits(['on-change', 'update'])
    const handleClick = () =>{
        emit('on-change', '父组件方法被调用了')
    }
</script>
子组件暴露属性和方法,给父组件引用
<script setup lang="ts">
function testChild():void{
    console.log('子组件方法testChild被调用了');
}
const b = ref(2)
// 统一暴露属性
defineExpose({
    obj:{name: '张三', age: 2300},
    b,
    testChild
})
</script>
父组件调用子组件方法和属性
<template>
    <TestPropsEmit ref="propsEmitRef" :msg='msg' @on-change="handleChange">         	</TestPropsEmit>
</template>
<script setup lang="ts">
    import TestPropsEmit from './components/test-props-emit/index.vue';
    import {ref, onMounted} from 'vue';

    const msg = ref('欢迎学习vite')

    const handleChange = (params:string)=>{
        console.log(params);
    }

    const propsEmitRef = ref()
    onMounted(()=>{
        console.log(propsEmitRef.value.child);
    })
</script>
🧨🧨🧨定义methods
<script lang="ts">
import { defineComponent, reactive, ref, toRefs } from 'vue';

type Todo = {
  id: number,
  name: string,
  completed: boolean
}

export default defineComponent({
  const data = reactive({
    todoList: [] as Todo[]
  })
  // 约束输入和输出类型
  const newTodo = (name: string):Todo  => {
    return {
      id: this.items.length + 1,
      name,
      completed: false
    };
  }
  const addTodo = (todo: Todo): void => {
    data.todoList.push(todo)
  }
  return {
    ...toRefs(data),
    newTodo,
    addTodo
  }
})
</script>
vue-router
- createRouter创建router实例
- router的模式分为:
- createWebHistory -- history模式
- createWebHashHistory -- hash模式
- routes的约束类型是RouteRecordRaw
import { createRouter, createWebHistory, RouteRecordRaw } from 'vue-router';
import Home from '../views/Home.vue';
const routes: Array< RouteRecordRaw > = [
  {
    path: '/',
    name: 'Home',
    component: Home,
  },
  {
    path: '/about',
    name: 'About',
    component: () => import(/* webpackChunkName: "about" */ '../views/About.vue')
  }
];

const router = createRouter({
  history: createWebHistory(process.env.BASE_URL),
  routes
});

export default router;
扩展路由额外属性
在实际项目开发中,常常会遇到这么一个场景,某一个路由是不需要渲染到侧边栏导航上的,此时我们可以给该路由添加一个hidden属性来实现。
在ts的强类型约束下,添加额外属性就会报错,那么我们就需要扩展RouteRecordRaw类型。
在setup中使用
需要导入useRouter创建一个router实例。
<script lang="ts">
import { useRouter } from 'vue-router';
import { defineComponent } from 'vue';
export default defineComponent({
  setup () {
    const router = useRouter();
    goRoute(path) {
       router.push({path})
    }
  }
})
</script>
🧨🧨🧨 vuex
使用this.$store
import { createStore } from 'vuex';
export type State = {
  count: number
}

export default createStore({
  state: {
    count: 0
  }
});
需要创建一个声明文件vuex.d.ts
// vuex.d.ts
import {ComponentCustomProperties} from 'vue';
import {Store} from 'vuex';
import {State} from './store'
declare module '@vue/runtime-core' {
    interface ComponentCustomProperties {
        $store: Store<State>
    }
}
在setup中使用
- 定义InjecktionKey
- 在安装插件时传入key
- 在使用useStore时传入
import { InjectionKey } from 'vue';
import { createStore, Store } from 'vuex';

export type State = {
  count: number
}
// 创建一个injectionKey
export const key: InjectionKey<Store<State>> = Symbol('key');
// main.ts
import store, { key } from './store';
app.use(store, key);
<script lang="ts">
import { useStore } from 'vuex';
import { key } from '@/store';
export default defineComponent({
setup () {
const store = useStore(key);
const count = computed(() => store.state.count);
return {
count
}
}
})
</script>模块
新增一个todo模块。导入的模块,需要是一个vuex中的interface Module的对象,接收两个泛型约束,第一个是该模块类型,第二个是根模块类型。
// modules/todo.ts
import { Module } from 'vuex';
import { State } from '../index.ts';

type Todo = {
  id: number,
  name: string,
  completed: boolean
}

const initialState = {
  todos: [] as Todo[]
};

export type TodoState = typeof initialState;

export default {
  namespaced: true,
  state: initialState,
  mutations: {
    addTodo (state, payload: Todo) {
      state.todos.push(payload);
    }
  }
} as Module<TodoState, State>; //Module<S, R> S 该模块类型 R根模块类型
// index.ts
export type State = {
  count: number,
  todo?: TodoState // 这里必须是可选,不然state会报错
}

export default createStore({
  state: {
    count: 0
  }
  modules: {
    todo
  }
});
使用:
setup () {
  console.log(store.state.todo?.todos);
}
🧨🧨🧨 在setup如何定义变量(字符串,对象,数组)
<template>
    <h2>{{count}} {{user.name}}</h2>
    <span v-for="(item, index) in arr" :key="index">{{item}}</span>
    <button @click="setName">点击我增加</button>
</template>
<script setup lang="ts">
    import { ref, reactive } from 'vue';
    // 字符串变量
    const count = ref(0)
    // 对象
    let user = reactive({
        name: '张三'
    })
    // 数组
    let arr = reactive(['1', '2', '3'])

    // 综合定义方案
    const originData = reactive({
        count: 0,
        user:{
            name: '张三'
        },
        arr: ['1', '2', '3']
    })

    // 方法
    const setName = ()=>{
        count.value++
        user.name = '李四'
    }
</script>
Watch和WatchEffect
1、基本使用方法:
<template>
    <p>{{originData.count}}  {{originData.user.name}}</p>
    <p v-for="(item, index) in originData.arr" :key="index">{{item}}</p>
    <button @click="incriment">点击我count增加</button>
</template>
<script setup lang="ts">
    import { ref, reactive, watchEffect, watch } from 'vue';

    const count = ref(0)
    const user = reactive({name: '张三'})
    const arr = reactive([1,2,3,4])

    // 综合定义方案
    const originData = reactive({
        count: 0,
        user:{
            name: '张三'
        },
        arr:[1,2,3,4]
    })
    const incriment = ()=>{
        originData.count++
        count.value++
        originData.user.name = '李四'
    }
	// 默认页面更新之前立即执行监听,懒执行开始
    watchEffect(() => console.log(count.value))
    // 默认监听数据变化后的值,页面更新后不会立即执行
    watch(count, (n, o) => {
        console.log('watch', n, o);
    })

    // 监听多个值
    watch([count, originData.user], (newValues, prevValues) => {
        console.log(newValues[0], newValues[1].name)
    })

    // 立即监听
    watch([count, originData.user], (newValues, prevValues) => {
        console.log(newValues[0], newValues[1].name)
    }, {deep: true, immediate: true})

</script>
提示:
watch与 watchEffect 比较,推荐watch监听
watch: 页面更新后不会立即执行,而watchEffect 它会执行;
🧨🧨🧨Vue3生命周期调用
在 setup () 内部调用生命周期钩子:
- 选项式 API Hook inside setup
- beforeCreate Not needed* 不需要
- created Not needed* 不需要
- beforeMount onBeforeMount 挂载之前
- mounted onMounted 页面加载完成时执行
- beforeUpdate onBeforeUpdate
- updated onUpdated
- beforeUnmount onBeforeUnmount
- unmounted onUnmounted 页面销毁时执行
- errorCaptured onErrorCaptured
- renderTracked onRenderTracked
- renderTriggered onRenderTriggered
- activated onActivated
- deactivated onDeactivated
<script setup lang="ts">
import { onMounted, onActivated, onUnmounted, onUpdated, onDeactivated } from 'vue';
// 读取环境变量
const mode = import.meta.env;
//   import HeadMenu from '@/components/head-menu/index.vue';
 onMounted(() => {
 console.log("组件挂载")
 })

 onUnmounted(() => {
 console.log("组件卸载")
 })

 onUpdated(() => {
 console.log("组件更新")
 })
 onActivated(() => {
 console.log("keepAlive 组件 激活")
 })

 onDeactivated(() => {
 console.log("keepAlive 组件 非激活")
 })
</script>
加🧨🧨🧨为必用的东西,可以多看看
最后:文章来源:https://www.toymoban.com/news/detail-778192.html
待续....精力有限 持续更新中....文章来源地址https://www.toymoban.com/news/detail-778192.html
到了这里,关于TypeScript快速上手语法+结合vue3用法的文章就介绍完了。如果您还想了解更多内容,请在右上角搜索TOY模板网以前的文章或继续浏览下面的相关文章,希望大家以后多多支持TOY模板网!