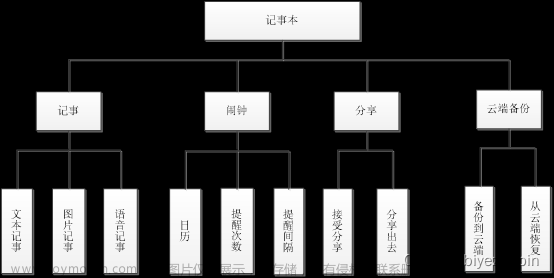
目录
实现效果
一、搭建记事本页面布局activity_notepad.xml
二、搭建记事本界面Item布局notepad_item_layout.xml
三、封装记录信息实体类NotepadBean类
四、编写记事本界面列表适配器NotepadAdapter类
五、创建数据库
六、实现记事本界面的显示功能NotepadAdapter.java
七、搭建添加记录界面和修改记录界面的布局activity_record.xml
八、实现添加记录界面的功能RecordActivity.java
九、实现修改记录界面的功能
十、删除记事本中的记录
实现效果
一、搭建记事本页面布局activity_notepad.xml
1.创建项目
项目名为Notepad,指定包名为cn.itcast.notepad
Activity名称为NotepadActivity,布局文件名为activity_notepad
2.导入图片到res文件夹下面 一个新建的文件夹drawable-hdpi中

3.页面代码如下
<?xml version="1.0" encoding="utf-8"?>
<RelativeLayout
    xmlns:android="http://schemas.android.com/apk/res/android"
    android:layout_width="match_parent"
    android:layout_height="match_parent"
    android:background="#fefefe">
    <TextView
        android:id="@+id/note_name"
        android:layout_width="match_parent"
        android:layout_height="45dp"
        android:textSize="20sp"
        android:textColor="@android:color/white"
        android:gravity="center"
        android:textStyle="bold"
        android:background="#fb7a6a"
        android:text="记事本"/>
    <ListView
        android:id="@+id/listview"
        android:layout_width="match_parent"
        android:layout_height="match_parent"
        android:cacheColorHint="#00000000"
        android:divider="#E4E4E4"
        android:dividerHeight="1dp"
        android:fadingEdge="none"
        android:listSelector="#00000000"
        android:scrollbars="none"
        android:layout_below="@+id/note_name">
    </ListView>
    <ImageView
        android:id="@+id/add"
        android:layout_width="wrap_content"
        android:layout_height="wrap_content"
        android:src="@drawable/add"
        android:layout_marginBottom="30dp"
        android:layout_alignParentBottom="true"
        android:layout_centerHorizontal="true"/>
</RelativeLayout>
4.修改清单文件
项目创建后所有界面最上方都有一个绿色的默认标题栏,不美观。在AndroidManifest.xml修改代码去掉标题栏。 在<application>标签中修改为:
android:theme="@style/Theme.AppCompat.NoActionBar"二、搭建记事本界面Item布局notepad_item_layout.xml
由于记事本界面使用了ListView控件展示记录列表,因此需要创建一个该列表的Item界面。
1.创建布局文件
res/layout文件夹中,右击【NEW】-【XML】-【Layout XML File】,名字为notepad_item_layout
2.布局notepad_item_layout.xml界面
放置两个TextView控件,分别用于显示记录的部分内容与保存的时间。
代码如下:
<?xml version="1.0" encoding="utf-8"?>
<RelativeLayout
    xmlns:android="http://schemas.android.com/apk/res/android"
    android:layout_width="match_parent"
    android:layout_height="match_parent"
    android:background="#fefefe">
    <TextView
        android:id="@+id/note_name"
        android:layout_width="match_parent"
        android:layout_height="45dp"
        android:textSize="20sp"
        android:textColor="@android:color/white"
        android:gravity="center"
        android:textStyle="bold"
        android:background="#fb7a6a"
        android:text="记事本"/>
    <ListView
        android:id="@+id/listview"
        android:layout_width="match_parent"
        android:layout_height="match_parent"
        android:cacheColorHint="#00000000"
        android:divider="#E4E4E4"
        android:dividerHeight="1dp"
        android:fadingEdge="none"
        android:listSelector="#00000000"
        android:scrollbars="none"
        android:layout_below="@+id/note_name">
    </ListView>
    <ImageView
        android:id="@+id/add"
        android:layout_width="wrap_content"
        android:layout_height="wrap_content"
        android:src="@drawable/add"
        android:layout_marginBottom="30dp"
        android:layout_alignParentBottom="true"
        android:layout_centerHorizontal="true"/>
</RelativeLayout>
三、封装记录信息实体类NotepadBean类
创建一个NotepadBean类,存放每个记录的记录内容和保存时间属性。
1.选中cn.itcast.notepad包,右击-【New】-【Package】,命名为bean,创建一个bean包。
在该包中,右击-【New】-【JavaClass】,命名为NotepadBean。

2.NotepadBean.java代码如下
package cn.itcast.notepad.bean;

public class NotepadBean {
    private String id;                  //记录的id
    private String notepadContent;   //记录的内容
    private String notepadTime;       //保存记录的时间
 //右击-【Generate】-【Getter and Setter】,产生下面代码
    public String getId() {
        return id;
    }
    public void setId(String id) {
        this.id = id;
    }
    public String getNotepadContent() {
        return notepadContent;
    }
    public void setNotepadContent(String notepadContent) {
        this.notepadContent = notepadContent;
    }
    public String getNotepadTime() {
        return notepadTime;
    }
    public void setNotepadTime(String notepadTime) {
        this.notepadTime = notepadTime;
    }
}
四、编写记事本界面列表适配器NotepadAdapter类
创建数据适配器NotepadAdapter对ListView控件进行数据适配。
1.选中cn.itcast.notepad包,右击-【New】-【Package】,命名为adapter。
在该包中,右击-【New】-【JavaClass】,命名为NotepadAdapter。

2.(1)NotepadAdapter类继承自BaseAdapter类,然后点击【Alt】+【Enter】,【implement methods】重写方法getCount()、getItem()、 getItemId()、getView()。
(2)创建构造方法
public NotepadAdapter(Context context, List<NotepadBean> list)通过inflate()方法加载Item界面的布局文件。
private LayoutInflater layoutInflater;
    private List<NotepadBean> list;
    public NotepadAdapter(Context context, List<NotepadBean> list){
        this.layoutInflater=LayoutInflater.from(context);
        this.list=list;
    }
(3)创建ViewHolder类
在类里面创建构造方法,在该方法中初始化Item界面(即notepad_item_layout.xml)上的控件。
public ViewHolder(View view){
            tvNoteoadContent=(TextView) view.findViewById(R.id.item_content);
            tvNotepadTime=(TextView) view.findViewById(R.id.item_time);
        }
接着继续在getView方法里面写代码
3.代码如下:
package cn.itcast.notepad.adapter;

import android.content.Context;
import android.view.LayoutInflater;
import android.view.View;
import android.view.ViewGroup;
import android.widget.BaseAdapter;
import android.widget.TextView;

import java.util.List;

import cn.itcast.notepad.R;
import cn.itcast.notepad.bean.NotepadBean;

public class NotepadAdapter extends BaseAdapter{
    private LayoutInflater layoutInflater;
    private List<NotepadBean> list;
    public NotepadAdapter(Context context, List<NotepadBean> list){
        this.layoutInflater=LayoutInflater.from(context);
        this.list=list;
    }
    @Override
    public int getCount() {
        return list==null ? 0 : list.size();
    }
    @Override
    public Object getItem(int position) {
        return list.get(position);
    }
    @Override
    public long getItemId(int position) {
        return position;
    }
    @Override
    public View getView(int position, View convertView, ViewGroup parent) {
        ViewHolder viewHolder;
        if (convertView==null){
            convertView=layoutInflater.inflate(R.layout.notepad_item_layout,null);
            viewHolder=new ViewHolder(convertView);
            convertView.setTag(viewHolder);
        }else {
            viewHolder=(ViewHolder) convertView.getTag();
        }
        NotepadBean noteInfo=(NotepadBean) getItem(position);
        viewHolder.tvNoteoadContent.setText(noteInfo.getNotepadContent());
        viewHolder.tvNotepadTime.setText(noteInfo.getNotepadTime());
        return convertView;
    }
    class ViewHolder{
        TextView tvNoteoadContent;;
        TextView tvNotepadTime;
        public ViewHolder(View view){
            tvNoteoadContent=(TextView) view.findViewById(R.id.item_content);
            tvNotepadTime=(TextView) view.findViewById(R.id.item_time);
        }
    }
}
五、创建数据库
在这个记事本程序中存储和读取记录的数据都是通过操作数据库完成的,因此需要创建数据库类SQLiteHelper和数据库的工具类DBUtils.java。
(一)创建DBUtils类
在该类中定义数据库的名称、表名、数据库版本、数据库表中的列名以及获取当前日期等信息。
1.选中cn.itcast.notepad包,右击-【New】-【Package】,命名为utils。
在该包中,右击-【New】-【JavaClass】,命名为DBUtils。

2.DBUtils.java代码如下
package cn.itcast.notepad.utils;

import java.text.SimpleDateFormat;
import java.util.Date;
public class DBUtils {
    public static final String DATABASE_NAME = "Notepad";//数据库名
    public static final String DATABASE_TABLE = "Note";  //表名
    public static final int DATABASE_VERION = 1;          //数据库版本
    //数据库表中的列名
    public static final String NOTEPAD_ID = "id";
    public static final String NOTEPAD_CONTENT = "content";
    public static final String NOTEPAD_TIME = "notetime";
    //获取当前日期
    public static final String getTime(){
        SimpleDateFormat simpleDateFormat = new SimpleDateFormat("yyyy年MM月dd日 HH:mm:ss");
        Date date = new Date(System.currentTimeMillis());
        return simpleDateFormat.format(date);
    }
}
(二)创建SQLiteHelper类
创建Notepad的数据库,实现增删改查的功能。
1.选中cn.itcast.notepad包,右击-【New】-【Package】,命名为database。
在该包中,右击-【New】-【JavaClass】,命名为SQLiteHelper。

2.SQLiteHelper.java代码如下
package cn.itcast.notepad.database;

import android.content.ContentValues;
import android.content.Context;
import android.database.Cursor;
import android.database.sqlite.SQLiteDatabase;
import android.database.sqlite.SQLiteOpenHelper;

import java.util.ArrayList;
import java.util.List;

import cn.itcast.notepad.bean.NotepadBean;
import cn.itcast.notepad.utils.DBUtils;

public class SQLiteHelper extends SQLiteOpenHelper {
    private SQLiteDatabase sqLiteDatabase;
    //创建数据库
    public SQLiteHelper(Context context){
        super(context, DBUtils.DATABASE_NAME, null, DBUtils.DATABASE_VERION);//调用了DBUtils类,得到数据库名Notepad
        sqLiteDatabase = this.getWritableDatabase();
    }
    //创建表,用execSQL()方法创建一个数据表,列名分别为ID、CONTENT、TIME
    @Override
    public void onCreate(SQLiteDatabase db) {
        db.execSQL("create table "+DBUtils.DATABASE_TABLE+"("+DBUtils.NOTEPAD_ID+
                " integer primary key autoincrement,"+ DBUtils.NOTEPAD_CONTENT +
                " text," + DBUtils.NOTEPAD_TIME+ " text)");
    }
    @Override
    public void onUpgrade(SQLiteDatabase db, int oldVersion, int newVersion) {}
    //添加数据
    public boolean insertData(String userContent,String userTime){
        ContentValues contentValues=new ContentValues();
        contentValues.put(DBUtils.NOTEPAD_CONTENT,userContent);
        contentValues.put(DBUtils.NOTEPAD_TIME,userTime);
        return
                sqLiteDatabase.insert(DBUtils.DATABASE_TABLE,null,contentValues)>0;
    }
    //删除数据
    public boolean deleteData(String id){
        String sql=DBUtils.NOTEPAD_ID+"=?";
        String[] contentValuesArray=new String[]{String.valueOf(id)};
        return
                sqLiteDatabase.delete(DBUtils.DATABASE_TABLE,sql,contentValuesArray)>0;
    }
    //修改数据
    public boolean updateData(String id,String content,String userYear){
        ContentValues contentValues=new ContentValues();
        contentValues.put(DBUtils.NOTEPAD_CONTENT,content);
        contentValues.put(DBUtils.NOTEPAD_TIME,userYear);
        String sql=DBUtils.NOTEPAD_ID+"=?";
        String[] strings=new String[]{id};
        return
                sqLiteDatabase.update(DBUtils.DATABASE_TABLE,contentValues,sql,strings)>0;
    }
    //查询数据
    public List<NotepadBean> query(){//将遍历的数据存放在一个List<NotepadBean>类型的合集中
        List<NotepadBean> list=new ArrayList<NotepadBean>();
//        通过query()方法查询数据库表中的所有数据,并返回一个Cursor对象
        Cursor cursor=sqLiteDatabase.query(DBUtils.DATABASE_TABLE,null,null,null,
                null,null,DBUtils.NOTEPAD_ID+" desc");
        if (cursor!=null){
            while (cursor.moveToNext()){//通过while循环遍历Cursor对象中的数据
                NotepadBean noteInfo=new NotepadBean();
                String id = String.valueOf(cursor.getInt
                        (cursor.getColumnIndex(DBUtils.NOTEPAD_ID)));
                String content = cursor.getString(cursor.getColumnIndex
                        (DBUtils.NOTEPAD_CONTENT));
                String time = cursor.getString(cursor.getColumnIndex
                        (DBUtils.NOTEPAD_TIME));
                noteInfo.setId(id);
                noteInfo.setNotepadContent(content);
                noteInfo.setNotepadTime(time);
                list.add(noteInfo);
            }
            cursor.close();
        }
        return list;
    }
}
六、实现记事本界面的显示功能NotepadAdapter.java
1.包括显示列表功能和 添加按钮功能
2.步骤
初始化ListView控件,初始化添加按钮
    listView = (ListView) findViewById(R.id.listview);
    ImageView add = (ImageView) findViewById(R.id.add);
创建initData()方法,在这个方法里初始化需要写入的数据
    protected void initData() {
        mSQLiteHelper= new SQLiteHelper(this); //创建数据库
        showQueryData();
   }
创建showQueryData()方法,在这个方法里获取数据库里面的数据,并显示在列表里面。
首先调用query()方法查询数据库中保存的数据,返回值是list的集合。
接着设置一个适配器,将获取的记录数据传递到NotepadAdapter中,需要传入两个参数,一个是上下文的信息,第二个是一个集合。
最后通过setAdapter()方法为ListView控件设置NotepadAdapter适配器。
list = mSQLiteHelper.query();
adapter = new NotepadAdapter(this, list);
listView.setAdapter(adapter);
initData()方法在onCreat()方法中调用一下。
为ImageView设置点击事件
创建intent对象,需传入两个参数,一个是上下文的信息,第二个是跳转的activity的名称。
调用startActivityForResult()方法跳转到添加记录界面。
add.setOnClickListener(new View.OnClickListener() {
            @Override
            public void onClick(View v) {
                Intent intent = new Intent(NotepadActivity.this,
                        RecordActivity.class);
                startActivityForResult(intent, 1);
            }
        });
重写onActivityResult()方法,当关闭添加记录界面时,调用该方法。
首先判断请求码是否为1 返回码是否为2(这是在添加记录界面设置的),是,调用showQueryData()方法重新获取数据并显示。
protected void onActivityResult(int requestCode,int resultCode, Intent data){
        super.onActivityResult(requestCode, resultCode, data);
        if (requestCode==1&&resultCode==2){
            showQueryData();
        }
    }
3.NotepadAdapter.java 具体代码如下
package cn.itcast.notepad;

import android.app.Activity;
import android.app.AlertDialog;
import android.content.DialogInterface;
import android.content.Intent;
import android.os.Bundle;
import android.view.View;
import android.widget.AdapterView;
import android.widget.ImageView;
import android.widget.ListView;
import android.widget.Toast;

import java.util.List;

import cn.itcast.notepad.adapter.NotepadAdapter;
import cn.itcast.notepad.bean.NotepadBean;
import cn.itcast.notepad.database.SQLiteHelper;

public class NotepadActivity extends Activity {
    ListView listView;
    List<NotepadBean> list;
    SQLiteHelper mSQLiteHelper;
    NotepadAdapter adapter;
    @Override
    protected void onCreate(Bundle savedInstanceState) {
        super.onCreate(savedInstanceState);
        setContentView(R.layout.activity_notepad);
        //用于显示便签的列表
        listView = (ListView) findViewById(R.id.listview);
        ImageView add = (ImageView) findViewById(R.id.add);
        add.setOnClickListener(new View.OnClickListener() {
            @Override
            public void onClick(View v) {
                Intent intent = new Intent(NotepadActivity.this,
                        RecordActivity.class);
                startActivityForResult(intent, 1);
            }
        });
        initData();
    }
    protected void initData() {
        mSQLiteHelper= new SQLiteHelper(this); //创建数据库
        showQueryData();
        listView.setOnItemClickListener(new AdapterView.OnItemClickListener() {
            @Override
            public void onItemClick(AdapterView<?> parent,View view,int position,long id){
                NotepadBean notepadBean = list.get(position);
                Intent intent = new Intent(NotepadActivity.this, RecordActivity.class);
                intent.putExtra("id", notepadBean.getId());
                intent.putExtra("time", notepadBean.getNotepadTime()); //记录的时间
                intent.putExtra("content", notepadBean.getNotepadContent()); //记录的内容
                NotepadActivity.this.startActivityForResult(intent, 1);
            }
        });
        listView.setOnItemLongClickListener(new AdapterView.OnItemLongClickListener() {
            @Override
            public boolean onItemLongClick(AdapterView<?> parent, View view, final int
                    position, long id) {
                AlertDialog dialog;
                AlertDialog.Builder builder = new AlertDialog.Builder( NotepadActivity.this)
                        .setMessage("是否删除此事件?")
                        .setPositiveButton("确定", new DialogInterface.OnClickListener() {
                            @Override
                            public void onClick(DialogInterface dialog, int which) {
                                NotepadBean notepadBean = list.get(position);
                                if(mSQLiteHelper.deleteData(notepadBean.getId())){
                                    list.remove(position);
                                    adapter.notifyDataSetChanged();
                                    Toast.makeText(NotepadActivity.this,"删除成功",
                                            Toast.LENGTH_SHORT).show();
                                }
                            }
                        })
                        .setNegativeButton("取消", new DialogInterface.OnClickListener() {
                            @Override
                            public void onClick(DialogInterface dialog, int which) {
                                dialog.dismiss();
                            }
                        });
                dialog =  builder.create();
                dialog.show();
                return true;
            }
        });

    }
    private void showQueryData(){
        if (list!=null){
            list.clear();
        }
        //从数据库中查询数据(保存的标签)
        list = mSQLiteHelper.query();
        adapter = new NotepadAdapter(this, list);
        listView.setAdapter(adapter);
    }
    @Override
    protected void onActivityResult(int requestCode,int resultCode, Intent data){
        super.onActivityResult(requestCode, resultCode, data);
        if (requestCode==1&&resultCode==2){
            showQueryData();
        }
    }
}
七、搭建添加记录界面和修改记录界面的布局activity_record.xml
当点击记事本界面的“添加”按钮时,会跳转到添加记录界面,当点击记事本界面列表中的item时,会跳转到修改记录界面。由于这两个界面上的控件与功能基本相同,因此设置同一个Activity和同一个布局文件显示。
1.选中cn.itcast.notepad包,右击-【New】-【Activity】,命名为RecordActivity

2.activity_record.xml代码如下
<?xml version="1.0" encoding="utf-8"?>
<LinearLayout xmlns:android="http://schemas.android.com/apk/res/android"
    android:orientation="vertical"
    android:layout_width="match_parent"
    android:layout_height="match_parent"
    android:background="#fefefe">
    <RelativeLayout
        android:layout_width="match_parent"
        android:layout_height="45dp"
        android:background="#fb7a6a"
        android:orientation="horizontal">
        <ImageView
            android:id="@+id/note_back"
            android:layout_width="45dp"
            android:layout_height="wrap_content"
            android:layout_centerVertical="true"
            android:paddingLeft="11dp"
            android:src="@drawable/back" />
        <TextView
            android:id="@+id/note_name"
            android:layout_width="wrap_content"
            android:layout_height="wrap_content"
            android:layout_centerInParent="true"
            android:gravity="center"
            android:text="记事本"
            android:textColor="@android:color/white"
            android:textSize="15sp"
            android:textStyle="bold" />
    </RelativeLayout>
    <TextView
        android:id="@+id/tv_time"
        android:layout_width="match_parent"
        android:layout_height="wrap_content"
        android:textSize="15sp"
        android:paddingTop="10dp"
        android:paddingBottom="10dp"
        android:gravity="center"
        android:visibility="gone"
        android:textColor="#fb7a6a"/>
    <EditText
        android:id="@+id/note_content"
        android:layout_width="match_parent"
        android:layout_height="match_parent"
        android:layout_weight="1"
        android:gravity="top"
        android:hint="请输入要添加的内容"
        android:paddingLeft="5dp"
        android:textColor="@android:color/black"
        android:background="#fefefe" />
    <View
        android:layout_width="match_parent"
        android:layout_height="1dp"
        android:background="#fb7a6a"/>
    <LinearLayout
        android:layout_width="match_parent"
        android:layout_height="55dp"
        android:orientation="horizontal">
        <ImageView
            android:id="@+id/delete"
            android:layout_width="0dp"
            android:layout_weight="1"
            android:layout_height="wrap_content"
            android:src="@drawable/delete"
            android:paddingBottom="15dp"
            android:paddingTop="9dp"/>
        <ImageView
            android:id="@+id/note_save"
            android:layout_width="0dp"
            android:layout_weight="1"
            android:layout_height="wrap_content"
            android:src="@drawable/save_note"
            android:paddingBottom="15dp"
            android:paddingTop="9dp"/>
    </LinearLayout>
</LinearLayout>
八、实现添加记录界面的功能RecordActivity.java
1.包括编辑记录、保存记录、清除记录功能
2.步骤
初始化界面控件,设置点击事件。
switch通过id判断被点击的按钮属于哪个控件。
当选择“保存”按钮时,首先要获取输入框中的内容getText(),将文本信息转换为字符串toString(),再将空字符串清除掉trim()。
接着判断输入的内容是否>0,如果大于0,调用insertData()方法,将记录添加到数据库中,需传入两个参数,一个是输入的内容,一个点击保存按钮的时间。
接下来判断数据是否保存成功,如果成功,要弹出一个“保存成功”的提示。失败,要弹出一个“保存失败”的提示。所以需要创建一个showToast()方法。保存成功还要调用setResult()方法返回一个返回码:2。
showToast()方法用于显示一些信息,在这个方法中调用makeText()方法。
创建initData()方法,创建数据库。
initData()方法在onCreat()方法中调用一下。
3.具体代码RecordActivity.java
package cn.itcast.notepad;

import android.app.Activity;
import android.content.Intent;
import android.os.Bundle;
import android.view.View;
import android.widget.EditText;
import android.widget.ImageView;
import android.widget.TextView;
import android.widget.Toast;

import cn.itcast.notepad.database.SQLiteHelper;
import cn.itcast.notepad.utils.DBUtils;

public class RecordActivity extends Activity implements View.OnClickListener {
    ImageView note_back;
    TextView note_time;
    EditText content;
    ImageView delete;
    ImageView note_save;
    SQLiteHelper mSQLiteHelper;
    TextView noteName;
    String id;
    @Override
    protected void onCreate(Bundle savedInstanceState) {
        super.onCreate(savedInstanceState);
        setContentView(R.layout.activity_record);
        note_back = (ImageView) findViewById(R.id.note_back);
        note_time = (TextView)findViewById(R.id.tv_time);
        content = (EditText) findViewById(R.id.note_content);
        delete = (ImageView) findViewById(R.id.delete);
        note_save = (ImageView) findViewById(R.id.note_save);
        noteName = (TextView) findViewById(R.id.note_name);
        note_back.setOnClickListener(this);
        delete.setOnClickListener(this);
        note_save.setOnClickListener(this);
        initData();
    }
    protected void initData() {
        mSQLiteHelper = new SQLiteHelper(this);
        noteName.setText("添加记录");
        Intent intent = getIntent();
        if(intent!= null){
            id = intent.getStringExtra("id");
            if (id != null){
                noteName.setText("修改记录");
                content.setText(intent.getStringExtra("content"));
                note_time.setText(intent.getStringExtra("time"));
                note_time.setVisibility(View.VISIBLE);
            }
        }
    }
    @Override
    public void onClick(View v) {
        switch (v.getId()) {
            case R.id.note_back:
                finish();
                break;
            case R.id.delete:
                content.setText("");
                break;
            case R.id.note_save:
                String noteContent=content.getText().toString().trim();
                if (id != null){//修改操作
                    if (noteContent.length()>0){
                        if (mSQLiteHelper.updateData(id, noteContent, DBUtils.getTime())){
                            showToast("修改成功");
                            setResult(2);
                            finish();
                        }else {
                            showToast("修改失败");
                        }
                    }else {
                        showToast("修改内容不能为空!");
                    }
                }else {
                    //向数据库中添加数据
                    if (noteContent.length()>0){
                        if (mSQLiteHelper.insertData(noteContent, DBUtils.getTime())){
                            showToast("保存成功");
                            setResult(2);
                            finish();
                        }else {
                            showToast("保存失败");
                        }
                    }else {
                        showToast("修改内容不能为空!");
                    }
                }
                break;
        }
    }
    public void showToast(String message){
        Toast.makeText(RecordActivity.this,message,Toast.LENGTH_SHORT).show();
    }
}
九、实现修改记录界面的功能
(备注:前面代码已经包含此内容,这里弄清楚就好)
比添加记录界面多了查看记录和修改记录的功能。
1.实现查看记录功能。
(1)记事本界面列表的每个Item只显示2行记录信息,如果想要查看更多的记录内容,则需要点击Item,进入修改记录界面进行查看。
(2)在NotepadActivity的initDate()方法中,添加跳转到修改记录界面的代码。
通过setOnItemClickListener()方法实现Item的点击事件,点击Item,会调用onItemClick()方法,在该方法中首先通过get()方法获取对应的Item数据。创建intent对象,需要传入两个参数,一个是上下文信息,另一个是需要跳转的activity的名称。接着将这些数据通过putExtra()方法封装到intent对象中,最后调用startActivityForResult()方法跳转到修改记录界面,请求码设为1。
protected void initData() {
        ...
        listView.setOnItemClickListener(new AdapterView.OnItemClickListener() {
            @Override
            public void onItemClick(AdapterView<?> parent,View view,int position,long id){
                NotepadBean notepadBean = list.get(position);
                Intent intent = new Intent(NotepadActivity.this, RecordActivity.class);
                intent.putExtra("id", notepadBean.getId());
                intent.putExtra("time", notepadBean.getNotepadTime()); //记录的时间
                intent.putExtra("content", notepadBean.getNotepadContent()); //记录的内容
                NotepadActivity.this.startActivityForResult(intent, 1);
            }
        });
(3)在RecordActivity中找到initData()方法,在该方法中接收记事本界面传递过来的记录数据并显示到界面上。
首先获取intent对象,接着判断对象是否为空。如果不为空,获取传递的数据。
先获取id ,判断id是否为空,如果不为空,需要将标题设为“修改记录”。然后通过get分别获取记录时间、记录内容并通过set显示,最后将记录时间设置为显示状态。
protected void initData() {
        mSQLiteHelper = new SQLiteHelper(this);
        noteName.setText("添加记录");
        Intent intent = getIntent();
        if(intent!= null){
            id = intent.getStringExtra("id");
            if (id != null){
                noteName.setText("修改记录");
                content.setText(intent.getStringExtra("content"));
                note_time.setText(intent.getStringExtra("time"));
                note_time.setVisibility(View.VISIBLE);
            }
        }
    }
2.实现修改记录功能
(1)在RecordActivity的onClick()方法中,找到“保存”按钮的点击事件,在该事件中,判断传递过来的id是否为空,如果不为空,那就是修改记录功能。将修改记录的id、修改的内容、保存修改记录的时间传递到updateData()方法中,进行修改。
如果为空,就是添加记录功能。
(2)具体代码:
public void onClick(View v) {
        switch (v.getId()) {
            ...
            case R.id.note_save:
                String noteContent=content.getText().toString().trim();
                if (id != null){//修改操作
                    if (noteContent.length()>0){
                        if (mSQLiteHelper.updateData(id, noteContent, DBUtils.getTime())){
                            showToast("修改成功");
                            setResult(2);
                            finish();
                        }else {
                            showToast("修改失败");
                        }
                    }else {
                        showToast("修改内容不能为空!");
                    }
                }else {
                    ...
        }
    }
十、删除记事本中的记录
(备注:前面代码已经包含此内容,这里弄清楚就好)
(1)当长按列表的Item,此时会弹出一个对话框提示是否删除记录,因此在NotepadActivity的initData()方法中要加上删除记录的代码。
(2)首先,通过setOnItemLongClickListener()设置长按事件的监听器。当长按Item,会调用onItemLongClick()方法,在该方法中实现长按事件。
创建一个AlertDialog对话框,用于提示用户是否删除。创建Builder对象,在这个对象中传入上下文信息。文章来源:https://www.toymoban.com/news/detail-779255.html
(3)NotepadActivity的initData()方法代码:文章来源地址https://www.toymoban.com/news/detail-779255.html
listView.setOnItemLongClickListener(new AdapterView.OnItemLongClickListener() {
            @Override
            public boolean onItemLongClick(AdapterView<?> parent, View view, final int
                    position, long id) {
                AlertDialog dialog;
                AlertDialog.Builder builder = new AlertDialog.Builder( NotepadActivity.this)
                        .setMessage("是否删除此事件?")
                        .setPositiveButton("确定", new DialogInterface.OnClickListener() {
                            @Override
                            public void onClick(DialogInterface dialog, int which) {
                                NotepadBean notepadBean = list.get(position);
                                if(mSQLiteHelper.deleteData(notepadBean.getId())){
                                    list.remove(position);
                                    adapter.notifyDataSetChanged();
                                    Toast.makeText(NotepadActivity.this,"删除成功",
                                            Toast.LENGTH_SHORT).show();
                                }
                            }
                        })
                        .setNegativeButton("取消", new DialogInterface.OnClickListener() {
                            @Override
                            public void onClick(DialogInterface dialog, int which) {
                                dialog.dismiss();
                            }
                        });
                dialog =  builder.create();
                dialog.show();
                return true;
            }
        });
到了这里,关于Android——记事本功能业务(完整代码)的文章就介绍完了。如果您还想了解更多内容,请在右上角搜索TOY模板网以前的文章或继续浏览下面的相关文章,希望大家以后多多支持TOY模板网!


