Android studio课程设计开发实现—日记APP
前言
你们好,我是oy,介绍一个简易日记APP。
一、效果
1.启动页、引导页及登陆注册
2.日记相关功能
3.个人中心界面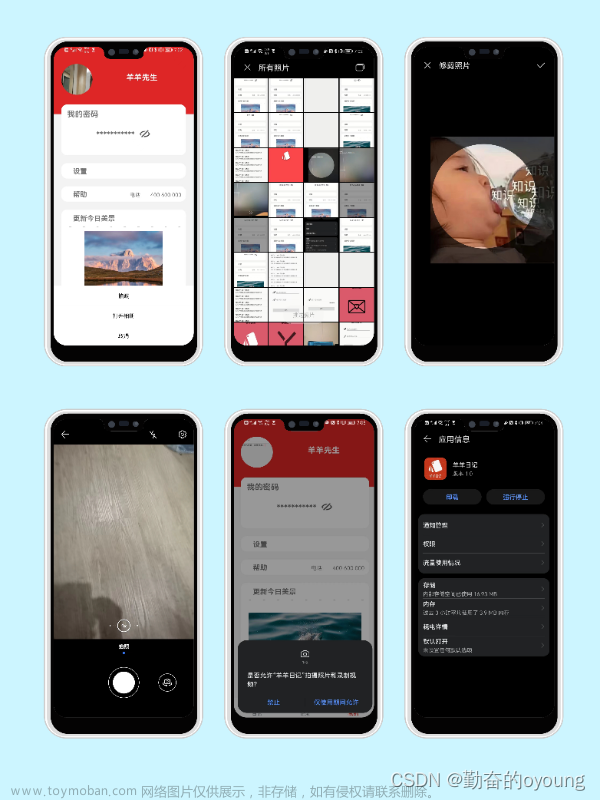
二、功能介绍
1.主要功能
- 实现应用启动页及引导页
- 实现设置密码进入APP,对密码进行加密处理
- 实现底部导航栏,分为日记列表,新建日记,个人中心模块
- 实现对日记删除、修改、新增的基础功能
- 实现圆形头像,通过相册及拍照并裁剪图片设置头像。可实时保存。
- 实现网络更新个人中心美图。
- 对密码展示及关闭,跳转应用设置界面
- 动态获取拍照及相册访问权限
…
…
2.涉及知识点
- activity与fragment数据传递、页面更新、相互跳转。
- SharedPrefrenced存储、文件存储、文件加密。
- Android应用权限获取及设置
- 控件的使用:Button、EditText、AlertDialog、Imageview、ImageButton、viewPager2、Toolbar、RecycleView、NavigationButton等
- 布局的使用:LinearLayout、ConstraintLayout、RelativeLayout等
- 调用Android系统应用
- 自定义View:底部弹窗(比较复杂)、圆形头像
- Glide框架使用:网络加载图片
- Android框架:MVC
…
…
三、实现思路
- MainActivity中使用BottomNavigationView、ViewPager2、Toolbar实现。
public class MainActivity extends AppCompatActivity {
    private BottomNavigationView bottomNavigationView;

    @Override
    protected void onCreate(Bundle savedInstanceState) {
        super.onCreate(savedInstanceState);
        setContentView(R.layout.activity_main);
        initToolbar();
        initFragment();
        initNavigationBottom();
    }

    @SuppressLint("ResourceAsColor")
    private void initNavigationBottom() {
        bottomNavigationView = findViewById(R.id.navigation_bottom);
        bottomNavigationView.setItemIconTintList(null);
        bottomNavigationView.setOnNavigationItemSelectedListener(itemSelectedListener);
    }

    @Override
    public boolean onCreateOptionsMenu(Menu menu) {
        return super.onCreateOptionsMenu(menu);
    }

    private void initFragment() {
        DiariesFragment diariesFragment = getDiariesFragment();
        if (diariesFragment == null) {
            diariesFragment = new DiariesFragment();
            ActivityUtils.addFragmentToActivity(getSupportFragmentManager(), diariesFragment, R.id.content);
        }
    }

    private DiariesFragment getDiariesFragment() {
        return (DiariesFragment) getSupportFragmentManager().findFragmentById(R.id.content);
    }

    private void initToolbar() {
        //设置顶部状态栏为透明
        getWindow().addFlags(WindowManager.LayoutParams.FLAG_TRANSLUCENT_STATUS);
        Toolbar toolbar = findViewById(R.id.toolbar);
        setSupportActionBar(toolbar);
    }

    private final BottomNavigationView.OnNavigationItemSelectedListener itemSelectedListener = item -> {
        switch (item.getItemId()) {
            case R.id.menu_diary:
                MeController.setToolbarVisibility(this);
                ActivityUtils.removeFragmentTOActivity(getSupportFragmentManager(), getSupportFragmentManager().findFragmentById(R.id.content));
                ActivityUtils.addFragmentToActivity(getSupportFragmentManager(), new DiariesFragment(), R.id.content);
                break;
            case R.id.menu_me:
                findViewById(R.id.toolbar).setVisibility(View.GONE);
                ActivityUtils.removeFragmentTOActivity(getSupportFragmentManager(), getSupportFragmentManager().findFragmentById(R.id.content));
                ActivityUtils.addFragmentToActivity(getSupportFragmentManager(), new MeFragment(), R.id.content);
                break;
            case R.id.menu_new:
                bottomNavigationView.setVisibility(View.GONE);
                MeController.setToolbarVisibility(this);
                ActivityUtils.removeFragmentTOActivity(getSupportFragmentManager(), getSupportFragmentManager().findFragmentById(R.id.content));
                ActivityUtils.addFragmentToActivity(getSupportFragmentManager(), new AddDiaryFragment(), R.id.content);
                break;
        }
        return true;
    };
}
MainActivity的layout
<?xml version="1.0" encoding="utf-8"?>
<LinearLayout
    xmlns:android="http://schemas.android.com/apk/res/android"
    xmlns:app="http://schemas.android.com/apk/res-auto"
    xmlns:tools="http://schemas.android.com/tools"
    android:layout_width="match_parent"
    android:layout_height="match_parent"
    android:orientation="vertical"
    tools:context=".MainActivity">

    <com.google.android.material.appbar.AppBarLayout
        android:layout_width="match_parent"
        android:layout_height="wrap_content">
        <androidx.appcompat.widget.Toolbar
            android:id="@+id/toolbar"
            android:layout_width="match_parent"
            android:layout_height="wrap_content"
            android:background="?attr/colorPrimary"
            android:minHeight="?attr/actionBarSize"
            android:fitsSystemWindows="true"
            android:theme="@style/Widget.AppCompat.Toolbar"
            app:popupTheme="@style/ThemeOverlay.AppCompat.Light"/>
    </com.google.android.material.appbar.AppBarLayout>

    <FrameLayout
        android:id="@+id/content"
        android:layout_width="match_parent"
        android:layout_height="0dp"
        android:layout_weight="1"/>

    <com.google.android.material.bottomnavigation.BottomNavigationView
        android:id="@+id/navigation_bottom"
        android:layout_width="match_parent"
        android:layout_height="wrap_content"
        app:menu="@menu/menu_navigation"
        android:background="?android:attr/windowBackground"/>

</LinearLayout>
- ViewPager2中切换不同fragment,对应导航栏新增日记、个人中心及日记列表。
public class DiariesFragment extends Fragment {
    private DiariesController mController;
    @Override
    public void onCreate(@Nullable Bundle savedInstanceState) {
        super.onCreate(savedInstanceState);
        mController = new DiariesController(this);
    }

    @Nullable
    @Override
    public View onCreateView(@NonNull LayoutInflater inflater, @Nullable ViewGroup container, @Nullable Bundle savedInstanceState) {
        View root = inflater.inflate(R.layout.fragment_diaries, container, false);
        mController.setDiariesList(root.findViewById(R.id.diaries_list));
        return root;
    }

    @Override
    public void onResume() {
        super.onResume();
        mController.loadDiaries();
    }
}
DiariesFragment的layout
<?xml version="1.0" encoding="utf-8"?>
<RelativeLayout xmlns:android="http://schemas.android.com/apk/res/android"
    android:layout_width="match_parent" android:layout_height="match_parent"
    android:orientation="vertical">

    <androidx.recyclerview.widget.RecyclerView
        android:id="@+id/diaries_list"
        android:layout_width="match_parent"
        android:layout_height="wrap_content"/>

</RelativeLayout>
public class AddDiaryFragment extends Fragment implements View.OnClickListener {
    private AddDiaryController mController;
    private View edit_layout;
    private Button btn_confirm;
    private EditText edit_title;
    private EditText edit_desc;

    @Override
    public void onCreate(@Nullable Bundle savedInstanceState) {
        super.onCreate(savedInstanceState);
        mController = new AddDiaryController(this);
    }

    private void initView(View view) {
        btn_confirm = view.findViewById(R.id.add_diary_confirm);
        btn_confirm.setOnClickListener(this);
        edit_title = view.findViewById(R.id.edit_add_title);
        edit_desc = view.findViewById(R.id.edit_add_desc);
        edit_layout = view.findViewById(R.id.edit_layout);
        edit_layout.setOnClickListener(this);
    }


    @Override
    public void onCreateOptionsMenu(@NonNull Menu menu, @NonNull MenuInflater inflater) {
        inflater.inflate(R.menu.menu_cancel, menu);
    }

    @Override
    public boolean onOptionsItemSelected(@NonNull MenuItem item) {
        switch (item.getItemId()) {
            case R.id.menu_cancel:
                mController.closeWriteDiary(getActivity().getSupportFragmentManager(), this);
                mController.setNavigationVisibility();
                return true;
        }
        return false;
    }

    @Nullable
    @Override
    public View onCreateView(@NonNull LayoutInflater inflater, @Nullable ViewGroup container, @Nullable Bundle savedInstanceState) {
        View root = inflater.inflate(R.layout.fragment_add_diary, container, false);
        initView(root);
        return root;
    }

    @Override
    public void onDestroy() {
        super.onDestroy();
    }

    @Override
    public void onClick(View view) {
        switch (view.getId()) {
            case R.id.add_diary_confirm:
                mController.addDiaryToRepository(edit_title.getText().toString().trim(), edit_desc.getText().toString().trim());
                mController.setNavigationVisibility();
                mController.closeWriteDiary(getActivity().getSupportFragmentManager(), this);
                break;
            case R.id.edit_layout:
                mController.changeFocus(edit_desc);
                break;
        }
    }
}
AddDiaryFragment的layout
<?xml version="1.0" encoding="utf-8"?>
<LinearLayout
    xmlns:android="http://schemas.android.com/apk/res/android"
    android:layout_width="match_parent"
    android:layout_height="match_parent"
    android:orientation="vertical">
    <LinearLayout
        android:layout_width="match_parent"
        android:layout_height="wrap_content"
        android:layout_marginTop="10dp"
        android:layout_marginStart="10dp"
        android:layout_marginEnd="10dp"
        android:orientation="vertical">
        <EditText
            android:id="@+id/edit_add_title"
            android:hint="@string/add_title_hint"
            android:minLines="1"
            android:layout_width="match_parent"
            android:layout_height="wrap_content" />
    </LinearLayout>
    <LinearLayout
        android:id="@+id/edit_layout"
        android:layout_width="match_parent"
        android:layout_height="0dp"
        android:layout_weight="1"
        android:layout_marginTop="5dp"
        android:layout_marginStart="10dp"
        android:layout_marginEnd="10dp"
        android:layout_marginBottom="10dp">
        <LinearLayout
            android:layout_width="match_parent"
            android:layout_height="match_parent"
            android:paddingStart="5dp"
            android:paddingTop="5dp"
            android:paddingEnd="5dp"
            android:paddingBottom="5dp"
            android:background="@drawable/edit_background">
            <EditText
                android:id="@+id/edit_add_desc"
                android:hint="@string/add_title_description"
                android:gravity="top"
                android:layout_width="match_parent"
                android:layout_height="wrap_content"
                android:scrollbars="vertical"
                android:background="@null"/>
        </LinearLayout>
    </LinearLayout>
    <LinearLayout
        android:layout_width="match_parent"
        android:layout_height="wrap_content"
        android:gravity="center"
        android:orientation="horizontal">
        <Button
            android:id="@+id/add_diary_confirm"
            android:text="@string/btn_ok"
            android:layout_width="wrap_content"
            android:layout_height="wrap_content"/>
    </LinearLayout>
</LinearLayout>
- 将应用密码加密保存与文件中。每次登陆获取密码并对比。
public class LoginDirectActivity extends AppCompatActivity implements View.OnClickListener {
    private EditText edit_input_text;
    private Button btn_comeIn;
    private TextView tv_setPsw;
    private static final String TAG = "Login2Activity";
    @Override
    protected void onCreate(Bundle savedInstanceState) {
        super.onCreate(savedInstanceState);
        setContentView(R.layout.activity_direct_login);
        bindView();
    }

    private void bindView() {
        getWindow().addFlags(WindowManager.LayoutParams.FLAG_TRANSLUCENT_STATUS);
        edit_input_text = findViewById(R.id.edit_login2_input_text);
        btn_comeIn = findViewById(R.id.btn_login2_comeIn);
        btn_comeIn.setOnClickListener(this);
        tv_setPsw = findViewById(R.id.tv_setPsw);
        tv_setPsw.setOnClickListener(this);
    }


    @Override
    public void onClick(View v) {
        switch (v.getId()) {
            case R.id.tv_setPsw:
                Intent setPsw_intent = new Intent(LoginDirectActivity.this, LoginActivity.class);
                startActivity(setPsw_intent);
                LoginDirectActivity.this.finish();
//                overridePendingTransition(R.anim.out_to_left,R.anim.in_from_right);
                break;
            case R.id.btn_login2_comeIn:
                String psw = edit_input_text.getText().toString().trim();
                if (psw.isEmpty()) {
                    Toast.makeText(this, "密码不能为空!", Toast.LENGTH_SHORT).show();
                    return;
                }
                String readInfoByContext = FileUtils.readInfoByContext(this);
                if (psw.equals(readInfoByContext)) {
                    Toast.makeText(this, "登录成功!", Toast.LENGTH_SHORT).show();
                    Intent intent = new Intent(this, MainActivity.class);
                    startActivity(intent);
//                    overridePendingTransition(R.anim.out_to_left,R.anim.in_from_right);
                } else {
                    Toast.makeText(this, "密码不正确!", Toast.LENGTH_SHORT).show();
                }
                break;

        }
    }
}
LoginDirectActivity 的layout
<?xml version="1.0" encoding="utf-8"?>
<androidx.constraintlayout.widget.ConstraintLayout xmlns:android="http://schemas.android.com/apk/res/android"
    xmlns:app="http://schemas.android.com/apk/res-auto"
    xmlns:tools="http://schemas.android.com/tools"
    android:layout_width="match_parent"
    android:layout_height="match_parent"
    tools:context=".view.LoginDirectActivity">

    <Button
        android:id="@+id/btn_login2_comeIn"
        android:layout_width="match_parent"
        android:layout_height="wrap_content"
        android:layout_marginStart="40dp"
        android:layout_marginEnd="40dp"
        android:text="进入"
        app:layout_constraintBottom_toTopOf="@+id/guideline5"
        app:layout_constraintEnd_toEndOf="parent"
        app:layout_constraintStart_toStartOf="parent" />

    <LinearLayout
        android:id="@+id/linearLayout"
        android:layout_width="match_parent"
        android:layout_height="wrap_content"
        android:layout_marginStart="40dp"
        android:layout_marginEnd="40dp"
        android:gravity="center_vertical"
        android:orientation="horizontal"
        app:layout_constraintEnd_toEndOf="parent"
        app:layout_constraintStart_toStartOf="parent"
        app:layout_constraintTop_toTopOf="@+id/guideline7">

        <ImageView
            android:layout_width="32dp"
            android:layout_height="32dp"
            android:src="@mipmap/come_in_key" />

        <EditText
            android:id="@+id/edit_login2_input_text"
            android:hint="输入您的密码"
            android:inputType="textPassword"
            android:layout_width="match_parent"
            android:layout_height="wrap_content" />

    </LinearLayout>


    <androidx.constraintlayout.widget.Guideline
        android:id="@+id/guideline4"
        android:layout_width="wrap_content"
        android:layout_height="wrap_content"
        android:orientation="horizontal"
        app:layout_constraintGuide_percent="0.22" />

    <androidx.constraintlayout.widget.Guideline
        android:id="@+id/guideline5"
        android:layout_width="wrap_content"
        android:layout_height="wrap_content"
        android:orientation="horizontal"
        app:layout_constraintGuide_percent="0.58" />

    <TextView
        android:id="@+id/tv_login2_password_title"
        android:layout_width="match_parent"
        android:layout_height="wrap_content"
        android:gravity="center"
        android:text="输入密码"
        android:textSize="30sp"
        android:textStyle="bold"
        app:layout_constraintEnd_toEndOf="parent"
        app:layout_constraintStart_toStartOf="parent"
        app:layout_constraintTop_toTopOf="@+id/guideline4" />

    <androidx.constraintlayout.widget.Guideline
        android:id="@+id/guideline7"
        android:layout_width="wrap_content"
        android:layout_height="wrap_content"
        android:orientation="horizontal"
        app:layout_constraintGuide_percent="0.4" />

    <TextView
        android:id="@+id/tv_setPsw"
        android:layout_width="wrap_content"
        android:layout_height="wrap_content"
        android:text="设置密码"
        android:textStyle="bold"
        app:layout_constraintEnd_toEndOf="@+id/linearLayout"
        app:layout_constraintTop_toBottomOf="@+id/linearLayout" />


</androidx.constraintlayout.widget.ConstraintLayout>
- 使用SharedPrefrenced存储日记内容及标题。
public final class SharedPreferencesUtils {
    private static final SimpleArrayMap<String, SharedPreferencesUtils> mCaches = new SimpleArrayMap<>();
    private SharedPreferences mSharedPreferences;
    private SharedPreferencesUtils(final String spName, final int mode) {
        mSharedPreferences = YyApplication.get().getSharedPreferences(spName, mode);
    }

    public static SharedPreferencesUtils getInstance(String spName) {
        SharedPreferencesUtils utils = mCaches.get(spName);
        if (utils == null) {
            utils = new SharedPreferencesUtils(spName, Context.MODE_PRIVATE);
        }
        return utils;
    }

    public void put(final String key, final String value) {
        mSharedPreferences.edit().putString(key, value).apply();
    }

    public String get(final String key) {
        return mSharedPreferences.getString(key, "");
    }

    public void remove(final String key) {
        mSharedPreferences.edit().remove(key).apply();
    }
}
下载链接
源码下载:https://pan.baidu.com/s/1bzSSuPrtlq1m5UG29TWvoQ
提取码:1111 (好像不需要)文章来源:https://www.toymoban.com/news/detail-779562.html
总结
以上就是今天讲的内容,本文仅仅简单介绍了Android日记APP,需要掌握上述知识点,能够较好的理解此应用逻辑。文章来源地址https://www.toymoban.com/news/detail-779562.html
到了这里,关于Android studio课程设计开发实现---日记APP的文章就介绍完了。如果您还想了解更多内容,请在右上角搜索TOY模板网以前的文章或继续浏览下面的相关文章,希望大家以后多多支持TOY模板网!