一、图像的翻转
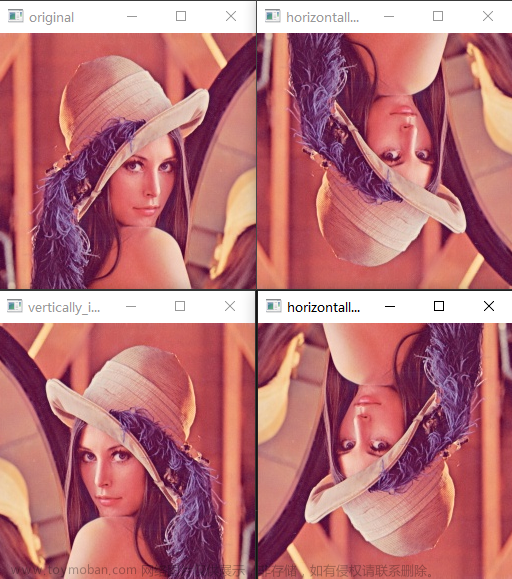
使用API---cv.flip(src, flipCode)
flipCode = 0表示上下翻转
flipCode > 0表示左右翻转
flipCode < 0上下 + 左右翻转
或者使用np的翻转src[: : -1,: : -1]实现上下翻转。
示例代码如下:
import cv2
import numpy as np

dog = cv2.imread("dog.png")

# 图片的翻转
# new_dog = cv2.flip(dog, 0)
new_dog1 = cv2.flip(dog, 1)
new_dog2 = cv2.flip(dog, -1)

# 使用np同样可以实现上下翻转。
new_dog = dog[::-1, ::-1]

cv2.imshow("dog", dog)
cv2.imshow("new_dog", new_dog)
cv2.imshow("new_dog1", new_dog1)
cv2.imshow("new_dog2", new_dog2)

cv2.waitKey(0)
cv2.destroyAllWindows()
输出结果如下:


二、图像的旋转
使用API ---cv2.rotate(img, rotateCode)
ROTATE_90_CLOCKWISE 90度顺时针
ROTATE_180 180度顺时针
ROTATE_90_COUNTERCLOCKWISE 90度逆时针
new_dog = cv2.rotate(dog, cv2.ROTATE_90_CLOCKWISE)
new_dog1 = cv2.rotate(dog, cv2.ROTATE_180)
new_dog2 = cv2.rotate(dog, cv2.ROTATE_90_COUNTERCLOCKWISE)
输出结果如下:


只提供了这三个角度设置,无法旋转其他角度。文章来源:https://www.toymoban.com/news/detail-781153.html
综合演示代码如下所示:文章来源地址https://www.toymoban.com/news/detail-781153.html
import cv2
import numpy as np

dog = cv2.imread("dog.png")

# 图片的翻转
# new_dog = cv2.flip(dog, 0)
# new_dog1 = cv2.flip(dog, 1)
# new_dog2 = cv2.flip(dog, -1)

# 使用np同样可以实现上下翻转。
# new_dog = dog[::-1, ::-1]

# 图像的旋转
new_dog = cv2.rotate(dog, cv2.ROTATE_90_CLOCKWISE)
new_dog1 = cv2.rotate(dog, cv2.ROTATE_180)
new_dog2 = cv2.rotate(dog, cv2.ROTATE_90_COUNTERCLOCKWISE)

cv2.imshow("dog", dog)
cv2.imshow("new_dog", new_dog)
cv2.imshow("new_dog1", new_dog1)
cv2.imshow("new_dog2", new_dog2)

cv2.waitKey(0)
cv2.destroyAllWindows()
到了这里,关于OpenCV-18图像的翻转和旋转的文章就介绍完了。如果您还想了解更多内容,请在右上角搜索TOY模板网以前的文章或继续浏览下面的相关文章,希望大家以后多多支持TOY模板网!


