前言
tkinter是python自带的标准gui库,对于我们自己日常做一些小程序出来给自己使用是非常不错的。因为tkinter相比较其它强大的gui库(PyQT,WxPython等等)而言要简单、方便、学起来也容易得很多,基本上两三天就能学会,所以非常是nice的。但是喃,它做出来的界面,如果你是没有一定的经验与技术是做不出来好看界面的,这样就很难受额。也会很影响我们把自己做的小程序分享给别个使用。不管怎么说都现在这个时代了,要是让别人拿个20年前的界面程序来盯着看也非常难受不是,哈哈哈!!!熟话说,爱美之心人皆有之,那何况对于我们自己的作品而言喃,那肯定还是要追求一下完美好看,不是?
所以,ttkbootstrap(第三方库)官方就很nice啊,直接把他俩结合了起来,并给它穿上了一件“皮肤”(叮:tkinter,您的外挂已到账!)。简单来说就是会tkinter了,那么也就基本上也会ttkbootstrap了,如果不会,那直接学ttkbootstrap难度也与tkinter差不多,简直就是太nice了,哈哈哈。
那么,之所以推出ttkbootstrap出来当然是为了解决界面好看的问题,它自己封装了很多主题来供用户选择,里面的主题切换出来的效果也很现代化好看。所以,我们要学简单的gui库那么就学ttkbootstrap吧!!!好了,接下来我们就开始对它做一些简单的使用了解吧!对了,学习ttkbootstrap的小伙伴们一定要去官方文档里面的查看内容,里面也提供了好几个项目来供大家参考!
(提示:本文是考虑在对tkinter有一定了解的基础上与大家分享学习的,因为下面的内容大多数都没注释,所以没有基础的小伙伴还请见谅!)
官方文档:https://ttkbootstrap.readthedocs.io/en/latest/
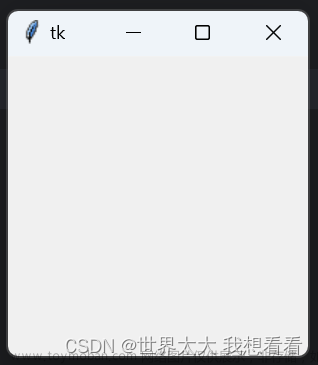
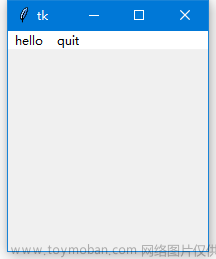
这两张图片是截取官网上提供的展示效果图。

主题切换
简单的主题切换,由于当前窗口上组件很少,所以感觉效果不明显,但是当组件布局很多时就会很好看。
import ttkbootstrap as ttk
from ttkbootstrap.constants import *
root = ttk.Window()
style = ttk.Style()
theme_names = style.theme_names()#以列表的形式返回多个主题名
theme_selection = ttk.Frame(root, padding=(10, 10, 10, 0))
theme_selection.pack(fill=X, expand=YES)
lbl = ttk.Label(theme_selection, text="选择主题:")
theme_cbo = ttk.Combobox(
        master=theme_selection,
        text=style.theme.name,
        values=theme_names,
)
theme_cbo.pack(padx=10, side=RIGHT)
theme_cbo.current(theme_names.index(style.theme.name))
lbl.pack(side=RIGHT)
def change_theme(event):
    theme_cbo_value = theme_cbo.get()
    style.theme_use(theme_cbo_value)
    theme_selected.configure(text=theme_cbo_value)
    theme_cbo.selection_clear()
theme_cbo.bind('<<ComboboxSelected>>', change_theme)
theme_selected = ttk.Label(
        master=theme_selection,
        text="litera",
        font="-size 24 -weight bold"
)
theme_selected.pack(side=LEFT)
root.mainloop()
ttkbootstrap一些简单使用介绍
首先对它实例化创建应用程序窗口的一些简单介绍。
import ttkbootstrap as ttk
#实例化创建应用程序窗口
root = ttk.Window(
        title="窗口名字",        #设置窗口的标题
        themename="litera",     #设置主题
        size=(1066,600),        #窗口的大小
        position=(100,100),     #窗口所在的位置
        minsize=(0,0),          #窗口的最小宽高
        maxsize=(1920,1080),    #窗口的最大宽高
        resizable=None,         #设置窗口是否可以更改大小
        alpha=1.0,              #设置窗口的透明度(0.0完全透明)
        )
# root.place_window_center()    #让显现出的窗口居中
# root.resizable(False,False)   #让窗口不可更改大小
# root.wm_attributes('-topmost', 1)#让窗口位置其它窗口之上
root.mainloop()
标签

import ttkbootstrap as ttk
from ttkbootstrap.constants import *
root = ttk.Window()
ttk.Label(root,text="标签1",bootstyle=INFO).pack(side=ttk.LEFT, padx=5, pady=10)
ttk.Label(root,text="标签2",bootstyle="inverse").pack(side=ttk.LEFT, padx=5, pady=10)
ttk.Label(root,text="标签3",bootstyle="inverse-danger").pack(side=ttk.LEFT, padx=5, pady=10)
ttk.Label(root, text="标签4", bootstyle=WARNING, font=("微软雅黑", 15), background='#94a2a4').pack(side=LEFT, padx=5, pady=10)
root.mainloop()
'''
# bootstyle colors
PRIMARY = 'primary'
SECONDARY = 'secondary'
SUCCESS = 'success'
DANGER = 'danger'
WARNING = 'warning'
INFO = 'info'
LIGHT = 'light'
DARK = 'dark'

# bootstyle types
OUTLINE = 'outline'
LINK = 'link'
TOGGLE = 'toggle'
INVERSE = 'inverse'
STRIPED = 'striped'
TOOLBUTTON = 'toolbutton'
ROUND = 'round'
SQUARE = 'square'
'''
按钮
按钮样式
import ttkbootstrap as ttk
from ttkbootstrap.constants import *
root = ttk.Window()
ttk.Button(root, text="Button 1", bootstyle=SUCCESS).pack(side=LEFT, padx=5, pady=10)
ttk.Button(root, text="Button 2", bootstyle=(INFO, OUTLINE)).pack(side=LEFT, padx=5, pady=10)
ttk.Button(root, text="Button 3", bootstyle=(PRIMARY, "outline-toolbutton")).pack(side=LEFT, padx=5, pady=10)
ttk.Button(root, text="Button 4", bootstyle="link").pack(side=LEFT, padx=5, pady=10)
ttk.Button(root, text="Button 5", bootstyle="success-link").pack(side=LEFT, padx=5, pady=10)
ttk.Button(root, text="Button 6", state="disabled").pack(side=LEFT, padx=5, pady=10) #在禁用状态下创建按钮
root.mainloop()
按钮点击
import ttkbootstrap as ttk
from ttkbootstrap.constants import *
root = ttk.Window()
#为按钮添加点击事件
#法一
def button1():
    print("Button1点击了一下!")
ttk.Button(root,text="Button1", bootstyle=(PRIMARY, "outline-toolbutton"),command=button1).pack(side=LEFT, padx=5, pady=10)
#法二
def button2(event): #这里要加一个参数,不然会报错
    print("Button2点击了一下!")
    button_text = event.widget["text"] #得到按钮上的文本
    print(button_text)
b = ttk.Button(root,text="Button2", bootstyle=(PRIMARY, "outline-toolbutton"))
b.pack(side=LEFT, padx=5, pady=10)
b.bind("<Button-1>", button2) #<Button-1>鼠标左键
root.mainloop()
输入框

import ttkbootstrap as ttk
from ttkbootstrap.constants import *
root = ttk.Window()
e1 = ttk.Entry(root,show=None)
e1.insert('0',"默认插入内容")
e1.grid(row=5, column=1, sticky=ttk.W, padx=10,pady=10)
e2 = ttk.Entry(root,show="*",width=50,bootstyle=PRIMARY)
e2.grid(row=10, column=1, sticky=ttk.W, padx=10, pady=10)
e3_content = ttk.StringVar()
e3 = ttk.Entry(root,bootstyle='success', textvariable=e3_content).grid(row=15, column=1, sticky=ttk.W, padx=10, pady=10)
def get_entry_contetn():
    print("e1: ",e1.get())
    print("e2: ",e2.get())
    print("e3: ",e3_content.get())
ttk.Button(root,text="get_entry_contetn", bootstyle=(PRIMARY, "outline-toolbutton"),command=get_entry_contetn).grid(row=20, column=1, sticky=ttk.W, padx=10, pady=10)
root.mainloop()
文本框

import ttkbootstrap as ttk
from ttkbootstrap.constants import *
root = ttk.Window()
text = ttk.Text(root,)
text.pack(padx=10,pady=10,fill=BOTH)
text.insert('insert','text-content 1') #插入内容
text.delete("0.0",'end') #删除内容
text.insert('insert','text-content 2\npy')
text.see(ttk.END) #光标跟随着插入的内容移动
root.mainloop()
日期输入

import ttkbootstrap as ttk
from ttkbootstrap.constants import *
root = ttk.Window()
de1 = ttk.DateEntry()
de1.grid(row=6, column=1, sticky=ttk.W,padx=10, pady=10)
print(de1.entry.get())

de2 = ttk.DateEntry(bootstyle="success",dateformat=r"%Y") #r"%Y-%m-%d"
de2.grid(row=6, column=2, sticky=ttk.W,padx=10, pady=10)
def get_dataentry():
    print(de2.entry.get())
ttk.Button(root,text="get_dataentry", bootstyle=(PRIMARY, "outline-toolbutton"),command=get_dataentry).grid(row=20, column=1, sticky=ttk.W, padx=10, pady=10)
root.mainloop()
单选按钮

import ttkbootstrap as ttk
root = ttk.Window()
variable_value = ttk.StringVar()
variable_value_dist = {
    "0":"男",
    "1":"女",
    "2":"未知"
}
ttk.Radiobutton(root, text='男', variable=variable_value, value=0).pack(side=ttk.LEFT, padx=5)
ttk.Radiobutton(root, text='女', variable=variable_value, value=1).pack(side=ttk.LEFT, padx=5)
ttk.Radiobutton(root, text='未知', variable=variable_value, value=2).pack(side=ttk.LEFT, padx=5)
def ensure():
    print(variable_value_dist[variable_value.get()])
ttk.Button(text="确定", command=ensure).pack(side=ttk.LEFT, padx=5)
root.mainloop()
多选按钮

import ttkbootstrap as ttk
root = ttk.Window()
variable_content = [
    [ttk.StringVar(),"111"],
    [ttk.StringVar(),"222"],
    [ttk.StringVar(),"333"],
    [ttk.StringVar(),"666"]
]
ttk.Checkbutton(root, text="111", variable=variable_content[0][0]).pack(side=ttk.LEFT, padx=5)
ttk.Checkbutton(root, text="222", variable=variable_content[1][0], bootstyle="square-toggle").pack(side=ttk.LEFT, padx=5)
ttk.Checkbutton(root, text="333", variable=variable_content[2][0], bootstyle="round-toggle").pack(side=ttk.LEFT, padx=5)
ttk.Checkbutton(root, text="666", variable=variable_content[3][0]).pack(side=ttk.LEFT, padx=5)
def ensure():
    print([v for i, v in variable_content if i.get()])
ttk.Button(text="确定",command=ensure).pack(side=ttk.LEFT, padx=5)
root.mainloop()
组合框

import ttkbootstrap as ttk
from ttkbootstrap.constants import *
root = ttk.Window()
cbo = ttk.Combobox(
            master=root,
            bootstyle = DANGER,
            font = ("微软雅黑",12),
            values=['content 1', 'content 2', 'content 3'],
        )
cbo.current(1) #首先展示values里面索引的对应的值
cbo.pack()
# cbo.set('set other')
def ensure(event):
    print(cbo.get())
cbo.bind('<<ComboboxSelected>>', ensure)
root.mainloop()
Frame和Labelframe

import ttkbootstrap as ttk
from ttkbootstrap.constants import *
root = ttk.Window()
f = ttk.Frame(bootstyle=SUCCESS)
f.place(x=10,y=10,width=600,height=200)

lf = ttk.Labelframe(text="提示",bootstyle=PRIMARY,width=100,height=60)
lf.place(x=10,y=210,width=300,height=100)
ttk.Label(lf,text="标签").pack()
ttk.Button(lf,text="按钮").pack()
root.mainloop()
仪表

import psutil,time,threading
import ttkbootstrap as ttk
from ttkbootstrap.constants import *
root = ttk.Window()
ttk.Meter(
        master=root,
        bootstyle=DEFAULT,
        metertype="full",#将仪表显示为一个完整的圆形或半圆形(semi)
        wedgesize=5, #设置弧周围的指示器楔形长度,如果大于 0,则此楔形设置为以当前仪表值为中心的指示器
        amounttotal=50, #仪表的最大值,默认100
        amountused=10, #仪表的当前值
        metersize=200,#仪表大小
        showtext=True, #指示是否在仪表上显示左、中、右文本标签
        interactive=True, #是否可以手动调节数字的大小
        textleft='左边', #插入到中心文本左侧的短字符串
        textright='右边',
        textfont="-size 30", #中间数字大小
        subtext="文本",
        subtextstyle=DEFAULT,
        subtextfont="-size 20",#文本大小
        ).pack(side=ttk.LEFT, padx=5)
def _():
        meter = ttk.Meter(
                metersize=180,
                padding=50,
                amountused=0,
                metertype="semi",
                subtext="当前网速(kB/s)",
                subtextstyle="warning",
                interactive=False,
                bootstyle='primary',
                )
        meter.pack(side=ttk.LEFT, padx=5)
        while True:
                meter.configure(amountused=round(getNet(),2))
def getNet():
    recv_before = psutil.net_io_counters().bytes_recv
    time.sleep(1)
    recv_now = psutil.net_io_counters().bytes_recv
    recv = (recv_now - recv_before)/1024
    return recv

t = threading.Thread(target=_)
t.setDaemon(True)
t.start()
root.mainloop()
进度条

import time,threading
import ttkbootstrap as ttk
from ttkbootstrap.constants import *
root = ttk.Window(size=(500,380))
def _():
    f = ttk.Frame(root).pack(fill=BOTH, expand=YES)
    p1 = ttk.Progressbar(f, bootstyle=PRIMARY)
    p1.place(x=20, y=20, width=380, height=40)
    p1.start() #间隔默认为50毫秒(20步/秒)
    p2 = ttk.Progressbar(f, bootstyle=INFO,orient=VERTICAL)
    p2.place(x=200, y=100, width=40, height=200)
    p2.step(10) #步长
    while True:
        for i in range(0,50,5):
            p2.step(i) #以步长i增长
            # p2.stop()#停止
            time.sleep(1)
t = threading.Thread(target=_)
t.setDaemon(True)
t.start()
root.mainloop()
Scale

import threading,time
import ttkbootstrap as ttk
from ttkbootstrap.constants import *
root = ttk.Window()
ttk.Scale(
    master=root,
    orient=HORIZONTAL,
    value=75,
    from_=0,
    to=100
).pack(fill=X, pady=5, expand=YES)
ttk.Scale(master=root,orient=HORIZONTAL,bootstyle=WARNING,value=75,from_=100,to=0).pack(fill=X, pady=5, expand=YES)
def scale():
    s2 = ttk.Scale(
        master=root,
        bootstyle=SUCCESS,
        orient=VERTICAL,
        value=0,
        from_=100,
        to=0
    )
    s2.pack(fill=X, pady=5, expand=YES)
    for i in range(101):
        s2.configure(value=i)
        time.sleep(0.1)
        # print(s2.get())
t = threading.Thread(target=scale)
t.setDaemon(True)
t.start()
root.mainloop()
水尺

import ttkbootstrap as ttk
from ttkbootstrap.constants import *
root = ttk.Window()
fg1 = ttk.Floodgauge(
    master=None,
    cursor=None,
    font=None,
    length=None,
    maximum=100,
    mode=DETERMINATE,
    orient=HORIZONTAL,
    bootstyle=PRIMARY,
    takefocus=False,
    text=None,
    value=0,
    mask=None,
)
fg1.pack(side=ttk.LEFT, padx=5)
fg1.start()
fg2 = ttk.Floodgauge(
    master=root,
    bootstyle="success",
    font=("微软雅黑",12), #文本字体
    length=100,  #水尺长度
    maximum=10, #增加到10
    mode=INDETERMINATE, #来回不确定
    orient=VERTICAL, #放置垂直方向
    text="文本", #文本
)
fg2.pack(side=ttk.LEFT, padx=5)
fg2.start()
fg3 = ttk.Floodgauge(
    root,
    bootstyle=INFO,
    length=300,
    maximum=200,
    font=("微软雅黑", 18, 'bold'),
    mask='loading...{}%',
)
fg3.pack(side=ttk.LEFT, padx=5)
fg3.start()
# fg3.stop()
# fg3.configure(mask='...{}%')
fg3.configure(value=25) #初始值
fg3.step(50) #将上面25该值增加50步
root.mainloop()
滚动条

import ttkbootstrap as ttk
from ttkbootstrap.constants import *
root = ttk.Window(size=(500,200))
f = ttk.Frame(root).pack(fill=BOTH, expand=YES)
text_content = '''
The Zen of Python, by Tim Peters

Beautiful is better than ugly.
Explicit is better than implicit.
Simple is better than complex.
Complex is better than complicated.
Flat is better than nested.
Sparse is better than dense.
Readability counts.
Special cases aren't special enough to break the rules.
Although practicality beats purity.
Errors should never pass silently.
Unless explicitly silenced.
In the face of ambiguity, refuse the temptation to guess.
There should be one-- and preferably only one --obvious way to do it.
Although that way may not be obvious at first unless you're Dutch.
Now is better than never.
Although never is often better than *right* now.
If the implementation is hard to explain, it's a bad idea.
If the implementation is easy to explain, it may be a good idea.
Namespaces are one honking great idea -- let's do more of those!
'''
# t = ttk.Text(f)
# t.insert("0.0",text_content)
# t.place(x=10,y=10,width=480,height=200)
# sl_x = ttk.Scrollbar(t,orient=HORIZONTAL) #使滚动条水平放置
# #放到窗口的底部, 填充X轴竖直方向
# sl_x.pack(side=ttk.BOTTOM, fill=ttk.X)
# sl_y = ttk.Scrollbar(t,bootstyle="round-success") #滚动条默认垂直放置
# #放到窗口的右侧, 填充Y轴竖直方向
# sl_y.pack(side=ttk.RIGHT, fill=ttk.Y)
# #两个控件相关联
# sl_x.config(command=t.xview)
# t.config(yscrollcommand=sl_x.set)
# sl_y.config(command=t.yview)
# t.config(yscrollcommand=sl_y.set)

##滚动文本框
from ttkbootstrap.scrolled import ScrolledText
st = ScrolledText(f, padding=5, height=10, autohide=True)
st.pack(fill=BOTH, expand=YES)
st.insert(END, text_content)

root.mainloop()
消息提示框

import ttkbootstrap as ttk
from ttkbootstrap.dialogs import Messagebox
root = ttk.Window()
print("ok: ",Messagebox.ok(
    message="要在消息框中显示的消息",
    title="消息框的标题",
    alert=False, #指定是否响铃,默认False
))
print("okcancel: ",Messagebox.okcancel(message="确定取消"))
print("retrycancel: ",Messagebox.retrycancel(message="重试取消"))
print("retrycancel: ",Messagebox.show_error(message="显示错误"))
print("retrycancel: ",Messagebox.show_info(message="显示信息"))
print("retrycancel: ",Messagebox.show_question(message="显示问题"))
print("retrycancel: ",Messagebox.show_warning(message="显示警告"))
print("retrycancel: ",Messagebox.yesno(message="是的"))
print("retrycancel: ",Messagebox.yesnocancel(message="是的取消"))
root.mainloop()
查询框

import ttkbootstrap as ttk
from ttkbootstrap.dialogs import Querybox
root = ttk.Window()
print("获取日期:",Querybox.get_date())
print("获取float型:",Querybox.get_float(
    prompt="请输入内容:",
    title="获取float型: ",
    initialvalue=666.666, #设置初始值
    # minvalue=None,
    # maxvalue=None
))
print("获取字体:",Querybox.get_font())
print("获取整数:",Querybox.get_integer())
print("获取字符串:",Querybox.get_string())
root.mainloop()
子窗口

import ttkbootstrap as ttk
root = ttk.Window()
root.wm_attributes('-topmost', 1)#让主窗口置顶
def my():
    ttk.Style("solar")
    #print(ttk.Style().theme_names())#可设置主题风格['cyborg', 'journal', 'darkly', 'flatly', 'solar', 'minty', 'litera', 'united', 'pulse', 'cosmo', 'lumen', 'yeti', 'superhero']
    mytoplevel = ttk.Toplevel(root,alpha=0.5)##里面的参数和Window()父窗口一致
ttk.Button(text="my_Toplevel ",command=my).pack()
root.mainloop()
菜单
新增,之前总是感觉好像缺了点什么,今天才想起来,哈哈哈!!!
import ttkbootstrap as ttk
from ttkbootstrap.dialogs import Messagebox
root = ttk.Window()
# 在窗口上创建一个菜单栏(最上方的菜单栏横条)
menubar = ttk.Menu(root)
def dianji(): #定义一个点击事件方法
    Messagebox.show_info(title='走走走!', message='该功能还未开放!')   #消息提示框窗口
# 定义一个竖条
filemenu = ttk.Menu(menubar)
# 在菜单单元中添加一个菜单项File
menubar.add_cascade(label='设置', menu=filemenu)
# 在设置菜单项添加命令选项
filemenu.add_command(label='更多', command=dianji)
# 添加一条分割线
filemenu.add_separator()
# 定义一个子菜单条
submenu = ttk.Menu(filemenu)  # 和上面定义菜单一样,不过此处是在设置上创建一个空的菜单
submenu.add_command(label="背景")  # 给submenu添加功能选项
submenu.add_command(label="字体")
submenu.add_command(label="大小")
# 添加一个展开下拉菜单,并把上面的子菜单嵌入给它
filemenu.add_cascade(label='个性化', menu=submenu, underline=0)
# 同样的在File中加入Exit小菜单,此处对应命令为window.quit
filemenu.add_command(label='退出', command=root.quit)
# 在顶部再添加多个菜单项
otherfunction = ttk.Menu(menubar)
menubar.add_cascade(label='选择', menu=otherfunction)
menubar.add_cascade(label='查看', menu=otherfunction)
otherfunction.add_command(label='该功能未开放!')
#帮助
def baidu():
    Messagebox.okcancel(title='baidu.com', message='走走走,自己去百度!')
help = ttk.Menu(menubar, tearoff=0)
menubar.add_cascade(label='帮助', menu=help)
help.add_command(label='help', command=baidu)
# 将菜单配置给窗口
root.config(menu=menubar)

root.mainloop()
面板

import ttkbootstrap as ttk
from ttkbootstrap.constants import *
root = ttk.Window()
f = ttk.Frame(root)
f.pack(pady=5, fill=X, side=TOP)
nb = ttk.Notebook(f)
nb.pack(
    side=LEFT,
    padx=(10, 0),
    expand=YES,
    fill=BOTH
)
nb_text = "This is a notebook tab.\nYou can put any widget you want here."
nb.add(ttk.Label(nb, text=nb_text), text="Tab 1", sticky=NW)
nb.add(
    child=ttk.Label(nb, text="notebook tab 2."),
    text="Tab 2",
    sticky=NW
)
f2 = ttk.Frame(nb)
ttk.Button(f2,text="notebook button").pack(side=ttk.LEFT, padx=5, pady=10)
nb.add(f2, text='Tab 3')
root.mainloop()
树视图

import ttkbootstrap as ttk
from ttkbootstrap.constants import *
root = ttk.Window()
tv = ttk.Treeview(
        master=root,
        columns=[0, 1],
        show=HEADINGS,
        height=5
    )
table_data = [
    (1,'one'),
    (2, 'two'),
    (3, 'three'),
    (4, 'four'),
    (5, 'five')
]
for row in table_data:
    tv.insert('', END, values=row)
# print(tv.get_children())#('I001', 'I002', 'I003', 'I004', 'I005')
tv.selection_set('I002')
tv.heading(0, text='ID')
tv.heading(1, text='NAME')
tv.column(0, width=60)
tv.column(1, width=300, anchor=CENTER)
tv.pack(side=LEFT, anchor=NE, fill=X)
root.mainloop()
加载gif动图
左边是官网上提供的方法,右边是一个自己定义的方法。
from pathlib import Path
from itertools import cycle
import ttkbootstrap as ttk
from ttkbootstrap.constants import *
from PIL import Image, ImageTk, ImageSequence
class AnimatedGif(ttk.Frame):
    def __init__(self, master):
        super().__init__(master, width=400, height=300)

        # open the GIF and create a cycle iterator
        file_path = Path(__file__).parent / "guanwang.gif"
        with Image.open(file_path) as im:
            # create a sequence
            sequence = ImageSequence.Iterator(im)
            images = [ImageTk.PhotoImage(s) for s in sequence]
            self.image_cycle = cycle(images)

            # length of each frame
            self.framerate = im.info["duration"]

        self.img_container = ttk.Label(self, image=next(self.image_cycle))
        self.img_container.pack(fill="both", expand="yes")
        self.after(self.framerate, self.next_frame)

    def next_frame(self):
        """Update the image for each frame"""
        self.img_container.configure(image=next(self.image_cycle))
        self.after(self.framerate, self.next_frame)

def loadingGif(app):
    numIdx = 12  # gif的帧数
    file_path = Path(__file__).parent / "TestGif.gif"
    frames = [ttk.PhotoImage(file=file_path, format='gif -index %i' % (i)) for i in range(numIdx)]
    def run(rate):
        frame = frames[rate]
        rate += 1
        gif_label.configure(image=frame)  # 显示当前帧的图片
        gif_label.after(100, run, rate % numIdx)  # 0.1秒(100毫秒)之后继续执行函数(run)
    gif_label = ttk.Label(app)
    gif_label.pack(side=LEFT,padx=20,fill=BOTH, expand=YES)
    run(0)
if __name__ == "__main__":
    app = ttk.Window("Animated GIF", themename="litera")
    gif = AnimatedGif(app)
    gif.pack(side=LEFT,padx=20,fill=BOTH, expand=YES)
    loadingGif(app)
    app.mainloop()
打开本地文件
import ttkbootstrap as ttk
from ttkbootstrap.constants import *
from tkinter.filedialog import askopenfilename
root = ttk.Window()
def open_file():
    path = askopenfilename()
    # print(path)
    if not path:
        return
ttk.Button(root, text="打开文件", command=open_file).pack(fill=X, padx=10, pady=10)
root.mainloop()
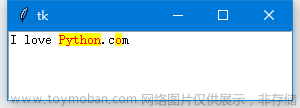
打开浏览器
import ttkbootstrap as ttk
from ttkbootstrap.constants import *
import webbrowser
root = ttk.Window()
def open_url(event):
    webbrowser.open("http://www.baidu.com", new=0)  # 启动web浏览器访问给定的URL
label = ttk.Label(root,text="https://www.baidu.com/",bootstyle=PRIMARY)
label.pack(fill=BOTH)
label.bind("<Button-1>", open_url)
root.mainloop()
好了,分享已经没有了!文章来源:https://www.toymoban.com/news/detail-781312.html
那么,就感谢大家查阅啦!!!文章来源地址https://www.toymoban.com/news/detail-781312.html
到了这里,关于Python GUI之tkinter的皮肤(ttkbootstrap)打造出你的窗口之美的文章就介绍完了。如果您还想了解更多内容,请在右上角搜索TOY模板网以前的文章或继续浏览下面的相关文章,希望大家以后多多支持TOY模板网!