前言
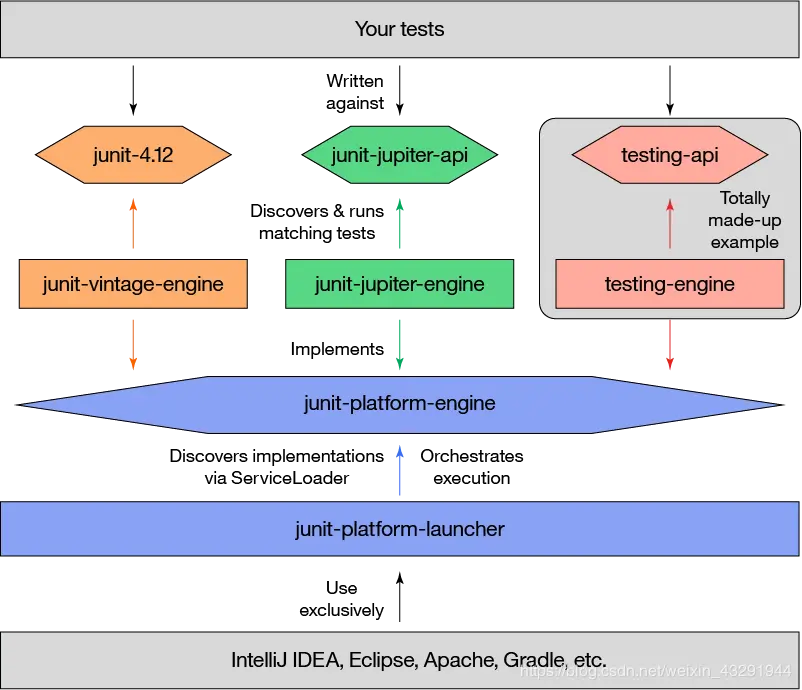
作为程序员为了提前发现代码bug,优化代码; 通常我们写完某个功能模块代码后都需要写单元测试对代码块进行测试(特别是敏捷开发中);Java项目最常用的单元测试框架即为Junit(目前最新版本为Junit5),SpringBoot本身也整合了该框架。在写单元测试时代码块中的调到第三方接口方法或涉及数据库操作的接口方法一般都需要mock掉(测试中叫打测试桩)。目前在 Java 中主流的 Mock 测试框架有 Mockito、JMock、EasyMock,Mockito 框架是SpringBoot 目前内建的 框架。本文主要介绍Junit5+Mockito在SpringBoot项目写单元测试的使用。
maven依赖
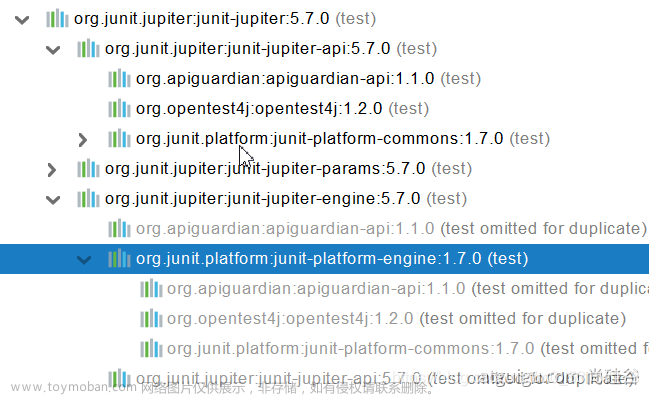
Mockito,Junit在SpringBoot 内部已依赖只需引入spring-boot-starter-test即可。
<dependency>
    <groupId>org.springframework.boot</groupId>
    <artifactId>spring-boot-starter-test</artifactId>
    <scope>test</scope>
    <exclusions>
      <exclusion>
        <groupId>org.junit.vintage</groupId>
        <artifactId>junit-vintage-engine</artifactId>
        </exclusion>
      </exclusions>
</dependency>
<dependency>
    <groupId>org.junit.jupiter</groupId>
    <artifactId>junit-jupiter-api</artifactId>
    <scope>test</scope>
</dependency>
Junit5基本使用
基本注解:
类注解:
@TestInstance(Lifecycle.PER_CLASS)注解
如果您希望JUnit Jupiter在同一个测试实例上执行所有测试方法,只需使用@TestInstance(Lifecycle.PER_CLASS)注释您的测试类。使用此模式时,每个测试类将创建一个新的测试实例。如果没使用@TestInstance(Lifecycle.PER_CLASS)注解,使用@BeforeAll和@AfterAll注解必须在static静态方法上使用。
- TestInstance.Lifecycle.PER_CLASS:每个测试类将创建一个新的测试实例。
- TestInstance.Lifecycle.PER_METHOD:将为每种测试方法,测试工厂方法或测试模板方法创建一个新的测试实例。此模式类似于JUnit版本1至4中的行为。
@ExtendWith(MockitoExtension.class)注解
用在springboot项目中,涉及spring的单元测试需要使用@ExtendWith(SpringExtension.class)注解,可以mock spring bean。不涉及spring时使用@ExtendWith(MockitoExtension.class)。
@ExtendWith(SpringExtension.class)注解在Spring boot 2.1.x需要配合@SpringBootTest 使用,Spring boot 2.1.x之后可以不使用@ExtendWith(SpringExtension.class)注解
参考文档:Java – 理解 @ExtendWith(SpringExtension.class) 和 @ExtendWith(MockitoExtension.class)之间的差别
@SpringBootTest(classes = Application.class)注解
classes = ApplicationStarter.class指向SpringBoot启动类,启动spring容器。
在不同的Spring Boot版本中@ExtendWith的使用:
其中在Spring boot 2.1.x之前:
@SpringBootTest 需要配合@ExtendWith(SpringExtension.class)才能正常工作的。
而在Spring boot 2.1.x之后:
@SpringBootTest 已经组合了@ExtendWith(SpringExtension.class),因此,无需在进行该注解的使用了,进一步简化。如下图@SpringBootTest注解中已包含@ExtendWith(SpringExtension.class):
方法注解:
基本的注解都是方法上的注解,意思就是只在测试方法上进行添加,对应注解有以下几种:
| 注解 | 说明 |
| @Test | 测试方法的入口;可单独运行 |
| @BeforeEach | 每个测试方法前运行;不可以单独运行该方法 |
| @AfterEach | 每个测试方法后运行;不可以单独运行该方法 |
| @BeforeAll | 在类中所有方法前运行;static修饰;不可单独运行该方法 |
| @AfterAll | 在类中所有方法后运行;static修饰;不可单独运行该方法 |
代码示例:
import org.mockito.InjectMocks;

@TestInstance(Lifecycle.PER_CLASS)
@SpringBootTest(classes = ApplicationStarter.class)
public class DemoServiceImplTest {

    @InjectMocks
    private DemoService demoService =new DemoServiceImpl();

    @BeforeAll
    void beforeAllInit() {
        System.out.println("running before all");
    }

    @AfterAll
    void afterAllCleanUp() {
        System.out.println("running after all");
    }

    @BeforeEach
    void init() {
        System.out.println("running before each...");
    }

    @AfterEach
    void cleanUp() {
        System.out.println("running after each...");
    }

    @Test
    void testSum() {
        assertEquals(2, demoService.addtwoNumbers(1, 1));
    }

}
断言校验:
Assertions.assertEquals()值比较校验:
assertEquals(expected, actual,message)里面最少是2个参数,一个自己的期望值「expected」,一个程序的实际值「actual」。如果想要断言失败的情况下显示自定义的说明,则加上第3个参数,即断言失败说明「message」。
Assertions.assertThrows()异常捕获校验:
assertThrows(Class<T> expectedType, Executable executable, String message)去判断代码抛出的异常是业务代码自定义的异常不,对应的期望值变成了异常类型「
Class<T>」的期望值,实际的值也是抛出异常的实际值「Executable」,同样如果想要断言失败的情况下显示自定义的说明,则加上第3个参数,即断言失败说明「message」。
代码示例:
import org.mockito.InjectMocks;

@TestInstance(Lifecycle.PER_CLASS)
@SpringBootTest(classes = ApplicationStarter.class)
public class DemoServiceImplTest {

    @InjectMocks
    private DemoService demoService =new DemoServiceImpl();


    @Test
    public void testSum() {
        //Assertions.assertThrows()
        Exception ex = Assertions.assertThrows(Exception.class, () ->demoService.addtwoNumbers(1, 1))
        //Assertions.assertEquals()
        Assertions.assertEquals(ex.getMessage(),"test");
    }

}
更多详细信息参考文档:test-instance-lifecycle
Mockito使用
在测试代码块中经常会调到第三方接口方法(比如第三方SDK接口方法或远程RPC接口),涉及数据库操作的接口方法(数据库增删改查接口)。这些方法需要其他环境服务支持,链接远程数据库,我们只需测试自己编写的单元代码块是否有问题,不想真实调用这些方法。要解决这个问题,可以把这些方法都mock(模拟)掉。Mockito框架提供很好的支持。
常用注解
- @Mock:创建一个Mock,用于替换被测试类中的引用的bean或第三方类。
- @InjectMocks:用于创建一个被测试类的实例,其余用@Mock(或@Spy)注解创建的mock将被注入到用该实例中。用于被测试类(如service层的ServiceImpl)
- @Mockbean:将Mock对象添加到Spring上下文中。Mock将替换Spring上下文中任何相同类型的现有bean,如果没有定义相同类型的bean,将添加一个新的bean。如果需要使用Mockbean注解,需要使用SpringRunner(Junit5 中是@ExtendWith(SpringExtension.class)
)
@Autowird 等方式完成自动注入。在单元测试中,没有启动 spring 框架,此时就需要通过 @ InjectMocks完成依赖注入。@InjectMocks会将带有@Spy 和@Mock 注解的对象尝试注入到被 测试的目标类中。如下代码示例:
代码示例:
@Component("mock")
public class MockRepository {


    public MockData mock(String userName) {
        return new MockData(userName);

    }

}
import org.mockito.InjectMocks;
@Service
public class DemoServiceImpl {
@Autowired
private UserRepository userRepository;
@Autowired
private ApplicationContext applicationContext;
@Override
public Result getUserInfo(String id) {
User user=userRepository.findUserById(id);
MockRepository mockRepository=applicationContext.getBean("mock");
MockData data=mockRepository.mock(user.getUserName());
return new Result("1000","success",data);
}
}import org.mockito.InjectMocks;
@TestInstance(Lifecycle.PER_CLASS)
@SpringBootTest(classes = ApplicationStarter.class)
public class DemoServiceImplTest {
@InjectMocks
private DemoService demoService =new DemoServiceImpl();
@Mock
private UserRepository userRepository;
@MockBean
private MockRepository mockRepository;
@Autowired
private ApplicationContext applicationContext;
@Test
public void testSum() {
//Assertions.assertThrows()
Result res =demoService.getUserInfo("test");
//Assertions.assertEquals()
Assertions.assertEquals(res.getCode(),"1000");
}
}Mock方法:
1.when(...) thenReturn(...)会调用真实的方法,如果你不想调用真实的方法而是想要mock的话,就不要使用这个方法。
import org.mockito.InjectMocks;

@TestInstance(Lifecycle.PER_CLASS)
@SpringBootTest(classes = ApplicationStarter.class)
public class DemoServiceImplTest {

    @InjectMocks
    private DemoService demoService =new DemoServiceImpl();

    @Mock
    private UserRepository userRepository;

    @MockBean
    private MockRepository mockRepository;

    @Autowired
    private ApplicationContext applicationContext;

    @Test
    public void testSum() {
        // when(..).thenReturn(..)
        Mockito.when(userRepository.findUserById(Mockito.anyString())).thenReturn(new User());
        Result res =demoService.getUserInfo("test");
        //Assertions.assertEquals()
        Assertions.assertEquals(res.getCode(),"1000");
    }

}
2.doReturn(...) when(...) 跟when(...) thenReturn(...)一样都是mock方法,但不会调用真实方法。文章来源:https://www.toymoban.com/news/detail-781927.html
import org.mockito.InjectMocks;

@TestInstance(Lifecycle.PER_CLASS)
@SpringBootTest(classes = ApplicationStarter.class)
public class DemoServiceImplTest {

    @InjectMocks
    private DemoService demoService =new DemoServiceImpl();

    @Mock
    private UserRepository userRepository;

    @MockBean
    private MockRepository mockRepository;

    @Autowired
    private ApplicationContext applicationContext;

    @Test
    public void testSum() {
        // doReturn(new User()).when(userRepository)
        Mockito.doReturn(new User()).when(userRepository).findUserById(Mockito.anyString()))
        Result res =demoService.getUserInfo("test");
        //Assertions.assertEquals()
        Assertions.assertEquals(res.getCode(),"1000");
    }

}
3.doAnswer…when 当模拟对象调用它的方法,需要执行一些操作(其实就是需要执行一个代码块)才能得到返回值时,则需要使用doAnswer来构造产生这个模拟的返回值。例如:当模拟对象调用某个方法的返回值是个复合值(bean)时,就需要用doAnswer来构造该返回值。文章来源地址https://www.toymoban.com/news/detail-781927.html
@InjectMocks
private DemoService demoService =new DemoServiceImpl();

@Mock
private StockDao stockDao;
...

@Test
public void stockTest() {

        doAnswer(new Answer<StockModel>) {
            @Override
            public StockModel answer(InvocationOnMock invocation) throws Throwable {
                StockModel  stock = new StockModel ();
                stock.setFundFamilyName("fundFamily01");
                return stock;
            }
        }).when(stockDao).lookup("testStock");
        Result res=demoService.stock("testStock");
        Assertions.assertEquals(res.getStock(),"test");

}
到了这里,关于SpringBoot单元测试--Mockito+Junit5框架使用的文章就介绍完了。如果您还想了解更多内容,请在右上角搜索TOY模板网以前的文章或继续浏览下面的相关文章,希望大家以后多多支持TOY模板网!


