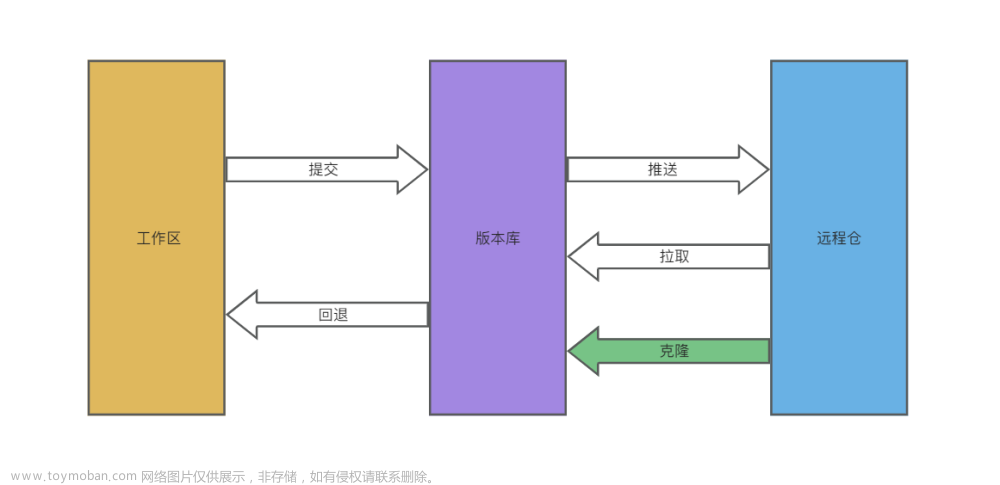
git
各个命令的详细使用方法参考git-docs。
Table of Contents
-
git
-
Table of Contents
-
add
-
archive
-
blame
-
branch
-
checkout
-
cherry-pick
-
clone
-
commit
-
config
-
diff
-
fetch
-
for-each-ref
-
github
-
init
-
log & show
-
merge
-
mv
-
pull
-
push
-
rebase
-
remote
-
rm file
-
reset
-
revert
-
stash
-
submodule
-
subtree
-
tag
-
upstream
-
底层实现
-
questions
-
add
-
git add . # 添加当前目录下的所有文件
-
git add -N # 在使用 "git commit -a" 提交文件之后,如果发现某个新加文件忘记提交,可以使用这个命令把某个新文件追加到最近一次 commit 中
-
git add -p # == git add --patch,查看本次add的内容,这个过程有很多交互式命令选项,可以输入 ? 查看各个子命令的意思
-
git add -f xxx # 如果某类文件在 gitignore 中被要求不要提交,可以通过 -f 参数强制提交
archive
-
git archive v1.3 | gzip > ./ldb.tgz
-
git archive master > ./ldb.zip
-
git archive --format zip --output ./ldb.zip v1.3
-
git archive --format tgz --output ./ldb.tgz master
blame
-
git blame filename # 可以查看某个文件的详细修改历史
branch
-
git branch # 列出本地的分支
-
git branch -vv # 列出分支并查看每个分支的详情
-
git branch -av # 查看远程所有分支
-
git branch -r # 查看远程分支
-
git checkout branch-name # 切换到某个分支
-
git branch --contains 5a0e815e5 # 查看包含某个 commit id 的 本地 分支
-
git branch -r --contains 5a0e815e5 # 查看包含某个 commit id 的 远端 分支
-
git branch branch-name tag-name # 从某个 tag 拉取分支
-
git checkout -b branch-name # 创建某个分支
-
git checkout -b hotfix origin/hotfix # 切换到远程分支 origin/hotfix,本地名称叫做hotfix
-
git checkout commitId -b brach-name # 从某个 commit 拉出一个分支
-
git branch -m old new # 重命名本地分支名称
-
git branch -d branch-name # 尝试删除本地某个分支(删除分支之前一定要先切换到别的分支上面)
-
git branch -D <branchname> # 强制删除本地某个分支
-
git push origin --delete branch-name # 删除远程分支
-
git push origin :branch-name # 冒号前面的空格不能少,原理是把一个空分支push到server上,相当于删除该分支。
-
git push -d origin branch-name # 作用同上
-
git branch -m <oldbranchname> <newbranchname> # 尝试修改
-
git branch -M <oldbranchname> <newbranchname> # 强制修改
-
git push origin develop:master -f # 把本地的 develop 分支强制推送到远端的 master,称之为 覆盖
-
git pull upstream feature/mq:feature/mq # 拉取上游分支 feature/mq 到本地分支 feature/mq
checkout
-
git checkout -p # 等同于 "git checkout --patch",查看checkout的改动内容。某些场景下这非常有用,例如,在你跟踪一个 bug 时引入了一堆调试日志语句,在修正了这个 bug 之后,你可以先使用 git checkout -p 删除所有新加的调试日志,之后使用 git add -p 来添加 bug 修复。没有比组合一个极好的、结构良好的提交更令人满意的了!
-
git checkout - # 切换到上一个分支
-
git checkout HEAD~2 # 将HEAD移动到当前commit的前两个commit上,同时更新workspace
cherry-pick
-
git cherry-pick ci # 获取ci并自动提交
-
git cherry-pick -n ci # 获取ci但不自动提交
-
git co master && git cherry-pick commit-hash-start^..commit-hash-end # develop 分支比 master 多出了很多 commits ,此命令可将 develop 分支中的连续多个 commits 提取到 master
-
git reflog & git cherry-pick # reset 之后,可以通过 reflog 命令找回提交的 ID,如果还想使用某个 ID,可以通过 cherry-pick 命令将这些 commit 摘取出来重新提交。
clean
-
git clean -fd # 强制删除尚未执行 "git add" 命令处于 "untracked" 状态的文件和目录。f 是强制删除,d 是把目录也删掉。
clone
-
git clone https://github.com/alexstocks/test ./dest_dir --depth 1 # 只克隆最近一次commit,最后的 @dest_dir 可以不要
commit
-
git commit --amend # 可以修改最后一次提交的信息.但是如果你已经push过了,那么其历史最后一次,永远也不能修改了。 这种方式可以比较方便的保持原有的Change-Id,推荐使用。
-
git commit --amend -m "" # 补加,并且修改上次提交的信息
-
git commit --amend --signoff # 等效于
git ci -a -s,修改 ci 的账号信息,即便已经通过 git ps origin head 进行了提交。当然通过这个命令修改后,须通过 git ps -f origin head 强行提交。 -
git commit -am “some sthing” # 将add和commit合并成一条命令。m与am的区别
-
git commit -a # 此时会出现默认的编辑器,提示用户填写 commit message。如果默认编辑器是 vim,则当前环境最好没有用户自定义的 .vimrc,否则会提示错误。
-
git commit --amend --author="xxx" # 修改作者信息
config
-
git config -l # 查看本地配置
-
git config —-global —-list
编辑代码库根目录.git/config,增加GitLab 远程库
<span style="background-color:#f8f8f8"><span style="color:#333333">[remote "gitlab"]
    url = git@1.2.1.1:l/a.git
    fetch = +refs/heads/*:refs/remotes/gitlab/*
    pushurl = git@1.2.1.1:l/a.git
    pushurl = git@1.2.1.1:l/b.git</span></span>
上面设置两个pushurl,用于同时推送到两个gitlab上,也可以通过如下两个命令达到同样的效果: git remote set-url --add --push origin git@1.2.1.1:l/a.git git remote set-url --add --push origin git@1.2.1.1:l/b.git
global
-
git config --global color.ui true # 使语法着色,让命令更加突出
-
git config --list # 查看config信息
-
git config --global user.name "shenguotao"
-
git config --global user.email "sgt_ah@163.com"
-
git config --global alias.logg "log --graph --decorate --abbrev-commit --all" # 美化log
-
git config --global push.default simple # 设置上传代码的分支
-
git config --unset --global user.name # 清除配置信息
<span style="background-color:#f8f8f8"><span style="color:#333333">  nothing: 直接push会出错,需要显式的指出推送的远程分支,例如:git push origin master;
  current: 推送时只会推送当前所在的分支到远程同名分支,如果远程分支不存在相应的同名分支,则创建该分支;
  upstream: 推送当前分支到它的upstream分支上,这个模式只适用于推送到与拉取数据相同的仓库(比如central workflow);
  simple: 在中央仓库工作流程模式下,只能推送到与本地分支名一致的upstream分支中,如果推送的远程仓库和拉取数据的远程仓库不一致,那么该模式会像current模式一样进行操作。因为该选项对于新手来说是最安全的,所以在git 2.0中,simple是push.default的默认值配置项(2.0以前的默认配置项是matching);
matching:推送本地和远程都存在的同名分支。</span></span>-
git config --global core.autocrlf false # 让Git不要管Windows/Unix换行符转换的事
alias
-
git config --global alias.st status
-
git config --global alias.co checkout
-
git config --global alias.ci commit
-
git config --global alias.br branch
-
git config --global alias.pl pull
-
git config --global alias.ps push
上面使用了“global”选项,则这些内容会存入“~/.gitconfig”中,如果没有这个选项则只会存储具体项目的的”.git/config”中。
diff
-
git diff HEAD@{yesterday} # 会看到从昨天以来的所有修改
-
git diff HEAD@{'2 months ago'}
-
git diff HEAD@{'2010-01-01 12:00:00'} # 一个确切的日期以来的修改
-
git config --global diff.tool vimdiff # 可以执行
git difftool命令通过调用 vimdiff 查看代码改动,可以在 .vimrc 中添加if &diff\n set number\n endif这条指令,以在比较时显示行号
fetch
-
git fetch --prune # 本地 git 项目和 github 项目经过一段时间的演进,本地与远端分支可能不一致,譬如本地可能存在但是远端不存在,此时需要通过这个命令把远端的分支同步到本地
for-each-ref
-
git for-each-ref --format='%(committerdate) %09 %(authorname) %09 %(refname)' | sort -k5n -k2M -k3n -k4n # 查看分支的创建者、创建时间
github
-
查看某人对某个项目的提交记录 https://github.com/alexstocks/getty/commits?author=AlexStocks
-
gh 常用命令
<span style="background-color:#f8f8f8"><span style="color:#333333"> > 下载 pr
<span style="color:#116644">1</span> gh pr checkout pr-id
<span style="color:#116644">2</span> 修改代码,修改过程中可以使用 <span style="color:#009900">`gh pr diff`</span> 比对修改之处
<span style="color:#116644">3</span> <span style="color:#3300aa">git</span> add xxx
<span style="color:#116644">4</span> <span style="color:#3300aa">git</span> commit <span style="color:#0000cc">--amend</span>/git commit <span style="color:#0000cc">-m</span> <span style="color:#aa1111">""</span>
<span style="color:#116644">5</span> <span style="color:#3300aa">git</span> push <span style="color:#0000cc">-f</span>
> 列出当前的 issue
gh issue list
> 找到与你相关的 issue
gh issue status</span></span>init
-
git --git-dir=lib1.git init --bare # 在本地创建名为 lib1 的 git
log & show
-
git log -p # 查看提交的详细内容
-
git show log-id # 用于查看某次提交前后代码的diff,log-id可以是提交id的前五位
-
git log --graph --pretty=format:'%Cred%h%Creset -%C(yellow)%d%Creset %s %Cgreen(%cr) %C(bold blue)<%an>%Creset' --abbrev-commit --date=relative # --graph 选项将图表添加到日志的左侧,--abbrev-commit 存储提交使用了 SHA 方法,--date=relative 表达式用相对的术语来表示日期,并且 --pretty 以 bit 格式处理自定义格式。
-
git reflog # 显示当前分支的所有活动的列表,并为您提供每个提交的 SHA1 值
-
git log --graph --abbrev-commit --decorate --oneline --simplify-by-decoration --all # 查看分支图形结构
merge
-
git checkout develop
-
git branch -av
-
git merge --no-ff feature/actlog # 强制merge
-
git branch -av
-
git push origin
mv
-
git mv -f oldfolder newfolder # 重命名文件夹 or 文件
pull
-
git pull <远程主机名> <远程分支名>:<本地分支名> # 用于拉取位于服务器上的最新分支到本地并合并,它等效于 git fetch + git merge。命令git fetch 会拉取服务器上的分支并保存在版本库的某个文件夹下,命令git merge则会将拉取下来的版本库与本地版本库进行合并。
-
git pull -r origin master # 等同于 git fetch + git rebase
-
git pull —rebase # 等同于
git pull -r,建议每天编码之前和代码上传之前不定期、频繁的进行git pull --rebase,以检测代码冲突 -
git pull origin pull/1941/head:repack-org-apache # 拉取Github PR代码到本地分支
-
git pull upstream feature/mq:feature/mq # 拉取上游分支 feature/mq 到本地分支 feature/mq
-
git pull https://github.com/apache/dubbo-go develop # 拉取更新 develop 分支的代码
push
-
git push -f master_zhao:master
-
git push <远程主机名> <本地分支名>:<远程分支名>
-
git push -d origin branch-name # 删除一个远程分支
rebase
-
git rebase -i HEAD~4 # 将最近4个commit合并为1个,HEAD代表当前版本。将进入VIM界面,你可以修改提交信息。
<span style="background-color:#f8f8f8"><span style="color:#333333">step1: git rebase -i HEAD~6
step2: 在 vim 命令界面把 pick 修改为 squash,然后输入 vim  'x' 命令进行存储
step3: 继续在 vim 界面修改 commit message
step4: 有冲突则解决冲突,解决完冲突后则输入 'git rebase --continue' 命令
step5: git add .
step5.1: 在解决冲突过程中也可以不断输入 'git rebase --continue && git add .'
step6: git ps -f origin head</span></span>
remote
-
git remove -v 这个命令可以显示对应项目的远程克隆地址
-
git remote add test https://github.com:AlexStocks/test # 把远程仓库简化为 test,用于替代长串的URL,在以后的推送和拉取中就可以使用这个简称来简化命令了。
<span style="background-color:#f8f8f8"><span style="color:#333333"> 尽量使用 `git remote add test https://github.com:AlexStocks/test`。
不要使用 `git remote add test git@github.com:AlexStocks/test.git`。
前者使用 https,后者使用 ssh 方式鉴权,使用命令 `git pull test master` 拉取代码的时候,可能报错如下:
fatal: 'upsteam' does not appear to be a git repository
fatal: Could not read from remote repository.
Please make sure you have the correct access rights
and the repository exists.
如果出现以上错误,可以在 `.git/config` 中对 remote 代码地址进行修改。</span></span>-
git remote rm test # 删除上游分支
-
git remote remove test # 删除 test
rm file
-
git rm a.txt
-
git rm -rf a.txt
-
git commit * -m "update"
-
git push origin master
reset
-
git reset --hard commit-id # commit-id可以通过git log查看,这个命令的意思是会退到相关的commit,把最新的提交撤销掉,彻底回退到某个版本,本地的源码也会变为上一个版本的内容,然后通过 git push -f origin head 就可以对远程仓库进行回退操作。
-
git reset —soft # 回退到某个版本,只回退了commit的信息,不会恢复到index file一级。如果还要提交,直接commit即可
-
git reset --mixed # 此为默认方式,不带任何参数的git reset,它回滚 "git add",只保留源码,回退commit和index信息
-
git reset --hard origin/develop # 把当前分支的指针指向 develop 分支
-
git checkout -- filename && git reset HEAD filename ## 如果不小心 rm 了工作区的某文件,可通过这个操作恢复之。
revert
-
git revert HEAD # 撤销前一次 commit
-
git revert HEAD^ # 撤销前前一次 commit
-
git revert fa042 # 撤销指定 commit id 为 fa042 的提交,撤销也会作为一次提交进行保存。之后进行 git commit 和 git push 即可。
git revert 撤销 某次操作,此次操作之前和之后的commit和history都会保留,并且把这次撤销 作为一次最新的提交。建议不要使用 revert。
<span style="background-color:#f8f8f8"><span style="color:#333333">git revert 和 git reset的区别
1. git revert是用一次新的commit来回滚之前的commit,git reset是直接删除指定的commit。
2. 在回滚这一操作上看,效果差不多。但是在日后继续merge以前的老版本时有区别。因为git revert是用一次逆向的commit“中和”之前的提交,因此日后合并老的branch时,导致这部分改变不会再次出现,但是git reset是之间把某些commit在某个branch上删除,因而和老的branch再次merge时,这些被回滚的commit应该还会被引入。
3. git reset 是把HEAD向后移动了一下,而git revert是HEAD继续前进,只是新的commit的内容和要revert的内容正好相反,能够抵消要被revert的内容。</span></span>
stash
-
git stash # 保存当前分支的工作状态
-
git stash save “xxxx” # 作用同上,不过给stash加上一个message
-
git stash list # 查看当前分支的stash列表
-
git stash pop # 恢复分支最新的工作状态
-
git stash apply stash@{0} # 恢复分支指定的工作状态,该命令可结合 git stash list 使用
-
git stash drop # 删除分支状态
-
git stash clear # 清空栈
-
git stash show -p stash@{2} # 查看 stash 内容
submodule
添加子模块
-
git submodule add --force https://github.com/divebomb/nemo.git third/nemo # 添加子仓库之后,主仓库的对应目录下(这里为lib),并不是sub仓库的文件,而是对应的commit id。所以一旦有submodule发生修改,在子目录所在的目录调用 git pull 把代码下拉之后,还需在主项目目录下通过 git ci & git ps 把 submodule 最新的引用 ci id 予以上传。
-
git submodule init # 初始化本地配置文件
-
git submodule update # 检出父仓库列出的commit
-
git submodule update --init --recursive --force # 可以替换上面两个命令,一定要在repo根路径执行此命令
-
git pull origin master # 拉取子模块代码
删除子模块
-
git rm -r --cached <本地路径> # 将子模块所在的文件从git中删除
-
rm -rf <本地路径>
-
删除.gitmodule里相关部分
-
删除.git/config 文件里相关字段
-
git commit -am "xxx"
-
git push origin master
拉取所有子模块
-
git submodule foreach --recursive git submodule init
-
git submodule foreach --recursive git submodule update
-
git submodule foreach git pull
更新子模块
-
git pull origin head # 在 submodule 目录中执行这个命令,拉取最新代码
-
git commit -am "xx" && git push origin head # 如果子模块有更新,则在工程主目录下提交子模块的更新
subtree
-
git subtree add --prefix=examples https://github.com/alexstocks/getty-examples.git master --squash # 拉取远程 github repo 到本地目录 examples,squash参数表示不拉取历史信息,而只生成一条commit信息,拉取完毕后 git push 即可对项目进行提交
-
git subtree pull --prefix=examples https://github.com/alexstocks/getty-examples.git master --squash # 当远程分支更新后,用这个命令可以把更新给拉取下来
-
git subtree push --prefix=examples https://github.com/alexstocks/getty-examples.git master # 如果在 examples 子目录下对代码进行了更改,可以通过这个手段把修改内容推送到 https://github.com/alexstocks/getty-examples
上面的命令可以通过 git remote 进行简化: git remote add -f getty-examples https://github.com/alexstocks/getty-examples.git git subtree add --prefix=examples getty-examples master --squash git subtree pull --prefix=examples getty-examples master --squash git subtree push --prefix=examples getty-examples master
subtree 主要用来管理业务组件代码,主工程和子工程都有可能更新。submodule 则适合用来管理公共基础库,只有基础库单向更新。
tag
-
git tag v0.4.05 # 创建本地tag,注意这种方式打出来的 tag 是主分支代码的 tag
-
git tag -a v0.1.2 -m "0.1.2版本" # 创建附注Tag, 参数a即annotated的缩, 后附Tag名, m = mark,注意这种方式打出来的 tag 是主分支代码的 tag
-
git tag -a v0.1.1 9fbc3d0 # 给指定的commit打Tag
-
git push origin v0.4.05 # 创建远程tag
-
git push origin --tags # 将本地所有Tag一次性提交到git服务器
-
git push --tags # 作用同上
-
git archive v0.4.05 > master.tar # 对 tag 内容进行打包
-
git tag -d v0.4.05 # 删除本地tag
-
git push origin :refs/tags/v0.4.05 # 删除远程tag
-
git tag -ln # 查看 tag 列表,并显示附注
-
git log --tags --simplify-by-decoration --pretty="format:%ci %d" # 显示 tag 以及打 tag 的时间
-
git show <tagName> # 可以查看 tag 的提交信息
-
git show-ref # 查看所有 tag 的 hash 值
-
git show-ref -s v1.1.0 # 查看 v1.1.0 tag 的 hash 值
-
git tag --contains 5a0e815e5 # 查某个commit在哪些tag或者branch下
upstream
-
git remote -v # 可以查看上游仓库
-
git remote add upstream https://github.com/antirez/redis.git # 配置remote
-
git fetch upstream # 从上游仓库获取到分支,及相关的提交信息,它们将被保存在本地的 upstream/master 分支
-
git checkout master # 切换到本地的一个分支
-
git merge upstream/master # 合并到本地的当前分支
-
git merge upstream/master --allow-unrelated-histories # 如果用上面的命令 merge 的时候,报出 “refusing to merge unrelated histories” 错误,则使用这个命令替换之
-
git ci -am “xxx”
-
git push origin head # 提交到fork仓库
可以在"~/.gitconfig"的[alias] section添加这样一条命令:um = !"git fetch origin -v && git fetch upstream -v && git merge upstream/master && git push"。这条命令执行前需要先通过上面第二条命令 "git remote add upstream https://github.com/antirez/redis.git" 配置好remote repo。
底层实现
深入理解Git的实现原理
1 数据库
-
git init 用于创建一个空的git仓库,或重置一个已存在的git仓库,其中
.git/objects就是git数据库的存储位置。 -
git hash-object git底层命令,用于向Git数据库中写入数据
echo "version 1" | git hash-object -w --stdin 83baae61804e65cc73a7201a7252750c76066a30 find .git/objects/ -type f .git/objects/83/baae61804e65cc73a7201a7252750c76066a30 hash值的前2位命名文件夹,后38位命名文件。 这就是git数据库的存储方式,一个文件对应一条内容。
-
git cat-file git底层命令,用于查看Git数据库中数据
git cat-file -t 83baa # -t选项用于查看键值对的类型 blob # blob是数据对象,是git数据库三大对象类型之一 git cat-file -p 83baa # -p选项用于查看键值对应的数据内容 version 1
git是一种对象数据库。
2 树对象(tree object)
树对象(tree object)解决文件名保存的问题,树对象也能够将多个文件组织在一起。Git通过树(tree)对象将数据(blob)对象组织起来,这很类似于一种文件系统——blob对象对应文件内容,tree对象对应文件的目录和节点。一个树(tree)对象包含一条或多条记录,每条记录含有一个指向blob对象或tree对象的SHA-1指针,以及相应的模式、类型、文件名。
树对象主要解决了各个时间点文件和文件夹的变化,但是各个时间点变化的先后顺序就是 commit 对象负责的事情了。
-
git update-index git底层命令,用于创建暂存区
git update-index --add file.txt # .git/index 被创建
-
git ls-files --stage git底层命令,用于查看暂存区内容
-
git write-tree git底层命令,用于将暂存区内容写入一个树对象,.git/objects 中会多出一个文件,用于存储 tree 对象
3 提交对象(commit object)
commit 对象能够记录提交时间、提交作者、提交版本、父版本、版本说明。
-
git commit-tree tree-object-hash -p parent-tree-object-hash -m “xxxx” # 创建提交对象(commit object), -p 指定父提交对象,但若是第一次提交,则不需要指定。
<span style="background-color:#f8f8f8"><span style="color:#333333"> > $ git write-tree
cb0fbcc484a3376b3e70958a05be0299e57ab495
> $ git commit-tree cb0fbcc -m "first commit"
7020a97c0e792f340e00e1bb8edcbafcc4dfb60f
> $ git cat-file 7020a97
tree cb0fbcc484a3376b3e70958a05be0299e57ab495
author john <john@163.com> 1537961478 +0800
committer john <john@163.com> 1537961478 +0800
first commit</span></span>上面的命令都是底层指令,使用多有不便,就提供了更高层的 add/commit 等指令。Git 所做的实质工作是将被改写的文件保存为数据对象,更新暂存区,记录树对象,最后创建一个指明了顶层树对象和父提交的提交对象。 这三种主要的 Git 对象——数据对象、树对象、提交对象——最初均以单独文件的形式保存在 .git/objects 目录下。
4 引用和tag对象
版本和数据对象的操作都是基于hash键值的,git 引入 引用(references) 这一概念解决这个问题。git的引用类似于一个指针,它指向的是某一个hash键值,其指向的 hash 值保存在.git/refs目录下。
<span style="background-color:#f8f8f8"><span style="color:#333333">    > $ echo "491404fa6e6f95eb14683c3c06d10ddc5f8e883f" > .git/refs/heads/master
    > $ cat .git/refs/heads/master
        491404fa6e6f95eb14683c3c06d10ddc5f8e883f</span></span>
如此成功的建立了一个指向最新一个提交 49140 的引用,引用名为master。执行 git log master 便等同于 git log 49140。
<span style="background-color:#f8f8f8"><span style="color:#333333"> > $ git update-ref refs/heads/master 49140 # 此处一条指令上面等同于上面两条指令</span></span>分支和tags都是引用概念的延伸,Git 分支的本质:一个指向某一系列提交之首的指针或引用。
questions
在GitLab添加SSH key
-
参考https://docs.gitlab.com/ce/gitlab-basics/create-your-ssh-keys.html
push代码的时候遇到protect提示 “You are not allowed to force push code to a protected branch on this project”
-
“settings -> Protected Branches” 在这里面可以对相关branch是否处于protect模式进行设置。
免密
首先配置~/.ssh/config,然后配置代码repo下的.git/config:
<span style="background-color:#f8f8f8"><span style="color:#333333">[remote "origin"]
    url = https://github.com/alexstocks/
    fetch = +refs/heads/*:refs/remotes/origin/*</span></span>
修改为:
<span style="background-color:#f8f8f8"><span style="color:#333333">[remote "origin"]
    url = git@github:AlexStocks/test
    fetch = +refs/heads/*:refs/remotes/origin/*</span></span>
把https方式push改为ssh方式push,此时.ssh下面的配置就起作用了。
查看某人在某个项目的所有 commit
-
https://github.com/apache/dubbo-go-pixiu/commits?author=baerwang
查看一个项目的 release tag 列表文章来源:https://www.toymoban.com/news/detail-781965.html
-
curl https://api.github.com/repos/fmtlib/fmt/releases | grep 9.1.0 -C 5文章来源地址https://www.toymoban.com/news/detail-781965.html
到了这里,关于git 命令的使用的文章就介绍完了。如果您还想了解更多内容,请在右上角搜索TOY模板网以前的文章或继续浏览下面的相关文章,希望大家以后多多支持TOY模板网!


