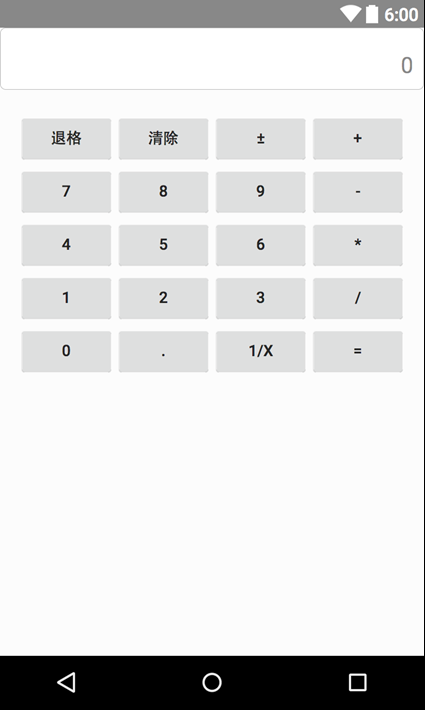
效果展示

实验内容及步骤
设计一款带有可视化界面的简单计算器,供用户输入数据并查看结果。用户通过点击相应按钮(加减乘除运算符、等号、数字)输入正确的表达式,计算器进行相应的加减乘除运算,且可以进行小数和整数的运算;长按清除按钮3秒,可以清除已录入的内容。
步骤:
- 在Layout文件夹中建立布局文件activity_main.xml,完成计算器界面的网格布局设计,包括了一个文本编辑框和17个按钮。
- 为每一个按钮编写单击事件,实现对应功能;点击数字和加减乘除按钮实现表达式的录入,并显示在TextView中;点击等号按钮,根据表达式计算结果;长按清除按钮3秒以上,清除录入的表达式
代码
activity_main.xml
<?xml version="1.0" encoding="utf-8"?>
<LinearLayout xmlns:android="http://schemas.android.com/apk/res/android"
    xmlns:app="http://schemas.android.com/apk/res-auto"
    xmlns:tools="http://schemas.android.com/tools"
    android:layout_width="match_parent"
    android:layout_height="match_parent"
    tools:context=".MainActivity"
    android:orientation="vertical"
    android:padding="10dp">

    <EditText
        android:id="@+id/result"
        android:layout_width="match_parent"
        android:layout_height="60dp"
        android:layout_marginLeft="4dp"
        android:paddingLeft="10dp"
        android:textSize="30dp"
        android:textColor="@color/colorPrimary"
        android:enabled="false"
        />
    <GridLayout
        android:layout_width="match_parent"
        android:layout_height="wrap_content"
        android:rowCount="5"
        android:columnCount="4"

        >
        <Button
            android:id="@+id/cls"
            android:layout_width="match_parent"
            android:layout_height="60dp"
            android:text="清除"
            android:textSize="20dp"
            android:textColor="@color/black"
            android:layout_columnSpan="4"
            android:background="@drawable/btn"
            />
        <Button
            android:id="@+id/one"
            android:layout_width="wrap_content"
            android:layout_height="60dp"
            android:text="1"
            android:textSize="20dp"
            android:layout_columnWeight="1"
            android:background="@drawable/btn"
            />
        <Button
            android:id="@+id/two"
            android:layout_width="wrap_content"
            android:layout_height="60dp"
            android:text="2"
            android:textSize="20dp"
            android:layout_columnWeight="1"
            android:background="@drawable/btn"
            />
        <Button
            android:id="@+id/three"
            android:layout_width="wrap_content"
            android:layout_height="60dp"
            android:text="3"
            android:textSize="20dp"
            android:layout_columnWeight="1"
            android:background="@drawable/btn"
            />
        <Button
            android:id="@+id/plus"
            android:layout_width="wrap_content"
            android:layout_height="60dp"
            android:text="+"
            android:textSize="20dp"
            android:layout_columnWeight="1"
            android:background="@drawable/btn"
            />
        <Button
            android:id="@+id/four"
            android:layout_width="wrap_content"
            android:layout_height="60dp"
            android:text="4"
            android:textSize="20dp"
            android:layout_columnWeight="1"
            android:background="@drawable/btn"
            />
        <Button
            android:id="@+id/five"
            android:layout_width="wrap_content"
            android:layout_height="60dp"
            android:text="5"
            android:textSize="20dp"
            android:layout_columnWeight="1"
            android:background="@drawable/btn"
            />
        <Button
            android:id="@+id/six"
            android:layout_width="wrap_content"
            android:layout_height="60dp"
            android:text="6"
            android:textSize="20dp"
            android:layout_columnWeight="1"
            android:background="@drawable/btn"
            />
        <Button
            android:id="@+id/min"
            android:layout_width="wrap_content"
            android:layout_height="60dp"
            android:text="-"
            android:textSize="20dp"
            android:layout_columnWeight="1"
            android:background="@drawable/btn"
            />
        <Button
            android:id="@+id/seven"
            android:layout_width="wrap_content"
            android:layout_height="60dp"
            android:text="7"
            android:textSize="20dp"
            android:layout_columnWeight="1"
            android:background="@drawable/btn"
            />
        <Button
            android:id="@+id/eight"
            android:layout_width="wrap_content"
            android:layout_height="60dp"
            android:text="8"
            android:textSize="20dp"
            android:layout_columnWeight="1"
            android:background="@drawable/btn"
            />
        <Button
            android:id="@+id/nine"
            android:layout_width="wrap_content"
            android:layout_height="60dp"
            android:text="9"
            android:textSize="20dp"
            android:layout_columnWeight="1"
            android:background="@drawable/btn"
            />
        <Button
            android:id="@+id/mul"
            android:layout_width="wrap_content"
            android:layout_height="60dp"
            android:text="×"
            android:textSize="20dp"
            android:layout_columnWeight="1"
            android:background="@drawable/btn"
            />
        <Button
            android:id="@+id/spot"
            android:layout_width="wrap_content"
            android:layout_height="60dp"
            android:text="."
            android:textSize="20dp"
            android:layout_columnWeight="1"
            android:background="@drawable/btn"
            />
        <Button
            android:id="@+id/zero"
            android:layout_width="wrap_content"
            android:layout_height="60dp"
            android:text="0"
            android:textSize="20dp"
            android:layout_columnWeight="1"
            android:background="@drawable/btn"
            />
        <Button
            android:id="@+id/equal"
            android:layout_width="wrap_content"
            android:layout_height="60dp"
            android:text="="
            android:textSize="20dp"
            android:layout_columnWeight="1"
            android:background="@drawable/btn"
            />
        <Button
            android:id="@+id/div"
            android:layout_width="wrap_content"
            android:layout_height="60dp"
            android:text="÷"
            android:textSize="20dp"
            android:layout_columnWeight="1"
            android:background="@drawable/btn"
            />
    </GridLayout>

</LinearLayout>
btn.xml(按钮的样式)
<?xml version="1.0" encoding="utf-8"?>
<selector xmlns:android="http://schemas.android.com/apk/res/android">
    <item android:state_pressed="true" android:drawable="@drawable/btn_pink_bg"/>
    <item android:drawable="@drawable/btn_pink"/>
</selector>
btn_pink.xml(按钮点击前)
<?xml version="1.0" encoding="utf-8"?>
<shape xmlns:android="http://schemas.android.com/apk/res/android"
    android:shape="rectangle">
    <stroke
        android:width="2dp"
        android:color="#ff9999" />
    <corners
        android:radius="5dp"/>

</shape>
btn_pink_bg.xml(按钮点击后)
<?xml version="1.0" encoding="utf-8"?>
<shape xmlns:android="http://schemas.android.com/apk/res/android"
    android:shape="rectangle">
        <solid android:color="#ff9999"/>
    <stroke
        android:width="2dp"
        android:color="#ff9999" />
    <corners
        android:radius="5dp"/>

</shape>
效果如下
 文章来源:https://www.toymoban.com/news/detail-783619.html
JAVA代码部分
MainActivity.java
package com.example.a1108;

import androidx.appcompat.app.AppCompatActivity;

import android.os.Bundle;
import android.view.MotionEvent;
import android.view.View;
import android.widget.Button;
import android.widget.EditText;

import java.util.Date;

public class MainActivity extends AppCompatActivity implements View.OnClickListener{
    EditText result;
//    定义数字按钮
    Button zero,one,two,three,four,five,six,seven,eight,nine,spot;
//    定义加减乘除按钮
    Button plus,min,mul,div;
//    定义等号按钮
    Button equals;
//    标识符,标识运算完成
    Boolean clr_flag=false;
//    清除按钮
    Button cls;
    @Override
    protected void onCreate(Bundle savedInstanceState) {
        super.onCreate(savedInstanceState);
        setContentView(R.layout.activity_main);
        result=(EditText) findViewById(R.id.result);

        zero=findViewById(R.id.zero);
        one=findViewById(R.id.one);
        two=findViewById(R.id.two);
        three=findViewById(R.id.three);
        four=findViewById(R.id.four);
        five=findViewById(R.id.five);
        six=findViewById(R.id.six);
        seven=findViewById(R.id.seven);
        eight=findViewById(R.id.eight);
        nine=findViewById(R.id.nine);
        spot=findViewById(R.id.spot);

        zero.setOnClickListener(this);
        one.setOnClickListener(this);
        two.setOnClickListener(this);
        three.setOnClickListener(this);
        four.setOnClickListener(this);
        five.setOnClickListener(this);
        six.setOnClickListener(this);
        seven.setOnClickListener(this);
        eight.setOnClickListener(this);
        nine.setOnClickListener(this);
        spot.setOnClickListener(this);

        plus=findViewById(R.id.plus);
        min=findViewById(R.id.min);
        mul=findViewById(R.id.mul);
        div=findViewById(R.id.div);

        plus.setOnClickListener(this);
        min.setOnClickListener(this);
        mul.setOnClickListener(this);
        div.setOnClickListener(this);

        equals=findViewById(R.id.equal);

        equals.setOnClickListener(this);

        cls=findViewById(R.id.cls);
//        为清除设置事件
        cls.setOnTouchListener(new View.OnTouchListener() {
            Date curDate=new Date(System.currentTimeMillis());
            Date endDate=new Date(System.currentTimeMillis());
            @Override
            public boolean onTouch(View view, MotionEvent motionEvent) {
                switch (motionEvent.getAction()){
//                    按下
                    case MotionEvent.ACTION_DOWN:
                        curDate=new Date((System.currentTimeMillis()));
                        break;
//                    抬起
                    case MotionEvent.ACTION_UP:
                        endDate=new Date(System.currentTimeMillis());
                        long durationMS=endDate.getTime()-curDate.getTime();
                        if(durationMS>3000)
                            result.setText("");
                        break;
                }
                return true;
            }
        });
    }


    @Override
    public void onClick(View view) {
//        getText()获取的内容是一个对象,所以要转换一下
        String str=result.getText().toString();
//        根据当前按钮按下的id进行判断
        switch (view.getId())
        {
            case R.id.zero:
            case R.id.one:
            case R.id.two:
            case R.id.three:
            case R.id.four:
            case R.id.five:
            case R.id.six:
            case R.id.seven:
            case R.id.eight:
            case R.id.nine:
            case R.id.spot:
//                如果标识符为真,让值为空
                if(clr_flag)
                    str="";
//                把现在的内容追加上,现在的内容来自于按钮的文本
//                按钮这个view对象先转换为Button
                result.setText(str+((Button)view).getText());
                clr_flag=false;
                break;
            case R.id.plus:
            case R.id.min:
            case R.id.mul:
            case R.id.div:
//                如果标识符为真,让值为空
                if(clr_flag)
                    str="";
                if(str.contains("+")||str.contains("-")||str.contains("×")||str.contains("÷"))
//                    从起始位置开始,我们只要运算符之前的内容
                    str=str.substring(0,str.indexOf(" "));
//                所以在运算符的前面和后面都追加一个“ ”
                result.setText(str+" "+((Button)view).getText()+" ");
                clr_flag=false;
                break;
            case R.id.equal:
                getResult();
                break;
        }
    }
//    点了等号后
    private void getResult(){
        clr_flag=true;
//        获取到字符串
        String exp=result.getText().toString();
//        按照空格分隔字符串,形成字符串数组,第一个元素是左侧操作数,第二个元素是运算符,第三个元素是右侧操作数
        String [] exp_arr=exp.split(" ");
//        定义结果
        double cnt=0;
//        定义操作数
        double d1=Double.parseDouble(exp_arr[0]);
        double d2=Double.parseDouble(exp_arr[2]);
//        判断运算符
        if(exp_arr[1].equals("+"))
            cnt=d1+d2;
        else if(exp_arr[1].equals("-"))
            cnt=d1-d2;
        else if(exp_arr[1].equals("×"))
            cnt=d1*d2;
        else if(exp_arr[1].equals("÷"))
            cnt=d1/d2;
//        设置结果
        result.setText(String.valueOf(cnt));
    }
}注释都写在里面了文章来源地址https://www.toymoban.com/news/detail-783619.html
到了这里,关于AndroidStudio案例——简单计算器的文章就介绍完了。如果您还想了解更多内容,请在右上角搜索TOY模板网以前的文章或继续浏览下面的相关文章,希望大家以后多多支持TOY模板网!


