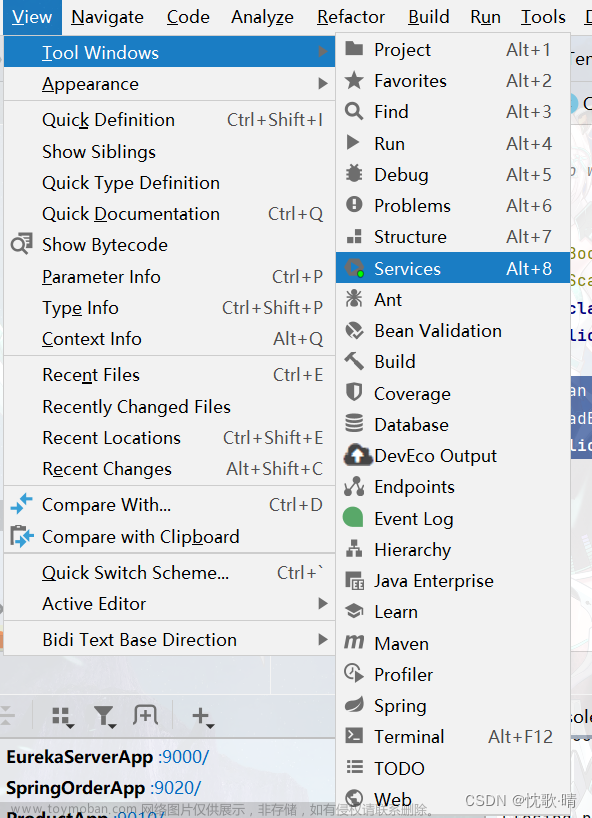
首先创建一个空项目:
创建父工程shop_parent 在IDEA中创建父工程 shop_parent 并引入坐标 :
<parent>
  <groupId>org.springframework.boot</groupId>
  <artifactId>spring-boot-starter-parent</artifactId>
  <version>2.3.9.RELEASE</version>
</parent>
<dependencies>
  <dependency>
    <groupId>org.springframework.boot</groupId>
    <artifactId>spring-boot-starter-web</artifactId>
  </dependency>
  <dependency>
    <groupId>org.springframework.boot</groupId>
    <artifactId>spring-boot-starter-logging</artifactId>
  </dependency>
  <dependency>
    <groupId>org.springframework.boot</groupId>
    <artifactId>spring-boot-starter-test</artifactId>
    <scope>test</scope>
  </dependency>
  <dependency>
    <groupId>org.projectlombok</groupId>
    <artifactId>lombok</artifactId>
    <version>1.18.4</version>
    <scope>provided</scope>
  </dependency>
</dependencies>

<dependencyManagement>
  <dependencies>
    <dependency>
      <groupId>org.springframework.cloud</groupId>
      <artifactId>spring-cloud-dependencies</artifactId>
      <version>Hoxton.SR10</version>
      <type>pom</type>
      <scope>import</scope>
    </dependency>
  </dependencies>
</dependencyManagement>
继续创建微服务模块也就是子模块:product_service 、order_service

搭建maven项目:
<dependencies>
    <dependency>
        <groupId>org.springframework.boot</groupId>
        <artifactId>spring-boot-starter-web</artifactId>
    </dependency>
    <dependency>
        <groupId>mysql</groupId>
        <artifactId>mysql-connector-java</artifactId>
        <version>8.0.28</version>
    </dependency>
    <dependency>
        <groupId>com.baomidou</groupId>
        <artifactId>mybatis-plus-boot-starter</artifactId>
        <version>3.4.2</version>
    </dependency>
    <!--引入EurekaClient-->
    <dependency>
        <groupId>org.springframework.cloud</groupId>
        <artifactId>spring-cloud-starter-netflix-eureka-client</artifactId>
    </dependency>
</dependencies>
要注意一定要指向父模块:没有的需要自己配置

实现代码中的实体类:
@Data
public class Product {
    private Long id;
    private String productName;
    private Integer status;
    private BigDecimal price;
    private String productDesc;
    private String caption;
    private Integer inventory;
}
编写dao:采用的是SpringBoot和MybatisPlus
public interface ProductMapper extends BaseMapper<Product> {
}
编写service:
public interface ProductService extends IService<Product> {
}
@Service
public class ProductServiceImpl extends ServiceImpl<ProductMapper, Product> implements ProductService {
}
编写web:
@RestController
@RequestMapping("/product")
public class ProductController {
    @Autowired
    private ProductService productService;
    @GetMapping("/{id}")
    public Product findById(@PathVariable Long id){
        Product product = productService.getById(id);
        return product;
    }
}
创建配置类:application.yml
server:
  port: 9010 #端口
spring:
  application:
    name: productservice #服务名称
  datasource:
    driver-class-name: com.mysql.cj.jdbc.Driver
    url: jdbc:mysql://localhost:3306/shop?useUnicode=true&characterEncoding=utf8
    username: root
    password: root
#mp日志
mybatis-plus:
  configuration:
    log-impl: org.apache.ibatis.logging.stdout.StdOutImpl
  global-config:
    db-config: #设置表名前缀
      table-prefix: tb_
      id-type: assign_uuid
#配置Eureka
eureka:
  client:
    service-url:
      defaultZone: http://localhost:9000/eureka
创建启动类:
@SpringBootApplication
@MapperScan("com.dao") // 指定扫描的 Mapper 接口所在的包
public class ProductApp {
    public static void main( String[] args ) {
        SpringApplication.run(ProductApp.class);
    }

    @Bean
    public RestTemplate restTemplate(){
        return new RestTemplate();
    }
}
搭建order与上一个模块一样不一一叙述了:
@Data
public class Order {
    private Long id;
    private Long userId;
    private Long productId;
    private Long number;
    private String productName;
    private String username;
    private BigDecimal price;
    private BigDecimal amount;
}
public interface OrderMapper extends BaseMapper<Order> {

}
public interface OrderService extends IService<Order> {
}
@Service
public class OrderServiceImpl extends ServiceImpl<OrderMapper, Order> implements OrderService {

}
@RestController
@RequestMapping("/order")
public class OrderController {
    @Autowired
    private OrderService orderService;

    @Autowired
    private RestTemplate restTemplate;

    @GetMapping("/{id}")
    public Product findById(@PathVariable Long id){
        Product product = restTemplate.getForObject("http://productservice/product/1", Product.class);
//Order order = orderService.getById(id);
        return product;
//        Order order = orderService.getById(id);
//        return order;
    }
}
server:
  port: 9020 #端口
spring:
  application:
    name: orderservice #服务名称
  datasource:
    driver-class-name: com.mysql.cj.jdbc.Driver
    url: jdbc:mysql://localhost:3306/shop?useUnicode=true&characterEncoding=utf8
    username: root
    password: root
#mp日志
mybatis-plus:
  configuration:
    log-impl: org.apache.ibatis.logging.stdout.StdOutImpl
  global-config:
    db-config: #设置表名前缀
      table-prefix: tb_
      id-type: assign_uuid
eureka:
  client:
    service-url:
      defaultZone: http://127.0.0.1:9000/eureka/
@SpringBootApplication
@MapperScan("com.dao") // 指定扫描的 Mapper 接口所在的包
public class SpringOrderApp{
    public static void main( String[] args ) {
        SpringApplication.run(SpringOrderApp.class);
    }

    @Bean
    @LoadBalanced
    public RestTemplate restTemplate(){
        return new RestTemplate();
    }
}
通过RestTemplate调用微服务:
@Bean
@LoadBalanced
public RestTemplate restTemplate(){
    return new RestTemplate();
}


搭建Eureka注册中心:

引入maven坐标:
<dependencies>
  <dependency>
    <groupId>org.springframework.cloud</groupId>
    <artifactId>spring-cloud-starter-netflix-eureka-server</artifactId>
  </dependency>
</dependencies>
配置application.yml:
server:
  port: 9000
spring:
  application:
    name: eurekaserver #eureka的服务名称
eureka:
  client:
    service-url: #eureka的地址信息
      defaultZone: http://127.0.0.1:9000/eureka
配置启动类:
@SpringBootApplication
@EnableEurekaServer //激活Eureka Server端配置
public class EurekaServerApp
{
    public static void main( String[] args )
    {
        SpringApplication.run(EurekaServerApp.class);
    }
}
启动两个实例:
-Dserver.port=9011

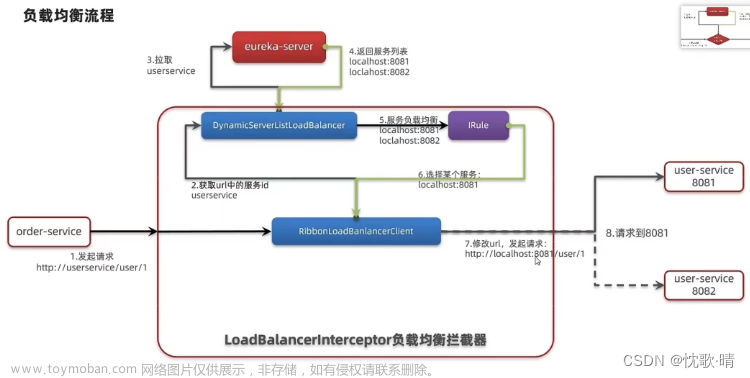
在order-service项目的启动类中的RestTemplate添加负载均衡注解:
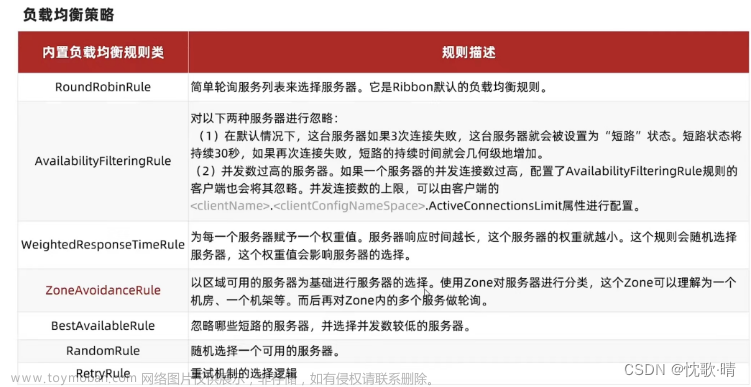
负载均衡策略修改 :
在启动类加上新的规则
}
在服务消费者【service-order】的application.yml配置文件中修改负载均衡策略:

最后附上数据库:
/*
Navicat Premium Data Transfer
Source Server : localhost_3306
Source Server Type : MySQL
Source Server Version : 80023
Source Host : localhost:3306
Source Schema : security
Target Server Type : MySQL
Target Server Version : 80023
File Encoding : 65001
Date: 07/01/2024 09:49:45
*/
SET NAMES utf8mb4;
SET FOREIGN_KEY_CHECKS = 0;
-- ----------------------------
-- Table structure for tb_permission
-- ----------------------------
DROP TABLE IF EXISTS `tb_permission`;
CREATE TABLE `tb_permission` (
`id` int NOT NULL AUTO_INCREMENT,
`name` varchar(32) CHARACTER SET utf8 COLLATE utf8_general_ci NULL DEFAULT NULL COMMENT '权限名称',
`url` varchar(255) CHARACTER SET utf8 COLLATE utf8_general_ci NULL DEFAULT NULL COMMENT '请求地址',
`parent_id` int NULL DEFAULT NULL COMMENT '父权限主键',
`type` varchar(24) CHARACTER SET utf8 COLLATE utf8_general_ci NULL DEFAULT NULL COMMENT '权限类型,M-菜单。A-子菜单,U-普通请求',
`permit` varchar(128) CHARACTER SET utf8 COLLATE utf8_general_ci NULL DEFAULT NULL COMMENT '权限字符串描述,如user:list 用户查看权限',
`remark` text CHARACTER SET utf8 COLLATE utf8_general_ci NULL COMMENT '描述',
PRIMARY KEY (`id`) USING BTREE
) ENGINE = InnoDB AUTO_INCREMENT = 13 CHARACTER SET = utf8 COLLATE = utf8_general_ci ROW_FORMAT = Dynamic;
-- ----------------------------
-- Records of tb_permission
-- ----------------------------
INSERT INTO `tb_permission` VALUES (1, '登录', '/login', 0, 'U', 'login:login', '登录权限');
INSERT INTO `tb_permission` VALUES (2, '进入登录页面', '/login', 0, 'U', 'login:tologin', '进入登录权限');
INSERT INTO `tb_permission` VALUES (3, '退出', '/logout', 0, 'U', 'logout', '退出权限');
INSERT INTO `tb_permission` VALUES (4, '注册', '/register', 0, 'U', 'reg:register', '注册权限');
INSERT INTO `tb_permission` VALUES (5, '进入注册页面', '/toRegister', 0, 'U', 'reg:toregister', '进入注册权限');
INSERT INTO `tb_permission` VALUES (6, '用户管理', '', 0, 'M', '用户:经理', '用户管理权限');
INSERT INTO `tb_permission` VALUES (7, '用户查询', '/user/list', 6, 'A', 'user:list', '用户查询权限');
INSERT INTO `tb_permission` VALUES (8, '用户新增', '/user/add', 6, 'U', 'user:add', '用户新增权限');
INSERT INTO `tb_permission` VALUES (9, '进入用户新增页面', '/user/toAdd', 6, 'U', 'user:toAdd', '进入用户新增页面权限');
INSERT INTO `tb_permission` VALUES (10, '用户修改', '/user/modify', 6, 'U', 'user:modify', '用户修改权限');
INSERT INTO `tb_permission` VALUES (11, '进入用户修改页面', '/user/tomodify', 6, 'U', 'user:toModify', '进入用户修改页面权限');
INSERT INTO `tb_permission` VALUES (12, '用户删除', '/user/remove', 6, 'U', 'user:remove', '用户删除权限');
-- ----------------------------
-- Table structure for tb_role
-- ----------------------------
DROP TABLE IF EXISTS `tb_role`;
CREATE TABLE `tb_role` (
`id` int NOT NULL AUTO_INCREMENT,
`name` varchar(32) CHARACTER SET utf8 COLLATE utf8_general_ci NULL DEFAULT NULL COMMENT '角色名称',
`remark` text CHARACTER SET utf8 COLLATE utf8_general_ci NULL COMMENT '角色描述',
PRIMARY KEY (`id`) USING BTREE
) ENGINE = InnoDB AUTO_INCREMENT = 3 CHARACTER SET = utf8 COLLATE = utf8_general_ci ROW_FORMAT = Dynamic;
-- ----------------------------
-- Records of tb_role
-- ----------------------------
INSERT INTO `tb_role` VALUES (1, '超级管理员', '全部权限');
INSERT INTO `tb_role` VALUES (2, '普通用户', '基础权限');
-- ----------------------------
-- Table structure for tb_role_permission
-- ----------------------------
DROP TABLE IF EXISTS `tb_role_permission`;
CREATE TABLE `tb_role_permission` (
`role_id` int NULL DEFAULT NULL COMMENT '角色ID',
`permission_id` int NULL DEFAULT NULL COMMENT '权限ID'
) ENGINE = InnoDB CHARACTER SET = utf8 COLLATE = utf8_general_ci ROW_FORMAT = Dynamic;
-- ----------------------------
-- Records of tb_role_permission
-- ----------------------------
INSERT INTO `tb_role_permission` VALUES (1, 1);
INSERT INTO `tb_role_permission` VALUES (1, 2);
INSERT INTO `tb_role_permission` VALUES (1, 3);
INSERT INTO `tb_role_permission` VALUES (1, 4);
INSERT INTO `tb_role_permission` VALUES (1, 5);
INSERT INTO `tb_role_permission` VALUES (1, 6);
INSERT INTO `tb_role_permission` VALUES (1, 7);
INSERT INTO `tb_role_permission` VALUES (1, 8);
INSERT INTO `tb_role_permission` VALUES (1, 9);
INSERT INTO `tb_role_permission` VALUES (1, 10);
INSERT INTO `tb_role_permission` VALUES (1, 11);
INSERT INTO `tb_role_permission` VALUES (1, 12);
INSERT INTO `tb_role_permission` VALUES (1, 13);
INSERT INTO `tb_role_permission` VALUES (2, 1);
INSERT INTO `tb_role_permission` VALUES (2, 2);
INSERT INTO `tb_role_permission` VALUES (2, 3);
INSERT INTO `tb_role_permission` VALUES (2, 4);
INSERT INTO `tb_role_permission` VALUES (2, 5);
INSERT INTO `tb_role_permission` VALUES (2, 6);
-- ----------------------------
-- Table structure for tb_user
-- ----------------------------
DROP TABLE IF EXISTS `tb_user`;
CREATE TABLE `tb_user` (
`id` int NOT NULL AUTO_INCREMENT,
`name` varchar(32) CHARACTER SET utf8 COLLATE utf8_general_ci NULL DEFAULT NULL COMMENT '姓名',
`username` varchar(32) CHARACTER SET utf8 COLLATE utf8_general_ci NULL DEFAULT NULL COMMENT '用户名',
`password` varchar(128) CHARACTER SET utf8 COLLATE utf8_general_ci NULL DEFAULT NULL COMMENT '密码',
`remark` text CHARACTER SET utf8 COLLATE utf8_general_ci NULL COMMENT '描述',
PRIMARY KEY (`id`) USING BTREE
) ENGINE = InnoDB AUTO_INCREMENT = 3 CHARACTER SET = utf8 COLLATE = utf8_general_ci ROW_FORMAT = Dynamic;
-- ----------------------------
-- Records of tb_user
-- ----------------------------
INSERT INTO `tb_user` VALUES (1, '超级管理员', 'admin', '123', '超级管理员');
INSERT INTO `tb_user` VALUES (2, '普通用户', 'guest', 'guest', '普通用户');
-- ----------------------------
-- Table structure for tb_user_role
-- ----------------------------
DROP TABLE IF EXISTS `tb_user_role`;
CREATE TABLE `tb_user_role` (
`user_id` int NULL DEFAULT NULL COMMENT '用户ID',
`role_id` int NULL DEFAULT NULL COMMENT '角色ID'
) ENGINE = InnoDB CHARACTER SET = utf8 COLLATE = utf8_general_ci ROW_FORMAT = Dynamic;
-- ----------------------------
-- Records of tb_user_role
-- ----------------------------
INSERT INTO `tb_user_role` VALUES (1, 1);
INSERT INTO `tb_user_role` VALUES (2, 2);文章来源:https://www.toymoban.com/news/detail-783975.html
SET FOREIGN_KEY_CHECKS = 1;文章来源地址https://www.toymoban.com/news/detail-783975.html
到了这里,关于关于SpringCloud的中的Eureka使用方法的文章就介绍完了。如果您还想了解更多内容,请在右上角搜索TOY模板网以前的文章或继续浏览下面的相关文章,希望大家以后多多支持TOY模板网!


