1.创建项目之前 node.js 版本是18.14.2的,之前是10.15.0
[nvm list//查看目前已经安装的版本
nvm list available //显示可下载版本的部分列表
nvm install 10.15.0 //安装指定的版本的nodejs
nvm use 10.15.0 //使用指定版本的nodejs]
2.npx create-react-app 项目名称
3.npm run start
4.注释掉src里面的index.js里面的
import reportWebVitals from './reportWebVitals';
reportWebVitals();
5.删除一些文件
src里面只剩index.css和index.js
index.js中只剩
  import React from 'react';
  import ReactDOM from 'react-dom/client';
  import './index.css';

  const root = ReactDOM.createRoot(document.getElementById('root'));
  root.render(
    <React.StrictMode>

    </React.StrictMode>
  );
6.引入组件(例如触摸组件)
npm install react-point
太卡了下载npm代理
# 配置nmp代理来提高速度,如设置淘宝镜像
npm config set registry https://registry.npm.taobao.org
# 查看配置是否成功
npm config get registry
# 成功后重新npm install安装
npm install
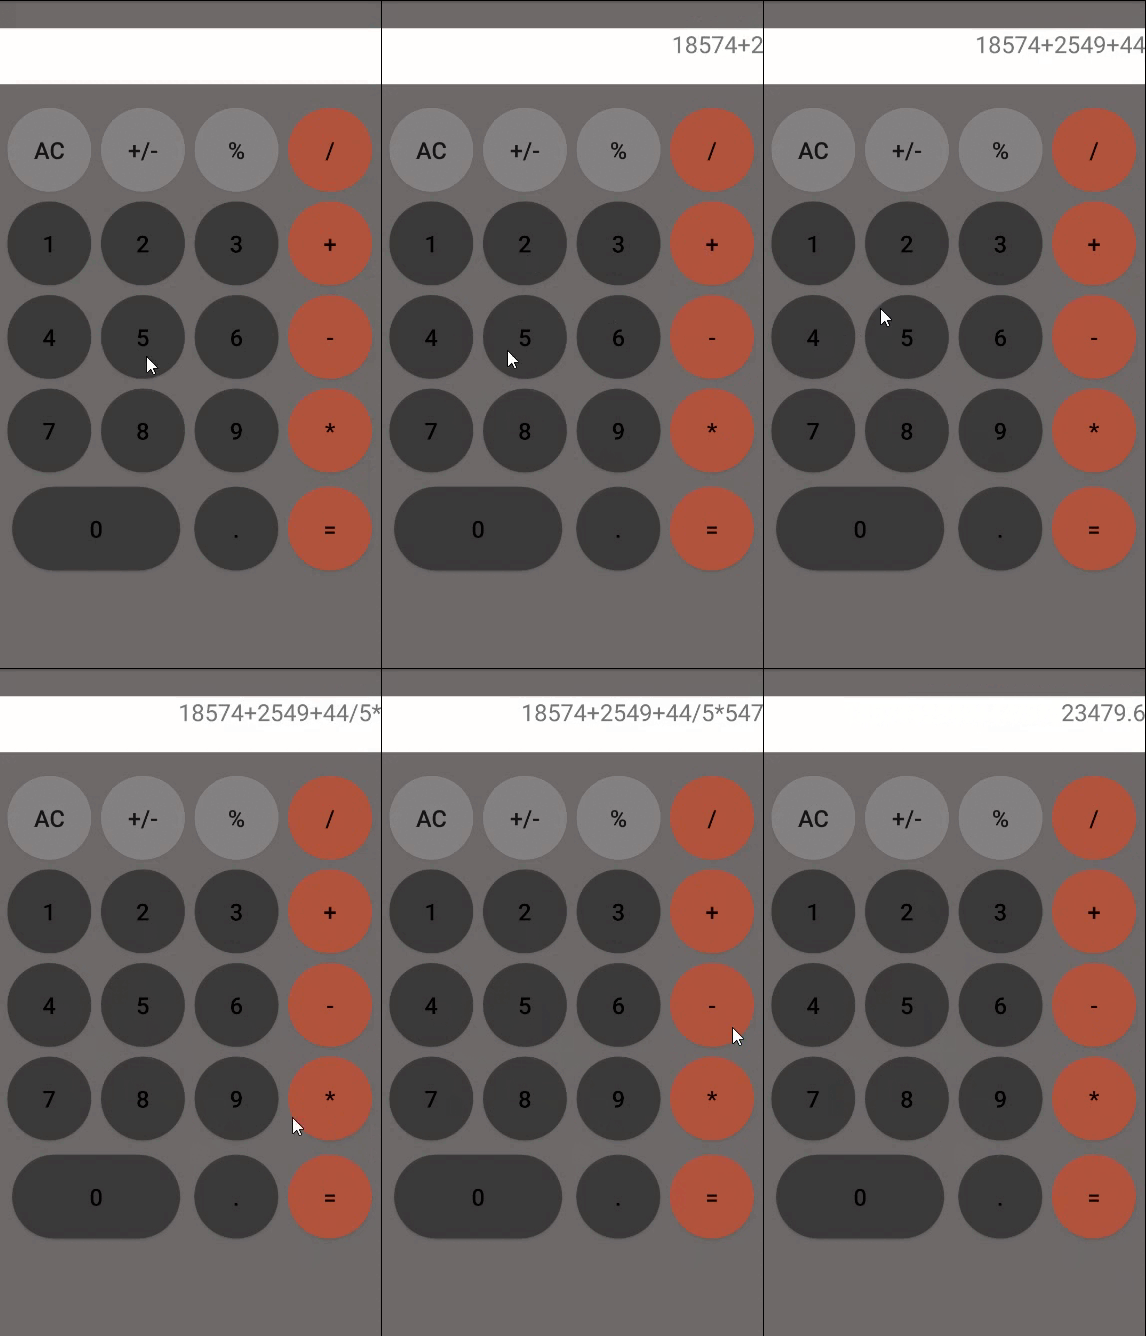
7.实现一个简易的计算器
在src里面新建一个文件夹calculator
里面写入计算器的css和js
在src外侧的index.js中引入css和js
  import './calculator/moduleone.css';
  import Mouduleone from './calculator/moduleone';
  <Mouduleone/>
在public的index.html中套入组件壳子
<div id="wrapper">
      <div id="root"></div>
</div>
8.实现一个简易的路由
//路由下载
npm install react-router-dom --save
//路径传值
npm install antd-mobile --save
//路径图标
npm install antd-mobile-icons --save
//版本
"antd-mobile": "^5.34.0",
"antd-mobile-icons": "^0.3.0",
"cra-template": "1.2.0",
"react": "^18.2.0",
"react-dom": "^18.2.0",
"react-point": "3.0.1",
"react-router-dom": "^6.21.1",
"react-scripts": "5.0.1"
1.1首先在index.js中
  //引入全局路由页面
  import Transit from './page/transit';
  //引入下载路由组件
  import {MemoryRouter} from 'react-router-dom'

  const root = ReactDOM.createRoot(document.getElementById('root'));
  root.render(
     <React.StrictMode>
       //嵌套路由组件
       <MemoryRouter>
             //写入路由
             <Transit/>
       </MemoryRouter>
      </React.StrictMode>
   );
1.2transit.js中作为页面中转
  import { Routes,Route,useNavigate,useLocation  } from 'react-router-dom'
  import { TabBar,Popup } from 'antd-mobile'
  import { tabs } from './router'
  function App() {
   const pathname = useLocation().pathname
   const navigate = useNavigate()
   const setRouteActive = (value) => {
    console.log(value)
    navigate(value,{state:'1'})
   }

   return (
    <>
      <Routes>
        {tabs.map(item => (
          <Route key={item.key} path={item.key} element={item.element} />
        ))}
        <Route path="*" element={<div>404</div>} />
      </Routes>
      <Popup visible={true} mask={false}>
      <TabBar activeKey={pathname} onChange={value => setRouteActive(value)}>
        {tabs.map(item => (
          <TabBar.Item key={item.key} icon={item.icon} title={item.title} />
        ))}
      </TabBar>
      </Popup>
    </>
   )
  }

  export default App
1.3router.js中配置路由
  import Home from "./home"
  import About from "./about"
  import { AppOutline, UserOutline } from "antd-mobile-icons"

  export const tabs = [
    {
      key: "/home",
      title: "首页",
      icon: <AppOutline />,
      element: <Home/>,
    },
    {
      key: "/about",
      title: "我的",
      icon: <UserOutline />,
      element: <About/>,
    },
  ]
1.4引入的页面Home.js
import React, { Component } from 'react';

export default class Home extends Component {
  render() {
    return (<h1>
      欢迎,这里是Home
    </h1>)
  }
}moduleone.js文件文章来源:https://www.toymoban.com/news/detail-785562.html
import React from 'react';
import PointTarget from 'react-point';

class AutoScalingText extends React.Component {
  state = {
    scale: 1
  };

  componentDidUpdate() {
    const { scale } = this.state

    const node = this.node
    const parentNode = node.parentNode

    const availableWidth = parentNode.offsetWidth
    const actualWidth = node.offsetWidth
    const actualScale = availableWidth / actualWidth

    if (scale === actualScale)
      return

    if (actualScale < 1) {
      this.setState({ scale: actualScale })
    } else if (scale < 1) {
      this.setState({ scale: 1 })
    }
  }

  render() {
    const { scale } = this.state

    return (
      <div
        className="auto-scaling-text"
        style={{ transform: `scale(${scale},${scale})` }}
        ref={node => this.node = node}
      >{this.props.children}</div>
    )
  }
}

class CalculatorDisplay extends React.Component {
  render() {
    const { value, ...props } = this.props

    const language = navigator.language || 'en-US'
    let formattedValue = parseFloat(value).toLocaleString(language, {
      useGrouping: true,
      maximumFractionDigits: 6
    })

    // Add back missing .0 in e.g. 12.0
    const match = value.match(/\.\d*?(0*)$/)

    if (match)
      formattedValue += (/[1-9]/).test(match[0]) ? match[1] : match[0]

    return (
      <div {...props} className="calculator-display">
        <AutoScalingText>{formattedValue}</AutoScalingText>
      </div>
    )
  }
}

class CalculatorKey extends React.Component {
  render() {
    const { onPress, className, ...props } = this.props

    return (
      <PointTarget onPoint={onPress}>
        <button className={`calculator-key ${className}`} {...props} />
      </PointTarget>
    )
  }
}

const CalculatorOperations = {
  '/': (prevValue, nextValue) => prevValue / nextValue,
  '*': (prevValue, nextValue) => prevValue * nextValue,
  '+': (prevValue, nextValue) => prevValue + nextValue,
  '-': (prevValue, nextValue) => prevValue - nextValue,
  '=': (prevValue, nextValue) => nextValue
}

export default class Calculator extends React.Component {
  state = {
    value: null,
    displayValue: '0',
    operator: null,
    waitingForOperand: false
  };

  clearAll() {
    this.setState({
      value: null,
      displayValue: '0',
      operator: null,
      waitingForOperand: false
    })
  }

  clearDisplay() {
    this.setState({
      displayValue: '0'
    })
  }

  clearLastChar() {
    const { displayValue } = this.state

    this.setState({
      displayValue: displayValue.substring(0, displayValue.length - 1) || '0'
    })
  }

  toggleSign() {
    const { displayValue } = this.state
    const newValue = parseFloat(displayValue) * -1

    this.setState({
      displayValue: String(newValue)
    })
  }

  inputPercent() {
    const { displayValue } = this.state
    const currentValue = parseFloat(displayValue)

    if (currentValue === 0)
      return

    const fixedDigits = displayValue.replace(/^-?\d*\.?/, '')
    const newValue = parseFloat(displayValue) / 100

    this.setState({
      displayValue: String(newValue.toFixed(fixedDigits.length + 2))
    })
  }

  inputDot() {
    const { displayValue } = this.state

    if (!(/\./).test(displayValue)) {
      this.setState({
        displayValue: displayValue + '.',
        waitingForOperand: false
      })
    }
  }

  inputDigit(digit) {
    const { displayValue, waitingForOperand } = this.state

    if (waitingForOperand) {
      this.setState({
        displayValue: String(digit),
        waitingForOperand: false
      })
    } else {
      this.setState({
        displayValue: displayValue === '0' ? String(digit) : displayValue + digit
      })
    }
  }

  performOperation(nextOperator) {
    const { value, displayValue, operator } = this.state
    const inputValue = parseFloat(displayValue)

    if (value == null) {
      this.setState({
        value: inputValue
      })
    } else if (operator) {
      const currentValue = value || 0
      const newValue = CalculatorOperations[operator](currentValue, inputValue)

      this.setState({
        value: newValue,
        displayValue: String(newValue)
      })
    }

    this.setState({
      waitingForOperand: true,
      operator: nextOperator
    })
  }

  handleKeyDown = (event) => {
    let { key } = event

    if (key === 'Enter')
      key = '='

    if ((/\d/).test(key)) {
      event.preventDefault()
      this.inputDigit(parseInt(key, 10))
    } else if (key in CalculatorOperations) {
      event.preventDefault()
      this.performOperation(key)
    } else if (key === '.') {
      event.preventDefault()
      this.inputDot()
    } else if (key === '%') {
      event.preventDefault()
      this.inputPercent()
    } else if (key === 'Backspace') {
      event.preventDefault()
      this.clearLastChar()
    } else if (key === 'Clear') {
      event.preventDefault()

      if (this.state.displayValue !== '0') {
        this.clearDisplay()
      } else {
        this.clearAll()
      }
    }
  };

  componentDidMount() {
    document.addEventListener('keydown', this.handleKeyDown)
  }

  componentWillUnmount() {
    document.removeEventListener('keydown', this.handleKeyDown)
  }

  render() {
    const { displayValue } = this.state

    const clearDisplay = displayValue !== '0'
    const clearText = clearDisplay ? 'C' : 'AC'

    return (
      <div className="calculator">
        <CalculatorDisplay value={displayValue} />
        <div className="calculator-keypad">
          <div className="input-keys">
            <div className="function-keys">
              <CalculatorKey className="key-clear" onPress={() => clearDisplay ? this.clearDisplay() : this.clearAll()}>{clearText}</CalculatorKey>
              <CalculatorKey className="key-sign" onPress={() => this.toggleSign()}>±</CalculatorKey>
              <CalculatorKey className="key-percent" onPress={() => this.inputPercent()}>%</CalculatorKey>
            </div>
            <div className="digit-keys">
              <CalculatorKey className="key-0" onPress={() => this.inputDigit(0)}>0</CalculatorKey>
              <CalculatorKey className="key-dot" onPress={() => this.inputDot()}>●</CalculatorKey>
              <CalculatorKey className="key-1" onPress={() => this.inputDigit(1)}>1</CalculatorKey>
              <CalculatorKey className="key-2" onPress={() => this.inputDigit(2)}>2</CalculatorKey>
              <CalculatorKey className="key-3" onPress={() => this.inputDigit(3)}>3</CalculatorKey>
              <CalculatorKey className="key-4" onPress={() => this.inputDigit(4)}>4</CalculatorKey>
              <CalculatorKey className="key-5" onPress={() => this.inputDigit(5)}>5</CalculatorKey>
              <CalculatorKey className="key-6" onPress={() => this.inputDigit(6)}>6</CalculatorKey>
              <CalculatorKey className="key-7" onPress={() => this.inputDigit(7)}>7</CalculatorKey>
              <CalculatorKey className="key-8" onPress={() => this.inputDigit(8)}>8</CalculatorKey>
              <CalculatorKey className="key-9" onPress={() => this.inputDigit(9)}>9</CalculatorKey>
            </div>
          </div>
          <div className="operator-keys">
            <CalculatorKey className="key-divide" onPress={() => this.performOperation('/')}>÷</CalculatorKey>
            <CalculatorKey className="key-multiply" onPress={() => this.performOperation('*')}>×</CalculatorKey>
            <CalculatorKey className="key-subtract" onPress={() => this.performOperation('-')}>?</CalculatorKey>
            <CalculatorKey className="key-add" onPress={() => this.performOperation('+')}>+</CalculatorKey>
            <CalculatorKey className="key-equals" onPress={() => this.performOperation('=')}>=</CalculatorKey>
          </div>
        </div>
      </div>
    )
  }
}moduleone.css文件文章来源地址https://www.toymoban.com/news/detail-785562.html
  html {
    box-sizing: border-box;
  }
  *,
  *:before,
  *:after {
    box-sizing: inherit;
  }

  body {
    margin: 0;
    font: 100 14px 'Roboto';
  }

  button {
    display: block;
    background: none;
    border: none;
    padding: 0;
    font-family: inherit;
    user-select: none;
    cursor: pointer;
    outline: none;

    -webkit-tap-highlight-color: rgba(0, 0, 0, 0);
  }

  button:active {
    box-shadow: inset 0px 0px 80px 0px rgba(0, 0, 0, 0.25);
  }

  #wrapper {
    height: 100vh;
    display: flex;
    align-items: center;
    justify-content: center;
  }

  #root {
    width: 320px;
    height: 520px;
    position: relative;
  }

  .calculator {
    width: 100%;
    height: 100%;
    background: black;

    display: flex;
    flex-direction: column;
  }

  #wrapper .calculator {
    box-shadow: 0px 0px 20px 0px #aaa;
  }

  .calculator-display {
    color: white;
    background: #1c191c;
    line-height: 120px;
    font-size: 6em;

    flex: 1;
  }

  .auto-scaling-text {
    display: inline-block;
  }

  .calculator-display .auto-scaling-text {
    padding: 0 30px;
    position: absolute;
    right: 0;
    transform-origin: right;
  }

  .calculator-keypad {
    height: 400px;

    display: flex;
  }

  .calculator .input-keys {
    width: 240px;
  }

  .calculator .function-keys {
    display: flex;
  }

  .calculator .digit-keys {
    background: #e0e0e7;

    display: flex;
    flex-direction: row;
    flex-wrap: wrap-reverse;
  }

  .calculator-key {
    width: 80px;
    height: 80px;
    border-top: 1px solid #777;
    border-right: 1px solid #666;
    text-align: center;
    line-height: 80px;
  }

  .calculator .function-keys .calculator-key {
    font-size: 2em;
  }

  .calculator .function-keys .key-multiply {
    line-height: 50px;
  }

  .calculator .digit-keys .calculator-key {
    font-size: 2.25em;
  }

  .calculator .digit-keys .key-0 {
    width: 160px;
    text-align: left;
    padding-left: 32px;
  }

  .calculator .digit-keys .key-dot {
    padding-top: 1em;
    font-size: 0.75em;
  }

  .calculator .operator-keys .calculator-key {
    color: white;
    border-right: 0;
    font-size: 3em;
  }

  .calculator .function-keys {
    background: linear-gradient(to bottom, rgba(202, 202, 204, 1) 0%, rgba(196, 194, 204, 1) 100%);
  }

  .calculator .operator-keys {
    background: linear-gradient(to bottom, rgba(252, 156, 23, 1) 0%, rgba(247, 126, 27, 1) 100%);
  }
到了这里,关于react从构建到实现小计算器到路由(基础篇)的文章就介绍完了。如果您还想了解更多内容,请在右上角搜索TOY模板网以前的文章或继续浏览下面的相关文章,希望大家以后多多支持TOY模板网!


