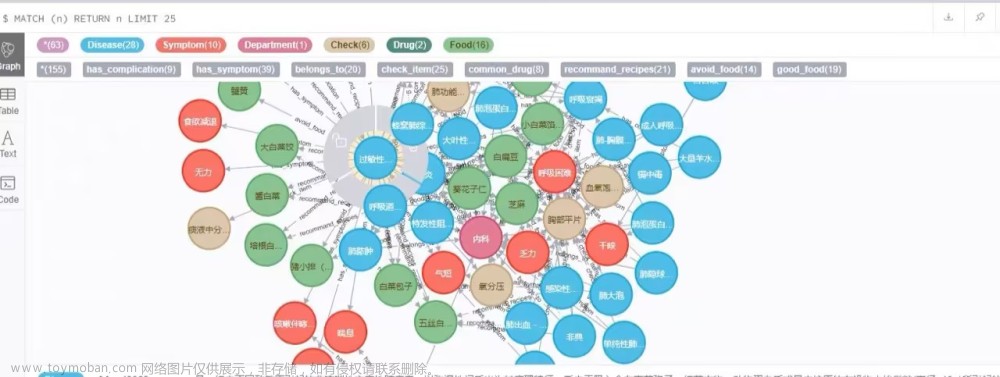
neo4j是什么?
简单来说,这是一种比较热门的图数据库,图数据库以图形形式存储数据。 它以节点,关系和属性的形式存储应用程序的数据。 一个图由无数的节点和关系组成。
安装图数据库在这里就不介绍了,本篇主要介绍如何连接neo4j数据库,将知识图谱成功显示在前端页面中。
一、Neovis.js 不用获取数据直接连接数据库绘图
1.、 Neovis.js与Neo4j的连接非常简单明了,并且Neovis 的数据格式与那neo4j数据库保持一致。在单个配置对象中定义标签、属性、节点和关系的样式和颜色。
首先下载依赖
npm install -save neovis.js
在项目中引用
import NeoVis from 'neovis.js';
创建用来绘图的DOM元素
<div style="height:100%;" ref="Screen">
    <div class="left" id="viz1" ref="viz1"></div>
 </div> -->
页面加载进来调用draw()画图函数
    mounted() {
     this.draw();
    },
    //neovis.js画图
    methods:{
     draw() {
       //获取dom元素
      var viz1 = this.$refs.viz1;

      //创建veovis实例
      var viz;

      //配置项
      var config = {
        container_id: "viz",
        //neo4j服务器地址,用户名 和 密码
        server_url: "bolt://192.x.xxx.10:7687",
        server_user: "nexx4j",
        server_password: "KGxxx34",

        **///labels是节点央样式的配置:**
        **/// caption :节点显示的文字对应内容
        **/// community: 节点颜色**
        **/// size:节点大小**
        **/// font:节点字体大小设置****
        **//没有在这个地方配置的节点将会是默认样式**
        labels: {
          "CITY": { caption: "name", community: "#5496FF", size: 200, font: { size: 35, color: "#606266", }, },
          "基本待遇政策": { caption: "name", community: "#5496FF", size: 95, font: { size: 25, color: "#606266", } },
          "基本筹资政策": { caption: "name", community: "#5496FF", size: 95, font: { size: 25, color: "#606266", }, },
        },

        **///relationships是关系线段样式的配置:**
        **/// caption :线段显示的文字对应内容
        **/// thickness: 线段粗细**
        **/// font:节点字体大小设置****
        **//没有在这个地方配置的线段将会是默认样式**
        relationships: {
          "待遇支付政策": { thickness: 1, caption: true, font: { size: 15, color: "#606266", }, },
          "待遇主体类别": { thickness: "count", caption: true, font: { size: 15, color: "#606266", }, },
        },

        //是否显示箭头
        arrows: true,

        hierarchical: true,

        // 分层结构或者默认 "hubsize"(默认)和"directed".
        // hierarchical_sort_method: 'hubsize',
        hierarchical_sort_method: 'directed',

        //配置数据库查询语句,MATCH n RETURN n,尝试过不对,必须用 MATCH p=()-->() RETURN p
        initial_cypher: 'MATCH p=()-->() RETURN p',
      };

      viz = new NeoVis(config);
      viz._container = viz1;
      viz.render();
     },
    }
二、vis.js 或者 echarts绘图
由于这两者需要的数据格式与neo4j数据格式不同,所以需要先从前端获取数据,然后处理成我们需要的格式。
1、(发现一个神器) neo4j-driver 能够直接通过前端获取数据。
上代码, 首先下载依赖
npm install -save neo4j-driver
再页面中引入
var neo4j = require("neo4j-driver");
export default {
   ...此处暂时省略...
}
页面初次加载调用 this.executeCypher() 执行 Cypher 查询数据
 mounted() {
    var  query= 'MATCH p=()-->() RETURN p'
    this.executeCypher(query);
  },
executeCypher()方法定义: 该方法处理的数据格式为echarts适用格式
    /**
         * 直接执行Cypher
         */
    executeCypher(query) {
      this.echartsNode = []  //节点数组
      this.nodesRelation = [] //关系线数组
      this.category = [] //echarts图例数据数
      // 创建实例
      this.driver = neo4j.driver('bolt://localhost:7687', neo4j.auth.basic('neo4j', 'KG****'));
      console.log("🚀 ~ file: AuthorArticleSearch.vue ~ line 46 ~ mounted ~  this.drive", this.driver)

      let me = this;
      me.records = [];
      this.clearAll = true;
      let session = this.driver.session();
      if (query == "") return;
      session.run(query, {}).then((result) => {
        me.clearAll = false;
        me.records = result.records;
        console.log("neo4j 查询结果", result.records);

        session.close();
        me.closeLoading(false);
      }).catch(function (error) {
        console.log("Cypher 执行失败!", error);
        me.driver.close();
      });
    },
    closeLoading(status) {
      console.log('closeLoading', status);
    },
以上我们就查询到了数据,紧接着开始处理数据,首先处理成适用echarts的数据格式
2、使用echarts绘图
首先处理获取的数据
            /**
         * 直接执行Cypher
         */
    executeCypher(query) {
      this.echartsNode = []  //节点数组
      this.nodesRelation = [] //关系线数组
      this.category = [] //echarts图例数据数
      // 创建实例
      this.driver = neo4j.driver('bolt://localhost:7687', neo4j.auth.basic('neo4j', '******'));
      console.log("🚀 ~ file: AuthorArticleSearch.vue ~ line 46 ~ mounted ~  this.drive", this.driver)

      let me = this;
      me.records = [];
      this.clearAll = true;
      let session = this.driver.session();
      if (query == "") return;
      session.run(query, {}).then((result) => {
        me.clearAll = false;
        me.records = result.records;
        console.log("neo4j 查询结果", result.records);
// 开始处理数据
        for (let i = 0; i < me.records.length; i++) {
          this.echartsData.push({
            name: me.records[i]._fields[0].segments[0].start.properties.name,
            category: me.records[i]._fields[0].segments[0].start.labels[0]
          });
          this.echartsData.push({
            name: me.records[i]._fields[0].segments[0].end.properties.name,
            category: me.records[i]._fields[0].segments[0].end.labels[0]
          });
          this.nodesRelation.push({
            source: me.records[i]._fields[0].segments[0].start.properties.name,
            target: me.records[i]._fields[0].segments[0].end.properties.name,
            name: me.records[i]._fields[0].segments[0].relationship.type,
          });
        }

        //删除arr中的重复对象
        var arrId = [];
        var legend = [];
        for (var item of this.echartsData) {
          legend.push({ name: item.category })
          if (arrId.indexOf(item.name) == -1) {
            arrId.push(item.name)
            this.echartsNode.push(item);
          }
        }
        this.category = Array.from(new Set(legend))

        session.close();
        me.closeLoading(false);
      }).catch(function (error) {
        console.log("Cypher 执行失败!", error);
        me.driver.close();
      });

      setTimeout(() => {
        this.knowlegGraphshow = true
       }, 4000);
    },
    closeLoading(status) {
      console.log('closeLoading', status);
    },
echarts配置:
this.options = {
                    tooltip: {//弹窗
                        show: false,
                        // enterable: true,//鼠标是否可进入提示框浮层中
                        // formatter: formatterHover,//修改鼠标悬停显示的内容
                    },
                    legend: {
                        type: 'scroll',
                        orient: 'vertical',
                        left: 10,
                        top: 20,
                        bottom: 20,
                        data: this.category
                    },
                    series: [
                        {

                            categories: this.category,
                            // categories: [{
                            //     name: "筹资渠道"
                            // }],
                            type: "graph",
                            layout: "force",
                            zoom: 0.6,
                            symbolSize: 60,
                            // 节点是否可以拖动
                            draggable: true,
                            roam: true,
                            hoverAnimation: false,
                            // labelLayout: {
                            //     hideOverlap: true,
                            // },
                            legendHoverLink: false,
                            nodeScaleRatio: 0.6, //鼠标漫游缩放时节点的相应缩放比例,当设为0时节点不随着鼠标的缩放而缩放
                            focusNodeAdjacency: false, //是否在鼠标移到节点上的时候突出显示节点以及节点的边和邻接节点。
                            // categories: categories,
                            itemStyle: {
                                color: "#67A3FF",
                            },
                            edgeSymbol: ["", "arrow"],
                            // edgeSymbolSize: [80, 10],
                            edgeLabel: {
                                normal: {
                                    show: true,
                                    textStyle: {
                                        fontSize: 12,
                                    },
                                    formatter(x) {
                                        return x.data.name;
                                    },
                                },
                            },
                            label: {
                                normal: {
                                    show: true,
                                    textStyle: {
                                        fontSize: 12,
                                    },
                                    color: "#f6f6f6",
                                    textBorderColor: '#67A3FF',
                                    textBorderWidth: '1.3',
                                    // 多字换行
                                    formatter: function (params) {
                                        // console.log(params);
                                        var newParamsName = "";
                                        var paramsNameNumber = params.name.length;
                                        var provideNumber = 7; //一行显示几个字
                                        var rowNumber = Math.ceil(paramsNameNumber / provideNumber);
                                        if (paramsNameNumber > provideNumber) {
                                            for (var p = 0; p < rowNumber; p++) {
                                                var tempStr = "";
                                                var start = p * provideNumber;
                                                var end = start + provideNumber;
                                                if (p == rowNumber - 1) {
                                                    tempStr = params.name.substring(start, paramsNameNumber);
                                                } else {
                                                    tempStr = params.name.substring(start, end) + "\n\n";
                                                }
                                                newParamsName += tempStr;
                                            }
                                        } else {
                                            newParamsName = params.name;
                                        }
                                        return newParamsName;
                                    },
                                },
                            },
                            force: {
                                repulsion: 200, // 节点之间的斥力因子。支持数组表达斥力范围,值越大斥力越大。
                                gravity: 0.01, // 节点受到的向中心的引力因子。该值越大节点越往中心点靠拢。
                                edgeLength: 400, // 边的两个节点之间的距离,这个距离也会受 repulsion影响 。值越大则长度越长
                                layoutAnimation: true, // 因为力引导布局会在多次迭代后才会稳定,这个参数决定是否显示布局的迭代动画
                                // 在浏览器端节点数据较多(>100)的时候不建议关闭,布局过程会造成浏览器假死。
                            },
                            data: this.data,
                            links: this.links,
                            // categories: this.categories
                        }

                    ]
                }
3、使用vis.js绘图
下载依赖:
npm install -s vis,js
引入:
//import Vis from "vis";
const Vis = require('vis-network/dist/vis-network.min');
require('vis-network/dist/dist/vis-network.min.css');
首先处理数据:
在这里插入代码片
         /**
         * 直接执行Cypher
         */
    executeCypher(query) {
      this.echartsNode = []  //节点数组
      this.nodesRelation = [] //关系线数组
      // 创建实例
      this.driver = neo4j.driver('bolt://localhost:7687', neo4j.auth.basic('neo4j', 'KG****'));
      console.log("🚀 ~ file: AuthorArticleSearch.vue ~ line 46 ~ mounted ~  this.drive", this.driver)

      let me = this;
      me.records = [];
      this.clearAll = true;
      let session = this.driver.session();
      if (query == "") return;
      session.run(query, {}).then((result) => {
        me.clearAll = false;
        me.records = result.records;
        console.log("neo4j 查询结果", result.records);

        // 开始处理数据
        let nodes = new Set();
        for (let i = 0; i < me.records.length; i++) {
          nodes.add(me.records[i]._fields[0].segments[0].start.properties.name);
          nodes.add(me.records[i]._fields[0].segments[0].end.properties.name);
          this.nodesRelation.push({
            from: me.records[i]._fields[0].segments[0].start.properties.name,
            to: me.records[i]._fields[0].segments[0].end.properties.name,
            label: me.records[i]._fields[0].segments[0].relationship.type,
            id: i,
          });
        }

        nodes.forEach((e) => {
          this.echartsData.push({
            label: e,
            id: e,
          });
        })
        session.close();
        me.closeLoading(false);
      }).catch(function (error) {
        console.log("Cypher 执行失败!", error);
        me.driver.close();
      });

      this.nodesArray = this.echartsData  //节点数组
      this.edgesArray = this.nodesRelation //关系线数组
      setTimeout(() => {
        this.knowlegGraphshow = true
       }, 4000);
    },
    closeLoading(status) {
      console.log('closeLoading', status);
    },
定义绘图dom元素
// width,height 画布的宽度,高度。 可以是百分比或像素,一般在dom元素上设置 -->
     <div v-if="knowlegGraphshow == true" id="network_id" ref="network_id" class="network" style="height: 100%;">
     </div>
调用绘图方法:文章来源:https://www.toymoban.com/news/detail-785780.html
 // vis.js画图
    visDraw() {
      let container = this.$refs.network_id;
      let data = { nodes: this.nodesArray, edges: this.edgesArray }
      console.log("🚀 ~ file: pageKnowlegGraph.vue ~ line 135 ~ visDraw ~ data", data)
      let options = {
        autoResize: true,
        // / 设置节点样式
        nodes: {
          shape: "dot",
          size: 20,
          font: {
            //字体配置
            size: 20
          },
          color: {
            // border: "#2B7CE9", //节点边框颜色
            background: "#97C2FC", //节点背景颜色
            highlight: {
              //节点选中时状态颜色
              border: "#2B7CE9",
              background: "#D2E5FF"
            },
            hover: {
              //节点鼠标滑过时状态颜色
              border: "#2B7CE9",
              background: "#D2E5FF"
            }
          },
          borderWidth: 0, //节点边框宽度,单位为px
          borderWidthSelected: 2 //节点被选中时边框的宽度,单位为px
        },
        // 边线配置
        edges: {
          width: 1,
          length: 260,
          color: {
            color: "#848484",
            highlight: "#848484",
            hover: "#848484",
            inherit: "from",
            opacity: 1.0
          },
          shadow: false,
          smooth: {
            //设置两个节点之前的连线的状态
            enabled: false //默认是true,设置为false之后,两个节点之前的连线始终为直线,不会出现贝塞尔曲线
          },
          arrows: { to: true } //箭头指向to
        },
        //计算节点之前斥力,进行自动排列的属性
        physics: {
          // enabled: true, //默认是true,设置为false后,节点将不会自动改变,拖动谁谁动。不影响其他的节点
          // barnesHut: {
          //   gravitationalConstant: -4000,
          //   centralGravity: 0.3,
          //   springLength: 120,
          //   springConstant: 0.04,
          //   damping: 0.09,
          //   avoidOverlap: 0
          // },
        },
        // physics: false,
        //用于所有用户与网络的交互。处理鼠标和触摸事件以及导航按钮和弹出窗口
        interaction: {
          hover: true,
          dragNodes: true, //是否能拖动节点
          dragView: true, //是否能拖动画布
          // hover: true, //鼠标移过后加粗该节点和连接线
          // multiselect: true, //按 ctrl 多选
          // selectable: true, //是否可以点击选择
          // selectConnectedEdges: true, //选择节点后是否显示连接线
          // hoverConnectedEdges: true, //鼠标滑动节点后是否显示连接线
          zoomView: true //是否能缩放画布
        },
      };
      this.network = new Vis.Network(container, data, options);
    },
源码已上传,需要的小伙伴可前往主页找到下载,https://download.csdn.net/download/qq_41859063/86246454?spm=1001.2014.3001.5503。文章来源地址https://www.toymoban.com/news/detail-785780.html
到了这里,关于vue+neo4j +纯前端(neovis.js / neo4j-driver) 实现 知识图谱的集成 大干货--踩坑无数!!!将经验分享给有需要的小伙伴的文章就介绍完了。如果您还想了解更多内容,请在右上角搜索TOY模板网以前的文章或继续浏览下面的相关文章,希望大家以后多多支持TOY模板网!


