一、标定原理
机器人手眼标定分为eye in hand与eye to hand两种。介绍之前进行变量定义说明:
{b}: base基坐标系
{g}: gripper夹具坐标系
{t}: target标定板坐标系
{c}: camera相机坐标系
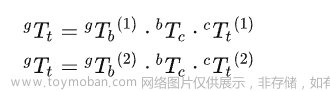
1、眼在手上(eye in hand)
眼在手上,相机固定在机器人上。
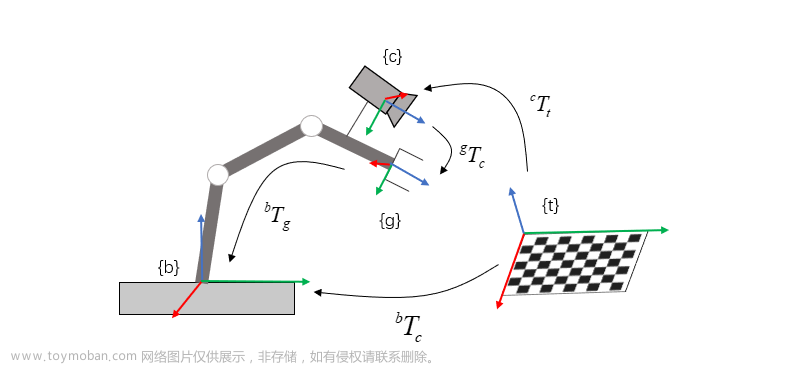
图1. eye in hand示意图

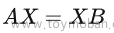
由以上两公式得:

经变换得:

可得:

求解X即标定 :

2、眼在手外(eye to hand)
眼在在手外,相机固定在机器人外。
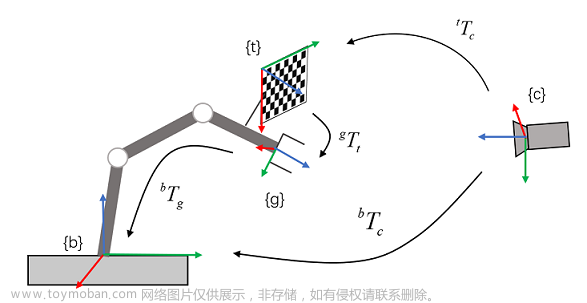
图2. eye to hand示意图
由以上两公式可得:

经变换得:

可得:
求解X即标定:

二 、标定步骤
将标定板固定至机械臂末端;
在位置1采集标定板图像,并记录机械臂在位置1下的位置与姿态;
在位置2采集标定板图像,并记录机械臂在位置2下的位置与姿态;
移动机械臂更换不同位置,采集25-40张图像,并记录机械臂在每个位置下的位姿;
相机标定,获取25-40组Tt_c ;
位姿读取,获取25-40组Tb_g ;文章来源:https://www.toymoban.com/news/detail-785843.html
根据5,6调用标定接口,获取Tc_b 。文章来源地址https://www.toymoban.com/news/detail-785843.html
三、标定代码
import os
import cv2
import xlrd2
from math import *
import numpy as np


class Calibration:
    def __init__(self):
        self.K = np.array([[2.54565632e+03, 0.00000000e+00, 9.68119560e+02],
                           [0.00000000e+00, 2.54565632e+03, 5.31897821e+02],
                           [0.00000000e+00, 0.00000000e+00, 1.00000000e+00]], dtype=np.float64)
        self.distortion = np.array([[-0.2557898, 0.81056366, 0.0, 0.0, -8.39153683]])
        self.target_x_number = 12
        self.target_y_number = 8
        self.target_cell_size = 40

    def angle2rotation(self, x, y, z):
        Rx = np.array([[1, 0, 0], [0, cos(x), -sin(x)], [0, sin(x), cos(x)]])
        Ry = np.array([[cos(y), 0, sin(y)], [0, 1, 0], [-sin(y), 0, cos(y)]])
        Rz = np.array([[cos(z), -sin(z), 0], [sin(z), cos(z), 0], [0, 0, 1]])
        R = Rz @ Ry @ Rx
        return R

    def gripper2base(self, x, y, z, tx, ty, tz):
        thetaX = x / 180 * pi
        thetaY = y / 180 * pi
        thetaZ = z / 180 * pi
        R_gripper2base = self.angle2rotation(thetaX, thetaY, thetaZ)
        T_gripper2base = np.array([[tx], [ty], [tz]])
        Matrix_gripper2base = np.column_stack([R_gripper2base, T_gripper2base])
        Matrix_gripper2base = np.row_stack((Matrix_gripper2base, np.array([0, 0, 0, 1])))
        R_gripper2base = Matrix_gripper2base[:3, :3]
        T_gripper2base = Matrix_gripper2base[:3, 3].reshape((3, 1))
        return R_gripper2base, T_gripper2base

    def target2camera(self, img):
        gray = cv2.cvtColor(img, cv2.COLOR_BGR2GRAY)
        ret, corners = cv2.findChessboardCorners(gray, (self.target_x_number, self.target_y_number), None)
        corner_points = np.zeros((2, corners.shape[0]), dtype=np.float64)
        for i in range(corners.shape[0]):
            corner_points[:, i] = corners[i, 0, :]
        object_points = np.zeros((3, self.target_x_number * self.target_y_number), dtype=np.float64)
        count = 0
        for i in range(self.target_y_number):
            for j in range(self.target_x_number):
                object_points[:2, count] = np.array(
                    [(self.target_x_number - j - 1) * self.target_cell_size,
                     (self.target_y_number - i - 1) * self.target_cell_size])
                count += 1
        retval, rvec, tvec = cv2.solvePnP(object_points.T, corner_points.T, self.K, distCoeffs=distortion)
        Matrix_target2camera = np.column_stack(((cv2.Rodrigues(rvec))[0], tvec))
        Matrix_target2camera = np.row_stack((Matrix_target2camera, np.array([0, 0, 0, 1])))
        R_target2camera = Matrix_target2camera[:3, :3]
        T_target2camera = Matrix_target2camera[:3, 3].reshape((3, 1))
        return R_target2camera, T_target2camera

    def process(self, img_path, pose_path):
        image_list = []
        for root, dirs, files in os.walk(img_path):
            if files:
                for file in files:
                    image_name = os.path.join(root, file)
                    image_list.append(image_name)
        R_target2camera_list = []
        T_target2camera_list = []
        for img_path in image_list:
            img = cv2.imread(img_path)
            R_target2camera, T_target2camera = self.target2camera(img)
            R_target2camera_list.append(R_target2camera)
            T_target2camera_list.append(T_target2camera)
        R_gripper2base_list = []
        T_gripper2base_list = []
        data = xlrd2.open_workbook(pose_path)
        table = data.sheets()[0]
        for row in range(table.nrows):
            x = table.cell_value(row, 0)
            y = table.cell_value(row, 1)
            z = table.cell_value(row, 2)
            tx = table.cell_value(row, 3)
            ty = table.cell_value(row, 4)
            tz = table.cell_value(row, 5)
            R_gripper2base, T_gripper2base = self.gripper2base(x, y, z, tx, ty, tz)
            R_gripper2base_list.append(R_gripper2base)
            T_gripper2base_list.append(T_gripper2base)
        R_camera2base, T_camera2base = cv2.calibrateHandEye(R_gripper2base_list, T_gripper2base_list,
                                                            R_target2camera_list, T_target2camera_list)
        return R_camera2base, T_camera2base, R_gripper2base_list, T_gripper2base_list, R_target2camera_list, T_target2camera_list

    def check_result(self, R_cb, T_cb, R_gb, T_gb, R_tc, T_tc):
        for i in range(len(R_gb)):
            RT_gripper2base = np.column_stack((R_gb[i], T_gb[i]))
            RT_gripper2base = np.row_stack((RT_gripper2base, np.array([0, 0, 0, 1])))
            RT_base2gripper = np.linalg.inv(RT_gripper2base)
            print(RT_base2gripper)

            RT_camera_to_base = np.column_stack((R_cb, T_cb))
            RT_camera_to_base = np.row_stack((RT_camera_to_base, np.array([0, 0, 0, 1])))
            print(RT_camera_to_base)

            RT_target_to_camera = np.column_stack((R_tc[i], T_tc[i]))
            RT_target_to_camera = np.row_stack((RT_target_to_camera, np.array([0, 0, 0, 1])))
            RT_camera2target = np.linalg.inv(RT_target_to_camera)
            print(RT_camera2target)

            RT_target_to_gripper = RT_base2gripper @ RT_camera_to_base @ RT_camera2target
            print("第{}次验证结果为:".format(i))
            print(RT_target_to_gripper)
            print('')


if __name__ == "__main__":
    image_path = r"D\code\img"
    pose_path = r"D\code\pose.xlsx"
    calibrator = Calibration()
    R_cb, T_cb, R_gb, T_gb, R_tc, T_tc = calibrator.process(image_path, pose_path)
    calibrator.check_result(R_cb, T_cb, R_gb, T_gb, R_tc, T_tc)
到了这里,关于机器人手眼标定原理与python实现的文章就介绍完了。如果您还想了解更多内容,请在右上角搜索TOY模板网以前的文章或继续浏览下面的相关文章,希望大家以后多多支持TOY模板网!