1.聊天室前端界面
创建一个简单聊天室的HTML和JavaScript代码,匹配相应的css样式,这个聊天室将使用WebSocket技术,允许用户实时发送和接收消息。
1.1 html和js代码
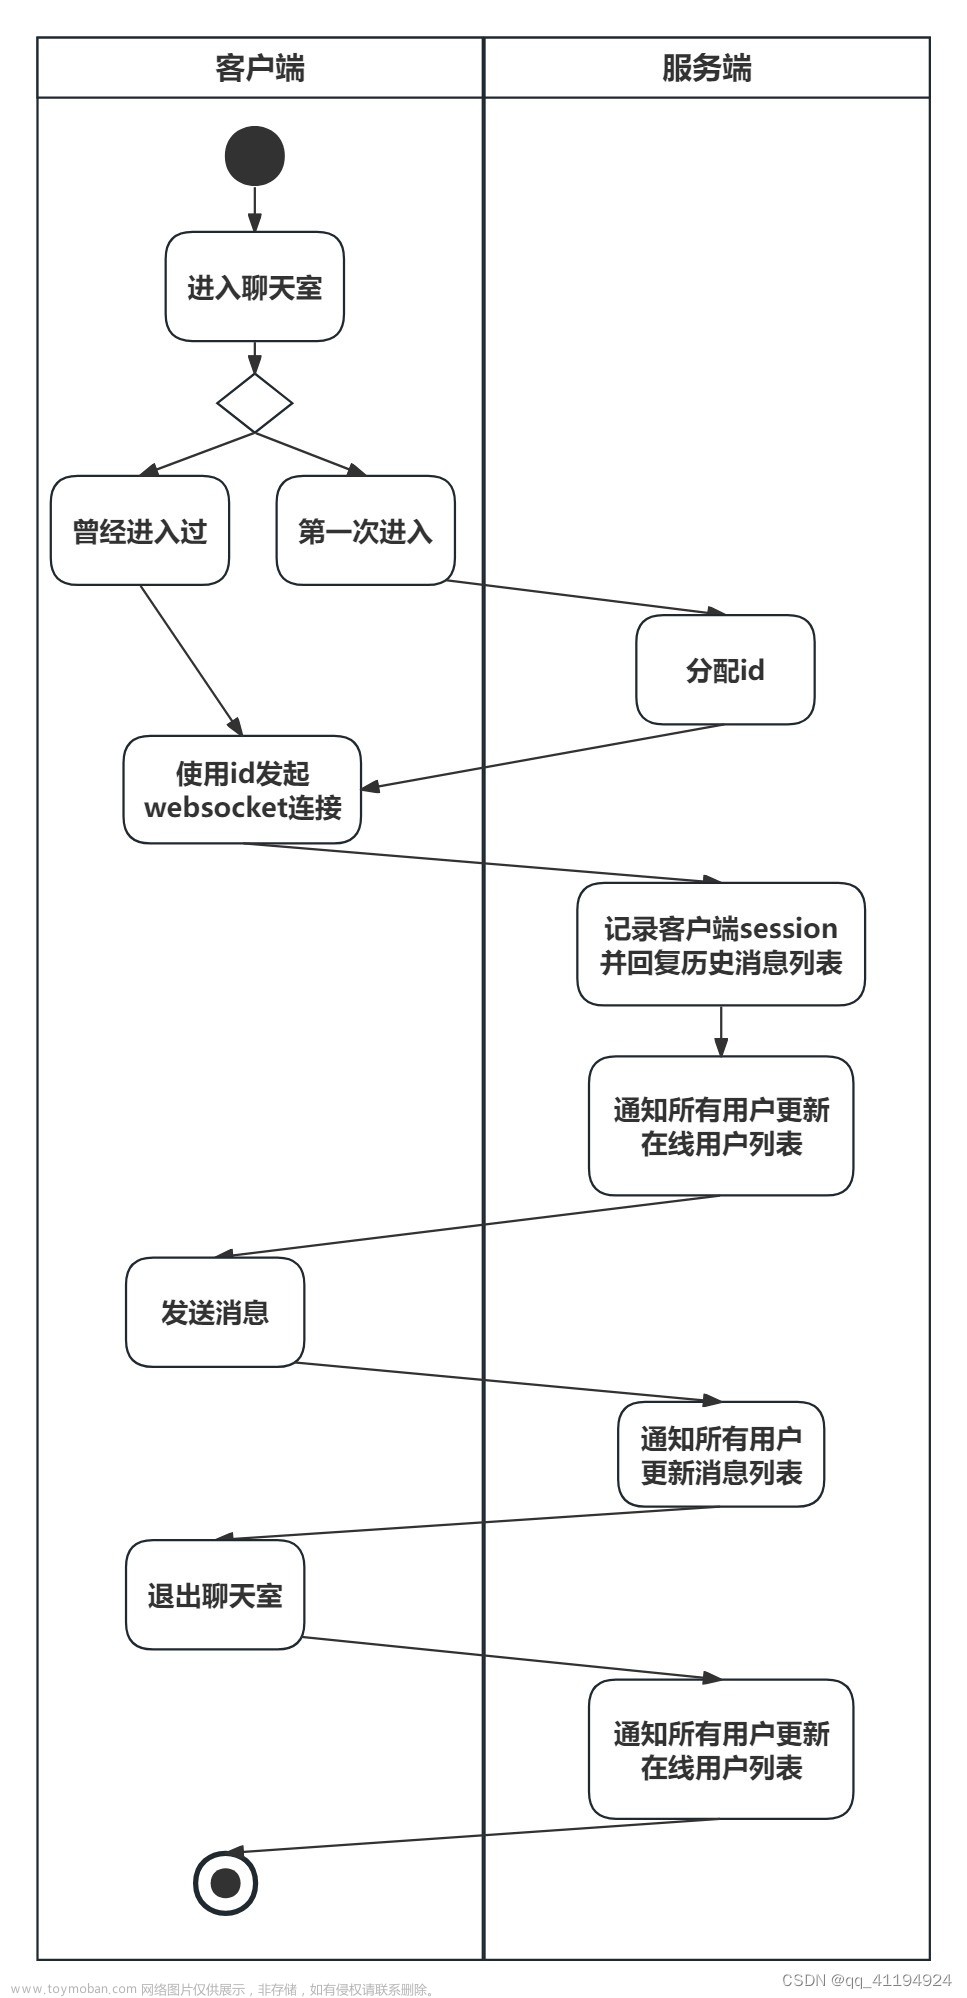
通过new WebSocket(url)建立一个新的websocket连接。websocket连接建立之后使用websocket.onopen,websocket.onclose,websocket.onerror等方法实时监测websocket连接使用情况,并在前端界面实时打印出连接情况,确保用户可以正确无误的使用聊天室。
<!doctype html>
<html>
<head>
    <meta charset="utf-8"></meta>
    <title>聊天室</title>
	<link rel="stylesheet" href="/static/css/index.css" />
</head>
<body>
<div class="main">
    <div class="m-head">
        <div class="head-img"><img src="/static/image/1d0d104e.jpg" height="50px" width="50px" /><span id="user_id">1</span></div>
        <div class="head-title">聊天室频道:test, 聊天中。。。<img src="/static/image/chat.png" height="40px" width="40px" /></div>
    </div>
    <div id="message_id" class="chat_content"></div>
    <form class="send-main" id="send-main">
        <input id="push_content" type="text" placeholder="请输入聊天内容" />
        <button onclick="sendMessage()" class="my-button">发送</button>
        <button onclick="closeWebsocket()" class="my-button close">关闭</button>
    </form>
</div>
</body>
<script type="text/javascript">
    var num = location.href.indexOf("id=");
    var id = 'default';
    if (num > 0) {
        id = decodeURI(location.href.substr(num + 3));
    }
    document.getElementById('push_content').focus();
    var websocket = null;
    //当前浏览前是否支持websocket
    if ("WebSocket" in window) {
        var url = "ws://127.0.0.1:9876/ws_test/" + id;
        document.getElementById('user_id').innerHTML = id;
        websocket = new WebSocket(url);
    } else {
        alert("浏览器不支持websocket");
    }

    websocket.onopen = function(event) {
        document.getElementById('message_id').innerHTML += "<p class='chat_msg_center'>您已进入群聊<br/>";
    }

    websocket.onclose = function(event) {
        document.getElementById('message_id').innerHTML += "<p class='chat_msg_center'>您已退出群聊<br/>";
    }

    websocket.onmessage = function(event) {
        setMessage(event.data);
    }

    websocket.onerror = function(event) {
        document.getElementById('message_id').innerHTML += "<p class='chat_msg_center'>网络异常<br/>";
    }

    //监听窗口关闭事件,当窗口关闭时,主动去关闭websocket连接,防止连接还没断开就关闭窗口,server端会抛异常。
    window.onbeforeunload = function() {
        closeWebsocket();
    }

    //关闭websocket
    function closeWebsocket() {
        //3代表已经关闭
        if (3 != websocket.readyState) {
            websocket.close();
        } else {
            document.getElementById('message_id').innerHTML += "<p class='chat_msg_center'>已经退出<br/>";
        }
    }

    //将消息显示在网页上
    function setMessage(message) {
        let msgs = message.split("_^Ag5F_");
        if (msgs[0] == "C1L2I3E4N5T") {
            if (id == msgs[1]) {
                document.getElementById('message_id').innerHTML += "<p class='chat_msg_right'>" + msgs[2] + '<b> :我</b><br/>';
            } else {
                document.getElementById('message_id').innerHTML += "<p class='chat_msg_left'><b>" + msgs[1] + ':</b>' + msgs[2] +
                    '<br/>';
            }
        } else if (msgs[0] == "S1Y2S1T3E4M") {
            document.getElementById('message_id').innerHTML += "<p class='chat_msg_center'>" + msgs[1] + '<br/>';
        }
        let div = document.getElementById('message_id');
        div.scrollTop = div.scrollHeight;
    }

    //发送消息
    function sendMessage() {
        //1代表正在连接
        if (1 == websocket.readyState) {
            var message = document.getElementById('push_content').value;
            //setMessage(message);
            websocket.send(message);
        } else {
            alert("websocket未连接");
        }
        document.getElementById('push_content').value = "";
        document.getElementById('push_content').focus();
    }

    document.getElementById("send-main").onsubmit = function() {
        return false;
    };
</script>
</html>
1.2 前端相应的css样式代码
p,div{
	margin: 0px;
}
.main{
	width: 850px;
	height: 600px;
	margin: auto;
	background: #fff;
	border: 1px solid rgba(153, 153, 153, 1);
	box-shadow: 0px 5px 5px #666;
	margin-top: 20px;
}
.m-head{
	width: 100%;
	height: 60px;
	background-color: #1a92ed;
	color: #FFFFFF;
	font-size: 1.5rem;
	line-height: 60px;
}
.head-img{
	height: 50px;
	padding: 2px 5px;
	float: left;
	color: #FFFFFF;
}
.head-img img{
	border-radius: 30px;
	border: 3px solid #FFFFFF;
	float: left;
}
.head-img span{
	height: 50px;
	font-size: 18px;
	padding-top: 15px;
	float: left;
	display: block;
    line-height: 50px;
}
.head-img:hover{
	cursor: pointer;
}
.head-title{
	width: 450px;
	height: 60px;
	display: block;
	margin: auto;
}
.head-title img{
	padding: 10px 40px 10px 0px;
	float: right;
}
.send-main{
	border-top: 2px solid #CCCCCC;
	padding: 10px;
	position: absolute;
	top: 550px;
}
#push_content{
    outline-style: none ;
    border: 1px solid #ccc;
    border-radius: 3px;
    padding: 13px 14px;
    width: 674px;
    font-size: 14px;
    font-weight: 600;
    font-family: "仿宋";
}
#push_content:focus{
    border-color: #66afe9;
    outline: 0;
    -webkit-box-shadow: inset 0 1px 1px rgba(0,0,0,.075),0 0 8px rgba(102,175,233,.6);
    box-shadow: inset 0 1px 1px rgba(0,0,0,.075),0 0 8px rgba(102,175,233,.6)
}
.my-button{
	outline-style: none ;
	border: 1px solid #ccc;
	border-radius: 3px;
	padding: 12px 14px;
	font-size: 14px;
	font-weight: 600;
	background-color: #0188fb;
	color: #FFFFFF;
}
.close{
	background-color: #CCCCCC;
}
.chat_msg_left{
	height: 30px;
	padding: 5px;
	line-height: 30px;
	text-align: left;
	padding-left: 10px;
}
.chat_msg_right{
	height: 30px;
	padding: 5px;
	line-height: 30px;
	text-align: right;
	padding-right: 10px;
}
.chat_msg_center{
	height: 30px;
	padding: 5px;
	line-height: 30px;
	border-radius: 5px;
	text-align: center;
	color: #666666;
}
.chat_content{
	overflow:auto;
	height: 470px;
}
2.后端核心代码的实现
2.1 项目中所依赖的pom文件
<?xml version="1.0" encoding="UTF-8"?>
<project xmlns="http://maven.apache.org/POM/4.0.0" xmlns:xsi="http://www.w3.org/2001/XMLSchema-instance"
         xsi:schemaLocation="http://maven.apache.org/POM/4.0.0 https://maven.apache.org/xsd/maven-4.0.0.xsd">
    <modelVersion>4.0.0</modelVersion>
    <parent>
        <groupId>org.springframework.boot</groupId>
        <artifactId>spring-boot-starter-parent</artifactId>
        <version>2.3.1.RELEASE</version>
        <relativePath/> <!-- lookup parent from repository -->
    </parent>
    <groupId>com.example.websocket</groupId>
    <artifactId>websocket-service</artifactId>
    <version>0.0.1-SNAPSHOT</version>
    <name>websocket-service</name>
    <description>Demo project for Spring Boot</description>

    <properties>
        <java.version>1.8</java.version>
    </properties>

    <dependencies>
        <dependency>
            <groupId>org.springframework.boot</groupId>
            <artifactId>spring-boot-starter-web</artifactId>
        </dependency>

        <dependency>
            <groupId>org.projectlombok</groupId>
            <artifactId>lombok</artifactId>
            <version>1.18.28</version>
            <optional>true</optional>
        </dependency>
        <dependency>
            <groupId>org.springframework.boot</groupId>
            <artifactId>spring-boot-starter-test</artifactId>
            <scope>test</scope>
        </dependency>
        <dependency>
            <groupId>org.springframework.boot</groupId>
            <artifactId>spring-boot-starter-thymeleaf</artifactId>
        </dependency>
        <!-- websocket依赖 -->
        <dependency>
            <groupId>org.springframework.boot</groupId>
            <artifactId>spring-boot-starter-websocket</artifactId>
        </dependency>
        <!--commons-lang3-->
        <dependency>
            <groupId>org.apache.commons</groupId>
            <artifactId>commons-lang3</artifactId>
            <version>3.9</version>
        </dependency>
    </dependencies>

    <build>
        <!-- 最终包名 -->
        <finalName>websocket-service</finalName>
        <plugins>
            <plugin>
                <groupId>org.springframework.boot</groupId>
                <artifactId>spring-boot-maven-plugin</artifactId>
                <executions>
                    <execution>
                        <goals>
                            <goal>repackage</goal>
                        </goals>
                    </execution>
                </executions>
            </plugin>
        </plugins>
    </build>

</project>
2.2 config系统配置
WebSocket配置,开启WebSocket支持,同时向Spring注册ServerEndpointExporter。
package com.example.websocket.config;

import org.springframework.context.annotation.Bean;
import org.springframework.context.annotation.Configuration;
import org.springframework.web.socket.server.standard.ServerEndpointExporter;

/**
 * WebSocket配置,开启WebSocket支持
 */
@Configuration
public class WebSocketConfig {
    /**
     * 向Spring注册ServerEndpointExporter
     *
     * @return
     */
    @Bean
    public ServerEndpointExporter serverEndpointExporter() {
        return new ServerEndpointExporter();
    }
}
2.3 controller控制层实现
基于SpringBoot应用程序中的WebSocket控制器。这个控制器定义了几个端点,用于处理WebSocket连接和消息传递。为前端界面提供单聊,群聊,消息发送等接口。消息发送成功或是失败,都给出相应的反馈结果。
package com.example.websocket.controller;

import com.example.websocket.service.WebSocketServer;
import com.example.websocket.utils.IPUtils;
import lombok.extern.slf4j.Slf4j;
import org.springframework.beans.factory.annotation.Autowired;
import org.springframework.http.ResponseEntity;
import org.springframework.web.bind.annotation.GetMapping;
import org.springframework.web.bind.annotation.PathVariable;
import org.springframework.web.bind.annotation.RequestMapping;
import org.springframework.web.bind.annotation.RestController;
import org.springframework.web.servlet.ModelAndView;

import javax.servlet.http.HttpServletRequest;
import java.io.IOException;

/**
 * WebSocket Controller
 */
@Slf4j
@RestController
@RequestMapping(value = "/api/ws")
public class WebSocketController {
    @Autowired
    private WebSocketServer webSocketServer;

    /**
     * 跳转到WebSocket客户端页面
     *
     * @return
     */
    @GetMapping("/index")
    public ModelAndView page() {
        return new ModelAndView("index");
    }

    /**
     * 发送消息到指定用户
     *
     * @param message
     * @param toUserId
     * @return
     */
    @GetMapping("/push/{toUserId}")
    public ResponseEntity<String> pushToUser(String message, @PathVariable String toUserId, HttpServletRequest request) {
        webSocketServer.sendToUser(String.format("C1L2I3E4N5T_^Ag5F_%s_^Ag5F_私信:%s", IPUtils.getIpAddr(request), message), toUserId);
        return ResponseEntity.ok("消息发送成功");
    }

    /**
     * 群发消息
     *
     * @param message
     * @return
     */
    @GetMapping("/push")
    public ResponseEntity<String> pushToWeb(String message, HttpServletRequest request) {
        webSocketServer.sendToAll(String.format("C1L2I3E4N5T_^Ag5F_%s_^Ag5F_%s", IPUtils.getIpAddr(request), message));
        return ResponseEntity.ok("群发消息成功");
    }
}
2.4 srevice服务层实现
package com.example.websocket.service;

import lombok.extern.slf4j.Slf4j;
import org.apache.commons.lang3.StringUtils;
import org.springframework.boot.ApplicationArguments;
import org.springframework.boot.ApplicationRunner;
import org.springframework.stereotype.Component;

import javax.websocket.*;
import javax.websocket.server.PathParam;
import javax.websocket.server.ServerEndpoint;
import java.io.IOException;
import java.util.concurrent.ConcurrentHashMap;

/**
 * WebSocket的具体实现类
 */
@Slf4j
@Component
@ServerEndpoint(value = "/ws_test/{id}")
public class WebSocketServer {
    /**
     * 客户端ID
     */
    private String userId = "";
    /**
     * 与某个客户端的连接会话,需要通过它来给客户端发送数据
     */
    private Session session;

    /**
     * 记录当前在线连接数(为保证线程安全,须对使用此变量的方法加lock或synchronized)
     */
    private static int onlineCount = 0;

    /**
     * 用来存储当前在线的客户端(此map线程安全)
     */
    private static ConcurrentHashMap<String, WebSocketServer> webSocketMap = new ConcurrentHashMap<>();

    /**
     * 连接建立成功后调用
     */
    @OnOpen
    public void onOpen(Session session, @PathParam(value = "id") String id) throws IOException {
        this.session = session;
        // 接收到发送消息的客户端ID
        this.userId = id;
        if (webSocketMap.containsKey(userId)) {
            webSocketMap.remove(userId);
            webSocketMap.put(userId, this);
            //加入set中
        } else {
            webSocketMap.put(userId, this);
            //加入set中
            addOnlineCount();
            //在线数加1
        }
        log.info("用户连接:" + userId + ",当前在线人数为:" + getOnlineCount());
        sendToAll("S1Y2S1T3E4M_^Ag5F_" + userId + "加入聊天室!!!");
    }

    /**
     * 连接关闭时调用
     */
    @OnClose
    public void onClose() {
        if (webSocketMap.containsKey(userId)) {
            webSocketMap.remove(userId);
            //从set中删除
            subOnlineCount();
        }
        sendToAll("S1Y2S1T3E4M_^Ag5F_" + userId + "退出聊天室!!!");
        log.info("用户退出:" + userId + ",当前在线人数为:" + getOnlineCount());
    }

    /**
     * 收到客户端消息后调用
     *
     * @param message 客户端发送过来的消息
     */
    @OnMessage
    public void onMessage(String message) {
        //可以群发消息
        //消息可以保存到数据库、redis
        if (StringUtils.isNotBlank(message)) {
            try {
                //传送给对应toUserId用户的websocket
                sendToAll(String.format("C1L2I3E4N5T_^Ag5F_%s_^Ag5F_%s", userId, message));
            } catch (Exception e) {
                e.printStackTrace();
            }
        }
    }

    /**
     * 发生错误时回调
     *
     * @param error
     */
    @OnError
    public void onError(Throwable error) {
        log.error("用户错误:" + this.userId + ",原因:" + error.getMessage());
        error.printStackTrace();
    }

    /**
     * 推送信息给指定ID客户端,如客户端不在线,则返回不在线信息给自己
     *
     * @param message      客户端发来的消息
     * @param sendClientId 客户端ID
     */
    public void sendToUser(String message, String sendClientId) {
        try {
            if (webSocketMap.get(sendClientId) != null) {
                webSocketMap.get(sendClientId).sendMessage(message);
            } else {
                log.error("客户端{}不存在", sendClientId);
            }
        } catch (Exception e) {
            log.error("推送消息到指定客户端出错", e);
        }
    }

    /**
     * 推送发送信息给所有人
     *
     * @param message 要推送的消息
     */
    public void sendToAll(String message) {
        try {
            for (String key : webSocketMap.keySet()) {
                webSocketMap.get(key).sendMessage(message);
            }
        } catch (Exception e) {
            log.error("推送消息到所有客户端出错", e);
        }
    }

    /**
     * 推送消息
     *
     * @param message 要推送的消息
     * @throws IOException
     */
    private void sendMessage(String message) throws IOException {
        this.session.getBasicRemote().sendText(message);
    }

    private static synchronized int getOnlineCount() {
        return onlineCount;
    }

    private static synchronized void addOnlineCount() {
        WebSocketServer.onlineCount++;
    }

    private static synchronized void subOnlineCount() {
        WebSocketServer.onlineCount--;
    }

}
创建一个Spring Boot项目,并添加相关的依赖。这里使用Lombok库来简化代码,使用Spring Boot的WebSocket依赖来实现WebSocket功能。
然后,创建一个名为WebSocketServer的类,它实现了ApplicationRunner接口。在这个类中,定义了一个WebSocket端点,并使用@OnOpen、@OnClose、@OnMessage和@OnError注解来处理WebSocket连接的打开、关闭、接收消息和发生错误时的逻辑。
在WebSocketServer类中,使用一个ConcurrentHashMap来存储当前在线的客户端,并使用一个静态变量来记录当前在线连接数。这样可以知道当前有多少客户端连接到服务器。
在连接建立成功后,使用Session对象来与客户端进行通信。还可以使用sendToUser方法来向指定ID的客户端发送消息,使用sendToAll方法来向所有客户端发送消息。
最后,需要在Spring Boot应用程序中运行WebSocketServer类。这可以通过在主类中调用applicationRunner方法来实现。
通过以上步骤成功地实现了一个基于Java和Spring Boot的WebSocket服务端。这个服务端可以处理多个客户端的连接,可以实时地发送和接收消息,可以进行群发消息等操作。
2.5 代码仓库地址
chat: 基于springboot与websocket所实现的简易聊天室
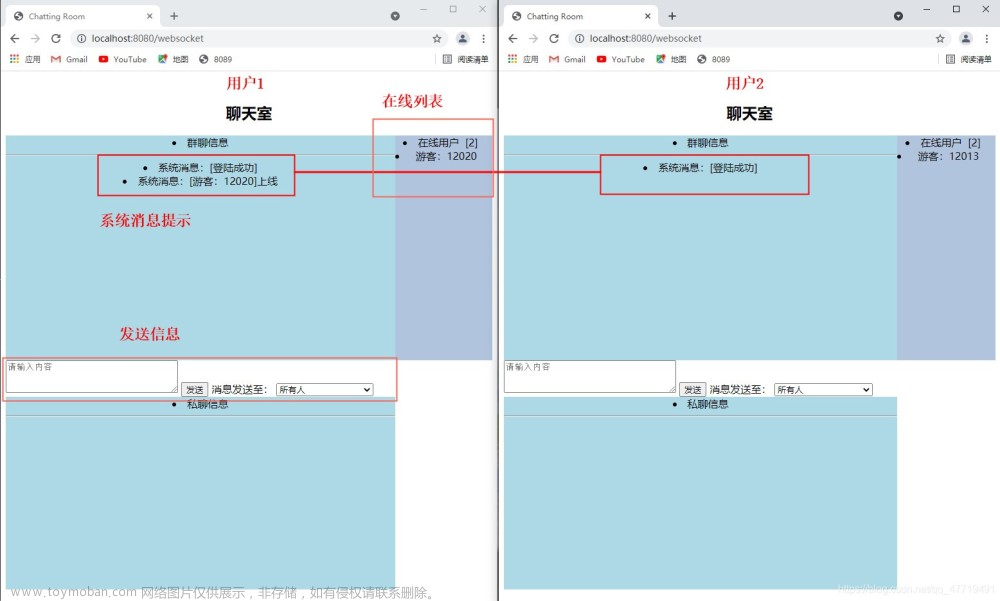
3.项目效果展示
分别打开三个聊天窗口


使用第三个窗口发送信息

第一个窗口收到信息

第二个窗口收到信息

群聊功能正常,成功实现群聊聊天室。文章来源:https://www.toymoban.com/news/detail-788781.html
4.总结
此次学习,实现了一个简易的网络聊天室,支持一对一聊天、用户信息群发推送、获取在线用户、session机制实现用户识别。
虽然课程已然结束,但是学习还未完结,孟宁老师深入浅出的课程讲解给我留下来深刻的印象。在此感谢孟宁老师的教导。文章来源地址https://www.toymoban.com/news/detail-788781.html
到了这里,关于基于springboot与websocket实现简易聊天室的文章就介绍完了。如果您还想了解更多内容,请在右上角搜索TOY模板网以前的文章或继续浏览下面的相关文章,希望大家以后多多支持TOY模板网!