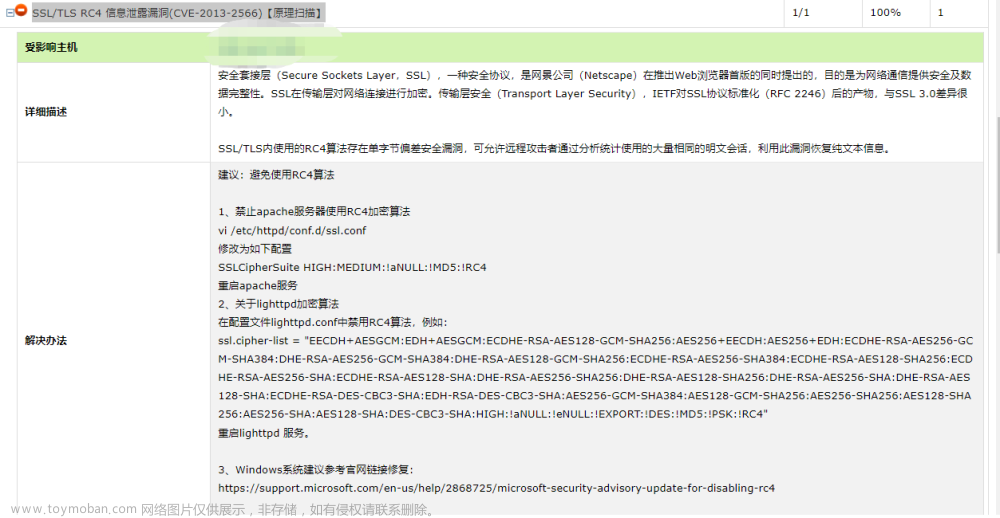
流程:配置yum源--安装telnet--安装openssl--安装openssh--修改22端口(看具体情况)--关闭并卸载telnet
1、主机配置yum源
#本地yum源配置
cd /etc/yum.repos.d/
mkdir baks
mv *.repo baks/
vi local.repo
#添加如下本地yum源
[base]
name=CentOS-$releasever - Base - local
failovermethod=priority
baseurl=http://172.168.1.199:18686/software/yum/
#mirrorlist=http://mirrorlist.centos.org/?release=$releasever&arch=$basearch&repo=os
gpgcheck=1
gpgkey=http://172.168.1.199:18686/software/yum/RPM-GPG-KEY-CentOS-7
#执行命令
yum clean all 表示删除原来的yum源文件索引
yum makecache 重新缓存新的yum源文件索引
2、安装telnet
安装前,可以使用ssh -V以及openssl version查询一下当前版本:
[root@home-lsolation-02 ~]# ssh -V
OpenSSH_6.6.1p1, OpenSSL 1.0.1e-fips 11 Feb 2013
[root@home-lsolation-02 ~]# openssl version
OpenSSL 1.0.1e-fips 11 Feb 2013
1,安装telnet
先查看原服务器有无安装telnet:
rpm -qa | grep telnet
如果在返回中没有telnet-server,就代表并未安装telnet服务端,执行下面操作即可。
直接安装这三个软件:
yum -y install telnet telnet-server xinetd
#进行一些配置:
systemctl enable xinetd.service
systemctl enable telnet.socket
#启动telnet服务:
systemctl start telnet.socket
systemctl start xinetd
#使用netstat -antpl | grep 23,如果有返回值,则说明安装成功
netstat -antpl | grep 23
tcp6 0 0 :::23 :::* LISTEN 1/systemd
配置telnet连接方式:
vi /etc/securetty
然后在下面添加这几行:
pts/0
pts/1
pts/2
pts/3
配置完毕之后,使用如下命令,会看到的是这样:
[root@localhost ~]# tail -5 /etc/securetty
xvc0
pts/0
pts/1
pts/2
pts/3
在防火墙上开放23端口:
[root@localhost ~]# firewall-cmd --zone=public --add-port=23/tcp --permanent
success
重启防火墙:
[root@localhost ~]# firewall-cmd --reload
success
查看防火墙上开放的服务:
[root@localhost ~]# firewall-cmd --list-services
dhcpv6-client ssh telnet
可以看到,其中有telnet了。
退出ssh,使用telnet远程连接,以下均是在telnet连接下的操作。
3、安装openssl
1,安装openssl
先查看原服务器有无安装openssl;
2,备份
[root@localhost ~]# cp -r /etc/pam.d /etc/pam.d.bak
[root@localhost ~]# cp -af /usr/bin/openssl /usr/bin/openssl.old
[root@localhost ~]# cp -af /etc/pki/ca-trust/extracted/openssl /etc/pki/ca-trust/extracted/openssl.old
[root@localhost ~]# cp -af /usr/lib64/openssl /usr/lib64/openssl.old
[root@localhost ~]# cp -af /usr/lib64/libcrypto.so.10 /usr/lib64/libcrypto.so.10.old
[root@localhost ~]# cp -af /usr/lib64/libssl.so.10 /usr/lib64/libssl.so.10.old
[root@localhost ~]# cp -arf /etc/ssh/ /etc/ssh_old
3,关闭selinux并重启
[root@localhost ~]# vim /etc/sysconfig/selinux
将其中的SELINUX=enforcing改为SELINUX=disabled
4,升级openssl
#下载openssl:https://ftp.openssl.org/source
#解压:
tar -zxvf openssl-1.1.1l.tar.gz
[root@localhost ~]# ls
openssl-1.1.1l openssl-1.1.1l.tar.gz
#进入openssl目录:
[root@localhost ~]# cd openssl-1.1.1l/
#清理旧文件并安装依赖包:
[root@localhost ~]# yum remove -y openssl
[root@localhost ~]# yum remove -y openssh
[root@localhost ~]# yum install -y gcc gcc-c++ glibc make autoconf openssl openssl-devel pcre-devel pam-devel cpan
[root@localhost ~]# yum install -y pam* zlib* perl*
#检查文件并移走备份:
[root@localhost openssl-1.1.1l]# ll /usr/bin/openssl
[root@localhost openssl-1.1.1l]# mv /usr/bin/openssl /usr/bin/openssl_bak
[root@localhost openssl-1.1.1l]# ll /usr/include/openssl
[root@localhost openssl-1.1.1l]# mv /usr/include/openssl /usr/include/openssl_bak
#编译安装:
[root@localhost openssl-1.1.1l]# ./config --prefix=/usr/local --openssldir=/usr/local/openssl && make && make install
#再次安装:
[root@localhost openssl-1.1.1l]# ./config shared && make && make install
#检查编译安装结果,如果输出为0,则代表安装成功:
[root@localhost openssl-1.1.1l]# echo $?
0
#配置openssl:
[root@localhost openssl-1.1.1l]# ln -s /usr/local/bin/openssl /usr/bin/openssl
[root@localhost openssl-1.1.1l]# ln -s /usr/local/include/openssl /usr/include/openssl
[root@localhost openssl-1.1.1l]# ll /usr/bin/openssl
lrwxrwxrwx. 1 root root 22 Sep 17 16:19 /usr/bin/openssl -> /usr/local/bin/openssl
[root@localhost openssl-1.1.1l]# ll /usr/include/openssl -ld
drwxr-xr-x. 2 root root 4096 Sep 17 16:19 /usr/include/openssl
[root@localhost openssl-1.1.1l]# echo "/usr/local/lib" >> /etc/ld.so.conf
[root@localhost openssl-1.1.1l]# echo "/usr/local/lib64/" >> /etc/ld.so.conf
[root@localhost openssl-1.1.1l]# /sbin/ldconfig
[root@localhost openssl-1.1.1l]# cp libcrypto.so.1.1 libssl.so.1.1 /usr/lib64
#安装成功,查看openssl版本:
[root@localhost openssl-1.1.1l]# openssl version
OpenSSL 1.1.1l 24 Aug 2021
4、安装openssh
下载openssh:https://openbsd.hk/pub/OpenBSD/OpenSSH/portable
#解压:
[root@localhost ~]# tar -zxvf openssh-8.8p1.tar.gz
#进入openssh目录:
[root@localhost ~]# cd openssh-8.8p1/
[root@localhost openssh-8.8p1]#
#编译文件:
[root@localhost openssh-8.8p1]# ./configure --prefix=/usr --sysconfdir=/etc/ssh --with-md5-passwords --with-pam --with-ssl-dir=/usr/local/openssl --with-zlib=/usr/local/lib64 --without-hardening
#最后应该为这个样子:
config.status: config.h is unchanged
OpenSSH has been configured with the following options:
User binaries: /usr/bin
System binaries: /usr/sbin
Configuration files: /etc/ssh
Askpass program: /usr/libexec/ssh-askpass
Manual pages: /usr/share/man/manX
PID file: /var/run
Privilege separation chroot path: /var/empty
sshd default user PATH: /usr/bin:/bin:/usr/sbin:/sbin
Manpage format: doc
PAM support: yes
OSF SIA support: no
KerberosV support: no
SELinux support: no
MD5 password support: yes
libedit support: no
libldns support: no
Solaris process contract support: no
Solaris project support: no
Solaris privilege support: no
IP address in $DISPLAY hack: no
Translate v4 in v6 hack: yes
BSD Auth support: no
Random number source: OpenSSL internal ONLY
Privsep sandbox style: seccomp_filter
PKCS#11 support: yes
U2F/FIDO support: yes
Host: x86_64-pc-linux-gnu
Compiler: cc
Compiler flags: -g -O2 -pipe -Wall -Wextra -Wpointer-arith -Wuninitialized -Wsign-compare -Wformat-security -Wsizeof-pointer-memaccess -Wno-pointer-sign -Wno-unused-parameter -Wno-unused-result -fno-strict-aliasing -fno-builtin-memset -fstack-protector-strong
Preprocessor flags: -I/usr/local/openssl -I/usr/local/lib64 -D_XOPEN_SOURCE=600 -D_BSD_SOURCE -D_DEFAULT_SOURCE
Linker flags: -L/usr/local/openssl -L/usr/local/lib64 -fstack-protector-strong
Libraries: -lcrypto -ldl -lutil -lz -lcrypt -lresolv
+for sshd: -lpam
PAM is enabled. You may need to install a PAM control file
for sshd, otherwise password authentication may fail.
Example PAM control files can be found in the contrib/
subdirectory
#检查输出结果:
[root@localhost openssh-8.8p1]# echo $?
0
为0说明编译正常。
安装:
[root@localhost openssh-8.8p1]# make
[root@localhost openssh-8.8p1]# echo $?
0
[root@localhost openssh-8.8p1]# chmod 600 /etc/ssh/ssh_host*
[root@localhost openssh-8.8p1]# make install
[root@localhost openssh-8.8p1]# echo $?
0
配置ssh并启动:
[root@localhost openssh-8.8p1]# echo "PermitRootLogin yes" >> /etc/ssh/sshd_config
[root@localhost openssh-8.8p1]# grep "^PermitRootLogin" /etc/ssh/sshd_config
PermitRootLogin yes
[root@localhost openssh-8.8p1]# echo "UseDNS no" >> /etc/ssh/sshd_config
[root@localhost openssh-8.8p1]# grep "UseDNS" /etc/ssh/sshd_config
#UseDNS no
UseDNS no
[root@localhost openssh-8.8p1]# cp -a contrib/redhat/sshd.init /etc/init.d/sshd
[root@localhost openssh-8.8p1]# cp -a contrib/redhat/sshd.pam /etc/pam.d/sshd.pam
[root@localhost openssh-8.8p1]# chmod +x /etc/init.d/sshd
[root@localhost openssh-8.8p1]# chkconfig --add sshd
[root@localhost openssh-8.8p1]# systemctl enable sshd
sshd.service is not a native service, redirecting to /sbin/chkconfig.
Executing /sbin/chkconfig sshd on
[root@localhost openssh-8.8p1]# chkconfig sshd on
移走原先服务,有报错可以无视:
[root@localhost openssh-8.8p1]# mv /usr/lib/systemd/system/sshd.service /home/
mv: cannot stat ‘/usr/lib/systemd/system/sshd.service’: No such file or directory
重启sshd:
[root@localhost openssh-8.8p1]# /etc/init.d/sshd restart
Restarting sshd (via systemctl): [ OK ]
查看是否正常开放:
[root@localhost openssh-8.7p1]# netstat -antpl
Active Internet connections (servers and established)
Proto Recv-Q Send-Q Local Address Foreign Address State PID/Program name
tcp 0 0 0.0.0.0:111 0.0.0.0:* LISTEN 784/rpcbind
tcp 0 0 192.168.122.1:53 0.0.0.0:* LISTEN 1804/dnsmasq
tcp 0 0 0.0.0.0:22 0.0.0.0:* LISTEN 107261/sshd: /usr/s
tcp 0 0 127.0.0.1:631 0.0.0.0:* LISTEN 1309/cupsd
tcp 0 0 127.0.0.1:25 0.0.0.0:* LISTEN 1660/master
tcp6 0 0 :::111 :::* LISTEN 784/rpcbind
tcp6 0 0 :::22 :::* LISTEN 107261/sshd: /usr/s
tcp6 0 0 :::23 :::* LISTEN 1/systemd
tcp6 0 0 ::1:631 :::* LISTEN 1309/cupsd
tcp6 0 0 ::1:25 :::* LISTEN 1660/master
tcp6 0 2 192.168.145.139:23 192.168.145.2:1205 ESTABLISHED 1/systemd
查看版本:
[root@localhost openssh-8.7p1]# ssh -V
OpenSSH_8.7p1, OpenSSL 1.1.1l 24 Aug 2021
5、修改22端口(此步骤如果没需求可以不用操作)
[root@home-lsolation-02 openssh-8.8p1]# vi /etc/ssh/sshd_config
找到Port=22
然后取消Port=22前面的注释
并修改Port=22为Port=22222
重启sshd即可
[root@home-lsolation-02 openssh-8.8p1]# service sshd restart
Restarting sshd (via systemctl): [ 确定 ]
[root@home-lsolation-02 openssh-8.8p1]#
---------------------------------------------------关闭并卸载telnet------------------------------------------------------------------文章来源:https://www.toymoban.com/news/detail-789570.html
6,关闭并卸载telnet
[root@localhost ~]# systemctl disable xinetd.service
Removed symlink /etc/systemd/system/multi-user.target.wants/xinetd.service.
[root@localhost ~]# systemctl stop xinetd.service
[root@localhost ~]# systemctl disable telnet.socket
Removed symlink /etc/systemd/system/sockets.target.wants/telnet.socket.
[root@localhost ~]# systemctl stop telnet.socket
[root@localhost ~]# netstat -antpl
Active Internet connections (servers and established)
Proto Recv-Q Send-Q Local Address Foreign Address State PID/Program name
tcp 0 0 0.0.0.0:111 0.0.0.0:* LISTEN 750/rpcbind
tcp 0 0 192.168.122.1:53 0.0.0.0:* LISTEN 1502/dnsmasq
tcp 0 0 0.0.0.0:22 0.0.0.0:* LISTEN 1245/sshd: /usr/sbi
tcp 0 0 127.0.0.1:631 0.0.0.0:* LISTEN 1191/cupsd
tcp 0 0 127.0.0.1:25 0.0.0.0:* LISTEN 1509/master
tcp 0 36 192.168.145.139:22 192.168.145.2:15925 ESTABLISHED 1996/sshd: root@pts
tcp6 0 0 :::111 :::* LISTEN 750/rpcbind
tcp6 0 0 :::22 :::* LISTEN 1245/sshd: /usr/sbi
tcp6 0 0 ::1:631 :::* LISTEN 1191/cupsd
tcp6 0 0 ::1:25 :::* LISTEN 1509/master
结束!
文章来源地址https://www.toymoban.com/news/detail-789570.html
到了这里,关于关于安全扫描漏洞修复的问题(配置yum源--安装telnet--安装openssl--安装openssh--修改22端口)的文章就介绍完了。如果您还想了解更多内容,请在右上角搜索TOY模板网以前的文章或继续浏览下面的相关文章,希望大家以后多多支持TOY模板网!

