HTTP配置
user  root;
worker_processes  1;

events {
    worker_connections  1024;
}
http {
    include       mime.types;
    default_type  application/octet-stream;
    sendfile        on;
    #tcp_nopush     on;
    #keepalive_timeout  0;
    keepalive_timeout 1800s;     #指定 KeepAlive 的超时时间(timeout)。指定每个 TCP 连接最多可以保持多长时间。Nginx 的默认值是 75 秒,有些浏览器最多只保持 60 秒,所以可以设定为 60 秒。若将它设置为 0,就禁止了      keepalive 连接。
    proxy_connect_timeout 1800s; #nginx跟后端服务器连接超时时间(代理连接超时)
    proxy_send_timeout 1800s; #后端服务器数据回传时间(代理发送超时)
    proxy_read_timeout 1800s; #连接成功后,后端服务器响应时间(代理接收超时)
    fastcgi_connect_timeout 1800s; #指定nginx与后端fastcgi server连接超时时间
    fastcgi_send_timeout 1800s; #指定nginx向后端传送请求超时时间(指已完成两次握手后向fastcgi传送请求超时时间)
    fastcgi_read_timeout 1800s; #指定nginx向后端传送响应超时时间(指已完成两次握手后向fastcgi传送响应超时时间)
    gzip  on;
       client_max_body_size 300m;
    server {
        listen       80;
        server_name  xxx.xxx.xxx.xxx;
            charset utf-8;
        #文件保存地址
            location /xxxx{
                  alias /home/xxxx/uploadPath;
            }


            # 某某管理系统
            location /xxxx/ {
                proxy_pass http://127.0.0.1:6500;
            }
            # 前端文件存放位置
            location /yyyyy {
                  alias /usr/local/nginx/html/yyyyy;
                  try_files $uri $uri/ /yyyyy/index.html;
                  index index.html;
            }
              error_page   500 502 503 504  /50x.html;
              location = /50x.html {
              root   html;
      }

    }

}
HTTPS环境搭建以及配置
1、验证是否安装ssl模块
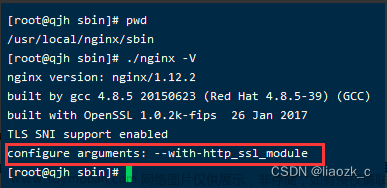
/usr/local/nginx/sbin/nginx -v

如果出现 (configure arguments: --with-http_ssl_module), 则已安装(下面的步骤可以跳过,直接进行第3步)。
2、安装ssl模块
# 进入到你的解压缩后的nginx目录,注意这里不是nginx安装目录,是解压缩后的目录
cd /usr/local/nginx-1.18.0

# 安装模块
./configure --prefix=/usr/local/nginx --with-http_stub_status_module --with-http_ssl_module

#切记不要执行make install,否则会重新安装nginx
make

#停止nginx服务
 /usr/local/nginx/sbin/nginx -s stop
#替换之前的nginxcp /usr/local/nginx-1.18.0/objs/nginx /usr/local/nginx/sbin

#注意这里是大写的V,小写的只显示版本号
/usr/local/nginx/sbin/nginx -V
#可以看到这里出现了configure arguments: --with-http_ssl_module 证明已经安装成功

#启动Nginx
/usr/local/nginx/sbin/nginx
3、配置ssl证书
解压缩下载好的证书(证书一般是pem文件和key文件,这里名字可以随便改)
将下载好的证书上上传到服务器,我将证书放在了root目录下的card文件夹文章来源:https://www.toymoban.com/news/detail-789821.html
# 创建存放证书路径
mkdir /usr/local/nginx/card

# 配置nginx.comf文件
vim /usr/local/nginx/conf/nginx.conf
配置如下:文章来源地址https://www.toymoban.com/news/detail-789821.html
http {
    include       mime.types;
    default_type  application/octet-stream;
    sendfile        on;
    keepalive_timeout  65;
  server {
  #监听443端口
    listen 443;
    #你的域名
    server_name huiblog.top;
    ssl on;
    #ssl证书的pem文件路径
    ssl_certificate  /usr/local/nginx/card/huiblog.top.pem;
    #ssl证书的key文件路径
    ssl_certificate_key /usr/local/nginx/card/huiblog.top.key;
    location / {
     proxy_pass  http://公网地址:项目端口号;
    }
}
server {
    listen 80;
    server_name huiblog.top;
    #将请求转成https
    rewrite ^(.*)$ https://$host$1 permanent;
}
}
4、重启Nginx服务
/usr/local/nginx/sbin/nginx -s reload
Nginx 之 proxy_pass详解
server {
    listen      80;
    server_name www.test.com;

    # 情形A
    # 访问 http://www.test.com/testa/aaaa
    # 后端的request_uri为: /testa/aaaa
    location ^~ /testa/ {
        proxy_pass http://127.0.0.1:8801;
    }

    # 情形B
    # 访问 http://www.test.com/testb/bbbb
    # 后端的request_uri为: /bbbb
    location ^~ /testb/ {
        proxy_pass http://127.0.0.1:8801/;
    }

    # 情形C
    # 下面这段location是正确的
    location ~ /testc {
        proxy_pass http://127.0.0.1:8801;
    }

    # 情形D
    # 下面这段location是错误的
    #
    # nginx -t 时,会报如下错误:
    #
    # nginx: [emerg] "proxy_pass" cannot have URI part in location given by regular
    # expression, or inside named location, or inside "if" statement, or inside
    # "limit_except" block in /opt/app/nginx/conf/vhost/test.conf:17
    #
    # 当location为正则表达式时,proxy_pass 不能包含URI部分。本例中包含了"/"
    location ~ /testd {
        proxy_pass http://127.0.0.1:8801/;   # 记住,location为正则表达式时,不能这样写!!!
    }

    # 情形E
    # 访问 http://www.test.com/ccc/bbbb
    # 后端的request_uri为: /aaa/ccc/bbbb
    location /ccc/ {
        proxy_pass http://127.0.0.1:8801/aaa$request_uri;
    }

    # 情形F
    # 访问 http://www.test.com/namea/ddd
    # 后端的request_uri为: /yongfu?namea=ddd
    location /namea/ {
        rewrite    /namea/([^/]+) /yongfu?namea=$1 break;
        proxy_pass http://127.0.0.1:8801;
    }

    # 情形G
    # 访问 http://www.test.com/nameb/eee
    # 后端的request_uri为: /yongfu?nameb=eee
    location /nameb/ {
        rewrite    /nameb/([^/]+) /yongfu?nameb=$1 break;
        proxy_pass http://127.0.0.1:8801/;
    }

    access_log /data/logs/www/www.test.com.log;
}

server {
    listen      8801;
    server_name www.test.com;

    root        /data/www/test;
    index       index.php index.html;

    rewrite ^(.*)$ /test.php?u=$1 last;

    location ~ \.php$ {
        try_files $uri =404;
        fastcgi_pass unix:/tmp/php-cgi.sock;
        fastcgi_index index.php;
        include fastcgi.conf;
    }

    access_log /data/logs/www/www.test.com.8801.log;
}
到了这里,关于Linux中Nginx的HTTP和HTTPS常用配置以及proxy_pass详解的文章就介绍完了。如果您还想了解更多内容,请在右上角搜索TOY模板网以前的文章或继续浏览下面的相关文章,希望大家以后多多支持TOY模板网!


