引言
TinyGPT-V来自论文:TinyGPT-V: Efficient Multimodal Large Language Model via Small Backbones,是一篇基于较小LLM作为backbone的多模态工作。相关工作已经开源,地址为:Github
之所以选择这篇文章,是因为比较具有落地意义,且便于本地运行,查看和调试。
以下代码只给出核心部分,会省略无关部分。如想查看完整代码,可以移步仓库SWHL/TinyGPT-V
整体结构图
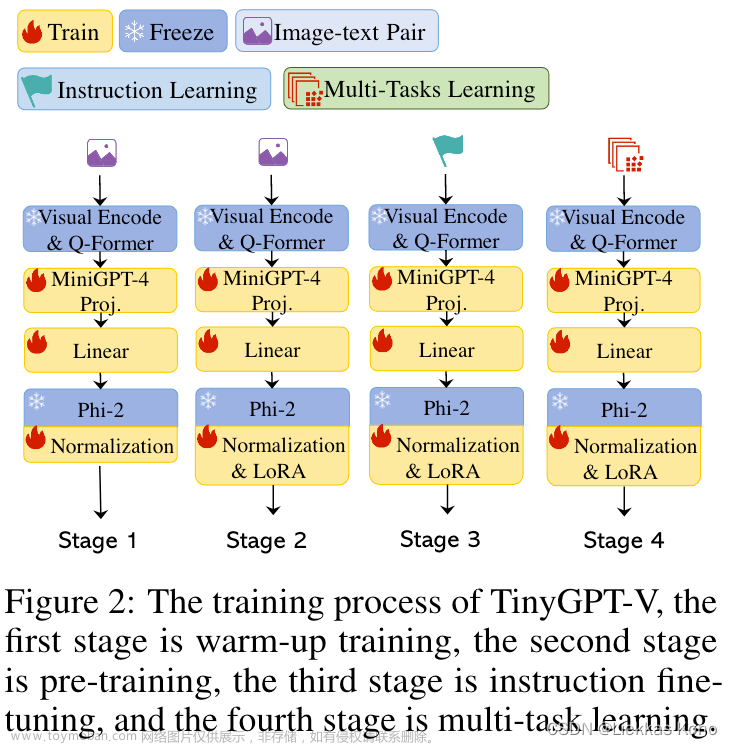
从以上整体结构图中可以看到,模型主要分为4部分:Visual Encode & Q-Former、MiniGPT-4 Proj、Linear和Phi-2。
推理流程讲解
该部分主要以Stage1-3阶段模型的推理入手,输入是一个图像和对应文本,注重讲述图像和文本是如何被处理,送入模型得到最终输出结果的。以下图的图像和文本(Please write a poem about the image)作为输入。

运行效果如下所示,小伙伴可自行前往Hugging Face体验: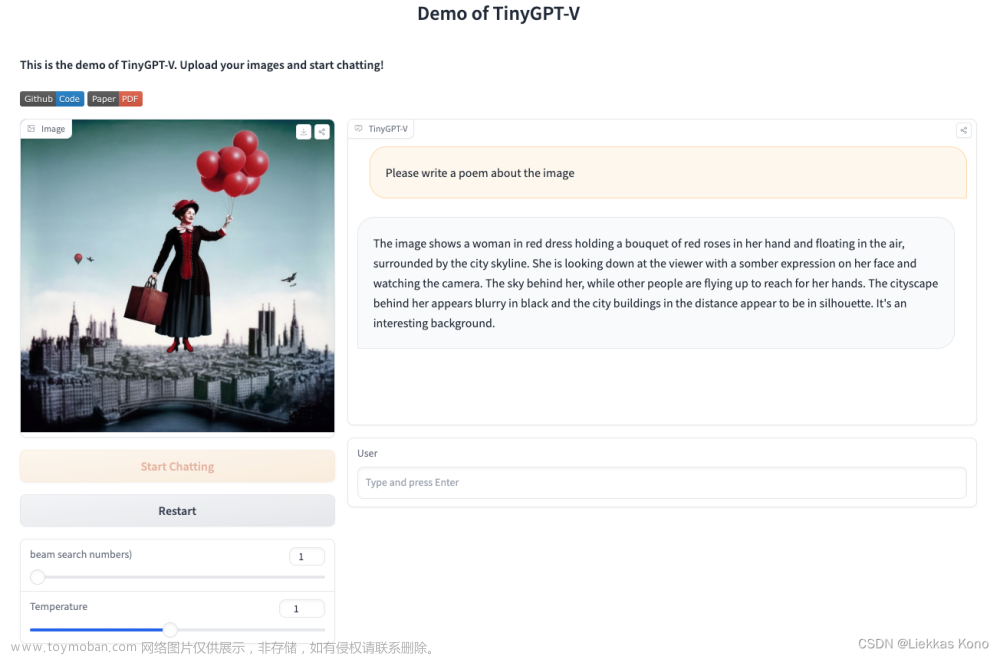
为了便于查看,我这里整理了命令行推理的版本(demo_cli.py),更加清晰看到数据走向,仅仅用于学习使用。
我们先来看一张图像,在推理阶段都经过了什么,才到达最终模型面前,截取demo_cli.py中核心代码如下:
# 1. Image读取图像
img_path = "tests/test_files/1.png"
img = Image.open(img_path)
img = img.convert("RGB")

# 初始化对话类
chat_state = CONV_VISION.copy()

# 2. 上传图像,并对图像做预处理
img_list = []
llm_message = chat.upload_img(img, chat_state, img_list)

# 3. 提取图像特征
chat.encode_img(img_list)

# 4. 将用户提问问题加入到对话类中,用于后续拼接prompt
user_msg = "Please write a poem about the image"
chat.ask(user_msg, chat_state)

# 5. 核心,送入到Phi-2中,根据图像回答用户问题
num_beams = 1
temperature = 1.0
llm_message = chat.answer(
    conv=chat_state,
    img_list=img_list,
    num_beams=num_beams,
    temperature=temperature,
    max_new_tokens=300,
    max_length=2000,
)[0]
print(llm_message)
接下来,依次对图像经过流程,做详细解读:
chat_state组成
conv = Conversation(
    system="Give the following image: <Img>ImageContent</Img>. "
    "You will be able to see the image once I provide it to you. Please answer my questions.",
    roles=("Human: ", "Assistant: "),
    messages=[],
    offset=2,
    sep_style=SeparatorStyle.SINGLE,
    sep="###",
)
chat.upload_img()
源码位置:link
def upload_img(self, image, conv, img_list):
     # 这里将<Img></Img>添加到了mesages下,便于后续拼接完整prompt
     conv.append_message(conv.roles[0], "<Img><ImageHere></Img>")
     img_list.append(image)
     msg = "Received."
     return msg
chat.encode_img(img_list)
源码位置:link
def encode_img(self, img_list):
    image = img_list[0]
    img_list.pop(0)
    if isinstance(image, str):  # is a image path
        raw_image = Image.open(image).convert("RGB")
        image = self.vis_processor(raw_image).unsqueeze(0).to(self.device)
    elif isinstance(image, Image.Image):
        # 因为上述代码传入是Image类型的,走这里
        raw_image = image
        image = self.vis_processor(raw_image).unsqueeze(0).to(self.device)

    # 这里进入模型对图像进行编码,得到图像特征向量
    image_emb, _ = self.model.encode_img(image)
    img_list.append(image_emb)
其中,根据配置文件tinygptv_stage1_2_3_eval.yam,可以知道 self.vis_processor指的是Blip2ImageEvalProcessor类。该类中,对图像做了三个操作:Resize、ToTensor、Normalize。代码如下(link):
@registry.register_processor("blip2_image_eval")
class Blip2ImageEvalProcessor(BlipImageBaseProcessor):
    def __init__(self, image_size=224, mean=None, std=None):
        super().__init__(mean=mean, std=std)

        self.transform = transforms.Compose(
            [
                transforms.Resize(
                    (image_size, image_size), interpolation=InterpolationMode.BICUBIC
                ),
                transforms.ToTensor(),
                self.normalize,
            ]
        )

    def __call__(self, item):
        return self.transform(item)
图像经过以上transform之后,就变为了Tensor向量,接下来将进入提取特征部分。根据论文中描述,该部分采用的是VIT EVA、Q-Former和全连接层。核心代码如下(源码:link):
(❓ 这里我有一点小小疑问:论文结构图中有一个部分是:MiniGPT-4 Proj,这一部分在源码中并没有发现。)
def encode_img(self, image):
     # 省略部分无关代码... ...

     with self.maybe_autocast():
         # self.visual_encoder就是基于eva_clip_g的模型
         # self.ln_vision指的是LayerNorm层
         image_embeds = self.ln_vision(self.visual_encoder(image)).to(device)

		 # 使用Q-Former,基于bert-base-uncased
         if self.has_qformer:
             image_atts = torch.ones(image_embeds.size()[:-1], dtype=torch.long).to(device)

             query_tokens = self.query_tokens.expand(image_embeds.shape[0], -1, -1)
             query_output = self.Qformer.bert(
                 query_embeds=query_tokens,
                 encoder_hidden_states=image_embeds,
                 encoder_attention_mask=image_atts,
                 return_dict=True,
             )

             inputs_llama = self.llama_proj(query_output.last_hidden_state)
             inputs_llama = self.llama_proj2(inputs_llama)

         atts_llama = torch.ones(inputs_llama.size()[:-1], dtype=torch.long).to(image.device)
     return inputs_llama, atts_llama
chat.ask()
源码:link
def ask(self, text, conv):
    if (
        len(conv.messages) > 0
        and conv.messages[-1][0] == conv.roles[0]
        and conv.messages[-1][1][-6:] == "</Img>"
    ):  # last message is image.
        conv.messages[-1][1] = " ".join([conv.messages[-1][1], text])
    else:
        conv.append_message(conv.roles[0], text)
将conv实例中message字段值做了拼接。拼接之后的message如下:
print(conv.messages)
[['Human: ', '<Img><ImageHere></Img>Please write a poem about the image']]
chat.answer()
源码:link
该部分是核心部分,以上做的操作都是在准备送入大模型。
def answer(self, conv, img_list, **kargs):
    # self.answer_prepare主要是将Image特征与Text特征做拼接
    generation_dict = self.answer_prepare(conv, img_list, **kargs)

    # 送入模型进行推理
    output_token = self.model_generate(**generation_dict)[0]

    # 解码得到文本
    output_text = self.model.llama_tokenizer.decode(
        output_token, skip_special_tokens=True
    )
    output_text = output_text.split("###")[0]  # remove the stop sign '###'
    output_text = output_text.split("Assistant:")[-1].strip()
    conv.messages[-1][1] = output_text
    return output_text, output_token.cpu().numpy()
接下来,让我们详细看一下self.answer_prepare这个函数具体做了什么?
def answer_prepare(self, ...):
     # 这里在message后追加一个Assitant:部分
     conv.append_message(conv.roles[1], None)

     # 将conv中system内容、图像和文本拼接,获得送入大模型的完整Prompt。示例如下:
     # Give the following image: <Img>ImageContent</Img>. You will be able to see the image once I provide it to you. Please answer my questions.###Human: <Img><ImageHere></Img>###Assistant:
     prompt = conv.get_prompt()

     # 获得文本的embedding,并与图像特征进行mix
     embs = self.model.get_context_emb(prompt, img_list)

     current_max_len = embs.shape[1] + max_new_tokens
     begin_idx = max(0, current_max_len - max_length)
     embs = embs[:, begin_idx:]

     generation_kwargs = dict(
         inputs_embeds=embs,
         max_new_tokens=max_new_tokens,
         stopping_criteria=self.stopping_criteria,
         num_beams=num_beams,
         do_sample=True,
         min_length=min_length,
         top_p=top_p,
         repetition_penalty=repetition_penalty,
         length_penalty=length_penalty,
         temperature=float(temperature),
         pad_token_id=tokenizer.pad_token_id,
         bos_token_id=tokenizer.bos_token_id,
         eos_token_id=tokenizer.eos_token_id,
     )
     return generation_kwargs
再看如何将文本与图像特征融合的:先将图像转为向量。将prompt除Image部分其他部分依次转为向量。再将两者mix,得到最终向量。
def get_context_emb(self, prompt, img_list):
    device = img_list[0].device
    prompt_segs = prompt.split("<ImageHere>")
    assert (
        len(prompt_segs) == len(img_list) + 1
    ), "Unmatched numbers of image placeholders and images."

    seg_tokens = [
        self.llama_tokenizer(seg, return_tensors="pt", add_special_tokens=i == 0)
        .to(device)
        .input_ids  # only add bos to the first seg
        for i, seg in enumerate(prompt_segs)
    ]

    seg_embs = [self.embed_tokens(seg_t) for seg_t in seg_tokens]

    # TODO: 这里具体如何混合在一起的,需要Debug查看
    mixed_embs = [emb for pair in zip(seg_embs[:-1], img_list) for emb in pair] + [
        seg_embs[-1]
    ]
    mixed_embs = torch.cat(mixed_embs, dim=1)
    return mixed_embs
至此,将准备好的数据送入到 self.model_generate() 函数中,即可得到模型的回答。文章来源:https://www.toymoban.com/news/detail-792035.html
写在最后
本篇文章写得还是较为粗糙一些,只是想通过这个来学习多模态中一般处理方法,不仅仅限于模型结构。后续如果时间,还会更新训练各个阶段的具体做法。欢迎持续关注。文章来源地址https://www.toymoban.com/news/detail-792035.html
到了这里,关于论文阅读:TinyGPT-V 论文阅读及源码梳理对应的文章就介绍完了。如果您还想了解更多内容,请在右上角搜索TOY模板网以前的文章或继续浏览下面的相关文章,希望大家以后多多支持TOY模板网!

